Fixed: Samsung SSD Not Showing Up in BIOS
Why is My Samsung SSD Not Showing Up in BIOS
A user's SSD stopped showing up in the boot priority list and even after troubleshooting, it still doesn't appear, even in the boot override list, which is the only drive that can boot Windows 10 correctly. They're seeking ideas to try and resolve the issue.
If your Samsung SSD is not showing up in the BIOS, there are four common reasons that could be causing the issue: the drive is not properly connected, the BIOS settings are not configured correctly, the drive is not recognized by the motherboard, or the drive is faulty.
- 1. The existing BIOS does not support Samsung SSDs, making it necessary to update to the latest version in order to utilize the drive.
- 2. The computer is not properly connected to the Samsung SSD, resulting in the system failing to detect it.
- 3. The issue of Samsung EVO SSD not showing up in BIOS can be caused by a problem with the SATA port connecting to the Samsung EVO SSD. This can lead to the SSD not being recognized by the motherboard, resulting in it not appearing in the BIOS settings.
- 4. Do not configure the BIOS setting.
The reasons for Samsung SSD not being recognized in BIOS are due to incorrect settings in the BIOS, outdated BIOS, incorrect SSD settings, and incorrect drive configuration. To solve this issue, we can try updating the BIOS, checking the SSD settings, ensuring the drive is configured correctly, and adjusting the BIOS settings to correctly identify the Samsung SSD.
| Workable Solutions | Step-by-step Troubleshooting |
|---|---|
| 1. Apply BIOS Update | Failure to update the BIOS can damage the motherboard. Make sure your computer doesn't...Full steps |
| 2. Disconnect the Cable | Disconnect the power supply of your computer. Using the screwdrivers to open...Full steps |
| 3. Connect to a Different Port | SATA ports can go bad due to a bad connection point. So, indeed, you can try another SATA...Full steps |
How to Fix Samsung SSD Not Detected In BIOS (4 Ways)
Start to use four ways here to fix hard disk cannot be recognized in BIOS.
Fix 1 - Apply BIOS Update
Updating the BIOS can correct hardware issues that other updates, including driver and operating system updates, cannot fix, and can even stabilize the computer by fixing bugs. However, this is an advanced option that requires caution, as incorrect operation can potentially damage your PC.
Step 1. Before you start.
1 - Check your power outlet.
Failing to update the BIOS can cause damage to the motherboard, so ensure your computer remains powered on and connected throughout the process.
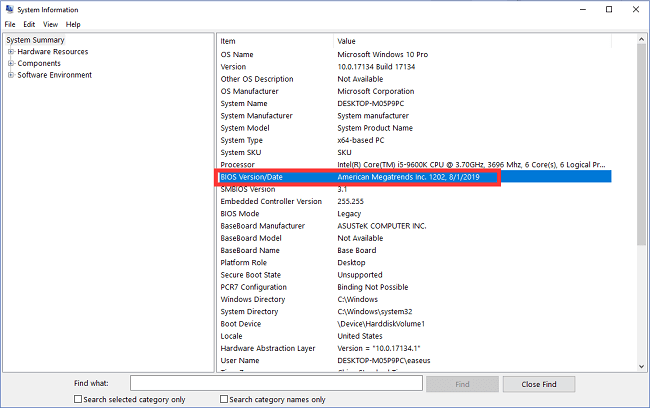
2 - Check your BIOS version via System Information.
To find the BIOS version and date, type "System Information" in the search box, click on the result, and then check the "BIOS Version/Date" in the right panel.
After checking the BIOS version, you need to download the new version from the website. Then, unzip the new BIOS version file. (If you're using the American Megatrends BIOS, you can download the AMI Firmware Update tool to update BIOS, skipping step 2.)
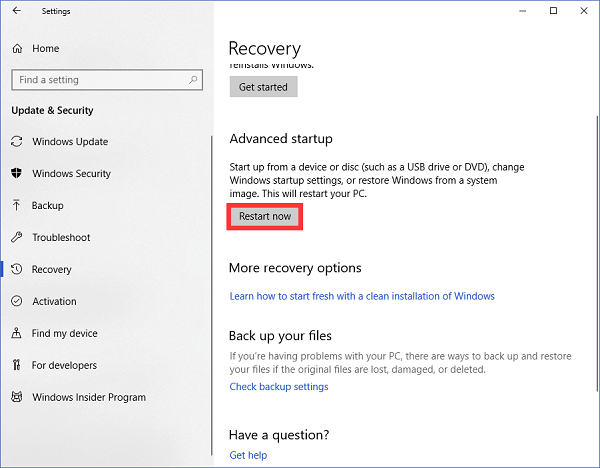
Step 2. Access "Advanced startup" page.
To restart your Windows 10 device, go to Settings, then click on Update & Security, followed by Recovery, and select Restart now.
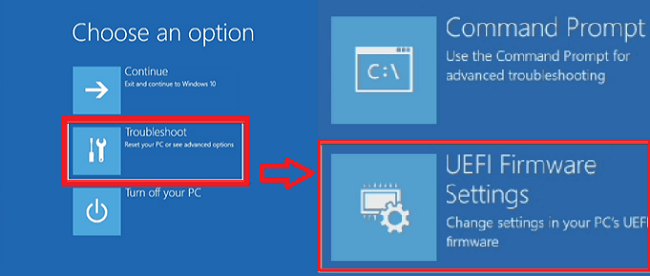
Step 3. Choose options.
To troubleshoot, click Troubleshoot, select Advanced options, choose UEFI Firmware Settings, and then click the Restart button to boot into BIOS.
Fix 2 - Disconnect the Cable and Re-connect Samsung SSD
Step 1. Disconnect the power supply of your computer.
Step 2. Using the screwdrivers to open the case. (See the tutorial on YouTube.)You can see the hard disk.
Step 3. To resolve the issue, you need to disconnect the cable connected to the SSD and reconnect the hard disk. This will allow the system to recognize the hard disk again and boot from it.
Fix 3 - Connect Samsung SSD to a Different SATA Port
If your computer can't see the SSD in the BIOS using the above methods, try connecting the hard drive to a different SATA port.
You can try using a different SATA port on your motherboard and then restart your computer to see if it resolves the issue.

Note: If some steps are too complicated for a novice, you can seek out a local computer service.
Fix 4 - Configure BIOS Setting
Step 1. Restart your computer and press F2 after seeing the first screen.
Step 2. Enter Config by press the Enter button.
Step 3. To configure the SATA controller mode, follow these steps: Choose Serial ATA and press Enter, then check the SATA Controller Mode Option.
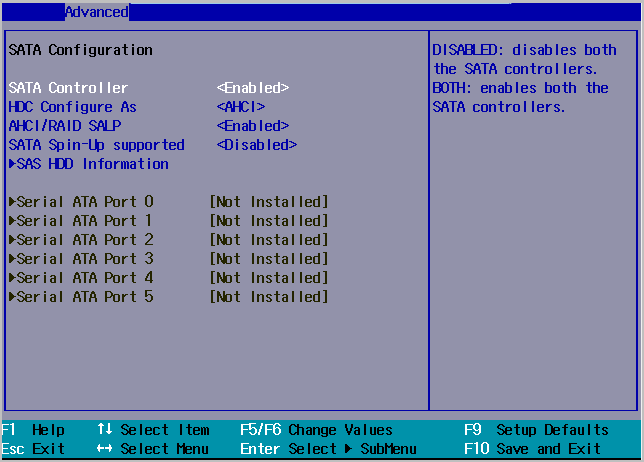
Step 4. Save your changes.
Step 5. Restart your computer to access BIOS.
We have written another article about SSD not showing up in Windows 10:
Easy fix to SSD not showing up in Windows 10
This tutorial covers four cases of Windows 10 not detecting a new (old) SSD, providing solutions to fix the issue. If you need to recover data from an inaccessible or formatted SSD, you can download Deep Data Recovery.
Do These Methods Work
The solutions to handle Samsung SSD not showing up in BIOS include checking the BIOS settings, updating the BIOS, and using a USB BIOS update tool. If these methods fail, users can try using a different SATA port, checking for loose connections, or using a different cable. If the issue persists, it may be a hardware problem and the SSD may need to be replaced.
The first solution is more complex, but you can try. If you are worried about the failure of the BIOS update, you can contact us for help (Send email to support@idiskhome.com).
More Info about Samsung EVO SSD Not Showing Up
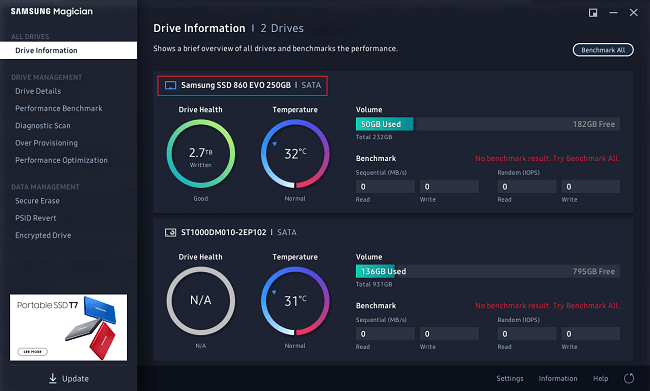
1. Samsung Magician Not Recognized Samsung 860 EVO SSD?
Fix 1 - Check the brand of SSD.
The Samsung Magician software is only compatible with Samsung brand SSDs. If you have a Samsung-made SSD sold under another brand, the software will not recognize it.
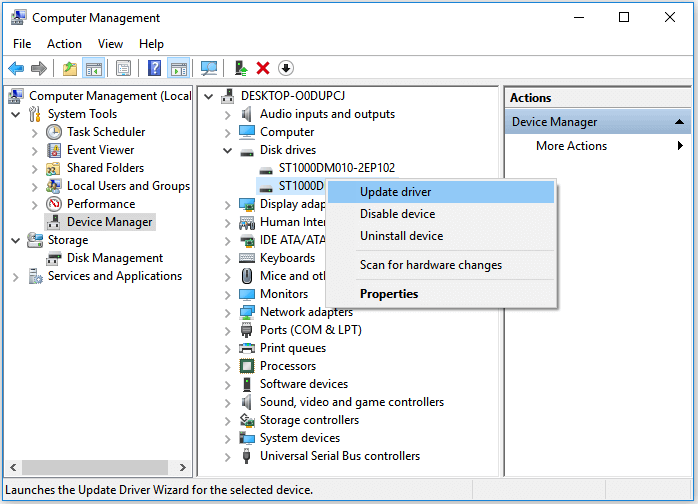
Fix 2 - Update driver (Incompatibility problem)
Step 1. Press Windows + X and click Device Manager to start.
Step 2. Right-click Samsung SSD 860 EVO and choose Update driver.
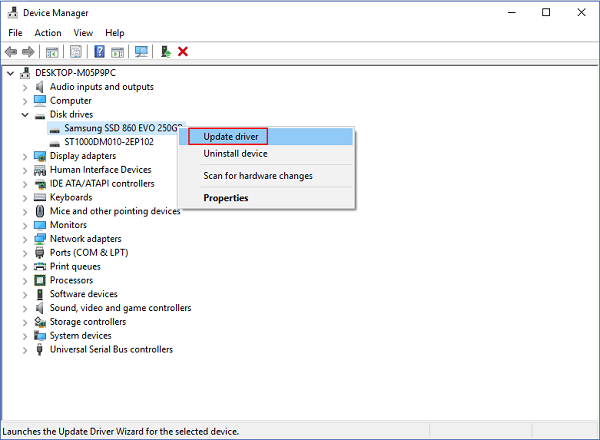
Step 3. Restart your system.
2. Samsung SSD Not Showing Up in Disk Management
If the Samsung SSD is not showing up in disk management, you can try restarting your computer and accessing BIOS to check the boot priority. Alternatively, you can follow other methods to correct the SSD connection.
If you lose data when fixing your Samsung SSD, you can use Qiling data recovery software to recover your data on your SSD, HDD, SD card, USB, and other devices.
Step 1. Select file types and click "Next" to start.
Launch Deep Data Recovery. Select the file types you want to recover and click "Next" to proceed with the recovery process.

Step 2. Scan the SSD
To recover lost data from an SSD, select the drive where the data was lost and click the "Scan" button to initiate the scanning process. This will allow the recovery software to locate and identify the lost data on the SSD.

Step 3. View the results
When the scanning process is complete, you can use the "Filter" and "Search" functions to locate lost SSD data. To do this, first check the "Deleted Files" and "Other Lost Files" folders.

Step 4. Recover SSD files
To recover lost SSD files, select the desired data and click the "Recover" button. This will initiate the process of retrieving the lost files.
Related Articles
- [DIY Guide] Where Do I Find My Scanned Documents on Windows/Mac
- How to Fix Buffalo External Hard Drive Not Working/Recognized
- How to Recover Permanently Deleted Files and Folders with or Without Software
- How to Turn on AutoSave in Excel 2007-2019 (An Easy Guide)
- How to Recover Files from SDHC Memory Card
If you've lost files from your SDHC memory card due to unexpected errors, there's hope for recovery. You can use SanDisk SDHC card recovery software to restore deleted files from your SDHC card. This software can be downloaded for free, allowing you to recover files from your SDHC card with ease. - How to Show Hidden Files in USB on Windows/Mac
Want to know how to show hidden files on your USB flash drive? It's easier than you think! Whether you're on a Mac or Windows PC, the process is straightforward. To show hidden files, you can simply follow the specific instructions for your operating system, and you'll be able to view and access any hidden files on your USB drive in no time.