How to Enable/Disable TRIM on SSD in Windows 10 [2021 New]
To check and enable or disable TRIM on your SSD, follow these steps. You can check if TRIM is enabled or disabled on your SSD by using command lines or freeware like Deep Data Recovery. This will allow you to see the current status of TRIM on your SSD and make any necessary changes to enable or disable it.
To enable or disable TRIM on your SSD, you can use one of two reliable methods in Windows 10/8/7. Additionally, we've gathered some practical tips to protect your SSD data after making these changes.
To enable TRIM on your SSD and protect your data, first, ensure your operating system supports TRIM. Then, check if your SSD supports TRIM by looking for the "TRIM" or "discard" feature in your SSD's specifications.
PAGE CONTENT:
- #1. Check If TRIM Is Enabled On Your SSD
- #2. How to Enable TRIM on SSD in Windows 10/8/7 (Two Ways)
- #3. Bonus Tip: Data Recovery with SSD TRIM Enabled on Windows 10
About SSD TRIM, Everything You Need to Know
The TRIM command is a feature that helps maintain the performance of solid-state drives (SSDs) by allowing the operating system to delete unnecessary data blocks. This process, also known as garbage collection, helps prevent the SSD from becoming fragmented and slows down over time.
1. What Is SSD TRIM?
2. Should You Enable TRIM on SSD?
3. How Often Should SSD be TRIMMED?
TRIM on SSD (The TRIM command, short for "Trim", is an Advanced Technology Attachment (ATA) command that instructs Solid-State Drives (SSDs) to erase data blocks when they are no longer in use. This allows the SSD's controller to manage storage space more efficiently, leading to improved data reading and writing speeds.
Enabling TRIM on your SSD can significantly improve its performance and extend its lifespan, making it a worthwhile feature to enable.
To always obtain high performance with fast reading and writing speed on your SSD, it's advised that you always turn on TRIM.
To check if TRIM is enabled on your SSD, follow the guide below. If the SSD TRIM is disabled, you can follow the steps to learn how to enable it on Windows 10/8/7.
#1. Check If TRIM Is Enabled On Your SSD
Normally, TRIM is enabled on SSDs by default, but it may be disabled by mistake or via a third-party tool. Therefore, you must check if TRIM is enabled regularly on your computer.
You can check and manage the TRIM function on your SSD using the Command Prompt. If you're unsure whether TRIM is in use, you can first check if it's enabled.
To check if TRIM is on:
Step 1. Press Windows + X keys, click "Search" and type cmd in the Search box.
Step 2. Right-click "Command Prompt" and choose "Run as administrator".
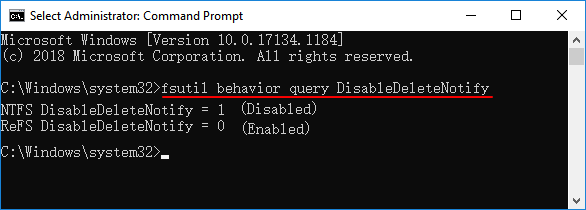
Step 3. Enter the following command: fsutil behavior query DisableDeleteNotify and hit Enter.
- If the output is DisableDeleteNotify = 1, it means that TRIM (TRIM is a feature that deletes items from the Recently Deleted folder) is currently disabled on your device.
- If the query result is DisableDeleteNotify = 0, it indicates that TRIM support is enabled on your SSD.
So how to turn on the TRIM if you see it's disabled on your SSD? Move to the next guide, we'll show you how to efficiently enable TRIM on SSD in Windows 10/8/7.
#2. How to Enable TRIM on SSD in Windows 10/8/7 (Two Ways)
To maintain your Solid-State Drive (SSD) performance at its best, it's recommended to enable TRIM, which helps the drive to automatically erase invalid data blocks, thereby keeping its performance high. You can enable TRIM on your SSD by checking your computer's BIOS settings and ensuring TRIM is enabled, or by using the Windows built-in feature, if available. Additionally, you can also use third-party tools to enable TRIM, such as the Samsung Magician software for Samsung SSDs, or the Crucial Storage Executive software for Crucial SSDs.
Enable TRIM on SSD via Command Prompt
If you prefer a Windows built-in way to enable TRIM on your SSD, follow the steps below:
Step 1. Right-click the Windows icon, select "Search" and type cmd in the Search box.
Step 2. Right-click "Command Prompt" and choose "Run as administrator".
Step 3. Type: fsutil behavior set DisableDeleteNotify 0 and hit Enter.
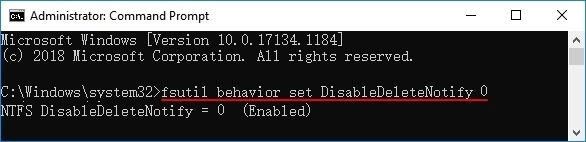
Now, SSD TRIM is enabled on your computer.
#3. Bonus Tip: Data Recovery with SSD TRIM Enabled on Windows 10
TRIM ensures high performance on your SSD, but it eliminates the possibility of data recovery by completely erasing data blocks when you perform "delete" operations.
While TRIM can make data recovery more difficult, it's not impossible to recover data even with TRIM enabled. Some data recovery software and techniques can still retrieve deleted files, but the success rate and data integrity may vary. However, if your SSD is TRIM-enabled, it's essential to act quickly and use specialized software to increase the chances of successful data recovery.
If you've accidentally deleted or formatted files on your SSD with TRIM enabled, prompt action is crucial for successful data recovery. The sooner you act, the better chance you'll have for recovering your lost files. The process involves the following steps: the steps outlined below.
1st. Disable TRIM on SSD Immediately
If you've lost data on your SSD, disable TRIM on the SSD as soon as possible once you've discovered the missing files.
Step 1. Right-click the Windows icon, select "Search" and type cmd in the Search box.
Step 2. Right-click "Command Prompt" and choose "Run as administrator".
Step 3. Type: fsutil behavior set DisableDeleteNotify 0 and hit Enter.
2nd. Recover Data from SSD on Windows 10/8/7 As Possible As You Can
With SSD TRIM disabled, you can apply reliable data recovery software like Deep Data Recovery to scan and find lost files.
1. Launch the deep data recovery software, select only the file types you want to recover, and click "Next" to begin the pen drive data recovery process.

2. You can see all drives on your computer, including your pen drive, listed in the main window. To recover data from your pen drive, simply select it and click "Scan" to initiate the data recovery process.

3. During the scanning process, files are found by the software and sorted into categories on the left. If the desired files are located, scanning can be stopped immediately. The found files can then be previewed and recovered to the computer by selecting the "Recover" option.

The Quick Scan is used first, but if the target files aren't found, a Deep Scan should be tried instead, which scans more thoroughly to help locate the lost files.
3rd. Create Backup of Valuable SSD Files
After restoring the lost SSD data, the next step is to ensure that all valuable files are safely backed up to an external hard drive. This will prevent future data loss in case of another SSD failure or any other data-related issue.
To back up your files, you can either manually copy and save them to an external storage device or use a reliable file backup software like Qiling Backup to selectively back up all your files at once.
It's Your Turn, Enabling TRIM and Protecting Files on SSD
To keep your SSD data safe with TRIM enabled, consider using a backup solution that can periodically copy your data to another storage device, such as an external hard drive or a cloud storage service. This way, even if data is lost due to TRIM, you can recover it from the backup. Additionally, you can also consider using a data recovery software that can scan your SSD and recover deleted or lost files. It's also a good idea to regularly clean up your SSD by deleting unnecessary files and folders to reduce the risk of data loss.
Here are our suggestions:
- 1st, create a complete backup of your SSD disk data to an external hard drive.
- If you don't have a backup, disable TRIM on your SSD as soon as you lose data to prevent further data loss.
- If you've lost important files, don't panic! First, try to recall the last time you saved your work and check if the files are still in the autosave folder.
- 4th, after this, enable SSD TRIM in Windows 10/8/7 again.
Related Articles
- How to Fix Error Code 43 for USB in Windows 10 & Recover Data
- Fix No Writable WD Smartware Partition Found and Recover Data
- How to Fix External Hard Drive Takes Long Time to Open and Read
- Does Initializing a Disk Erase Data, Yes or No?
- How to Recover WhatsApp Messages Without Backup on iPhone/Android
Wondering how to recover If you're looking to recover WhatsApp messages from a year-old WhatsApp conversation without a backup, you're in luck! Qiling MobiSaver is a tool that can help you restore your WhatsApp messages with just a few clicks, making it easy to retrieve your lost conversations. - Accidentally Clicked Don't Save Word Mac? Recover Unsaved Word
If you've accidentally clicked 'Don't Save' on Word on Mac and lost your unsaved files, don't worry! You can recover them using reliable Mac file recovery software, by checking the TMP folder, or by utilizing AutoRecovery. Follow these steps to bring back your lost Word files on Mac.