Undo ESD-USB | Convert 32GB ESD-USB Hard Drive/External Hard Drive to Normal
If your USB drive has been affected by ESD (Electrostatic Discharge) and you're experiencing issues with its capacity, There are solutions to help you undo the damage and restore your device to its full capacity without losing any data on Windows 10, 8, 7, XP, or Vista.
Accidentally Converted External Hard Drive to 32GB ESD-USB, Lost data and Partition
"Does someone know how to restore my 32GB ESD-USB 1TB external hard drive to normal?
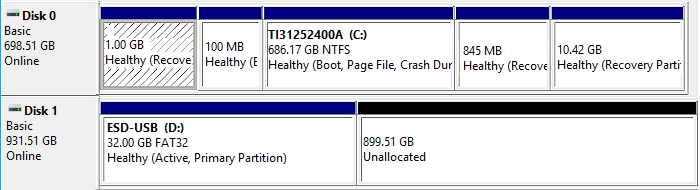
You accidentally converted a Windows media creation tool to an ESD-USB drive, resulting in a 32GB partition being left, while the rest of the partition and data were lost.
Besides the shown state of ESD-If you've experienced issues with a USB drive, you may also have encountered similar problems with your hard drive or external hard drive, including data corruption, file system errors, and system crashes.
- 1. The issue of a hard drive or external hard drive showing only 32GB or 31GB in Windows Explorer can be caused by a few reasons. Firstly, it could be due to a corrupted file system, which can be resolved by running a check disk (chkdsk) on the drive.
- 2. When an external hard drive, such as an ESD-USB, is partitioned, it's divided into sections, each with its own file system. If a partition becomes unallocated, it means that the section of the drive is no longer assigned to a specific file system or operating system.
- 3. Saved data get deleted or lost
How to restore lost data and undo the ESD-USB drive on your own
- Notice:
- If you lost valuable data on your hard drive or external hard drive, move to Part 1. You can apply the methods there to bring your lost files back immediately.
- If you want to immediately convert your ESD-USB hard drive or external hard drive to normal, follow solutions in Part 2 for help.
Part 1. Restore Valuable Lost Files
When you accidentally create the Windows Media Installation Tool on the wrong drive, it can lead to catastrophic consequences, including the loss of all partitions and data, leaving behind only a 32GB ESD-USB partition. The immediate priority is to recover the lost files and restore your storage device to its original state.
To recover lost files from a deleted ESD-USB partition, you'll need to delete the partition first and then apply file recovery software to scan and restore all lost files. This process can help you bring back your lost data quickly.
1. Delete Existing ESD-USB Partition
The existing ESD-USB partition only contains some Windows installation files, which are not what you want. Deleting the existing 32GB partition won't cause an actual data loss on your drive.
To prevent the restored data from being inaccessible, Qiling data recovery experts recommend deleting the ESD-USB partition and using file recovery software to scan the entire hard drive.
To ensure the restored data is available and reusable, delete the existing partition by following these steps: 1. Boot from the installation media, 2.
Step 1.To connect your external hard drive to a PC and open Disk Management, you simply need to physically connect the external hard drive to your computer using a USB cable, and then open the Disk Management tool on your PC. This can usually be done by searching for "Disk Management" in the Start menu or by typing "diskmgmt.
Step 2.To delete the ESD-USB 32GB partition, locate it on your device, right-click on it, and select "Delete Volume" from the context menu.
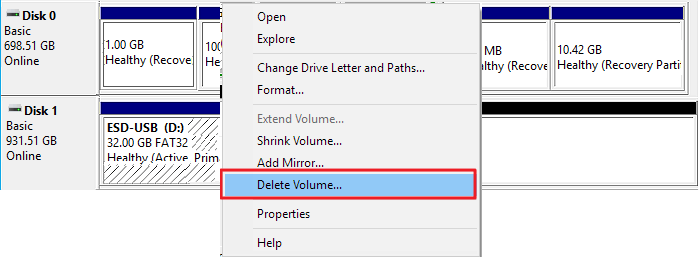
Step 3. Click "OK" to confirm.
2. Restore All Lost Drive Files with Qiling File Recovery Software
To recover lost files, a practical and secure method is to use a reliable file recovery software to restore all lost files from the ESD-USB device.
You can either search online to find a file recovery tool or download Data Recovery Wizard software for help.
Deep Data Recovery can thoroughly scan all existing and lost files from the ESD-USB drive and restore everything on the device in just three steps.
Step 1. Select file types
Launch Deep Data Recovery, select the desired file types, and click "Next" to begin the recovery process.

Step 2. Select a drive and start scanning
Hover over the partition where you lost data, then click "Scan" to initiate the scan process.

Step 3. Check and preview scanned files
To narrow down the scan results, use the file format filter to find the specific files you need. You can then click the "Preview" button or double-click a file to view its content. This will help you locate the desired files more efficiently.

Step 4. Recover lost data to a secure location
To recover lost data, select the file, check the box next to it, and click "Recover". Place the recovered data in a secure location, avoiding the original disk where the data was lost.
- Warning
- Don't save the recovered files to the current hard drive or external hard drive before making it usable again.
- In the next part, you will see the complete solutions to restore an ESD-USB hard drive or external hard drive to its full capacity.
Part 2. Undo ESD-USB, Restore Hard Drive/External Hard Drive to Full Capacity
IMPORTANT: If you directly jump to this part, please delete the existing ESD-USB partition on your device first by using Disk Management.
After following Part 1, the ESD-USB partition is no longer on your hard drive or external hard drive. The device is now an unallocated drive.
You can create a new partition on the device to undo ESD-USB, restoring your HDD or external hard drive to its full capacity.
Step 1. To create a new partition on your unallocated space, go to Disk Management, right-click on the unallocated space, and select "New Simple Volume".

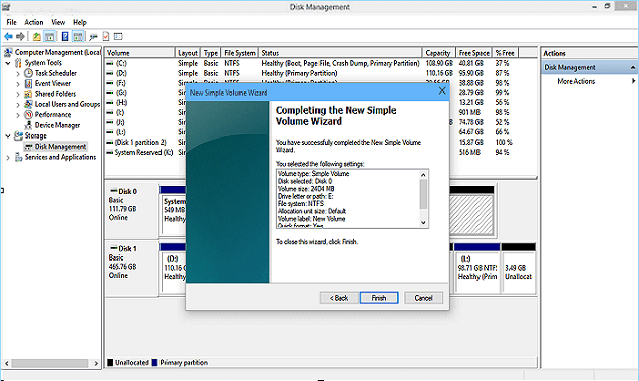
Step 2. Enter the New Simple Volume Wizard, click "Next" to continue.
Step 3. Set the new partition size, choose the file system as NTFS, and assign a partition label on your hard drive or external hard drive.

Step 4. Once you've completed all the settings, click "Finish" to finalize the process.
Note: To create multiple partitions on your hard drive, you'll need to allocate the unused space after each partition creation and then repeat the process for the remaining unallocated space. This ensures that each new partition gets its own dedicated space.
After the data recovery process, you can reuse your hard drive or external hard drive to store relevant data and files again.
To avoid mistakenly converting your hard drive or external hard drive to ESD-USB, it's essential to take precautions. Knowing the ways to protect your data and prevent such mishaps is crucial. In the next part, you'll find reliable tips to help you resolve this issue with ease.
Part 3. Bonus Tips to Protect HDD/External Hard Drive with Data
Protecting your data and external or internal hard drive is crucial in preventing data loss. Regular backups, secure password management, and using reputable antivirus software can help safeguard your information.
Here are some reliable tips for you to apply and take action to protect your valuable files and storage device immediately:
1. Create Data Backup and Save to Anther Device or Cloud Drive
It's a good habit to create a full backup of your files to another hard drive or external storage device, allowing you to restore them if they get lost on your device.
A time-Using reliable file backup software like Qiling Backup can help save and effectively back up files, hard disk partitions, and even the Windows OS to another hard drive, external storage device, or cloud drive in just 3 simple steps.
Step 1. To initiate a backup, click the "File backup" button located in the "Backup and recovery" page.

Step 2. Local and network files will be displayed on the left side, allowing users to extend the directory and choose which files to back up.

Step 3. You can choose to store the backup on an external drive, cloud storage, or another location on your computer. The backup location you choose will depend on your specific needs and preferences.

Step 4. To encrypt the backup with a password, click on "Options" in the "Backup Options" section. This allows for various customization options to be set for the backup process.

In the "Backup Scheme" section, set up a backup schedule and choose to initiate a backup at a specific event.

Step 5. You can save the backup to a local disk, Qiling's online service, or a NAS.

Step 6. To start a backup, click "Proceed". Once the backup process is complete, it will be displayed as a card on the left side of the panel. To manage the backup job further, right-click it.

2. Run Antivirus Software to Clear Virus, Malware, etc. Regularly
In addition to updating your operating system, you can also use antivirus software to remove viruses and malware from your computer. This software can detect and eliminate existing or dormant viruses, helping to keep your hard drive and external storage devices safe.
Microsoft Defender may not be sufficient on its own, but there are other reliable antivirus software options worth considering. Here are some alternatives to try:
- Norton Security 360/Norton Antivirus Plus
- McAfee
- AVG
- Avira
- Avast
- Malwarebytes
- Kaspersky Anti-Virus
Once you've installed the software, run it immediately to thoroughly scan your computer and external storage devices, removing any potential viruses.
3. Encrypt and Lock Hard Drive/External Hard Drive with Password
Encrypting or locking your hard drive or external hard drive with a password helps protect your device and data from unauthorized access, making it more difficult for hackers to access your sensitive information. This adds an extra layer of security to prevent data breaches and cyber attacks.
To enable BitLocker on your Windows 10/8/7 device, follow these steps:
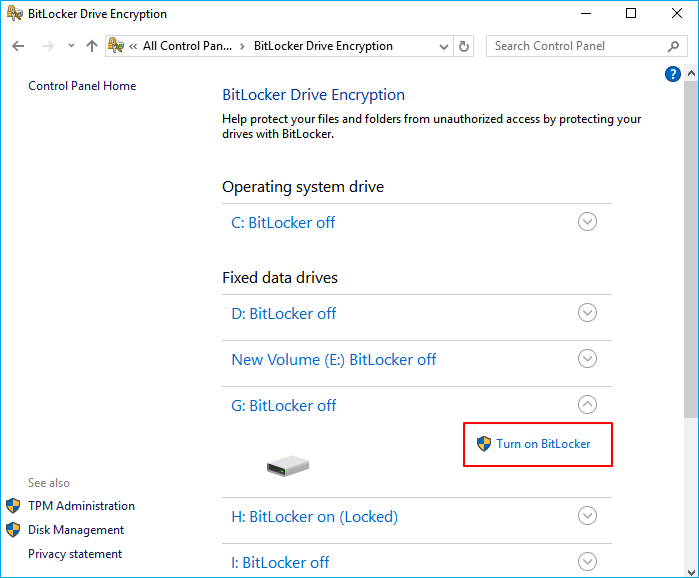
Step 1. Open Control Panel and click "BitLocker Drive Encryption".
Step 2. To lock your drive or external hard drive, locate and expand it, then select "Turn on BitLocker" from the context menu.
Step 3. Set a password to lock the selected hard drive or external hard drive and click "Next" to proceed.
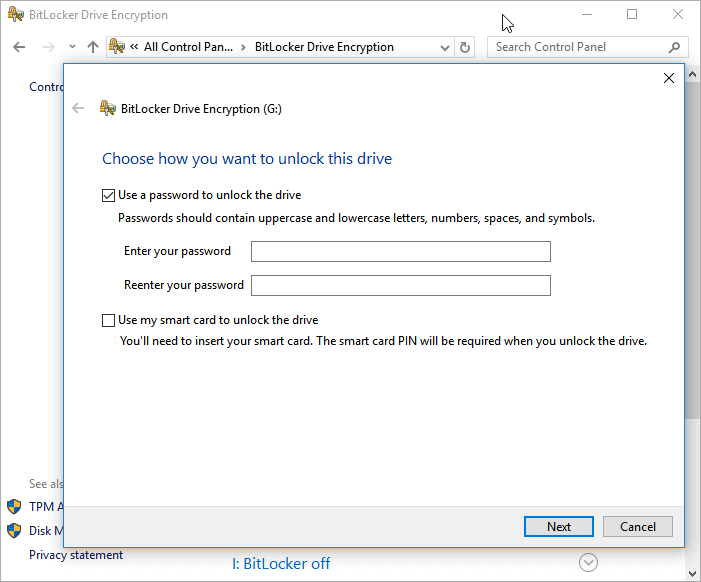
Step 4. To save your password to your Microsoft account, a USB drive, a file, or print the recovery key, click "Next" to confirm after selecting the desired method.
Step 5. To encrypt your drive, select the amount of space you want to encrypt and click "Next" to proceed.
- To improve performance, you can enable encryption on only the used disk space, which is faster and more suitable for new PCs and drives. This approach allows you to take advantage of the benefits of encryption without slowing down your system, making it ideal for fresh installations or newly formatted drives.
- To encrypt the entire drive, which is the most secure option, you'll need to use a full-disk encryption tool. This process is slower than the other methods but is recommended for PCs and drives already in use.

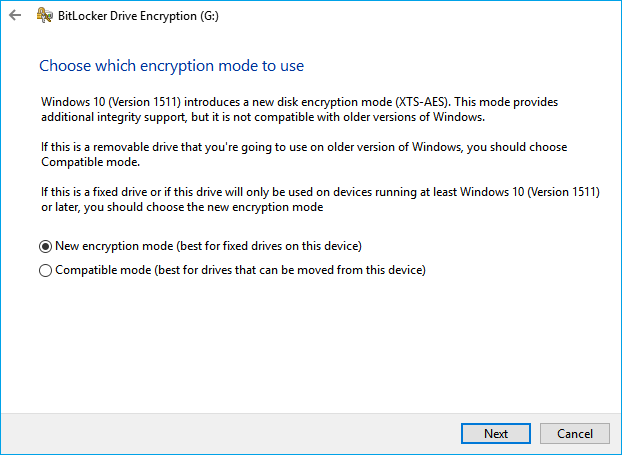
Step 6. Choose the encryption mode you want to use and click "Next" to proceed.
- New encryption mode (best for fixed drives on this device)
- In compatible mode, the operating system is set to read and write data to the drive in a way that is compatible with other devices. This mode is best for drives that can be moved from this device to other devices, as it ensures that the data is accessible and usable on those other devices.
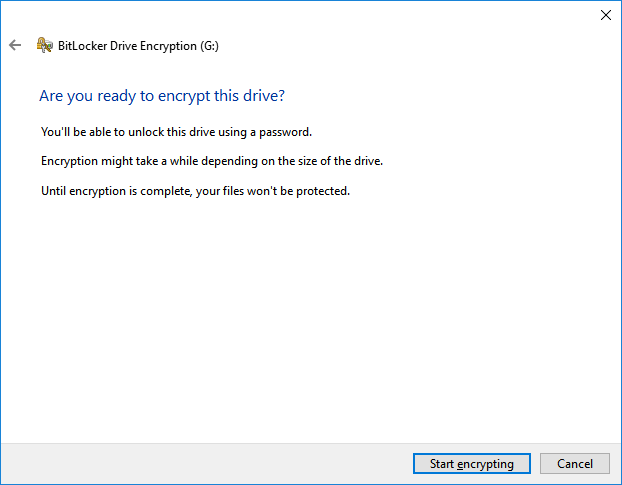
Step 7. Click "Start encrypting" and wait for the process to finish.
Some programs can lock and encrypt your drive with a password, making it inaccessible to others without a password, providing an additional layer of security and protection for your data.
- Tip
- When you need to access and use your files on the locked hard drive or external hard drive, here is how to unlock the device:
- 1. Keep your hard drive or external hard drive connected to your PC.
- 2. To access your drive after encrypting it with BitLocker, double-click on the drive and enter the password you previously set for the encryption.
- 3. After this, you can open your device and use the data securely again.
The Bottom Line
We have provided complete solutions in Part 1 and Part 2 to revert the ESD-USB drive to normal without data loss. By using data recovery software first and then creating new partitions, you can recover your drive.
The tips from Part 3 will provide a complete plan to protect your data from being overwritten or prevent storage devices from being converted to ESD-USB by mistake. This will help you safeguard your data and avoid any potential issues.
Related Articles
- You Want to Perform SWF File Recovery? Got it
- Unlimited Data Recovery Software Free Download Full Version [2025]
- Free Download Transcend JetFlash Online Recovery Tool
- Run Deep Data Recovery from WinPE Bootable Disk
- How to Recover Deleted Game Files/Steam Data/Game Saves on PC
Recovering deleted game files on a PC can be achieved through several efficient approaches. To effectively recover deleted game files, refer to the detailed instructions in the article, which outline 5 methods for recovering lost game data after deletion. - How to Recover Deleted MP4 Files on Windows 10/11 [NEW]
Is it possible to recover deleted MP4 files on Windows PCs? Yes, you can recover deleted files with Undo option, Recycle Bin, Backup and Restore utility, and File History. Most importantly, you can trust and rely on Deep Data Recovery to recover deleted MP4 files.