Windows Repair Tools and Services [Windows 10/11]
Windows, the world's most popular operating system, is not immune to problems. Over time, it can cause various issues that affect performance, stability, and even data security. These issues can manifest as slow or unresponsive systems, frequent crashes or blue screens, incomplete updates, and unexpected error messages or pop-ups, as well as programs that fail to work correctly.
If you're experiencing any Windows system problems, there are many ways to repair them. This article will explore some of the most common Windows issues and provide guidance on the repair tools available to help you resolve them.
4 Biggest Windows Problems (Detailed Info)
Windows has several well-Here are four known Windows system issues that can cause significant inconveniences for users:
1. Getting Windows Ready Stuck
The "Getting Windows ready. Don't turn off your computer" message is a normal part of the Windows update process, where the system applies updates, including new features, security patches, and other improvements. It's essential to keep the computer on during this time to ensure the updates are successfully installed and avoid potential system problems.
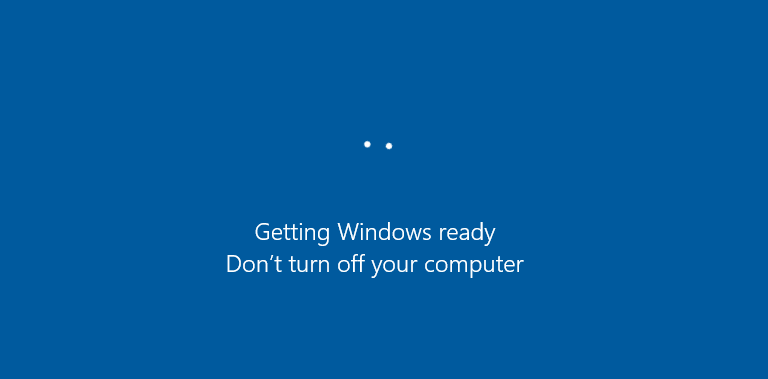
If your computer is stuck on the "Getting Windows Ready" screen, it's best to wait until the process is finished, which can take a few minutes or even an hour or more, depending on the size and number of updates being installed. Once the updates are installed, your computer will restart, and you'll be able to use it as usual.
Learn more:
If waiting a long time doesn't resolve the issue, you may need to take alternative troubleshooting steps to resolve the "Getting Windows Ready" stuck problem, as the computer may still not respond.
2. WHEA Uncorrectable Error
A WHEA uncorrectable error is a type of hardware error that occurs when a computer starts up, causing a blue screen with an error message to appear, often with a message like the one shown in the screenshot.
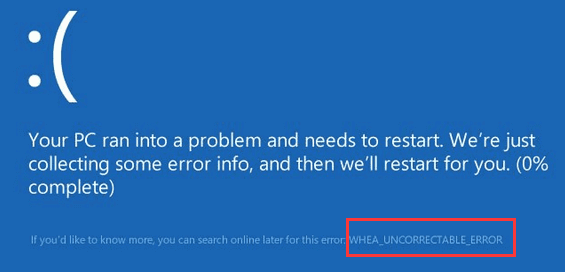
A severe computer problem, uncorrectable errors can cause crashes and potentially lead to data loss. To resolve the issue, you need to identify the cause, which is often due to an overheating processor, faulty memory, failing hard drive, or improperly configured CPU.
If your processor is overheating, try cooling it down with a cooling pad or fan. Alternatively, you can reset the memory modules if the WHEA uncorrectable error is caused by faulty memory.
Learn more:
If you're experiencing a Windows 10 WHEA uncorrectable error, there are advanced solutions available to help you resolve the issue. However, before diving into these, two quick fixes can be tried: updating the BIOS and checking for loose connections. If these don't work, other advanced solutions are ready to assist.
3. Windows 10 Won't Shut Down
If your Windows 10 won't shut down, you're not alone, as many users have reported this issue, which can be frustrating.
Windows 10 may refuse to shut down due to various reasons. One possible cause is the presence of running programs in the background, even if it appears that all programs have been closed. Additionally, Windows 10's automatic updates can sometimes interfere with the shutdown process, while issues with power settings, corrupted system files, or BIOS can also prevent the computer from shutting down properly.
The Windows won't shut down issue can be resolved through various methods, ranging from simple to complex. This includes checking your power settings, updating drivers, and fixing corrupted system files, as well as troubleshooting Windows updates. These steps can help resolve the problem without requiring extensive technical expertise.
Learn more:
If you're experiencing issues with Windows 10 not shutting down, this beginner's guide is here to help. To resolve the problem, first, try restarting your computer in safe mode to see if the issue persists.
4. Blue Screen of Death
A blue screen of death (BSOD) is a fatal system error screen that appears on a Windows computer after a critical system failure, displaying an error message on a blue background.
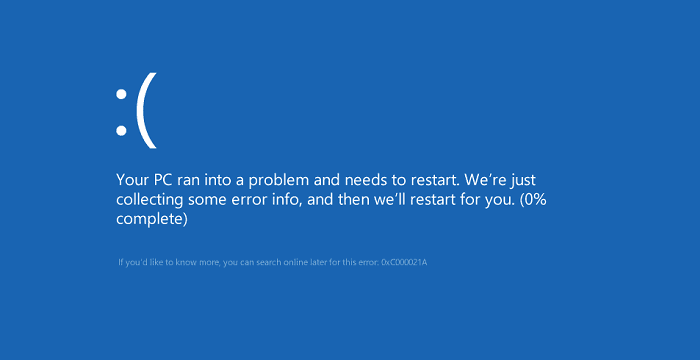
Blue screen of death errors are usually caused by hardware or software issues, such as faulty RAM, overheating components, or software incompatibility, and should be addressed to prevent computer damage or data loss.
Learn more:
Want to know how to fix a Blue Screen of Death without losing any data? Here's what to do:
How to Repair Windows 10 Without Losing Data
Windows problems are not limited to those mentioned, and regardless of the issue, the ultimate goal is to keep your computer data secure. We strongly recommend recovering data from your computer first.
Deep Data Recovery allows you to recover lost data from both bootable and unbootable computers, and supports data recovery on various Windows versions, including Windows 11, 10, 8, 7, and all Windows Server versions.
Windows 10 can't boot properly? you can use Deep Data Recovery Pro with Bootable Media to recover data from a dead hard drive and inaccessible Windows computer.
Step 1. Download Deep Data Recovery WinPE Edition to create a bootable disk.
Step 2. Connect the bootable disk to your computer, then restart and press F2 simultaneously to enter BIOS. From there, select the option to boot your device from the bootable USB.
Step 3. Run Deep Data Recovery. Scan for your lost files to recover.

After successful data recovery, follow the approaches below for Windows 10 repair.
Fix 1. Run Command Prompt for Windows Repair
Windows malfunctions or crashes can be caused by system file corruption, which can be resolved using Windows repair tools. The DISM (Deployment Image Servicing and Management) and SFC (System File Checker) tools can be used to scan and fix corrupted system files, helping to resolve issues and get Windows running smoothly again.
Here's how to do it:
Step 1. To boot into the recovery environment, hold down the Shift key while clicking the Restart option in the Start menu.
Step 2. To access the Command Prompt in the recovery environment, select "Troubleshoot > Advanced options > Command Prompt".
Step 3. To repair your Windows 10, you can follow these commands in order:
- To repair any corrupt files that may be causing issues, type `DISM /Online /Cleanup-Image /RestoreHealth` in the command prompt.
- I removed the strong tags as they are not necessary in the rewritten response)
- Type in Dism /Online /Cleanup-Image /RestoreHealth once again to ensure that all necessary files are in place.
After running the commands, reboot your computer and you're done.
Fix 2. Use Automatic/Startup Repair Windows 10
Automatic repair, also known as startup repair, is a built-in tool in Windows 10/8/7 that troubleshoots and fixes common problems with your Windows installation, helping to resolve issues and get your system up and running smoothly.
To use Automatic Repair, follow these simple steps:
Step 1. To restart your computer in Windows, you can press the Windows + I keys to open the Settings app, then navigate to Update & Security > Recovery > Advanced startup, and click the "Restart now" button.
Step 2. On the WinRE screen, select "Troubleshoot"> "Advanced Options".
Step 3. To fix Windows 10 boot issues, go to Advanced options, select "Automatic Repair" and then click on "Automatic/Startup" Repair.
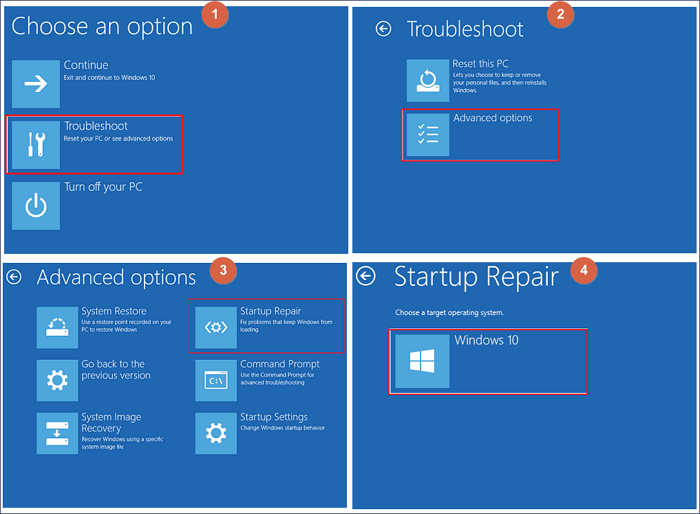
Windows 10 will try to fix the installation, which might take some time and even allow your computer to boot. If it's successful, you'll see a "Finish" button, and you can reboot your PC.
If Automatic Repair fails and you encounter a preparing automatic repair loop or Windows cannot repair this computer automatically, you'll need to investigate further to find a solution. However, in many cases, Automatic Repair can successfully repair a corrupt or damaged Windows 10 installation.
Fix 3. Windows Repair Services
For Windows repair, you can try using a professional and reliable Windows repair service, such as Qiling Data Recovery Service, which can help solve system startup errors without data loss, including system failure, blue screen, black screen, and more. After a free evaluation, their experts can offer services such as data recovery, system repair, and more to get your system up and running smoothly again. You can contact them for a free evaluation by clicking here.
- Fix Windows boot issues, including BSOD
- Fix Windows error and configure Windows environment
- Restore the system when it fails to boot
- Optimize Windows computer to make it run quickly
If your Windows 10 installation is experiencing problems, try running the built-in System File Checker (SFC) tool, which scans and replaces corrupted system files. Alternatively, you can try running the Deployment Image Servicing and Management (DISM) tool, which can repair corrupted system files and registry entries. If these tools don't work, you can try booting into Safe Mode and then running a System Restore to a previous point when Windows was working properly. If none of these methods resolve the issue, you can try reinstalling Windows or seeking further assistance.
Learn more:
To get the complete tutorials for Windows 10 repair, check out the 6 effective ways to repair Windows 10.
Windows 11 Repair in Every Way
When running Windows 11, you may encounter various system problems, similar to those experienced with Windows 10, including boot issues, upgrade difficulties, and black screen of death, among others.
Fix 1. Boot Into Safe Mode
If your Windows 11 won't boot up properly, try using the "Safe Mode" option. This can be done by restarting your computer and pressing the F8 key repeatedly until the "Advanced Boot Options" menu appears. From there, select "Safe Mode" and see if your computer boots up correctly. This can help you troubleshoot any issues and potentially resolve the problem.
Step 1. To access the boot menu, restart your computer and press the "F8" key when the boot screen appears. This will bring up a menu of options.
Step 2. Select "Safe Mode" from this menu and press Enter.
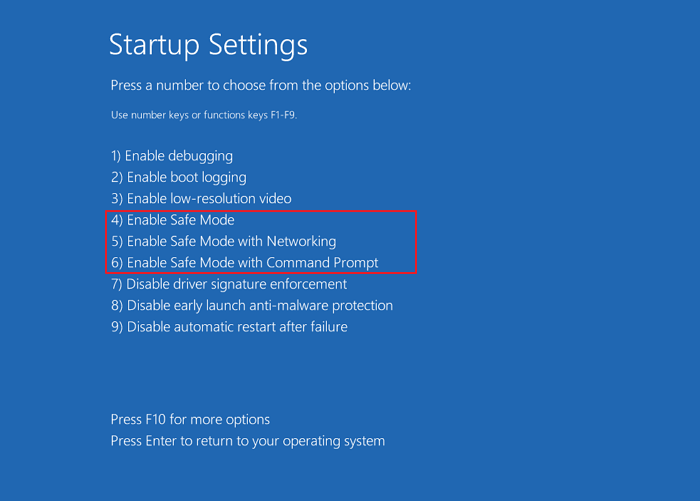
Step 3. Once your computer has booted into Safe Mode, try restarting it to see if the issue has been resolved.
Fix 2. Perform System Restore to Repair Windows 11
To resolve issues with your Windows 11 system, you can use the "System Restore" feature to restore your system to a previous state where it was working properly. This can be done by going to the "Control Panel", then clicking on "System and Security", followed by "System", then clicking on "System Protection" and finally clicking on "System Restore". From there, you can select a restore point from a list of available restore points and follow the prompts to complete the restore process. This may help resolve any issues you're experiencing with your Windows 11 system.
Step 1. To restore your computer to a previous state, click on the "Start" button and type "System Restore" into the search box.
Step 2. Once the System Restore window appears, select a restore point before the date you started experiencing issues with your system.
Step 3. To restore your computer, follow the prompts to complete the restore process and restart your computer.
Fix 3. Perform a Clean Install of Windows 11
If the above steps don't work, you may need to perform a clean install of the operating system, which should be a last resort as it will erase all data on your hard drive. Before doing so, restore data from any unbootable drives. To do a clean install, you'll need to reinstall the operating system and all software, and then restore any data from backups. This will require a significant amount of time and effort, but may be necessary to resolve the issue.
To clean install Windows 11, insert the installation disc into your computer and follow the prompts to complete the process. Before starting, be sure to back up your important data to avoid losing any essential files.
Learn more:
To effectively repair Windows 11, follow a comprehensive approach that includes running the built-in System File Checker (SFC), DISM (Deployment Image Servicing and Management), and the System Update Readiness Tool, as well as performing a System Restore point and a clean boot to isolate issues. Additionally, check for and remove malware, update drivers and firmware, and run a full disk cleanup to free up space and resolve any disk errors. If you're still experiencing problems, try resetting Windows 11, and if that doesn't work, consider reinstalling the operating system or seeking professional help. By following these steps, you'll be able to identify and fix the root cause of the issue, ensuring a stable and secure Windows 11 environment.
Conclusion
You may encounter various Windows problems, such as failed startup, blue screen of death, or a crashed system, due to issues like a corrupted registry, outdated drivers, or a virus/malware attack, among other reasons.
If you're experiencing issues with Windows startup or updates, you can try troubleshooting by running the Windows Startup repair tool, fixing system files with CMD, using Windows repair services, or performing a system restore.
Before taking any action, use a reliable file recovery tool to rescue and recover your data in advance to prevent further damage.
Related Articles
- USB Fixes: Troubleshoot/Repair Corrupted USB Erros in 2025 [Full Guide]
- Recycle Bin Windows 10 - Full Guide [with Pictures]
- The Best Video Repair Tools You Must Know in 2025
- Chrome History: How to View, Delete, and Recover
- SanDisk Repair Tool to Fix SanDisk Memory SD Card/Pen Drive/USB/SSD
If you're looking for SanDisk SD card repair tool, SanDisk USB repair tool, or SanDisk format tool, I suggest you try the right SanDisk repair tool to fix the memory card, USB drive, Pen drive, HDD, or SSD problems according to the symptoms. - Fixed: Flash Drive Shows Up as CD Drive
This post aims to help people who saw their USB flash drive showing up as CD, DVD ROM drive on the computer. If your flash drive shows up as a CD drive and you are unable to open the USB drive in Windows 11/10/8/7, as usual, the troubleshooting here is exactly what you need.