[Fixed] Windows 11/Windows 10 Preparing Automatic Repair Loop
Sorry to hear that! It sounds like your laptop is stuck in an Automatic Repair loop. To fix this, try the following: Restart your laptop in Safe Mode by pressing the F8 key as it boots up, and see if it loads normally. If it does, try uninstalling any recently installed software or drivers that might be causing the issue.
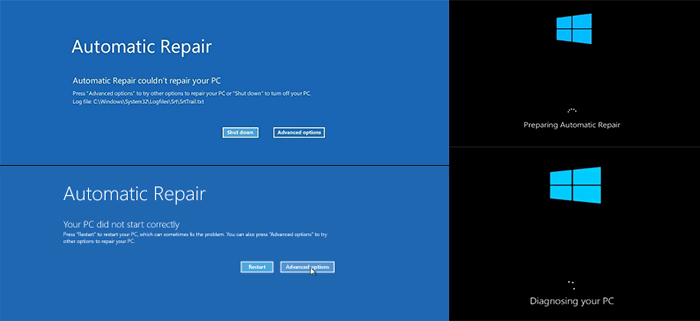
If your computer keeps restarting with an error message about "Preparing Automatic Repair" or "Automatic Repair couldn't repair your PC", don't panic. This issue can be caused by various factors such as corrupted system files, driver issues, or hardware problems. To resolve this, you can try booting in Safe Mode, running a System File Checker, or using a System Restore point.
This guide will help you quickly fix the "Preparing Automatic Repair" loop in Windows 10 or Windows 8.1/8 without losing any data. It provides a complete solution to this issue, allowing you to bypass the loop and access your system again.
| Workable Solutions | Step-by-step Troubleshooting |
|---|---|
| Fix 1. Use Windows Repair Services | Use Windows repair services to solve any system startup issues, including system failure, BSOD...Full steps |
| Fix 2. Extend the System Partition | Windows requires enough space to work properly. Extend system drive to fix "Preparing Automatic Repair"....Full steps |
| Fix 3. Disable Early Launch Anti-Malware Protection | Disable early launch anti-malware protection is useful to fix Preparing Automatic Repair...Full steps |
| Fix 4. Run System File Checker & CHKDSK Disk Utility | Run System File Checker and CHKDSK tool to check and repair missing or corrupted system files...Full steps |
| Fix 5. Rebuild BCD | If Master Boot Record (MBR) and Boot Configuration Data (BCD) are corrupted, Windows won't start...Full steps |
| More Effective Solutions | Try to restore Windows Registry; perform System Restore and hard reboot, boot into Safe Mode...Full steps |
Your Quick Guide: By following the guides, you can successfully restore your computer from the "Preparing Automatic Repair" loop on your own. If you're not interested in learning the causes of this error, you can start from Guide 2 and skip the explanation.
Windows Preparing Automatic Repair Error Overview
Automatic Repair is a Windows feature that tries to fix boot-related issues when a startup problem occurs. However, when it fails, it can get stuck in a loop, causing the computer to continuously reboot with the "Automatic Repair loop" error.
As a result, you will encounter computer boot failure, and all the programs, services, and files on the computer will become inaccessible.
Symptoms of Windows Preparing Automatic Repair Error
When Automatic Repair fails, your computer will have one of the following symptoms:
- If your computer is stuck on a black screen with a "Preparing Automatic Repair" or "Diagnosing your PC" error message, try pressing the power button to shut it down, then restart it. If this doesn't work, try booting in Safe Mode by pressing the F8 key repeatedly as the computer boots up.
- Windows is stuck in a loop of preparing for automatic repair, but instead of taking you to the repair screen, it's freezing on a black screen with no output. This suggests that there might be an issue with the operating system's boot process or a problem with the system's hardware.
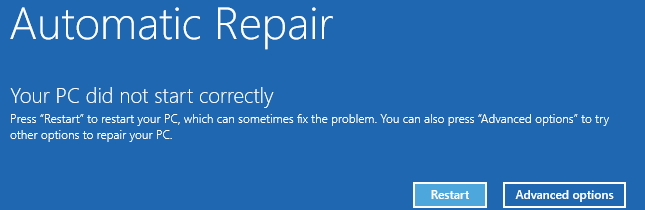
- If your computer is stuck in an Automatic Repair loop, showing a blue screen with the message "Your PC did not start correctly" or "Automatic repair couldn't repair your PC", clicking "Restart" will simply reboot the computer and catch the loop, rather than resolving the issue.
Causes of Windows "Preparing Automatic Repair" or "Automatic Repair Loop"
The "Preparing Automatic Repair" issue commonly occurs on Windows 11/10/8.1/8 computers, often after a Windows update or unexpected shutdown, causing a loop of Automatic Repair or startup repair.
But what causes this error? Here is a list of common causes:
- Issues with Windows Registry
- BOOTMGR (Windows Boot Manager) file corruption
- Missing or damaged system files
- Hardware drivers, such as hard drive drivers, motherboard drivers, and graphics drivers, can sometimes cause issues with computer systems. These drivers are software components that manage and control specific hardware components, and problems with them can lead to a range of technical difficulties, including system crashes, freezes, and errors.
- Other unknown reasons
To solve the "Preparing Automatic Repair" error, thoroughly follow Guide 2 and Guide 3, which will help you make your computer work normally again.
Restore Windows Data from Preparing Automatic Repair Loop
In any situation where your computer is stuck in a blue or black screen loop, the top priority should be to retrieve your data from the unresponsive machine.
Here, you'll get two methods to rescue your Windows data from this error automatically or manually. If you prefer an easy and efficient way, you can try the automatic method first, which involves using a data recovery software to scan your system for any recoverable data. This method is recommended if you're not comfortable with manual recovery or if you're dealing with a large amount of data.
Method 1. Recover Data from Automatic Repair Computer with Bootable Data Recovery Software
Deep Data Recovery software allows you to create a bootable media that can help you boot up a computer stuck in an "Automatic Repair" loop error. This software can provide a reliable solution for bootable data recovery.
You can recover all data from a computer that is unbootable or dead by scanning and recovering the data. This process allows you to access and save all the information that was stored on the computer, even if it is no longer functioning properly.
Qiling Bootable Data Recovery Tool
- Recover lost or deleted files, documents, photos, audio, music, and emails easily with specialized software. These tools can effectively retrieve data from various storage devices, including hard drives, solid-state drives, memory cards, and USB drives, even after accidental deletion, formatting, or system crashes.
- You can restore files from a variety of storage devices, including hard disk drives (HDD), SD cards, USB flash drives, memory cards, digital cameras, and more.
- Recovering data after a system crash, sudden deletion, formatting, hard drive corruption, or virus attack can be done under various circumstances. In the event of a system crash, data can be recovered from a backup or by using data recovery software.
Step 1. Create a bootable disk
To create a bootable disk, start by preparing an empty USB drive. If the USB already contains important data, back up those files to another device to avoid losing them, as the bootable disk creation process will erase the existing data. Once the USB is empty, you can use Deep Data Recovery WinPE Edition to assist in creating a bootable disk. This tool will guide you through the process, ensuring that your new bootable disk is correctly formatted and ready for use.
Connect a USB drive to your PC, then launch the Deep Data Recovery WinPE Edition software. Select the USB drive and click "Create" to create a bootable disk.
Step 2. Boot from the bootable USB
Connect a bootable disk to the PC that won't boot, then change the computer's boot sequence in the BIOS. This can often be done by restarting the computer and pressing F2 at the same time to enter the BIOS.
To boot the PC from a device other than the hard drive, press F10 to save and exit the BIOS settings, selecting "Removable Devices" (such as a bootable USB drive) or "CD-ROM Drive" (such as a bootable CD or DVD) as the boot priority. This allows the PC to start from an external source instead of the hard drive.
Step 3. Recover data from a hard drive that won't boot
When booting from a USB, you can run Deep Data Recovery from the WinPE bootable disk, then select the file type and click "Next".

To recover lost files, select the drive you want to scan. This will initiate a search for all files on the drive, including those that may have been deleted or lost due to various reasons.

Click "Scan" to start the scanning process.
After scanning, you can preview all recoverable files, select the targeted files, and click the "Recover" button to restore your files. It's recommended to save all of the recovered data to another place to avoid data overwriting.

Also Read: What's Top 10 Best Data Recovery Software in 2022?
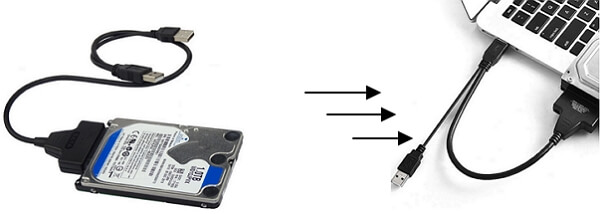
Method 2. Manually Get Data Off Automatic Repair Computer Drive on Another PC
Step 1. Unlock the computer case from your computer with an "Automatic Repair" error.
Step 2. Remove the hard drive connection cables and unplug them from your computer.
Step 3. Connect the hard drive to another healthy computer as an external disk, then try to access it on the other computer to see if it's working properly. If it's not, it may be a problem with the hard drive itself.
Step 4. To access the old computer's drive data on the new PC, restart the new PC and then use File Explorer to access the old computer's drive. This will allow you to view and interact with the files and data from the old computer on the new one.
Step 5. Copy and save all the hard drive data to another secure external hard drive.
To fix the "Windows 10 preparing automatic repair" error, you'll need to take action. Depending on the situation, you'll have different solutions, but they can be categorized into two cases: black screen or blue screen. In each case, there are workable solutions that can bypass automatic repair on your computer.
How to Fix Windows Automatic Repair Loop with Blue Screen
When Automatic Repair fails, your computer displays a blue screen with "Your PC did not start correctly" or "Automatic repair couldn't repair your PC." Clicking "Restart" restarts the process, creating an Automatic Repair loop.
To resolve the blue screen of Automatic Repair error on your computer, follow these steps. First, try booting your computer in Safe Mode by pressing the F8 key during startup. If this doesn't work, insert the Windows installation media and follow the on-screen instructions to boot from it.
- Fix 1. Use Windows 10 Repair Services
- Fix 2. Extend the System Partition
- Fix 3. Disable Early Launch Anti-Malware Protection
- Fix 4. Run System File Checker & CHKDSK
- Fix 5. Rebuild BCD
- Fix 6. Restore Windows Registry
- Fix 7. Perform System Restore
Fix 1. Fix Windows Automatic Repair Loop with Windows Repair Services
A secure way to repair Windows 10 without data loss is through manual Windows repair services, which can help resolve system startup errors such as system failure, blue screen, and black screen issues. Qiling's professional technical team can assist in solving these problems.
Consult with Qiling data recovery experts for one-on-one manual recovery service, which includes a FREE diagnosis, followed by a range of services such as manual recovery and more.
- Fix Windows boot issues, including BSOD
- Fix Windows error and configure Windows environment
- Restore the system when it fails to boot
- Optimize Windows computer to make it run quickly
If you like to try to solve the problem by yourself, move to the following methods.
Fix 2. Extend the System Partition
If your computer's system drive is almost full, you might experience issues like "Your PC ran into a problem" or Windows getting stuck at "Preparing Automatic Repair".
To free up space for the system and applications, you can use a professional partition tool like Qiling Partition Master to extend the system partition from a bootable disk, which can help rescue your computer from a blue screen of Automatic Repair error.
1. Create a Bootable Disk on Another Healthy PC
Step 1. To create a bootable disk of Qiling Partition Master, prepare a storage media such as a USB drive or CD/DVD disc, and correctly connect it to your computer.
Step 2. Launch Qiling Partition Master, find the "Create bootable media" feature on the tools page and click on it.
Step 3. You can choose to save the ISO file to a USB, CD/DVD, or local drive, and then proceed with the process. If you don't have a storage device, you can save the ISO file to a local drive and burn it later. Once you've made your choice, click the "Proceed" button to start.
After the process is complete, you will have a Qiling Partition Master WinPE bootable disk that allows you to manage your hard disks and partitions even when the computer fails to boot normally.
In a WinPE environment, you may need to load the RAID driver first by clicking "Add Driver" from the menu bar. This is because some devices, such as RAID drives or specific hard disks, may not be recognized without their drivers installed.
2. Extend System Partition from Bootable Disk
Connect the bootable USB disk to your computer, restart the PC, and enter the BIOS settings by pressing F2/F11/Del. From there, set your PC to boot from the bootable disk.
When the computer boots up from the Qiling WinPE bootable disk, you can enter Qiling Partition Master to extend the system drive. To do this, follow the steps in Qiling Partition Master to extend the system drive, allowing you to increase the size of the system drive and potentially resolve any storage issues.
Option 1. Extend System C drive with unallocated space
- 1. Click on the System C: drive and select "Resize/Move".
- 2. Drag the system partition end into the unallocated space so to add it to the C: drive. After resizing the partition, click "Proceed" to execute the operations and extend the C drive.
Option 2. Extend System C drive without unallocated space
- 1. Click a big partition with enough free space on the system disk, select "Resize/Move".
- 2. To extend the C drive, select the system drive at the "Allocate Space" and drag the end of the System C drive into the unallocated space. Click "Proceed" to complete the extension.
3. Restart PC from Original OS Disk
After extending the system drive, you can now restart the PC from the original system disk. This will allow the system to recognize the newly expanded system drive and configure it properly.
Step 1. Restart PC and press the F2/F11/Del key to enter BIOS.
Step 2. To set the original system disk as the boot drive, navigate to the boot menu, select the original system disk, and set it as the boot drive. This will make the original system disk the primary drive for booting the system.
Step 3. Save the changes, exit BIOS, and restart the PC.
Wait for the computer to boot up. If you see the login window, congratulations and you've successfully solved this issue. If the problem still exists, move to the next fixes for help.
Fix 3. Disable Early Launch Anti-Malware Protection
To get out of the Windows Automatic Repair loop, you can disable early launch anti-malware protection from Command Prompt. This can be done by following these steps:
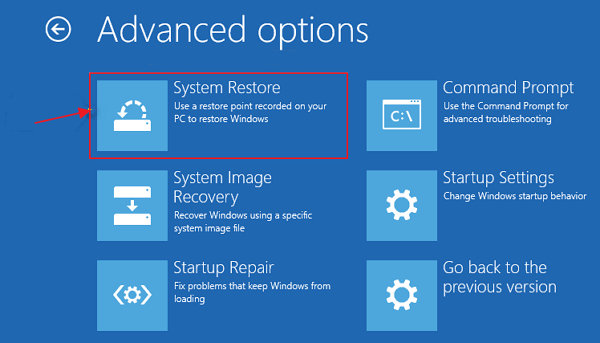
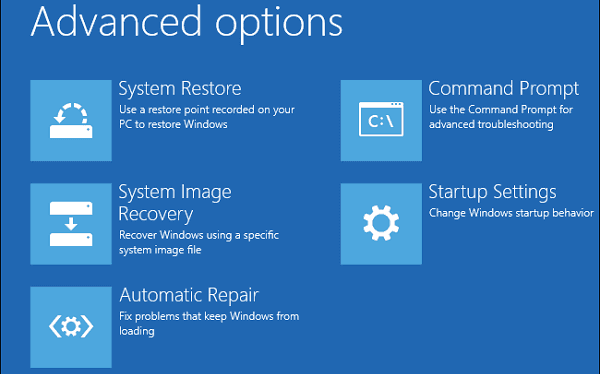
Step 1.To resolve the issue, restart your PC and click on the "Advanced options" on the Automatic Repair blue screen.
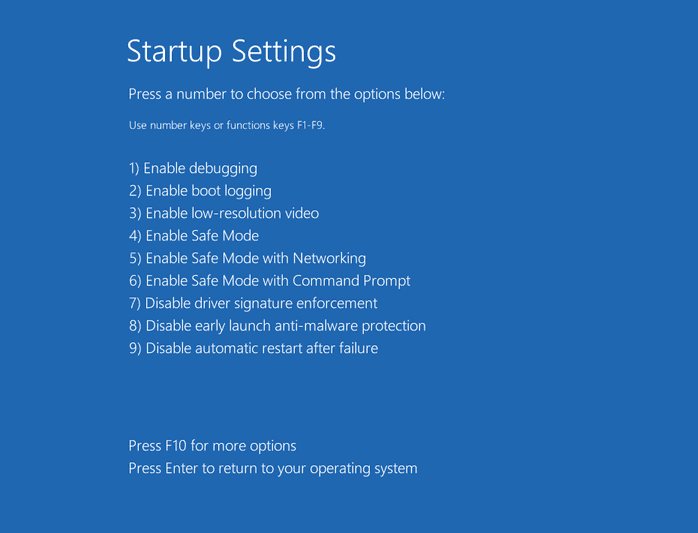
Step 2. Click "Troubleshoot" > "Advanced Options" > "Startup Settings".
Your computer will restart, then present you with a list of options.
Step 3. Choose "Disable early launch anti-malware protection".
To resolve the issue, you can try booting your PC in safe mode, then restart and check if it boots normally. If it does, you can try uninstalling recently installed software or drivers to see if that resolves the problem.
Fix 4. Run System File Checker & CHKDSK Disk Utility
If the computer system files are damaged or missing, the problem likely stems from there. Windows has a built-in tool to check and repair missing or corrupted system files.
- Warning
- To fix system files issues, running chkdsk can be attempted, but it may also result in total data loss. It's recommended to perform data recovery beforehand and then proceed with the CMD method.
To fix the blue screen error, you need a Windows installation media connected to your computer. Insert the installation media, boot from it, and select the option to repair your computer.
Step 1. Reboot your PC from the Windows installation media.
Step 2. On the Windows Setup window, choose "Next".
Step 3. To access the Command Prompt in Windows 10, follow these steps: Choose "Repair your computer" from the Windows installation media, then select "Troubleshoot", followed by "Advanced options", and finally "Command Prompt".
Step 4. Type sfc /scannow and hit Enter.
Step 5. Type chkdsk /f /r /x C: and hit Enter.

Step 6. Type exit to close Command Prompt and restart the computer.
Fix 5. Rebuild BCD
If the Master Boot Record (MBR) and Boot Configuration Data (BCD) are missing, corrupted, or not properly configured, Windows may not start. To resolve this, enter Windows and manually repair the MBR and rebuild the BCD.
When your computer won't start, the tool bootrec.exe can be used to repair issues with the Master Boot Record (MBR), Boot Sector, Boot Configuration (BCD), and boot.ini files, which are crucial for the startup process.
Step 1. Connect the Windows installation media/disc to your PC.
Step 2. Start and boot your PC from Windows installation media or DVD.
Step 3. On the Windows Setup window, choose "Next" and then select "Repair your computer" to proceed with the repair process.
Step 4. Choose "Troubleshoot" > "Advanced Options" > "Command Prompt".
Step 5. When Command Prompt appears, enter the following lines in succession:
- bootrec /fixboot
- bootrec /scanos
- bootrec /fixmbr
- bootrec /rebuildbcd
- exit
Afterward, restart the PC and check if your computer boots up normally.
Fix 6. Restore Windows Registry
The Registry is a database that stores OS and application configuration info, and corruption can cause serious issues like the Automatic Repair loop.
The registry automatically makes a backup of configuration data, allowing you to restore the Windows registry to a working version using the backup.
Step 1. The blue screen of Automatic Repair error can be resolved by selecting the "Advanced options" on the screen. This will provide additional troubleshooting and repair options to resolve the issue.
Step 2. Navigate to "Troubleshoot" > "Advanced Options" > "Command Prompt".
Step 3. Select the account and enter the password.
Step 4. Here are the commands to help you with the issue:
- C:
- CD Windows\System32
- CD config
- DIR
- CD regback
- DIR
- CD..
- REN default default1
- ren sam sam1
- ren security security1
- ren software software1
- ren system to system1
- CD regback
- copy * c:\windows\system32\config
Step 5. Type exit and hit Enter.
To turn off your computer and then start it again, go to the "Choose an option" screen, select "Turn off your PC", and then restart your computer.
Fix 7. Perform System Restore
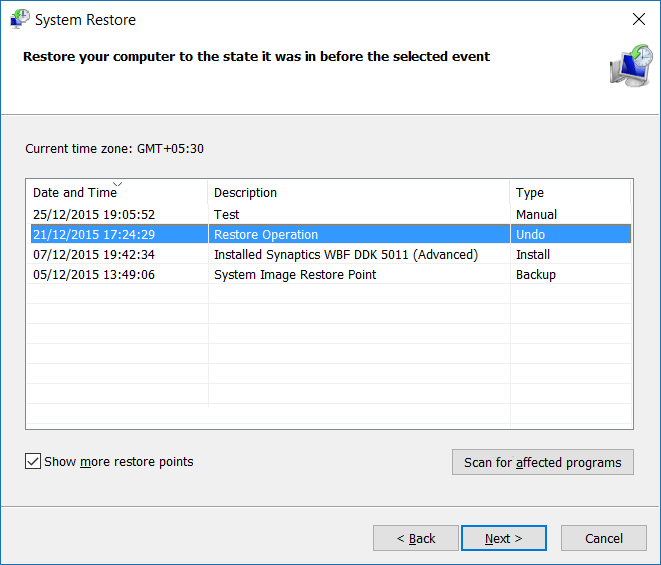
If you created a Windows restore point before the Automatic Repair loop occurs, you can perform a system restore to cope with the issue.
Note that performing system restore will overwrite your files on the system C drive, remember to get your data out of the computer first. You can revert to restore data in two reliable ways.
Here are the steps:
Step 1. On the Automatic Repair blue screen, choose "Advanced options".
Step 2. Navigate to "Troubleshoot" > "Advanced Options" > "System Restore".
Step 3. Choose a restore point and click "Next" to restore your computer to a healthy state.
Step 4. Once the restore process is complete, restart your computer.
How to Fix Preparing Automatic Repair Loop with Black Screen
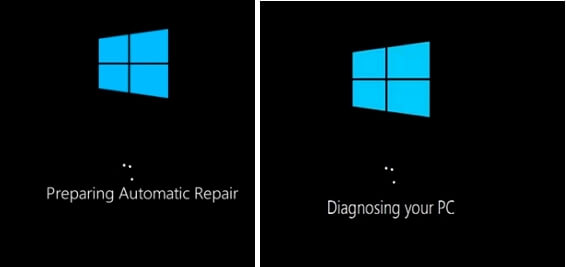
When stuck on the "Preparing Automatic Repair/Diagnosing your PC" black screen, the computer screen stays black after preparing for an Automatic Repair, indicating a potential issue that needs to be addressed.
Here are some fixes that can help you out:
- Fix 1. Perform a Hard Reboot
- Fix 2. Boot into Safe Mode
- Fix 3. Disable Automatic Repair
- Fix 4. Refresh or Reset PC
- Fix 5. Fresh Install or Reinstall Windows 10
Fix 1. Perform a Hard Reboot
If your computer is stuck on a black screen with a message saying "Preparing Automatic Repair", try a hard reboot first. A hard reboot is when you manually restart your computer by pressing the power button, rather than using the usual operating system controls.
Step 1. Press and hold the power button on the computer until it shuts down.
Step 2. Afterward, repress the power button and start the computer.
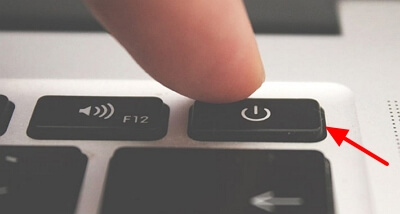
Step 3. Check and see whether the issue persists.
Fix 2. Boot into Safe Mode
Windows Safe Mode is a diagnostic mode that allows you to troubleshoot and fix system-related issues by uninstalling incompatible software/drivers, deleting problematic files, and removing viruses, among other things.
If your computer is stuck on the "Preparing Automatic Repair/Diagnosing your PC" screen or the screen goes black and stops responding, you can try running the PC from a Windows installation CD/DVD and booting into Safe Mode to resolve the issue.
If you don't have an installation disc, you can create a Windows installation media by following the Microsoft guide to create a Windows Installation Media.
Here are the steps to enter Safe Mode:
Step 1. Connect the Windows Installation Media to the computer.
Step 2. Restart PC and Press F2/F11/Del to enter BIOS.
Step 3. Choose to boot from the installation media from the screen, and wait for the program to be loaded.
Step 4. On the Windows Setup window, choose "Next".
Step 5. To access the Startup Settings, follow these steps: Choose "Repair your computer" from the Windows installation menu, then select "Troubleshoot", followed by "Advanced options", and finally "Startup Settings".
Step 6. To enable safe mode on your computer, you can select from three options: Enable Safe Mode, Enable Safe Mode with Networking, and Enable Safe Mode with Command Prompt. These modes allow your computer to start in a limited state, with only the most essential programs and drivers running, which can help troubleshoot and resolve issues.
Step 7. Fix computer issues after entering Safe Mode:
- Run antivirus software to scan for and remove virus
- Delete any files that are causing the issue, such as system files, drivers, or programs that are not needed. This can be done through the Windows Recovery Environment or by booting from a Windows installation media and using the built-in file deletion tools.
- Uninstall suspicious software or drivers
- To update the hardware driver, you can use a CD/DVD or USB that contains the driver. Simply insert the disc or plug in the USB drive, and follow the on-screen instructions to install the updated driver.
Fix 3. Disable Automatic Repair
To fix a computer that won't boot due to Automatic Repair, you can disable it in Windows. This can resolve the issue.
You need to enter Command Prompt like in method 3 to finish the task.
Step 1. Insert or connect a Windows installation disc/media to your PC.
Step 2. Start and boot the computer from Windows installation media.
Step 3. On the Windows Setup window, choose "Next" then select "Repair your computer".
Step 4. Choose "Troubleshoot" > "Advanced Options" > "Command Prompt".
Step 5. Type bcdedit /set {current} recoveryenabled No and hit Enter.
You can also delete problematic files using the command line. To do this, navigate to the Windows\System32\LogFiles\Srt directory by typing "C: cd Windows\System32\LogFiles\Srt" and then delete the SrtTrail.txt file.

If you see a message saying "Critical Boot file c:\windows\system32\drivers\vsock.sys is corrupt", go to the Command Prompt, navigate to the location "c:\windows\system32\drivers\", and enter the command "del vsock.sys" to delete the corrupted file.
Step 6. Type exit to close Command Prompt and restart the computer.
Fix 4. Refresh or Reset PC
If you're stuck in an endless loop of 'Preparing Automatic Repair', Microsoft recommends refreshing or resetting your PC directly, bypassing the usual troubleshooting steps.
NoteRefreshing or resetting your PC can result in serious data loss, so it's crucial to back up your important files and data before proceeding. Don't forget to get your data off the computer first to avoid losing your precious memories, documents, and other valuable information.
Here are the steps:
Step 1. The 'Preparing automatic repair' window will appear. Press and hold the Power button for three seconds, then release it.
Force to shut down the machine.
Step 2. After 2-3 reboots, the system will automatically enter the boot repair page.

Step 3. To resolve the issue, select the "Troubleshoot" option from the start menu, followed by "Refresh PC or Reset PC".
Follow the on-screen instructions to complete the resetting process:
To troubleshoot the issue, restart your browser, clear its cache and cookies, and check if the problem persists. If so, try using a different browser or device to access the repair page.
Fix 5. Fresh Install or Reinstall Windows 10
If issues related to Automatic Repair in Windows persist, consider reinstalling Windows 10 on your computer as a last resort.
You can either use Windows installation media to reinstall Windows 10/8.1/8 or download the latest Windows 10 update to fresh install Windows 10 on your PC.
- Windows 10 20H2 October Update Rolls Out:
- Microsoft is making the newest Windows 10 October Update available for mainstream users to install, starting October 20.
- If you haven't received it yet, you can manually download it from a variety of channels.
- To install the latest Windows 10 20H2 update, click on the "Download Latest Windows 10 Update" link from Microsoft's official site.
It's Your Turn, Bring Life Back on Your Computer
This page explains what Automatic Repair is and the causes of the Automatic Repair loop error on Windows 11/10/8.1/8 computers.
If you're experiencing issues with your PC not booting, I recommend following a complete guide to troubleshoot the problem. If your data is crucial, consider using Qiling bootable data recovery software to extract your data from the unbootable PC before proceeding.
If you're experiencing a blue screen "Automatic Repair" or a black screen "Preparing Automatic Repair" error, you can try the above fixes based on your situation. The fixes may vary depending on whether you're having a blue screen or a black screen error, so be sure to tailor your approach accordingly.
To ensure your computer's safety, we recommend creating a system backup image immediately. This will serve as a lifesaver and allow you to restore your computer to its previous state in case of a crash or death. It's a simple yet crucial step to take now to avoid potential future headaches.
Related Articles
- How to Fix Recuva Deep Scan Stuck or Frozen
- How to Lower Disk Usage in Windows 10 from 100% to ...0%
- (3 Ways) How to Recover Deleted Photos from Computer/External Hard Drive
- Hard Drive Not Showing Up or Detected in Windows? Learn How to Fix
- Four Options: How to Recover Lost Data from Hard Disk for Free
Have been confused about how to recover lost data from hard disk? Don't worry, we'll give you four options to retrieve your last data back in this post. - How to Recover Lost Word Documents in Windows?
If you've lost a Word document, don't worry - there are ways to recover it. You can recover unsaved, deleted, or corrupted Word documents using various methods outlined on this page. Additionally, you can also find the best data loss prevention software for Windows to help prevent future data loss incidents.