[Solved] 2018-11 Update For Windows 10 Version 1803 For X64-Based Systems (Kb4023057) – Error 0x80070643
Fix Windows update error 0x80070643 with effective ways:
| Workable Solutions | Step-by-step Troubleshooting |
|---|---|
| Fix 1. Retry Windows Update KB4023057 | Uninstall and retry KB4023057 update. Click "Start" and go to "Settings". Choose "Apps", find KB4023057...Full steps |
| Fix 2. Disable Antivirus Software Temporarily | Your antivirus software can be interfering with the apps or Windows Update, resulting in 0x80070643...Full steps |
| Fix 3. Run SFC Tool | Access CMD (Command Prompt) as administrator. Input sfc/scannow to scan...Full steps |
| Fix 4. Run DISM Command | The DISM command lines also can fix a corrupted file system that leads to a Windows update error...Full steps |
| More Useful Methods | Fix corrupted update database; install the latest .NET Framework; run Windows Update Troubleshooter; update Windows defender signature...Full steps |
Windows 10 KB4023057 has been re-released, but it's causing installation failures on some devices, with error 0x80070643 appearing in the process.
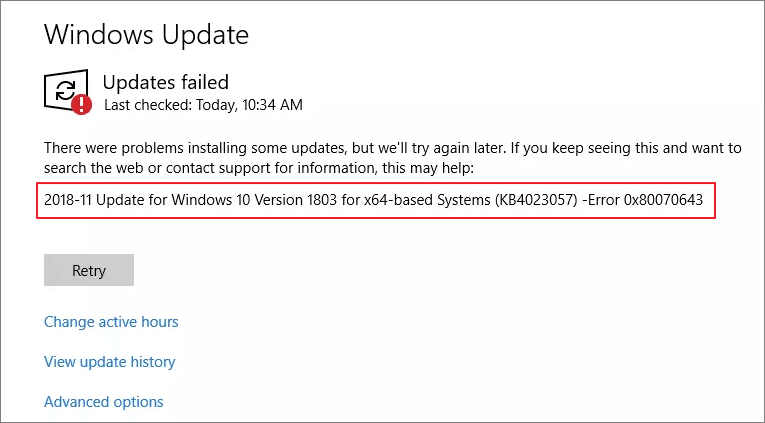
Windows 10 KB4023057 is an update that keeps devices running the April 2018 Update or older up-to-date, and enhances the dependability of Windows Update, but it can also change system settings and configurations.
To resolve the 2018-11 update for Windows 10 version 1803 for x64-based systems (KB4023057) error 0x80070643, you can try resetting the network and freeing up enough space to handle update issues. This may resolve the problem.
Fix 2018-11 Update for Windows 10 Version 1803 For X64-Based Systems (Kb4023057) – Error 0x80070643 in 8 Ways
Several effective approaches are most likely to be used to resolve the issue with the Windows 10 upgrade for x64-based devices. Pay close attention to the approaches and procedures outlined below.
Fix 1. Retry Windows Update KB4023057
To resolve the problem 0x80070643, it may be necessary to reinstall the update KB4023057 to fix the issue that occurs when updating Windows 10, specifically for Windows 10 version 1803 x64-based devices.
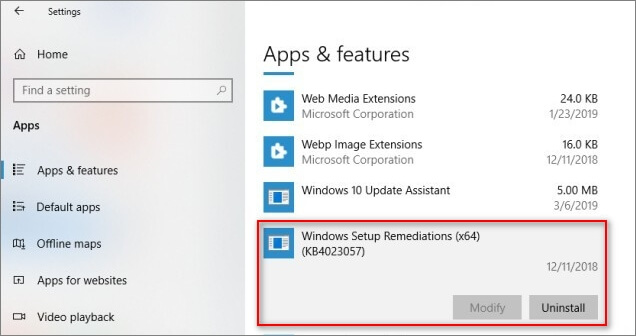
Uninstall the KB4023057 Update
Step 1. To access the "Settings" menu, click on the "Start" button.
Step 2. You must now examine the "Apps" section.
Step 3.To uninstall the KB4023057 update, search for it in the Windows search bar, and then right-click on the result to select "Uninstall" from the context menu. This will remove the update from your system.
To repeat the Windows update procedure, follow these steps: Start by opening the Settings app on your Windows device, then click on the "Update & Security" option. From there, select the "Windows Update" tab and click on the "Check for updates" button.
Retry the KB4023057 Update
Step 1. Click on the "Start" button and then choose "Settings".
Step 2. Choose "Updates & Security".
Step 3. After deleting the KB4023057 update, reinstall the update, and try again.
If the problem you are experiencing continues, you can want to try the following method.
Fix 2. Disable Your Antivirus Software Temporarily
If your antivirus software is interfering with Windows Update or apps on your computer, it may be causing the 0x80070643 error message. Try temporarily removing your antivirus program to see if it resolves the issue.
To troubleshoot the issue, disable all of the antivirus program's functionality, and then check if Windows Update can update your system regularly. This will help determine if the antivirus program is interfering with the update process.
Step 1. Start by selecting Start from the Windows Start menu.
Step 2.To access Windows Security, press the Enter key on your keyboard. This will allow you to continue with the process.
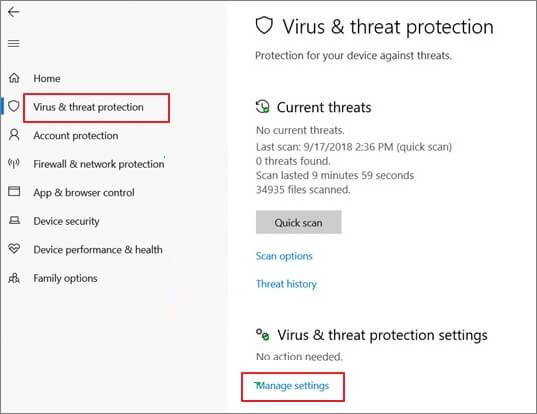
Windows Security
Step 3. To protect your computer from viruses and threats, select "Virus & threat protection" from the drop-down menu on the left action bar.
Step 4. To manage virus and threat protection settings, go to Virus and threat protection settings and select "Manage settings".
Step 5. To temporarily disable Windows Defender Antivirus, select the toggle button under Real-time protection from the drop-down menu.
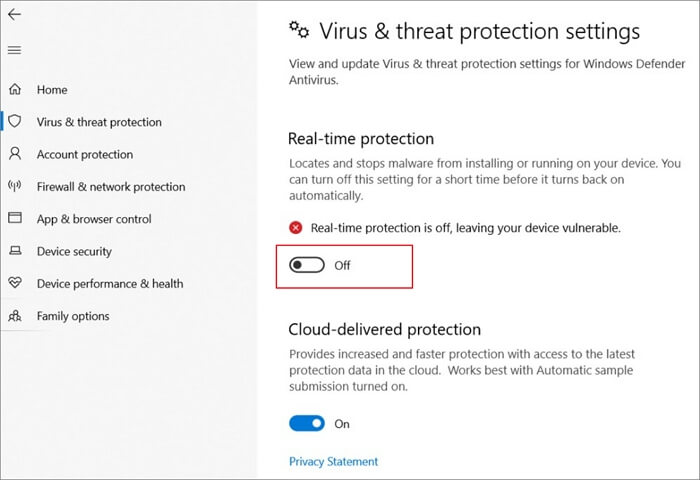
Step 6. If you are prompted to confirm the change, select "Yes" and verify if the issue.
Step 7. To turn Windows Defender Antivirus back on, click the toggle button a second time.
Step 8. If real-time protection is not manually activated, it will automatically turn on the next time the machine is restarted.
Fix 3. Run SFC to Fix Corrupted System Files
To repair damaged files on your computer, the SFC Scan Command scans system-protected files from Windows and can fix Error 0x80070643.
To run the SFC Scan command on your computer, you can follow these steps: Open the Command Prompt as an administrator, type the command "sfc /scannow" and press Enter, then wait for the scan to complete and any corrupted system files to be replaced. This process may take some time to finish, and the system will automatically reboot to apply the changes.
Step 1. You can access the Command Prompt in Windows by pressing the Windows Key + X combination. This will open a menu with several options, including Command Prompt.
Step 2. To scan your computer for corrupted system files, execute the command "sfc /scannow" and press Enter. This will initiate the System File Checker (SFC) tool, which will scan and replace any corrupted system files with their original versions.
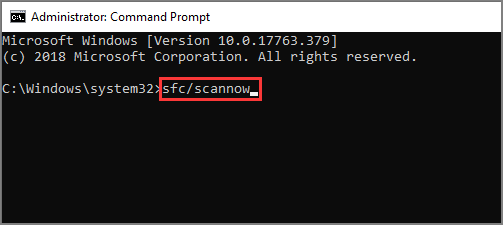
Step 3. The corrupted files on your computer have been removed, and your PC should now be free from any issues caused by them. The procedure has completed successfully, and you can now use your computer without worrying about the corrupted files affecting its performance.
Fix 4. Run DISM Command
The Dism.exe command-line utility can be used to support Windows images. This utility allows users to install, uninstall, and configure Windows features, as well as service packs and updates.
Step 1. To find the Command Prompt, type "cmd" into the Search box on your taskbar. This will open the Command Prompt window, where you can type commands to execute tasks.
Step 2. Start the program using the command prompt as an administrator.
Step 3. Type the following command to complete the task: dism.exe/cleanup-picture/restorehealth.
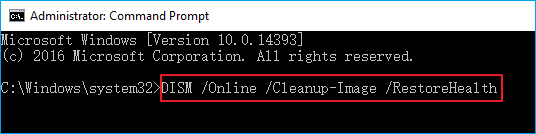
Step 4. You can let the computer run its process in the background while you do something else, freeing up your time to focus on other tasks. This approach is especially useful when working with large files or complex processes that take a significant amount of time to complete.
Fix 5. Fix Corrupted Update Database with Command Prompt
Windows may continue to apply the same update repeatedly, resulting in corrupted files being stored on your computer's hard drive. To resolve this issue, the following instructions will help check various paths and delete the damaged files that have been stored there in the past.
We're planning to modify the software distribution folder, which may be causing the Windows 10 update for x64-based devices (KB4023057) to malfunction.
Step 1. Search for CMD (Command Prompt) and run it as administrator.
Step 2. Type each of the instructions in the following order.
net stop wuauserv
net stop cryptSvc
net stop bits
net stop msiserver
Ren C.\Windows\SoftwareDistribution SoftwareDistribution.old
Ren C.\Windows\System32\catroot2 Catroot2.old
net start wuauserv
net start cryptSvc
net start bits
net start msiserver
Important Note:Please try each instruction individually, followed by the enter key, to avoid rendering yourself impotent. Do not copy and paste all the instructions at once. Instead, take your time and execute each one separately, allowing the system to process each command before proceeding to the next.
Fix 6. Install the Latest .NET Framework
If you're experiencing issues with the Net Framework and getting an error message, you can obtain a repair tool to fix the problem. To do this, you can follow the instructions provided to download and install the tool, which will help you resolve the error and get the Net Framework working properly again.
We will run the Net Framework to hopefully resolve the issue, and if that doesn't work, we will use the Net Framework repair tool. The Net Framework was also installed on the Windows 10 system to address any potential problems.
Step 1. The.Net Framework can be obtained from the Microsoft website.
Step 2. Run the .NET Framework repair tool, accept the terms, and install it.
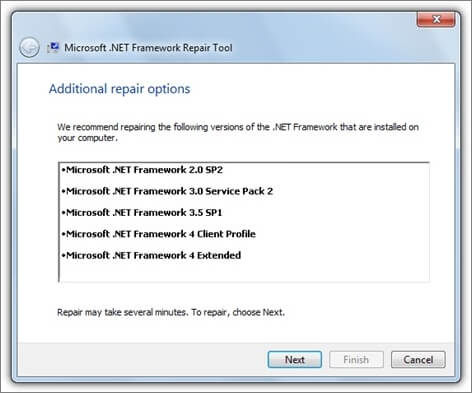
Note. Gathering a large number of logs can help identify the source of an issue, potentially revealing the underlying cause of the problem.
In that case, the issue is likely due to the fact that the installation process has not been completed. To resolve this, you can try reinstalling the software or checking if the installation process was interrupted.
Fix 7. Run Windows Update Troubleshooter
To run the Windows troubleshooter, go to Settings > Update & Security > Troubleshoot problems. Click on the type of issue you're experiencing, and then follow the prompts to run the troubleshooter. If the troubleshooter can't resolve the issue, you can try restarting your computer or seeking additional help from Microsoft.
Step 1. Troubleshoot can be found by searching for it. Click "Additional troubleshooter".
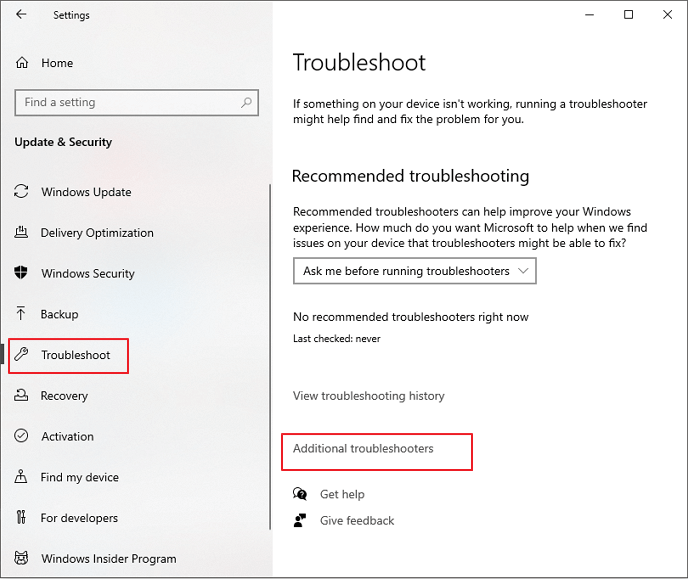
Step 2. Find Windows Update and choose "Run the troubleshooter".
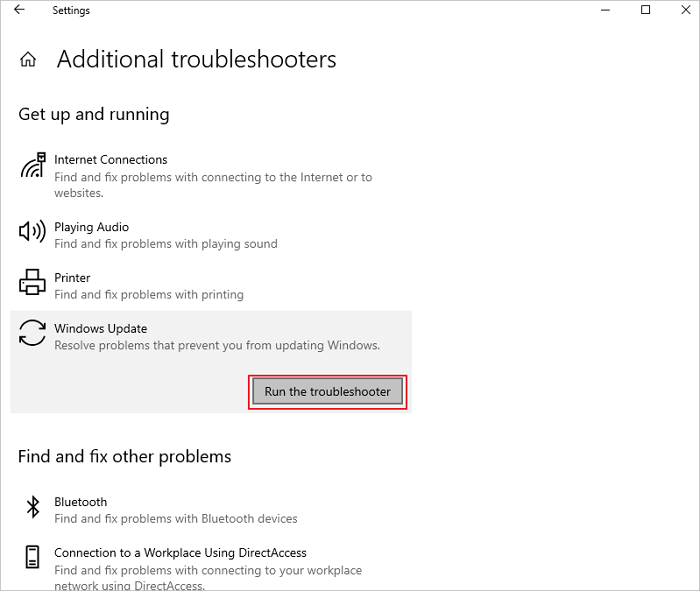
Note. The Windows Update troubleshooter will identify and attempt to resolve any errors that occurred during the installation of Windows updates, potentially resolving the issue. If it doesn't, alternative options will be suggested for further investigation and correction.
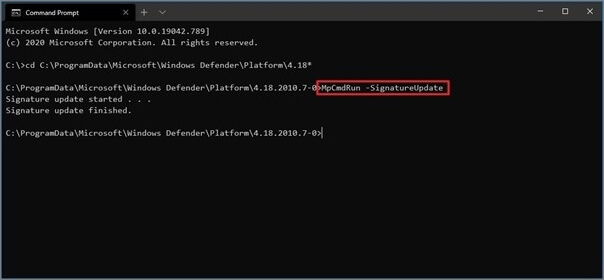
Fix 8. Updating Windows Defender Signature
To update Windows Defender Signature, you can follow these steps.
Step 1. Run CMD (Command Prompt) as administrator.
Step 2. This command is used to clean out all of the corrupted signatures that have been stored on the computer system. It removes any invalid or damaged digital signatures from the system, freeing up space and improving overall system performance.
"%ProgramFiles%\Windows Defender\MPCMDRUN.exe" -RemoveDefinitions -All
Step 3. To download and install the newest Windows Defender signature update, you need to use this command.
Note. To update the Windows Defender signature, you can run a command on a command prompt. First, delete the existing signature by running the command `ren %windir%\System32\drivers\StorSvc\StorSvc.
"%ProgramFiles70\Windows Defender\MPCMDRUN.exe" -SignatureUpdate
"%ProgramFiles%\Windows Defender\MPCMDRUN.exe" -SignatureUpdate –MMPC
How to Recover Lost Data Due to Windows Update
If you experience data loss due to a Windows error or installation, we offer a reliable software solution to help you recover deleted data. Deep Data Recovery Free is a unique file recovery program that can assist you in retrieving lost files.
The Deep Data Recovery can be used to recover data from various storage devices that have been deleted or erased, including hard disk drives, solid-state drives, SD cards, USB flash drives, and more. Additionally, it can repair corrupted files after recovery, such as fixing broken MP4/MOV videos and repairing corrupted documents and pictures.
Step 1. Run Deep Data Recovery on your computer. Select the file types you want to recover and click "Next" to begin the process.

Step 2. To recover lost files, first select the drive where the files were lost, then click on the "Scan" button. If the lost files were on an external storage device, ensure it is connected to the computer before proceeding.

Step 3. The software swiftly scans deleted files, then conducts a deeper scan to locate additional lost files. Once the scan is finished, users can apply the "Filter" feature to quickly narrow down specific file types.

Step 4. To preview and recover files, click the "Preview" button or double-click on a file to view its contents. Select the desired files, click "Recover," and choose a new safe location to save them.
The Bottom Line
We have identified the most effective methods to resolve the "2018-11 update for Windows 10 version 1803 for x64-based systems (kb4023057) - error 0x80070643" issue on Windows PCs.
We believe that any one of these techniques would function for you, and you'll be able to download and upgrade your Windows system. If you're still having issues, let us know, but we'd like to suggest using Deep Data Recovery to recover your lost files after solving the problem.
Related Articles
- PhotoRec Review: Pros, Cons, Alternatives
- Windows 11 ISO Download Full Version 64 Bit or 32 Bit
- Qiling Price | Hard Drive Data Recovery Cost
- M.2 Not Recognized? See How to Make Your M.2 SSD Show Up in Windows
- Free Download Bad Sector Repair Tool - Flobo Hard Disk Repair
Flobo Hard Disk Repair is developed for hard drive bad sector repair. No matter your hard drive is corrupted, damaged, or dead due to bad sectors, you can rely on this tool. While Flobo Hard Disk Repair would not recover hard drive data, you may download Qiling hard drive recovery software to recover data before doing the repair. - Folder Is Not Accessible Access Is Denied
If you're experiencing issues with accessing files and folders in Windows 10/8/7, such as “Folder is not accessible. Access is Denied” errors, don't worry!