Fixed: Recent Documents Not Showing in Word 2013 2016 on Windows 10/8/7
How do I find recent documents in Word
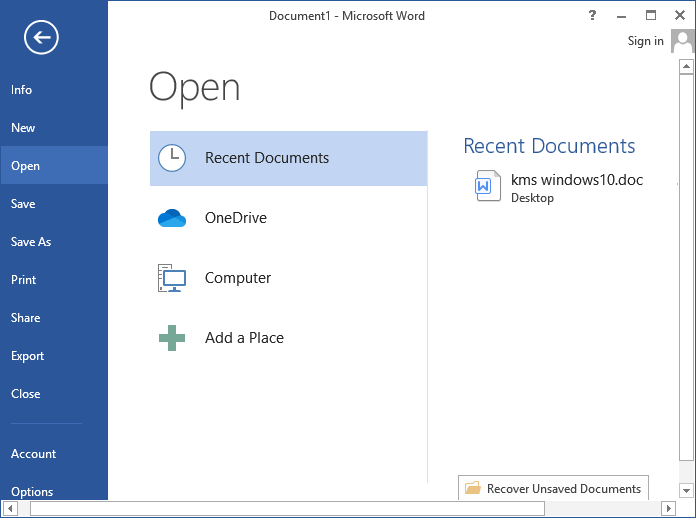
The recent files list is not appearing when you open the File > Open option in Microsoft Office Word on Windows 10.
The Excel, Notepad, and PowerPoint are all fine, whereas the Word 2016 is not showing recent documents anymore. I don't know what happened and I need help to restore the disappeared recent list so that I could continue using this function again."
| Workable Solutions | Step-by-step Troubleshooting |
|---|---|
| Method 1. Sign In with MS Account | Open a blank Word file > Sign in with email > Enter your password...Full steps |
| Method 2. Disable and Re-enable Recent Documents | Disable Recent Documents > Open Advanced feature > Set the number...Full steps |
The Recent Documents option provides quick access to saved Microsoft Office documents, such as Word, Excel, and PowerPoint files, helping users locate and access them when needed.
Some MS Office Word users have reported that the Recent Document option may not appear in the Word application. This issue can be caused by various factors, and it can be resolved by checking the Word options, resetting the Word settings, or reinstalling the Word application. To recover the Recent Document option, users can try checking the Word options, resetting the Word settings, or reinstalling the Word application.
Why is recent documents list not showing in Word
The recent documents list in Windows may not show up in Word application due to three main reasons. To bring the missing documents back, it's essential to identify the exact cause first. Once you've determined the reason, you can take the necessary steps to resolve the issue and restore the recent documents list.
# 1. Recent Word files were manually removed from the Recent Documents list
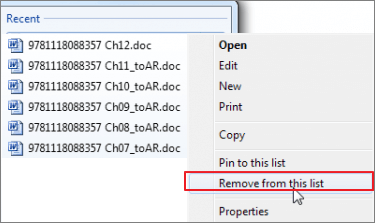
Microsoft Office gives users the option to remove individual files from the recently used file list by selecting "Remove from list". This action only removes the file from the list, not from the entire system, unless the user chooses to delete it.
If you've manually removed or deleted recently opened or edited Word documents from the Recent Documents list, you'll need to locate and open each Word file individually on your local drive or external storage device.
# 2. Microsoft Office Word is logged out with no MS account
If you used to sign in with a Microsoft Office account in Word 2013 or 2016, the app would save all your edits and changes to your MS account.
When you sign out with your MS Account in MS Word, you may lose some recordings, such as the Recent Document list recordings, due to the account-based data storage.
# 3. The Recent Documents list was disabled
Microsoft Office Word's Recent Document list can be disabled by default, but some users may disable it to speed up their computer. To enable it again, users can follow the workarounds available in the next part.
To resolve the issue of recent Word files not showing up in the list, try the following steps: Check if the Word application is running in the background, as it might be consuming system resources and causing the issue. Close the application and then restart it.
How to recover recent documents in Word on Windows 10/8/7
The Recent Documents list in Word 2013/2016 can be brought back with some practical solutions. These methods can also be applied to other Microsoft Office applications like MS Excel, PPT, and Word 2010. By implementing these solutions, you can easily access your frequently used documents and restore the Recent Documents list.
Fix 1. Sign In with MS Account to Make Recent Documents Show Up in Word
If you're logged out of your MS account, try signing in with your Microsoft Office account to see if it brings back the Recent Document list.
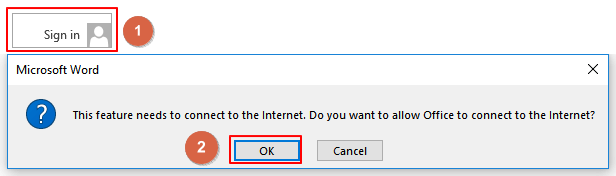
Step 1. To start, open a blank new Word file and click "Sign in" at the top right corner. Select "Yes" to allow Office to connect to the Internet.
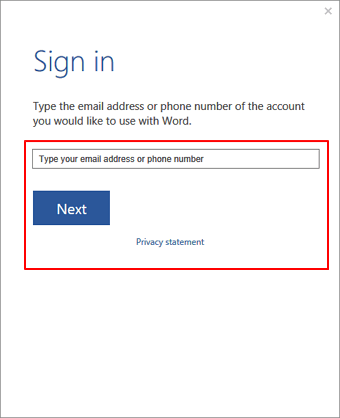
Step 2. To sign in to your account, enter your email address or phone number in the field provided, then click the "Next" button to proceed with the sign-in process.
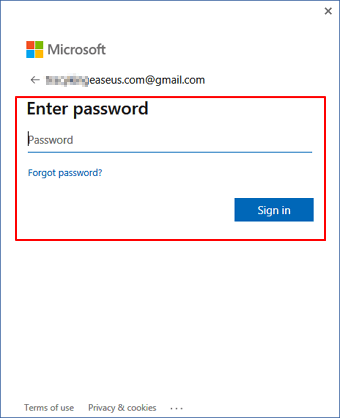
Step 3. To log in to your Microsoft account, enter your password and click the "Sign in" button.
Step 4. Now, you can open a new Word file and go to File > Open > Check the Recent Document list under Open.
If recent Word files show up on the list, you can directly access and open them through this list. If nothing appears, follow the next fix to enable the Recent Documents list feature.
Fix 2. Disable and re-enable Recent Documents feature
If the Recent Document feature is disabled, you won't be able to view anything under the Open column in MS Word 2013, 2016. To resolve this issue, first disable the Recent Document feature, then re-enable it with new settings in Word, which should allow you to view the Open column again.
Step 1. Disable Recent Documents feature in Word
1. Open Word 2013/2016, click File -> Options -> Advanced.
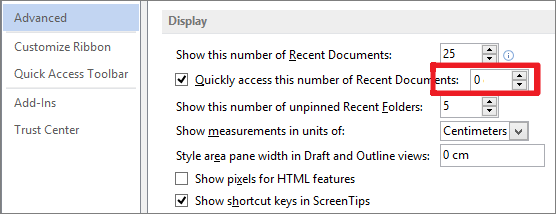
2. Under Display, set "Show this number of Recent Documents" to "0" and uncheck the box of "Quickly access this number of Recent Documents".
Step 2. Re-enable Recent Documents in MS Word
1. To access the Advanced features in Word, open a new Word document, navigate to the File tab, select Options, and then click on Advanced.
2. Set the number "0" to "10" "15" "25" or other numbers as you like next to "Show this number of Recent Documents" to control how many recent documents are displayed. If set to zero, no recent documents will be shown.
3. Check the box of "Quickly access this number of Recent Documents" and change the number "0" to "10" "15" "25" or other numbers as you like.
Step 3. Click "OK" to keep all the changes, restart the Word application.
After the software update, you can open a new Word file, go to File > Open > Recent Documents to check your missing Word files from the list.
Bonus Tip: Restore Missing or Lost Word Documents
After making Word document files show up in the Recent Documents list, you can quickly access and open your files through this list. If MS Word doesn't bring up your desired Word file, try searching the document name on your PC or check the Recycle Bin to see if you can find the file.
If a Word file is not found, it may be lost or missing, and the best option is to use reliable Office file recovery software to recover the lost document.
Qiling file recovery software is able to help recover lost files in just 3 steps: scanning, selection, and recovery. It can assist in retrieving files regardless of the reason for their loss.
Step 1. Select file types and click "Next" to start
Launch Deep Data Recovery. Select the file types you want to recover and click "Next" to proceed with the recovery process.

Step 2. Choose the Word file location
Select the drive or a specific folder you want to scan and click the "Scan" button.

Step 3. Locate your Word files
The software will immediately start scanning all lost data on the selected drive, and after the scan, you can click the "Documents" option in the left panel, choose "Word" from the category bar, and then click "Preview".

Step 4. Recover Word files
After previewing the lost Word files, select the desired files and click "Recover" to retrieve them. Next, choose a folder to save the recovered Word files.
Further Word FAQs
On this page, we provide fixes for two common issues with Word 2013 and 2016: getting Recent Documents to show up, as well as a bonus tip on how to recover lost or deleted Word documents on your computer.
We gathered some frequently asked questions about the MS Word document. You may find a desired answer or satisfying solution toward your issues if you continue reading.
Question 1: How do I find my recent documents in Windows 10?
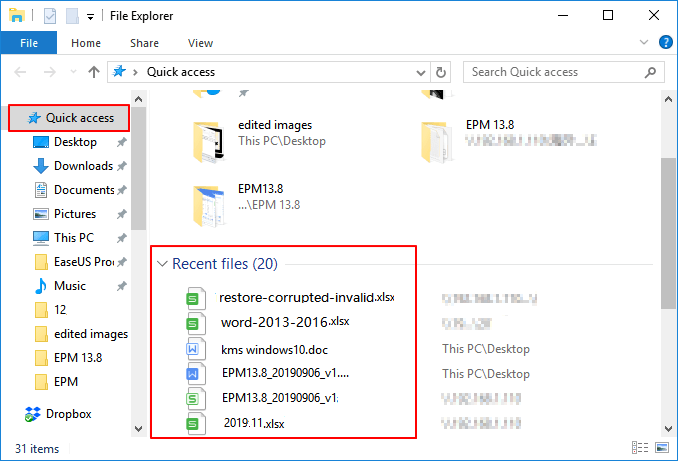
Answer: The recent documents option has been removed from Windows 10. However, you can still access all your recent files via Quick access on your PC.
To view recently accessed files in Windows, press the Windows key + E to open File Explorer, select "Quick access" from the left panel, and check the list of recently viewed files or documents under "Recent files".
Question 2: How do I find recent documents in Word?
What is the Recent Documents list in Word?
You can simply click the document to open it. If you don't see anything below the Recent Document list, try the provided solutions on this page to fix it.
Question 3. How do I recover an unsaved Word document?
You can restore an unsaved Word document by relaunching Word, going to File > Open, and clicking "Recover Unsaved Document". Then, select the unsaved file and save it as .doc or .docx on another secure location.
If you're looking for ways to recover an unsaved Word document, you can try using the AutoRecover feature in Word, which can automatically save your work at set intervals. You can also check the Word Temp folder for a temporary copy of your document, or use a third-party recovery tool to scan your computer for lost files.
If you have more questions, try searching the website (https://www.idiskhome.com) or visit the How-To tips page for more solutions.
Related Articles
- How to Recover Unsaved, Deleted, and Lost WordPad Documents in Windows 10/8/7
- How to Recover Deleted Temp Files
- How to Recover Deleted Windows.old Folder in Windows 11/10
- Free | How to Repair Corrupted Excel Files with Excel Repair Tool (.XLS/.XLSX)
- 6 Best Free Disk Drill Alternatives for Mac Data Recovery in 2025
If you're looking for alternatives to Disk Drill, there are six free options available to help you recover deleted, formatted, or lost files from various storage devices, including hard drives, memory cards, USB drives, and digital cameras, on your Mac. - Qiling Free Trial Code: Free Get Deep Data Recovery License Code & Serial Key
Free get Deep Data Recovery with license code, serial number, keygen, torrent to restore deleted, formatted, virus attacked data under all Windows OS. Genuine license code with Deep Data Recovery is available here to help you restore unlimited lost data with ease.