[Tips] AutoSave Is Greyed Out or Not Working in Office, Word, Excel
"The AutoSave feature in Office 2016 is enabled by default. However, if it's not available, it might be due to your organization's policies or the version of Office you're using. If you're using Office 2016, you can try checking the settings in your Excel and Word applications to see if AutoSave is turned off. "
Microsoft users have been experiencing issues with the AutoSave feature not working or being unavailable, causing problems with saving and backing up Office Excel and Word files. Fortunately, reliable methods have been found to fix the issue of the AutoSave switch being greyed out, and to automatically backup Word or Excel files when the AutoSave feature is not working.
Fix AutoSave Is Not Working, Greyed Out or Not available Error Now
If your Office Word or Excel is not working to automatically save files or fail to create temp files for the under-editing document, you can try the following solutions to resolve this issue. Just follow the provided steps to fix the problem and get back to work.
Method 1. Use AutoSave alternative to back up Office, Word, Excel files
If the AutoSave feature isn't working for saving or backing up Word, Excel files on your computer, you can use Qiling Backup to automatically backup your files with just a few clicks.
Qiling Backup can only help with automatic backups of saved Word or Excel documents, but does not assist with auto-saving files that are currently being edited.
If you want to automatically backup target Office files like Word or Excel documents for free, Qiling Backup can help. This free tool allows you to easily install and apply it to backup your Word or Excel files with ease.
Step 1. Launch Qiling Backup and choose "System Backup" on the home page.

Step 2.The system partition will be automatically selected, you only need to choose the installation location.

Step 3.You can save your backup file to a local drive, cloud storage, or network-attached storage (NAS), or even connect an external hard drive to store system backup files.

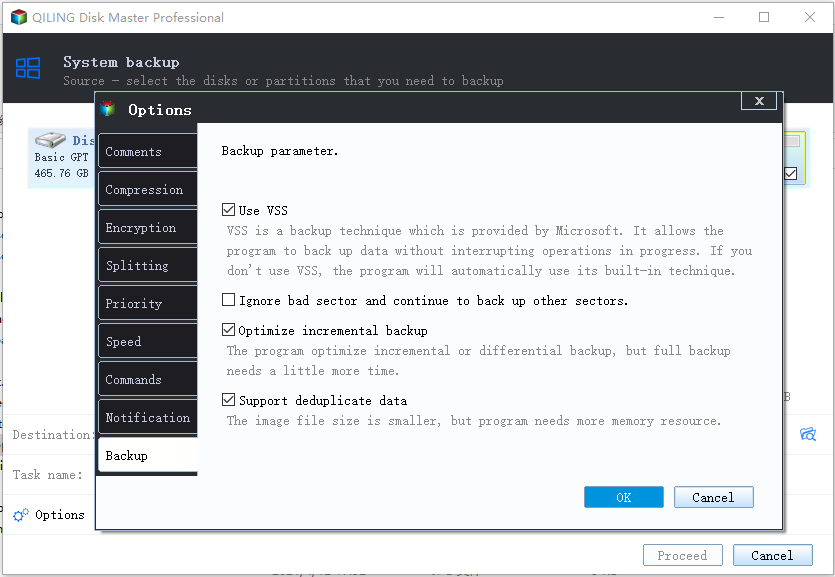
Step 4.You can customize the settings in "Options" at the bottom left, then click "Proceed" to start the process.
After finishing the backup process, you can check the backup status, recover, open, or delete the backup by right-clicking the backup task on the left.
After the first full backup, your Excel, Word, or PPT files will be automatically backed up without any further action required.
Method 2. Try to enable AutoSave feature in Office, Excel, Word
If the AutoSave feature is not working in Word or Excel, try enabling it in the Office application to see if it resolves the issue.
Here we'll take Excel as an example to show you how to enable AutoSave feature in Excel/Word etc Office applications:
Step 1. To open an Excel or Word file and access the "Options" menu, follow these steps: Go to the application, select "File" from the top menu, and click on "Options" from the dropdown list. This will open the Options dialog box, allowing you to customize various settings and preferences within the application.
Step 2. To enable the AutoRecover feature in Word or Excel, go to the "Save" section and check the box next to "Save AutoRecover information every X minutes" to activate the feature.
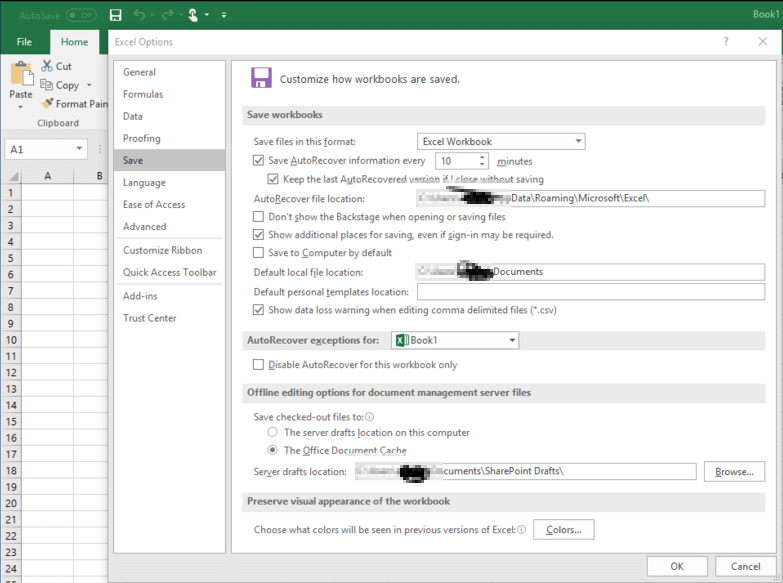
You can save your Excel or Word document every minute on the minute as you wish.
AutoSave will be enabled when you save your file in a cloud service like OneDrive, OneDrive for Business, or SharePoint. To enable the AutoSave feature, follow these tips:
Step 3. To update your Microsoft Office applications, such as Word or Excel, follow these steps: Open the application, navigate to the "File" menu, select "Account", then choose "Update Options" and finally click on "Update Now".
Step 4. To open an Open Office app, click on "File" and then select "Open". From the dropdown menu, navigate to the server location, which can be either OneDrive or SharePoint, to access the necessary files.
Step 5. To open the file directly from OneDrive or SharePoint, simply use a web browser to access the file location, and then click on the file to open it.
After following the steps above, the AutoSave feature should now be enabled for your Word or Excel files.
Method 3. Uninstall and reinstall Office application to repair not working AutoSave feature
The last way to repair the not working AutoSave feature in Office applications is to uninstall and reinstall Office on your PC.
You can uninstall the app from your computer and then redownload it from the Windows Store to install it again on your PC.
Once you've installed the new version of Microsoft Office, you can sign in to your Office account if you have one, and then check if the AutoSave feature is available. This will allow you to save your files automatically to the cloud, ensuring they're always up-to-date and secure.
Related Articles
- How to Recover Deleted Emails from Hotmail
- Microsoft Outlook Has Stopped Working 2016/2013/2010 in Windows 10/8/7
- How to Fix Corrupted Recycle Bin in Windows 10 and Restore Lost Data
- Hard Drive Not Spinning? Causes and Fixes Here!
- How to Fix Windows Boot Manager Boot Failed [Full Guide]
Want to boot your Windows normally? If you're experiencing issues with the Windows Boot Manager Boot Failed error, don't worry! There are ways to fix it, and you can find them here. - 5 methods-Windows Did Not Detect a Properly Installed Network Adapter
There are two major reasons why the WIndows is unable to detect the properly installed network adapters. One is missing driver updates and the other is improperly installed network adapters. The articles discuss fixes to solve both problems and get your network adapters back to work to give out their full potential.