How to Stop Windows 10 Update in Progress in 3 Ways
If you are in the middle of a Windows 10 update and want to stop it, there are three simple methods to cancel the update. You can try stopping automatic maintenance, disabling the Windows Update service, or using the Group Policy Editor (for Windows 10 Pro users).
| Workable Solutions | Step-by-step Troubleshooting |
|---|---|
| Fix 1. Stop automatic maintenance | Open the Windows 10 search box, type "Control Panel" and hit Enter. Click "System and Security" and then click "System".Full steps |
| Fix 2. Stop updates in the Services | Type "Services" in the Windows 10 search box, and the Services application should appear in the search results. Right-click and select "Run as Administrator".Full steps |
| Fix 3. Stop Windows 10 Pro update | To access the Local Group Policy Editor, press the Windows + R keys to open the Run window, then type gpedit.msc and click "OK".Full steps |
Downloading and installing Windows updates automatically keeps your system up to date and secure, as each update includes patches for security. However, some users may want to stop or cancel Windows updates in progress. For Windows 10 users of Home, Pro, and Enterprise, the solutions presented in this article provide answers to their questions.
- How to stop Windows 10 update in progress
- How to stop Windows update in progress once started
- How to cancel an unwanted Windows 10 update
- How to interrupt Windows 10 updates while updating
People are asking how to cancel a Windows 10 update that's being downloaded by default. To do this, follow the methods below, but be aware that disabling or stopping updates will leave your computer vulnerable to attacks, so consider this carefully before taking action.
How to Stop Windows 10 Update in Progress on Blue Screen
If your PC starts installing an update, don't turn it off, even if it's on a blue screen showing progress. Let the update complete, as shutting down your device can cause serious damage to Windows and make your computer unusable. Once the process finishes, you can either uninstall the update or use Windows 10's rollback option to revert to the previous version.
1. Stop Windows 10 Automatic Maintenance to Stop Update
If the Windows 10 update has not been installed, even if you have already downloaded it, you can still stop it instantly. You just need to stop the "maintenance" of Windows itself. Follow the following steps correctly.
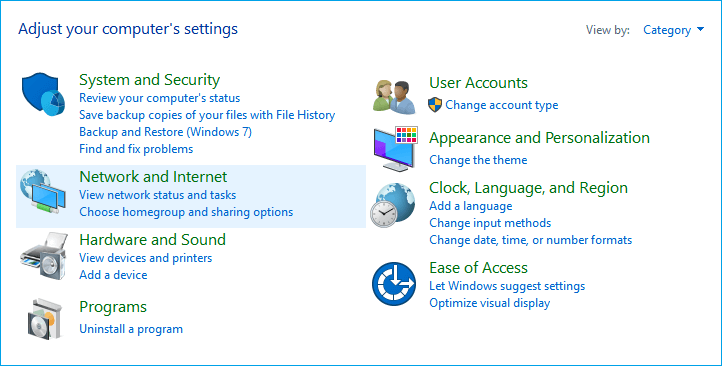
Step 1. To open the Control Panel in Windows 10, simply open the search box, type "Control Panel" and press the "Enter" button. This will take you directly to the Control Panel interface where you can access various settings and tools.
Step 2. Click "System and Security" option.
Step 3. Now, click the "Security and Maintenance" option.
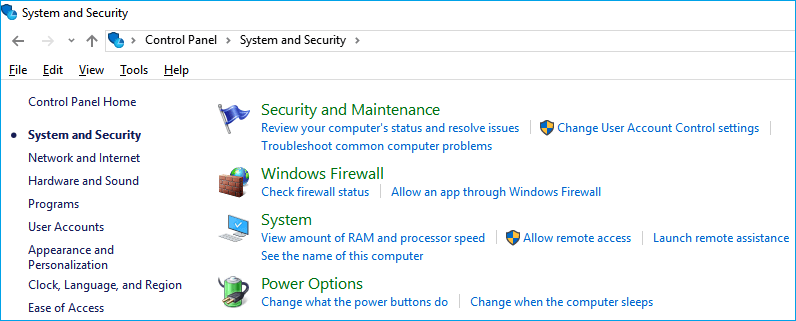
Step 4. To stop Windows 10 updates in progress, click the Maintenance button on the right side, expand the settings, and then click the "Stop maintenance" button. This will pause the updates.

2. How to Stop Windows 10 Update in Progress in Services
To disable Windows 10 updates permanently and stop them from updating at any time in the future, you can turn off Windows automatic updates entirely. This will also cancel any Windows update in progress.
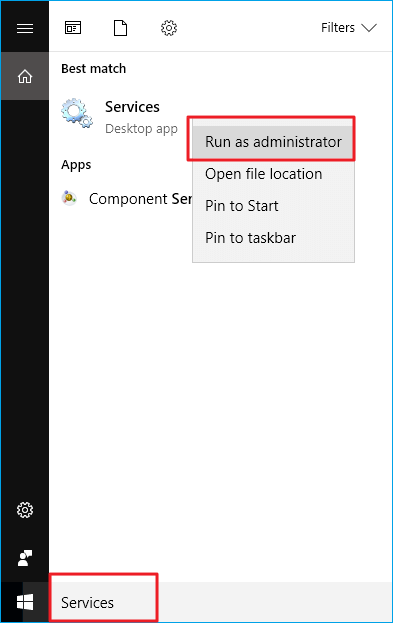
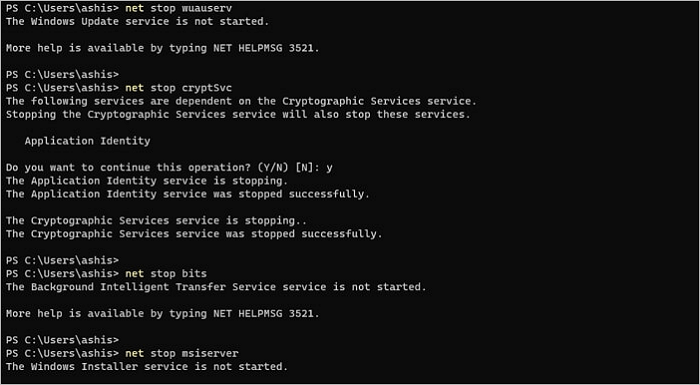
Step 1.To run the Services application as an administrator in Windows 10, type "Services" in the Search box, right-click on the Services application in the search results, and select "Run as Administrator".
Step 2.To check if Windows Update is running in the background, open the Services window, scroll down to find the Windows Update service, and verify its status, which should indicate it is running.

Step 3.To stop Windows Update, right-click on "Windows Update" and select "Stop" from the context menu, or click on the "Stop" link at the top left of the window.
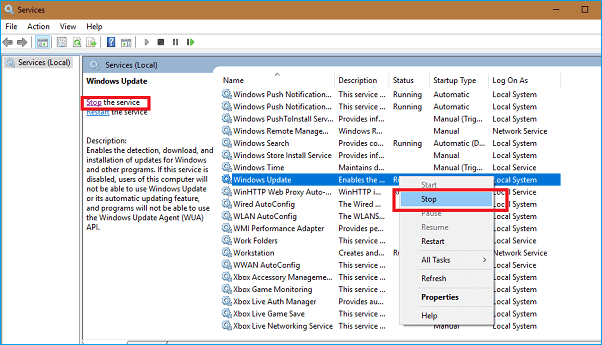
Step 4. Click on the "Stop" button in the top-right corner of the screen.
Since you've canceled the Windows 10 system update, the downloaded update package, which takes up a significant amount of space, is no longer necessary. Fortunately, you can use Qiling partition manager to delete the canceled update files and free up disk space.
3. How to Stop Windows Update in Progress in Windows 10 Pro
For Windows 10 Professional users, there's an additional method to stop Windows 10 updates in progress using the Windows 10 Group Policy Editor, which some users may prefer over other methods to stop and cancel the update. Note that this solution is not available in the Windows Home edition.
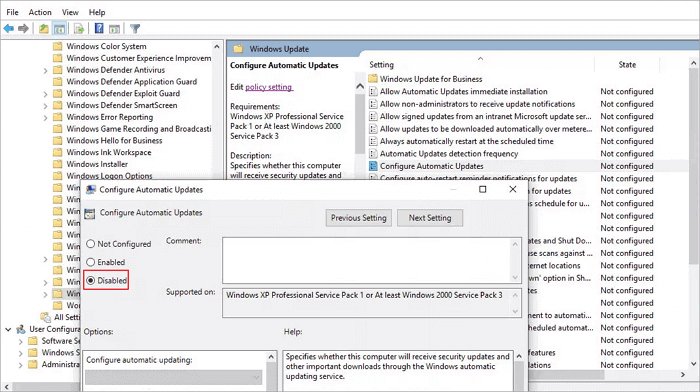
Step 1.To start the Run window, press the Windows key + R, then type gpedit.msc and click OK. This will open the Local Group Policy Editor.
Step 2. Go to "Computer Configuration" > "Administrative Templates" > "Windows Components" > "Windows Update".
Step 3. To disable automatic updates, go to the "Configure Automatic Updates" option, select "Disabled" from the dropdown menu, and then click "Apply" and "OK" to confirm the changes.
Summary:After trying the three methods above, you should have successfully stopped the Windows 10 update in progress. If you need to reverse the steps, you can simply undo them and allow Windows 10 to resume its automatic updates.
People Also Ask
1. How do I stop a Windows Update in Progress?
Here are three ways to stop a Windows update in progress: you can stop the update in service, stop Windows automatic maintenance, or use the Windows 10 Group Policy Editor if you're a Windows 10 Professional user.
2. What happens if you turn off computer during update?
If your computer is already in the middle of installing an update, you can't stop the update process on the blue screen without risking damaging your Windows install and making your system unusable.
3. What do I do if my computer is stuck updating?
If Windows 10 update gets stuck at the "checking for updates" stage, you can try to resolve the issue by stopping the Windows Update service, deleting all files in the "DataStore" and "Download" folders, or starting the Windows Update service from the Command Prompt window.
Bonus Tips: Use Windows 10 Partition Master
The latest Windows system provides a solid foundation for smooth computer performance, and optimizing disk management can significantly boost it. Qiling Windows partition manager software offers a simple way to create, resize, clone, move, merge, and format partitions, making it easier to manage your computer's storage.
A great partition manager provides advanced conversion functions, allowing you to convert a logical partition to primary or primary to logical, FAT to NTFS, or MBR to GPT, and vice versa. With this tool, you can resize partitions effortlessly, making it a valuable asset for daily disk management.
Step 1. Locate the Target Partition.
To extend a partition, locate the target partition and select "Resize/Move" to begin the process.

Step 2. Extend the Target Partition.
To add unallocated space to your current partition, drag the partition panel to the right or left, and then click "Proceed" to confirm the action.

Extra Option: Get Space from Another Drive
If there's not enough unallocated space on your disk, try clicking on a larger partition with sufficient free space and select the "Resize/Move" option.
Drag the partition panel rightward or leftward to shrink it for unallocated space, then click "Proceed" to confirm.
Step 3. Execute Operations to Extend Partition.
To complete the task, drag the dots of the target partition into the unallocated space. This action will allocate the unallocated space to the target partition, effectively resizing it to occupy the newly allocated space.
Then Click the "Proceed" button to keep all the changes.
Related Articles
- How to Recover Your Deleted Firefox Browsing History
- How to Solve Webcam Freeze Up in Windows 10 Error?
- Hard Drive Not Spinning? Causes and Fixes Here!
- 5 Ways to Fix a Corrupted User Profile in Windows 10/8/7
- (All Methods to Fix) Computer Keeps Booting to BIOS
If your computer keeps booting to BIOS, don't worry, this article has got you covered. There are 4 ways to help you solve the issue, and we'll also provide a way to protect your data on the computer. Whether you're a tech-savvy individual or just need some guidance, we'll walk you through the steps to get your PC up and running smoothly again. So, let's get started and fix that pesky BIOS boot loop! - Computer Keeps Crashing When Playing Games - How to Fix?
Have you encountered the computer keeps crashing when playing games error? What to do if the PC continues crashing while gaming? Please read about the best solutions, their steps, and additional safety benefits.