How to Fix Windows Startup Repair Infinite Loop
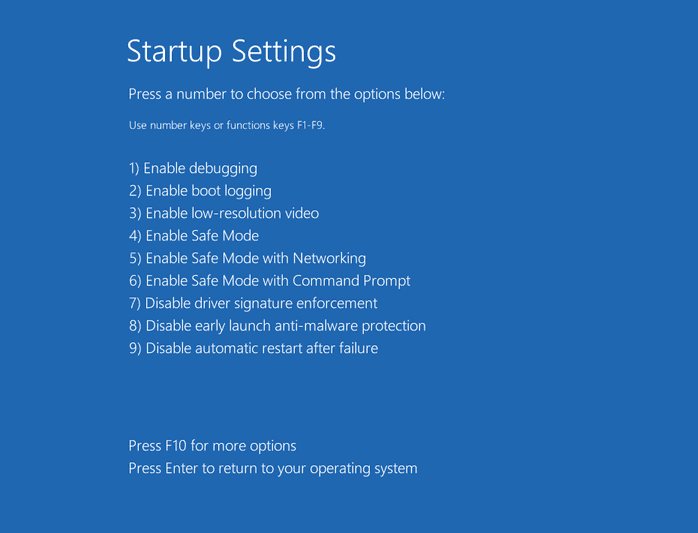
Fix: Boot into Safe Mode
- 1. Insert the disc and reboot the system.
- 2. Press any key to boot from the DVD.
- 3. Choose your keyboard layout.
- 4. Click Repair your computer at the Install now screen.
- 5. Click Troubleshoot.
- 6. Click Advanced options.
- 7. Click Startup Settings.
- 8. Click Restart...
7 Fixes to Stuck in Windows 7 Startup Repair Loop
Your computer is stuck in an infinite loop of Startup Repair, preventing normal booting. Despite multiple attempts, Startup Repair is unable to complete the repair, leaving you unable to access your computer normally. This suggests that the issue may be more complex than a simple repair, and you may need to explore other troubleshooting methods or seek further assistance to resolve the problem.
Follow the fixes to troubleshoot your Windows Startup Repair loop.
| Workable Solutions | Step-by-step Troubleshooting |
|---|---|
| Fix 1. Disable Startup Repair | Restart your computer > wait for your BIOS to complete POST > tapping F8...Full steps |
| Fix 2. Run CHKDSK Command | Boot Windows from the bootable device > navigate to "Repair your computer" option...Full steps |
| Fix 3. Run Bootrec | Open Command Prompt > type those following commands...Full steps |
| Fix 4. Perform System Restore | Boot Windows from the bootable device > click "Troubleshoot > System Restore"...Full steps |
| Fix 5. Delete Problematic File | Access Command Prompt again and enter the following command: cd C:\Windows\...Full steps |
| Fix 6. Restore Windows Registry | In the Windows Boot Options menu, choose "Troubleshoot >Advanced Options"...Full steps |
| Fix 7. Check Device Partition | In the Command Prompt, type "bcdedit" and press "Enter", then find the "device partition" and follow the instructions from there.Full steps |
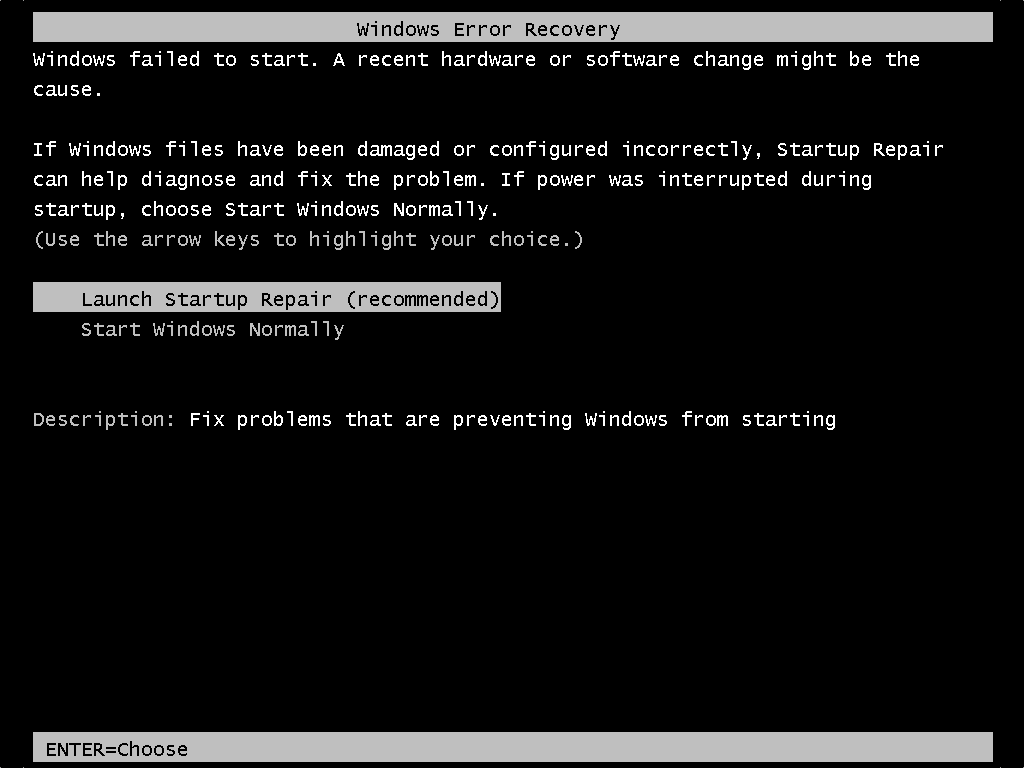
1 - Windows 7 Startup Repair Infinite Loop Error Details
Windows Error Recovery
Windows failed to start due to a recent hardware or software change.
If Windows files have been damaged or configured incorrectly, Startup Repair can help diagnose and fix the problem, or if power was interrupted during startup, choose Start Windows Normally.
(Use the arrow keys to highlight your choice.)
Launch Startup Repair (recommended)
Start Windows Normally
Description: Fix problems that are preventing Windows from starting
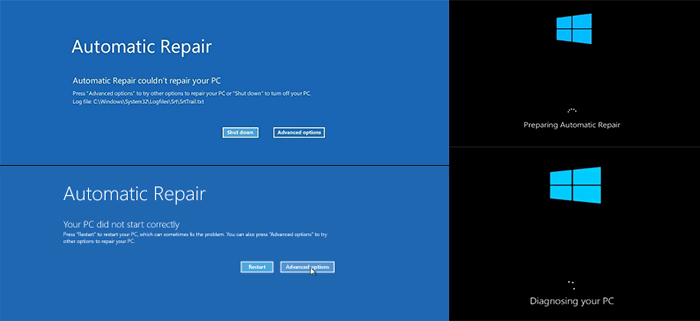
Startup Repair may fail to load, launch, or run and claim repairs have been executed, and your PC will continue to attempt to endlessly start Startup Repair each boot, also known as Automatic Repair in Windows 8, 8.1, and 10.
2 - Startup Repair Error Symptoms
Unexpected PC shutdowns, viruses, malware, driver issues, and damaged BDC settings can all cause Windows startup problems, as can a corrupted boot partition, a Blue Screen of Death, or even a Black Screen of Death on reboot.
The Windows error recovery feature suggests using Start Repair to automatically fix abnormal Windows startup issues. However, when choosing the recommended option, you'll only encounter two facts.
1. Startup Repair can take a while to load or launch due to various reasons such as a large number of system files being scanned or a malfunctioning operating system. This can cause frustration for users who need to access their computer quickly.
2. Startup Repair immediately runs, but the repairing process never finishes.
In both cases, your PC will keep trying to run Startup Repair on each reboot, resulting in an infinite loop of Startup Repair attempts that never resolve the issue.
3 - Troubleshoot Windows Automatic Startup Repair Infinite Loop Error with 7 Fixes
A clean Windows installation is a surefire solution to resolve Windows Startup Repair, which can take forever but results in complete data loss. However, is there an alternative to recovering from an infinitely looping Startup Repair without reinstalling Windows?
We've listed the possible fixes from easiest to most complex, and from safest to riskiest. It's recommended to try them in order of least to most invasive. This approach allows you to address the issue with minimal disruption, while still attempting to resolve the problem.
- Important
- The essential tool for most of the fixing methods:
- The Windows installation media is a bootable USB drive, CD, or DVD disc that corresponds to a Windows installation.
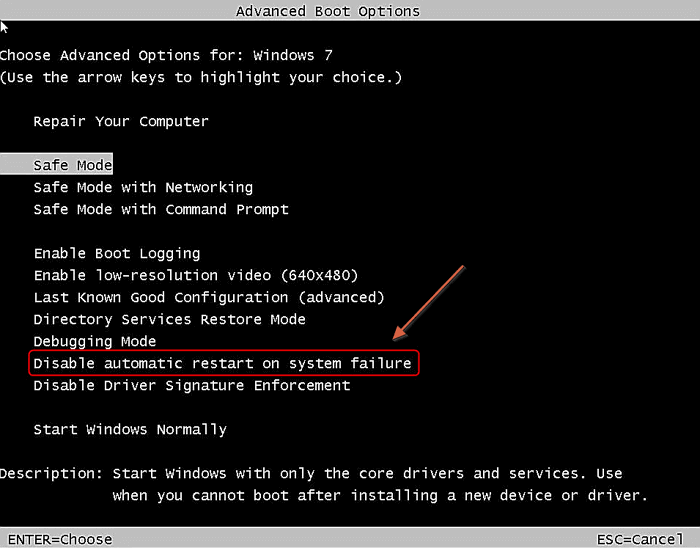
Fix 1. Disable Automatic Startup Repair to Fix Startup Repair Loop
You can try disabling the automatic restart to stop the endless restart, but it may not resolve the boot error itself.
Step 1. Restart your computer.
Step 2. Wait for your BIOS to complete the Power-On Self-Test (POST) process, which will display your manufacturer's logo and/or system information on the screen.
Step 3. Quickly press the F8 key repeatedly until you see the list of boot options.
Step 4. Choose "Disable automatic restart on system failure".
Step 5. Press "Enter" and wait for your PC to boot.
Fix 2. Run CHKDSK Command to Check and Repair Drive Errors
This helps check or even repair the drives to tackle file system corruption.
Step 1. Boot your computer from the Windows 7 installation CD if you're unable to boot from the USB drive.
Step 2. To access the Command Prompt in Windows, navigate to the "Repair your computer" option and select "Command Prompt".
Step 3. To run a disk check on the C drive, open the Command Prompt window, type chkdsk /r c:, and press "Enter" to execute the command. The "/r" option is used to scan the drive for errors and fix them. The "c" represents the drive where Windows is installed.
Step 4. To ensure the disk errors are checked and repaired, click "Y" to allow the CHKDSK utility to run at the next system restart. This will initiate a disk check and attempt to fix any errors found, promoting a healthy system environment.
Run CHKDSK Alternative Tool to Repair Device
Download Qiling CleanGenius and install it on your computer to start checking and refixing file system errors on your device.
Step 1. Click "File Showing" to enter the next step.
Step 2. Choose the target device and check the box for "Check and fix file system error". Then click "Execute" to initiate the repair process for the problematic device.
Step 3. When the fixing process completes, click "here" to open and use your device.
Fix 3. Run Bootrec to Fix Damaged or Corrupted BCD Settings
The startup repair loop can occur due to various reasons, including corrupted system files, faulty drivers, or issues with the bootloader installation or configuration. To resolve this issue, you can try the steps mentioned earlier, which may help resolve the problem and allow your system to boot normally.
Step 1. In the same way open Command Prompt as the second fix did.
Step 2. In the Command Prompt window, type those following commands and press "Enter".
bootrec /fixmbr
bootrec /fixboot
bootrec /rebuildbcd
Step 3. Restart the system and let bootrec repair MBR.
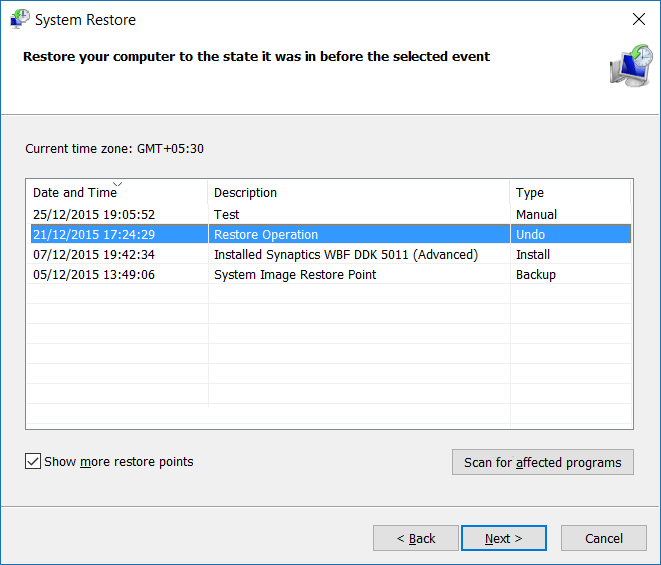
Fix 4. Perform System Restore to SolveWindows Startup Repair Loop
System Protection is enabled by default to help restore your computer to an earlier state, which can fix issues.
Step 1. Boot Windows from the bootable device.
Step 2. Click "Troubleshoot > System Restore".
Step 3. To resolve the Automatic Startup Repair loop error, follow the wizard instructions to select a restore point that predates the date when the error occurred. This will allow the system to revert to a previous state before the issue began, potentially resolving the loop.
Fix 5. Delete the Problematic File to Resolve Startup Repair
Step 1. Access Command Prompt again and enter the following command:
cd C:\Windows\System32\LogFiles\Srt SrtTrail.txt
Step 2. You can see an error message that says "Boot critical file c:\windows\system32\drivers\tmel.sys is corrupt." To resolve this, you can type the following command in the Command Prompt:
cd c:windowssystem32drivers delvsock.sys
If your Windows 10 computer is experiencing issues, try restarting it. If that doesn't resolve the problem, you can try running the System File Checker tool to scan for corrupted system files and replace them if necessary. Additionally, you can try running the DISM tool to check for any corrupted system components and repair them if needed.
Fix 6. Restore Windows 10 Registry to Fix Repair Loop
Step 1. In the Windows Boot Options menu, select "Troubleshoot > Advanced Options > Command Prompt".
Step 2. In Command Prompt, type the following command and then hit "Enter".
cd C:\windows\system32\logfiles\srt\
Change your drive letter according to your needs.
Step 3. Type txt to open the file in notepad.
Step 4. To access and modify system files, you can press "Ctrl + O" and select "All files" from the file type dropdown menu. Then, navigate to the C:\windows\system32 folder, which contains system files.
Step 5. To run the command prompt as an administrator, right-click on the Command Prompt icon and select "Run as administrator". Then, type the command and press the "Enter" key.
cd C:\windows\system32\config
Step 6. To backup Windows system files, you can rename the Default, Software, SAM, System, and Security folders to .bak. This can be done by executing the following commands in the Command Prompt, one by one, and pressing Enter after each command:
rename DEFAULT DEFAULT.bakrename SAM SAM.bak
rename SECURITY SECURITY.bak
rename SOFTWARE SOFTWARE.bak
rename SYSTEM SYSTEM.bak
copyc:\windows\system32\config\RegBack c:\windows\system32\config
Step 7. Restart your PC to check if you have solved the error. If the issue persists, try running a system file checker to identify and replace corrupted system files.
Fix 7. Check Device Partition and Osdevice Partition
If your device partition values are incorrect, you might get stuck in the startup repair loop. To resolve this, you can check the device partition and OS device partition values, and then take steps to correct them and fix the error.
Step 1. In Command Prompt, type bcdedit and press "enter".
Step 2. To ensure accurate device partition and OS device partition values, verify that the partition values are correct and match the intended partition on the device. This involves checking the partition table or using a tool to confirm the correct partition for the OS and device. Ensure that the values are set to the correct partition to avoid any potential issues or conflicts.
Windows is preinstalled on C partition only, and the correct value is C. Enter the following commands and press "Enter" after each one if the value isn't set to C.
bcdedit /set {default} device partition=c: bcdedit /set {default} osdevice partition=c:
To resolve the Windows startup repair loop, you can try booting your PC in safe mode, running a System File Checker (SFC) scan, or using a recovery drive to restore Windows to a previous point when it was working properly. If none of these methods work, you may need to reinstall Windows or seek further assistance from a professional.
Additional Fix - Boot into Safe Mode in Windows 7/8/10
To fix the Automatic Repair loop error, boot into Safe Mode and uninstall recently installed device drivers or software. To do this, you may need the original DVD or USB for your Windows system. If you don't have the installation disc, create a Windows Installation Media. Once in Safe Mode, you can safely uninstall any recently installed software or drivers that may be causing the issue.
Step 1. Insert the disc and reboot the system.
Step 2. Press any key to boot from the DVD.
Step 3. Choose your keyboard layout.
Step 4. To troubleshoot your computer, click on "Repair your computer" at the Install now screen, then select "Troubleshoot" followed by "Advanced options" and finally "Startup Settings".
Windows has a built-in feature that allows users to boot into a limited mode, known as Safe Mode, which can help troubleshoot and fix issues with the operating system. This feature can be accessed by restarting the computer and pressing the F8 key repeatedly until the Advanced Boot Options menu appears, where users can select Safe Mode, Safe Mode with Networking, or Safe Mode with Command Prompt.
How to Recover Data After Fixing Startup Repair Infinite Loop
Users who want to get rid of an endless startup repair loop may need to perform a clean install of Windows, which will result in part of their computer data being lost, or use other fixes like system restore or factory resetting, which also carry the risk of data loss.
You may be able to recover your data using a third-party data recovery tool, such as Deep Data Recovery, which can restore data even after formatting, deleting, or system refreshing. It's worth trying to see if the software can recover your lost data.
Note: To increase the chances of successful data recovery, install the Qiling data recovery software on a separate disk drive, rather than the original one where the files were lost.
Step 1. Launch Deep Data Recovery on your Windows 11, Windows 10, Windows 8, or Windows 7 computer, select the file types you want to recover and click "Next" to start the recovery process.

Step 2. Select the disk partition or storage location where you lost data and click "Scan".

Step 3. This recovery software will scan the disk to find lost and deleted files, and after the scan, you can filter the results by file type.

Step 4.Preview and restore lost Windows files by scanning the PC, double-clicking to preview the scanned files, selecting the target data, and clicking the "Recover" button to save them to a safe spot.
If you're stuck in the Startup Repair loop on Windows 7, there are 7 ways to break the cycle, even without an installation disc. Whether the process is taking forever or you can't stop or cancel it, you can try these solutions to get back on track. Additionally, if you've lost data during the process, you can recover it using Qiling data recovery software once the issue is resolved.
Related Articles
- How to Fix PS4 Cannot Access System Storage Error Code CE-34335-8
- Fix Windows (11/10/8/7) Won't Boot From USB Error
- Find My IP Address on Windows or Mac [2022 Full Guide]
- How to Fix Grayed Out Folders or Files on Mac
- 2022 Aptio Setup Utility Ultimate Guide | How to Access and Fix It
Learn what Aptio Setup Utility is, how to access and configure AMI BIOS settings, fix boot loop errors, and recover data from an unbootable PC using bootable recovery software. - Archive vs Delete: What's the Difference and Which One to Use
This post will explain the Archive and Delete features and highlight their key differences. We'll cover what Archive and Delete mean, and provide a concise list of the main distinctions between the two, making it easy to understand which option is best for your needs.