What Is Windows 10 Kiosk Mode and How to Set It Up
Running multiple programs on a computer can slow it down, but Windows 10 has features to help with that. Kiosk mode is one such feature that restricts the system to a single application for improved performance and security.
Windows 10 Kiosk mode is a feature that allows you to lock down a Windows 10 device to run a single application, restricting access to other features and apps. To enable Kiosk mode, go to Settings > Accounts > Family & other people, and select the "Set up a kiosk" option. From there, you can choose the type of kiosk you want, such as a single-app kiosk, and configure the settings as needed.
What Is Kiosk Mode?
Windows 10's Kiosk mode is a specific method that restricts the system from running multiple programs, allowing only a single program to be executed. This feature enables IT experts or administrative admins to limit the device's processing, effectively locking it down to a single application.
Kiosk mode limits a device's processing to a specific application or program, allowing administrators to make registry changes and gain full control. This method helps lock down the system, focusing on processing a single program and providing a secure environment for specific tasks.
Windows 10 Kiosk mode allows users to perform multiple actions, such as browsing the internet, running specific apps, and more. To set up this mode on your device, follow the discussion of these actions, and we'll guide you through the process of setting up Kiosk mode on your Windows 10 device.
How to Set Up Kiosk Mode in Windows 10?
To set up Kiosk mode in Windows 10, you can restrict the device's processing by allowing users to sign in and run a limited number of Microsoft apps in their user account. This mode will let you control the apps that can be run and the user's access to the device, making it suitable for public or shared computers.
Step 1. To access the Windows settings, tap the Windows key + I keys simultaneously on your keyboard. This will open the Settings app, where you can manage various system settings and preferences.
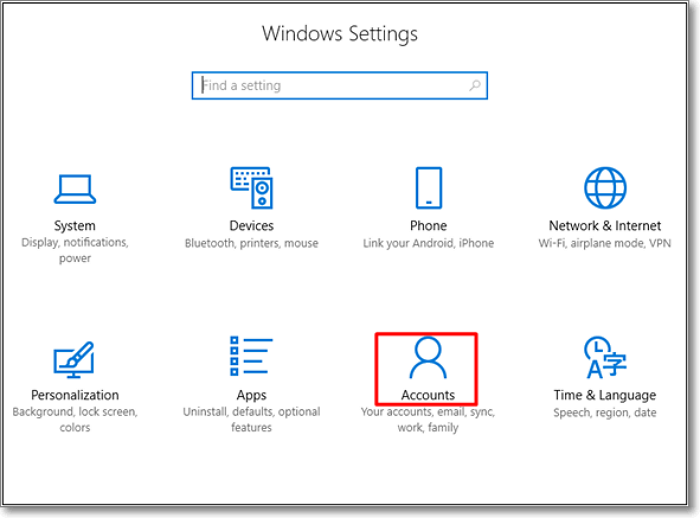
Step 2. Check for the Accounts option and click on it
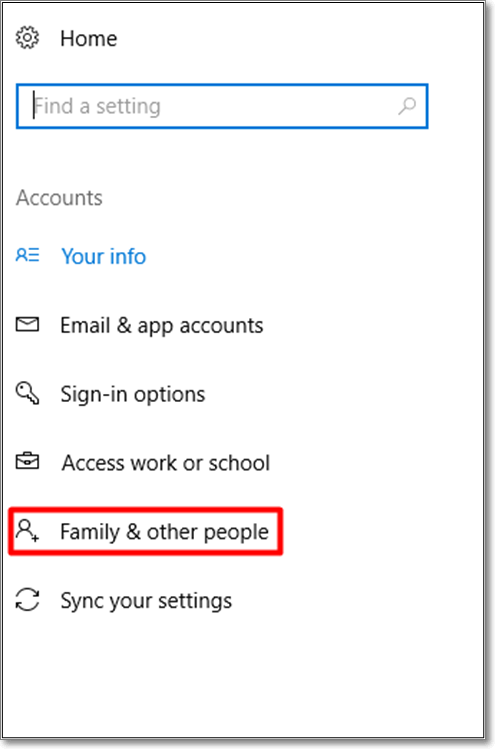
Step 3. To find the Family & other people option, look for it under the main menu, which is usually located at the bottom of the screen. It may be labeled as "Family" or have a similar name, depending on the device or app you're using.
Step 4. To access the Kiosk tab, look at the right navigation bar and check for it.
Step 5. To enable Assigned access, tap on the "Assigned access" option given below the "Kiosk" tab. This will allow you to assign a specific app to run in full-screen mode with limited access to other apps and features.
Step 6. Wait until the next page will be opened
Step 7. Click on "Get started"
Step 8. Set your Kiosk account name properly and tap on the Next button.
Step 9. Select the Microsoft app from the list and click on the "Next" button.
Follow the on-screen instructions to complete the setup process.
How to Turn On Kiosk Mode?
To instantly turn on Windows 10 Kiosk mode, follow these simple steps. It won't take more than a few minutes to complete. You can set it up quickly by following these steps.
Step 1. Go to Settings > Accounts > Family & other people.
Step 2. Click on "Set up" assigned accounts
Step 3. Choose the account that you have created before
Step 4. To add an application to Windows 10 Kiosk mode, follow these steps:
Step 5. Close the tabs and restart the computer
To operate your computer in Kiosk mode, turn on the system and select the app you want to run. Only that application will be accessible, ensuring a focused and secure environment.
How to Turn Off Kiosk Mode?
To get your computer back to normal, simply turn off Kiosk mode. This can be done by following a series of steps, which should be completed one by one.
Step 1. Go to Settings > Accounts > Family & other people.
Step 2. In the Kiosk setup option, look for assigned accounts.
Step 3. To remove access to your account from another user, click on their account and select "Remove access" from the options.
To remove a specific account from Kiosk mode, simply restart your computer and log in using the account details that were previously in Kiosk mode. This will resolve the issue.
FAQs
1. Does Windows 10 pro have kiosk mode?
Windows 10 Pro supports Kiosk mode, which is available in Version 1709 and later operating systems.
2. Can Windows 10 home run in kiosk mode?
Kiosk mode is only available on Windows 10 Pro, Enterprise, or Education editions, not on Windows 10 Home.
3. How do I add a third-party app to Kiosk mode?
To get started, follow the steps mentioned above and then select the app you want to use.
4. How do I open Chrome in Kiosk mode?
To open Chrome in Kiosk mode, go to chrome, click on the manage extension, add the Kiosk app ID in the Manage Kiosk applications box, and click the Add button.
Related Articles
- Windows 11 Taking Forever to Install? Get Complete Guide to Fix Windows 11 Slow to Install Issue
- How to Repair and Use Mac Recovery Disk [Full Guide]
- What Are the System Recovery Options on Windows? [Detailed Description]
- What Is Windows 10 Installation Disc [All You Should Know]
- How to Delete Search Engines on Google Chrome on Windows, Mac, Android, and iPhone
To remove search engines from Chrome, go to the Chrome menu, click on “Settings,” then scroll down to the “Search engine” section, click on the three dots next to the search engine you want to delete, and select “Remove.” - Dish Hopper External Hard Drive Format: What Is the Best & How to Set [Ultimate Guide]
If your DVR isn't recognizing your hard drive, it might be due to the hard drive not being properly formatted for use with the DVR. This guide will help you choose the best format for your Dish Hopper external hard drive, ensuring it works seamlessly with your device.