Windows 11 Taking Forever to Install? Get Complete Guide to Fix Windows 11 Slow to Install Issue
Microsoft's official Windows 11 release has left some users frustrated, as they're stuck in the installation process. Despite meeting the minimum system requirements, some people are experiencing a lengthy installation process, with Windows 11 taking what seems like an eternity to install.
A user on Reddit reported experiencing a frustrating issue with a Windows update, where the installation process took an unusually long time, with only 4% progress after 10 hours. The user started the update at 2 am, expecting a relatively quick process, but was left waiting for an extended period. The slow progress and lack of clear updates on the installation status added to the user's frustration. This experience may resonate with others who have encountered similar issues with Windows updates.
To resolve the issue of Windows 11 being slow to install, you can try some quick fixes mentioned in this post.
| Workable Solutions | Step-by-step Troubleshooting |
|---|---|
| Fix 1. Run Windows Update Troubleshooter | Right-click the Windows icon > Choose Settings...Full steps |
| Fix 2. Use Command Prompt to Check Install Error | Click the Search icon > type cmd in the search box >Select Run as administrator...Full steps |
| To fix a Windows 11 installation that's stuck, apply Task Manager to the installation process. This can be done by pressing Ctrl + Shift + Esc to open Task Manager, then navigating to the "Details" tab and searching for the "setup.exe" process. | Right-click the Windows icon > Click the Task Manager tab...Full steps |
| Fix 4. Check System Configuration | Click the search icon > input System Configuration > Click it to move...Full steps |
| Fix 5. Use Cleanup Tool to Free Up Disk Space | Download and install Qiling CleanGenius...Full steps |
How Does It Take to Install Windows 11
General: Between 10 and 20 minutes.
Windows 11 updates can take anywhere from 10 minutes on newer SSDs to over 20 minutes or even hours on older computers.
Preparation Before Troubleshoot Windows 11 Update Stuck
Check Internet Connection
If your machine fails to run under the correct internet connection, Windows 11 update will be stuck.
Solution 1. Run Windows Update Troubleshooter
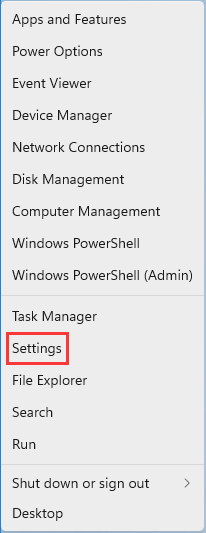
Step 1. Right-click the Windows icon and choose Settings.
Step 2. Go to the System tab on the left panel and scroll down to the right panel to locate the Troubleshoot option.
Step 3. Under the Options section, click Other troubleshooters.
Step 4. Under the "Most frequent" section, click the "Run" button next to the "Windows Update" option.
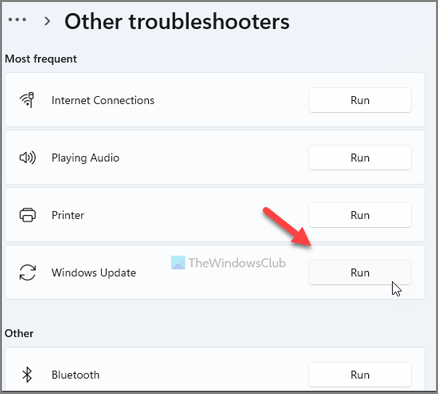
The Windows Update will start to detect problems. Once the troubleshooting is completed, you can see the problems under a box titled "Check for Windows Update issues".
Step 5. Restart your computer and run Windows update again.
Solution 2. Use Command Prompt to Check Install Error
Step 1. To open the Command Prompt as an administrator, click the Start button, type cmd in the search box, and select Run as administrator.
Step 2. Click Yes if User Account Control pops up.
Step 3. You typed: sfc /scannow. Press Enter to run the scan.
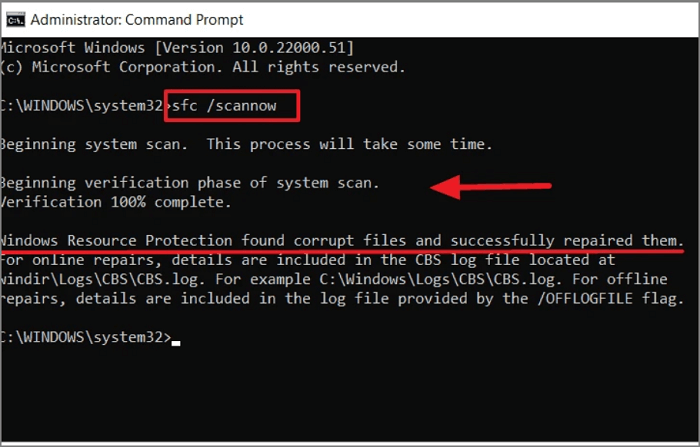
Step 4. The system scan will take some time. Be patient.
Solution 3. Apply Task Manager to Fix Windows 11 Installation Stuck
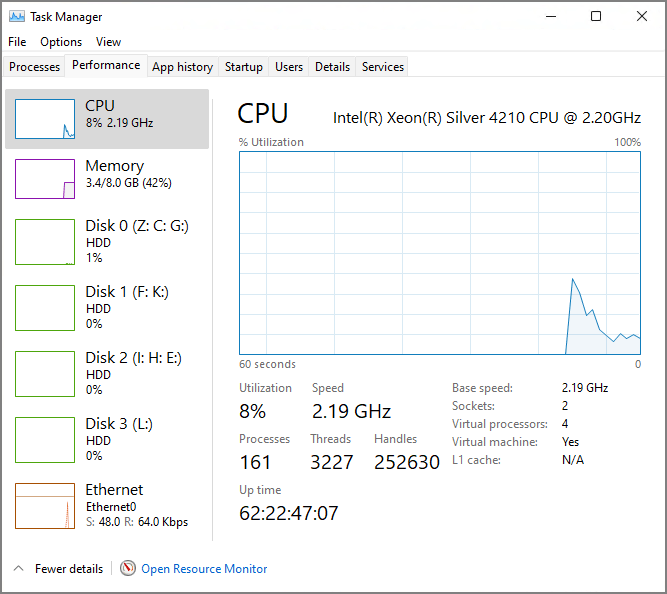
Step 1. Right-click the Windows icon and click the Task Manager tab.
Step 2. Once the Task Manager window appears, go to the Performance tab.
Step 3. The system information section displays CPU, Memory, Disk, and Ethernet details, and it's essential to check this section's activity during Windows 11 installation to ensure a smooth process.
Solution 4. Check System Configuration
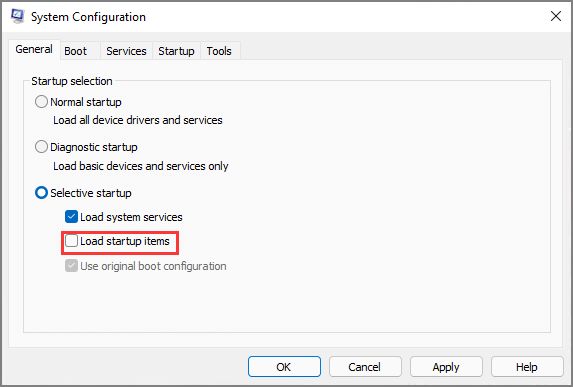
Step 1. To access the System Configuration, click the search icon, type "System Configuration" in the search box, and then click it to proceed.
Step 2. To disable startup items, go to the General tab and unpick the option that says "Load startup items".
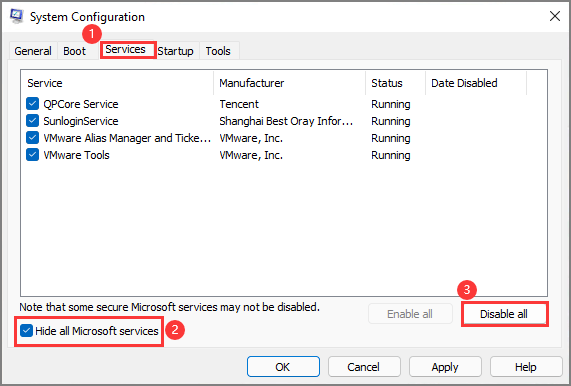
Step 3. To disable all Microsoft services, go to the Services tab, click on "Hide all Microsoft services" at the bottom left side, and then click on "Disable All".
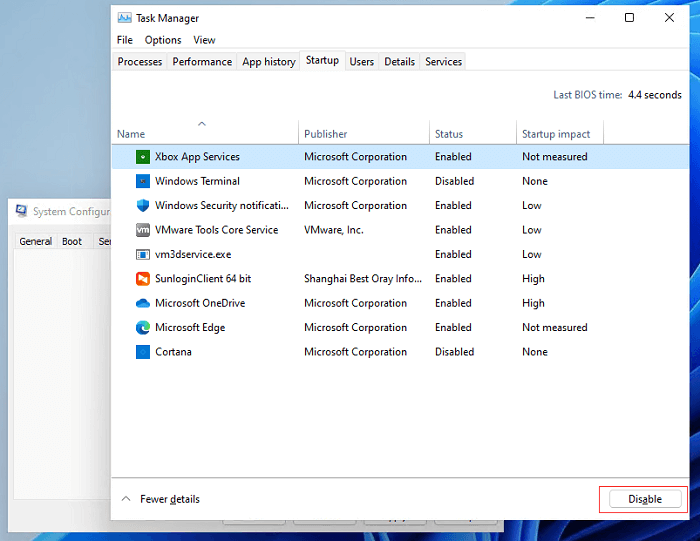
Step 4. To resolve the issue, go to the Startup tab, click on the "Open Task Manager" option, and then disable the unnecessary startup programs that are consuming the system resources. This will prevent them from running automatically when the system starts and help free up some memory.
Step 5. Go back to System Configuration, click Apply, and a restart will be required to apply the changes. A note will appear asking you to restart your system.
You can install Windows 11 again.
Solution 5. Use Cleanup Tool to Free Up Disk Space
To install Windows 11, you'll need a disk with at least 64GB of available storage space, similar to Windows 10. So, it's essential to ensure your disk has enough room for the system installation, but this doesn't mean deleting necessary big files. Start by getting rid of unnecessary junk files to free up space.
You can use Qiling CleanGenius, a third-party software, to remove useless data, including files left by third-party apps, system junk files, and junk files from built-in apps.
Download the software and start file cleanup.
Step 1. To start, download and install Qiling Partition Master Suite on your PC, and then click to download PC Cleaner on the panel.
Step 2. Install Qiling CleanGenius on your PC. Navigate to "Cleanup" and click "Scan" to start the process.
Step 3.Qiling CleanGenius will immediately scan your PC for useless files, select system junk files and invalid entries, and then click "Clean" to remove them.
Step 4. After completing the cleaning process, you will be able to see the total amount of data cleaned in MBs or GBs, and then click "Done" to finalize the process.
To Sum Up
Microsoft released Windows 11, but some users are experiencing slow installation issues. If you're facing this problem, - there are quick fixes available. You may need to try multiple methods to resolve the issue, but if none of them work, it's recommended to contact the official website for further assistance.
Related Articles
- Windows 11 Is Not Activated: How to Activate Windows 11 OS for Free
- What Is a TPM, How to Check and Enable TPM 2.0 for Windows 11 [Full Guide]
- Reset This PC Not Working on Windows 11 (4 Fixes)
- How to Stop Windows 11 Update (Block It Forever)
- I Can't Format USB to exFAT on Windows 10, What Should I Do
This short page explains why you are unable to format USB to exFAT on Windows 10. And you can use the best solution to fix the format error on Windows. - Can't Safely Eject External Hard Drive on Windows 10, How to Solve It?
If you encountered the 'Problem Ejecting a USB Mass Storage Device' problem and can't safely eject an external hard drive on Windows 10, you can try the practical ways in this post to fix this issue.