Reset This PC Not Working on Windows 11 (4 Fixes)
| Workable Solutions | Step-by-step Troubleshooting |
|---|---|
| 1. Install the Latest Update | Click the start icon and choose "Settings". Navigate to the "Update & Security"...Full steps |
| 2. Uninstall Feature Update | Click the "Start" button and select the "Power" button, hold "Shift" on your keyboard...Full steps |
| 3. Use System Restore | Press Windows + R and enter rstrui. Click "OK". Click "Next" and select the desired restore...Full steps |
| 4. Reinstall Windows 11 | Download Qiling Win11builder on your computer. It's a free Windows 11 iso...Full steps |
Some users are experiencing issues with the "Reset This PC" feature on Windows 11, where it's not working as expected. This feature, which allows users to reset their PC to its original settings, is not functioning properly for some users, causing frustration and inconvenience.
"Greetings, I have recently installed Windows insider preview; it is around 20 hours since installation, and it was not working properly so I tried to "Go back", from System > Recovery > Go Back & Restore, but it does not seem to work, so I contacted customer support they told me to do the Reset, but the "Reset" option is also not working, just a loading circle appears and then disappears. I prefer to reset without losing data.
Any help would be really appreciated. Thank you! Version 21H2(Build 22000.71)"
What Does Reset This PC Mean on Windows 11
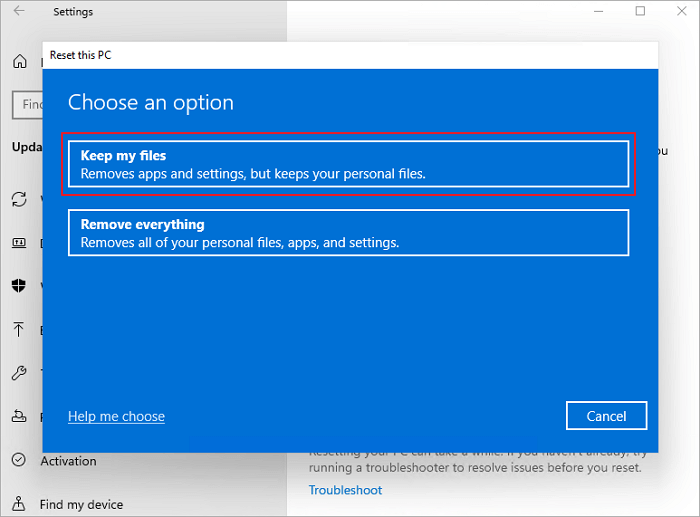
When you choose the Reset option, you have two choices: either remove apps and settings while keeping personal files, or completely remove all files, apps, and settings.
Restoring your operating system to its default factory state will erase all your files and apps. It's recommended to back up your files before using this feature, as you won't be able to recover them if you lose data. If you do experience data loss, you can try using Deep Data Recovery to restore deleted files, pictures, videos, and other files on Windows 11/10/8.1/8/7.
Step 1. Select file types and click "Next" to start
To recover lost files, launch Deep Data Recovery, select the file types you want to recover, and click "Next" to proceed.

Step 2. Select a location and start scanning
Choose the partition where you lost data. Then, click "Scan".

Step 3. Filter and preview files
To find the files you need, use the file format filter on the left or upper right corner, and then click the "Preview" button or double-click a file to view its content.

Step 4. Recover lost data or files
To recover lost data, select the file you want to recover, check the box next to it, and click the "Recover" button to restore it to a secure location.
Also read: Recover data after Windows 11 reset.
How to Fix Reset This PC feature Not Working on Windows 11
The "reset This PC feature not working" error on Windows 11 is often caused by a system bug, according to user feedback. To resolve this issue, you can try the tried-and-true solutions to fix the problem.
Method 1. Install the Latest Update of Windows 11
To fix the error, upgrade to the latest Windows 11 by installing the latest update, which was released on October 5. Follow the steps to install the update.
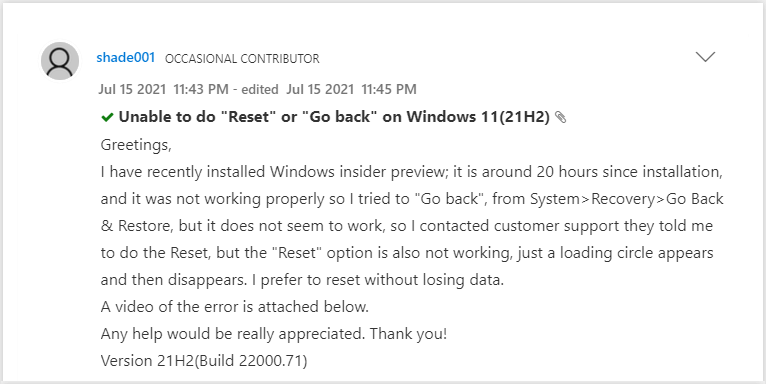
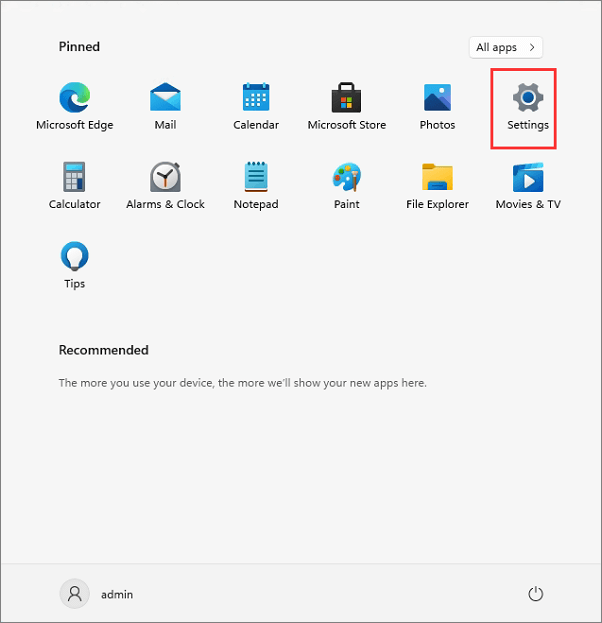
Step 1. Click the start icon and choose "Settings".
Step 2. To update Windows, go to the "Update & Security" section, then click on "Check for updates".
Once your system is up to date, check if the Reset option is available.
Also read: How to stop Windows 11 update.
Method 2. Uninstall Feature Update to Fix "Reset This PC Not Working"
If you have already installed the latest update, and you are sure that it's the update that caused this error. Then, try to uninstall the feature update. Here are the steps to make it.
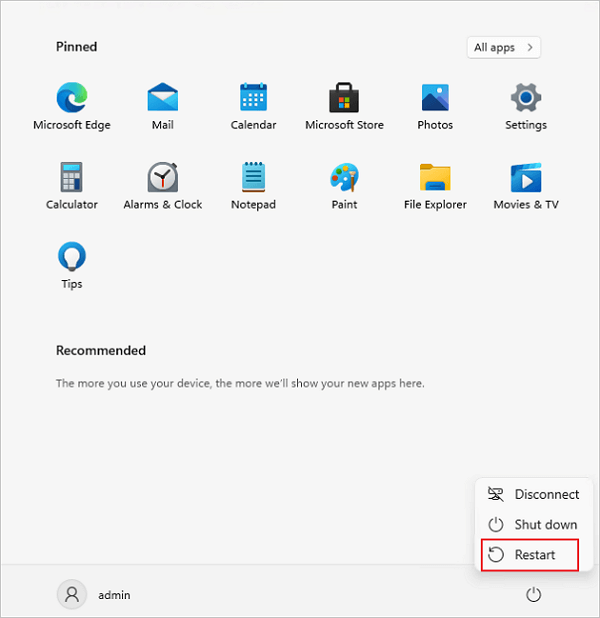
Step 1. To restart Windows, click the "Start" button, select the "Power" button, hold the "Shift" key on your keyboard, and click "Restart".
Step 2. Go to "Troubleshoot > Advanced options > Uninstall Updates".
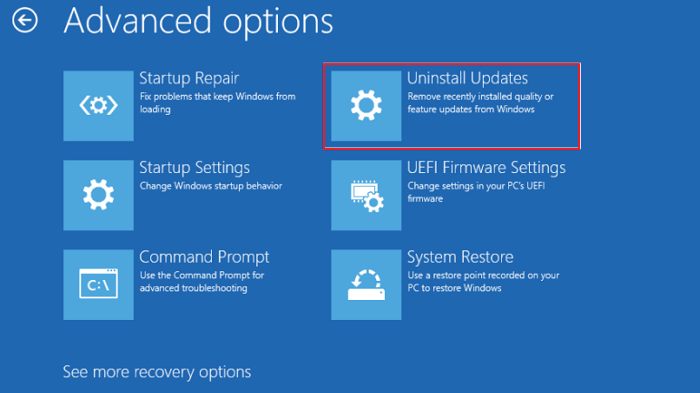
Step 3. Uninstall the latest feature update by selecting the "Uninstall latest feature update" option and following the on-screen instructions to complete the process.

Method 3. Use System Restore to Fix "Reset PC Not Working"
If you've created a system restore point beforehand, you can use it to fix the error - reset PC not working on Windows 11. This allows you to revert your system to a previous state where the reset feature was working.
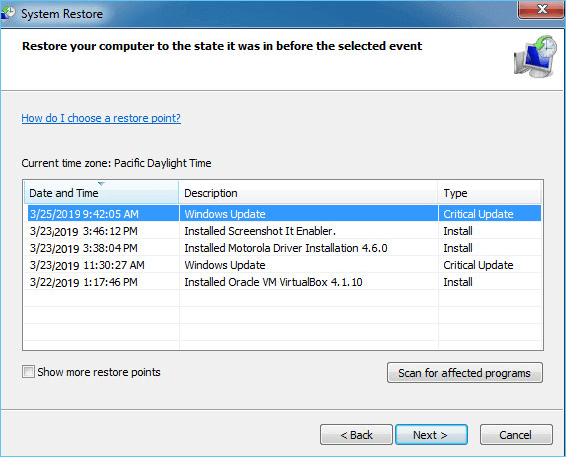
Step 1. Press Windows + R and enter rstrui. Click "OK".

Step 2. Click "Next" and select the desired restore point and click "Next".
Step 3. Select "Choose a different restore point" and click "Next".
Step 4. Run the software, click "Scan for affected programs" and follow the on-screen instructions to complete the uninstallation process.
Method 4. Reinstall Windows 11 to Solve Your Problem
You can easily reinstall Windows 11 using Qiling Win 11 Builder, which allows you to download and install the operating system on your PC with just a few steps, including preparing a USB drive with at least 4GB of space.
Step 1. The Win11 builder is integrated with Qiling OS2Go software, allowing for a seamless download and installation process. After installation, simply click the download button to launch the program.
Step 2.The name of the application was changed from WinToGo Creator to Windows Install Drive Creator, and it now supports the creation of Windows 11, 10, and 8.1 installation drives. The system information is displayed on the home screen and updates in real-time. Additionally, the application supports the creation of Windows 10 and 8.1 installation drives, in addition to Windows 11.
Step 3. Connect your USB flash drive to the computer, and the Win11 builder will automatically detect it. Click the "Create" button to proceed.
Step 4. The software will erase the data on your used USB drive, so make sure to back up any important files first. Once you start the download process, simply wait for it to complete, or take a break to attend to other tasks while it finishes.
Step 5. After downloading the Windows 11 iso image file to a USB drive, you can proceed to install Windows 11 on your computer by following the installation wizard step by step, starting from the bootable USB drive.
How Can I Reset This PC on Windows 11
Windows 11 has a built-To reset Windows 11, you can follow these steps: the process allows you to restore your computer to its factory settings, remove all installed apps, and optionally delete all your personal files. The "Reset" option is a function that enables this. By following the steps, you can reset Windows 11 and return it to its original state.
Step 1. Click on the "Start" icon and open the "Settings" app.
Step 2. Navigate to "Update & Security > Recovery > Reset PC".
Step 3. Choose your preferred option to continue.
Step 4. If you've chosen to reset your PC, you can use one of the following options to complete the process.
Then, follow the instructions on the screen to complete the process.
Conclusion
No matter what kind of problems you are faced with, Qiling can give you practical solutions. Always stay calm when your computer or Windows 11 goes wrong. If you find a way to fix this problem on your own, feel free to share it with us.
Related Articles
- Windows 11 Taking Forever to Install? Get Complete Guide to Fix Windows 11 Slow to Install Issue
- Windows 11 Games Crash or Freeze? Don't Miss Quick Fixes Here!
- How to Check Update to Windows 11 and Set Up Your PC to be Windows 11 Compatible
- How to Map a Network Drive in Windows 11? Your Complete Guide Is Here
- Top 5 Best Kingston USB Formatter Utility and Software Recommend in 2022 [Pros and Cons]
Got a Kingston USB? Well most of us have used them as they are pretty popular among the masses. Click here for the 5 best Kingston USB formatter software and tools to assist Kingston USB users to fully format their USB drives with ease. - How to Fix "Local Disk D Almost Full" in Windows 11/10/8/7 [Step-by-Step Guide]
Your local disk D is almost full, but there are efficient fixes to free up more space on your D drive. This issue can be caused by a variety of factors, including a large number of temporary files, a full recycle bin, or a bunch of unnecessary system files.