How to Stop Windows 11 Update (Block It Forever)
Microsoft has released Windows 11, offering a calm and creative space for pursuing passions through a fresh experience. Although Microsoft emphasizes the importance of keeping Windows 11 updated with the latest features and security patches, it is possible to disable Windows updates.
***Join the hot discussion for fixing Windows 11 cumulative update failed to download and install
How to Disable Windows 11 Update (Full Guide)
Microsoft has stated that the Windows 11 update will not be automatically installed on Windows 10 users at launch. Instead, users will need to manually check for the update by going to "Settings > Update & Security > Windows Update".
To free up Windows 11 disk space, users who have enabled automatic updates can stop them by disabling the feature, which can be achieved through various methods such as disabling the Windows Update service, editing the Registry, or using third-party tools.
- 1. Turn off Windows Update Services in Windows 11
- 2. Block Windows 11 Update with Group Policy Editor
- 3. Pause Windows 11 Updates for Every Week
- 4. Stop Windows 11 Update with Registry Editor
- 5. Disable Windows 11 Update with Third-party Tool
Notice: Disabling Windows 11 updates is generally safe and won't result in data loss, but if you experience data loss due to improper actions, stop using the affected disk and use professional recovery software to restore lost data.
Qiling Windows 11 Data Recovery Tool
- Recover deleted files, documents, photos, audio, music, and emails in Windows 11/10/8/7 with ease.
- The software supports various data recovery tasks, including hard drive recovery, emptied recycle bin recovery, memory card/flash drive recovery, and others.
- Data recovery can be supported in various Windows and macOS operating systems, including Windows 11, 10, 8.1, 8, 7, XP, and Vista, as well as macOS versions 11.2 to 10.9.
Solution 1. Turn off Windows Update Services in Windows 11
To stop Windows updates, turn off the Windows Update service. This can be done by going to the Services window, finding the Windows Update service, right-clicking on it, and selecting "Stop". This will prevent Windows from automatically updating.
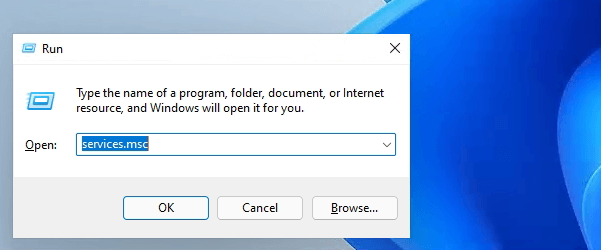
Step 1. Press "Window + R" to open the Run window.
Step 2. To open the Services Window, type `services.msc` in the Run dialog box and press Enter. This will open a window that displays all the services currently running on your system, along with their current status.
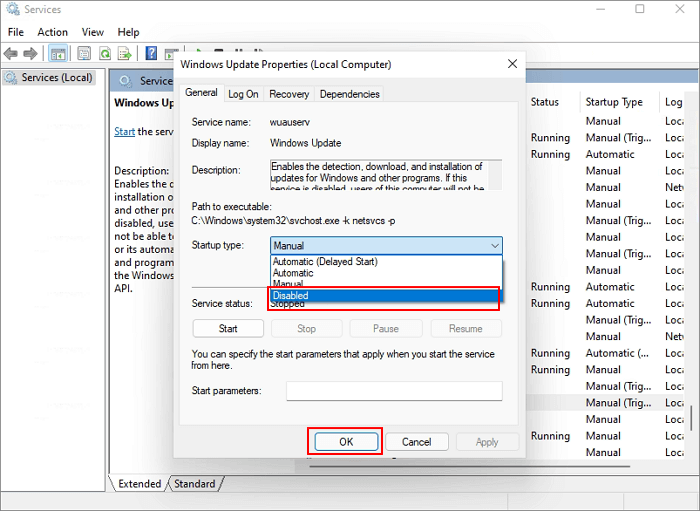
Step 3. To stop the Windows Update service, go to the Services list and select the "Windows Update" option, then click the "Stop" button.
Step 4. To change the "Startup Type" to "Disabled", click on the "General" tab.
Solution 2. Block Windows 11 Update with Group Policy Editor
If you don't mind delaying the Windows 11 installation, you can disable Windows 11 update by using the Group Policy Editor.
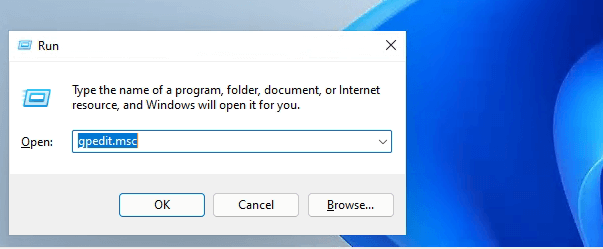
Step 1. To open the Group Policy Editor, press the Windows key + R, then type gpedit.msc and press Enter.
Step 2. Navugate to "Local Computer Policy > Computer Configuration > Administrative Templates > Windows Components > Windows Update > Windows Update for Business".
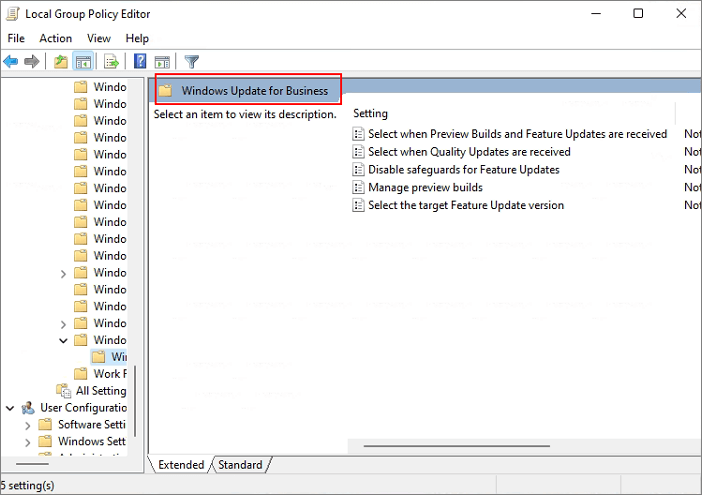
Step 3. Double-click on "Select the target feature update version".
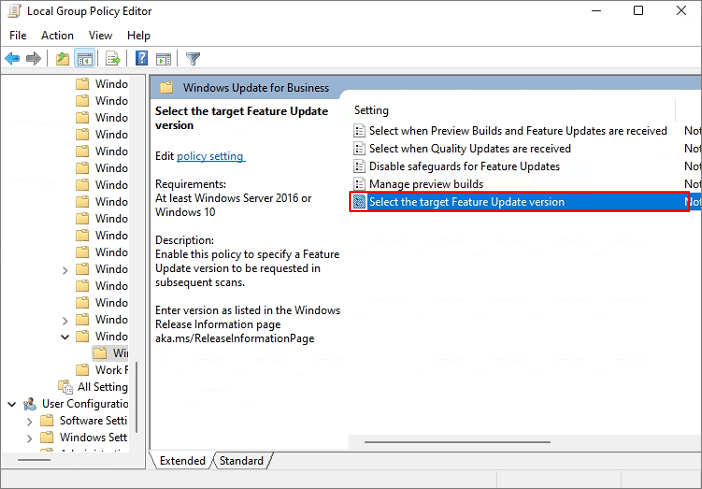
Step 4. Set the policy to "Enabled", type 21H1 into the field, and close the Group Policy Editor.
Solution 3. Pause Windows 11 Updates for Every Week
Another way to disable Windows 11 update is to pause the update every week. To pause Windows 11 computerized updates, follow the steps below.
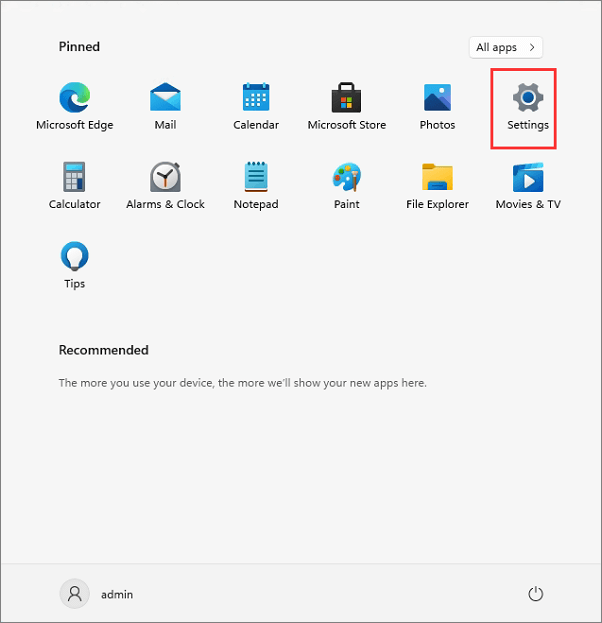
Step 1. Click the start icon and choose "Settings".
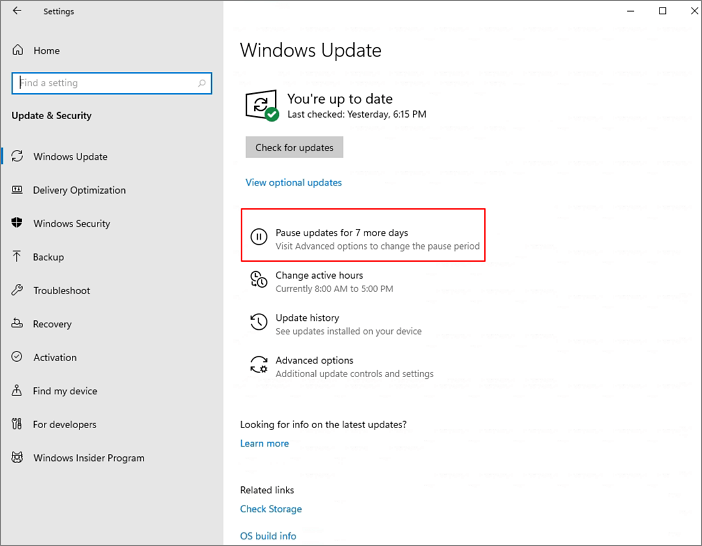
Step 2. To pause Windows updates for 7 days, select the "Update & Security" option from the Settings menu, then click on "Pause updates for 7 days".
Solution 4. Stop Windows 11 Update with Registry Editor
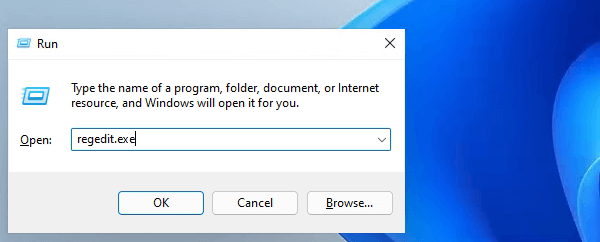
Step 1. To open Registry Editor, press the Windows key + R to open the Run dialog box, then type "regedit.exe" and press Enter.
Step 2. Go to "HKEY_LOCAL_MACHINE\SOFTWARE\Policies\Microsoft\Windows\WindowsUpdate".
Step 3. Set the "DWORD (32-bit)" value to 1.
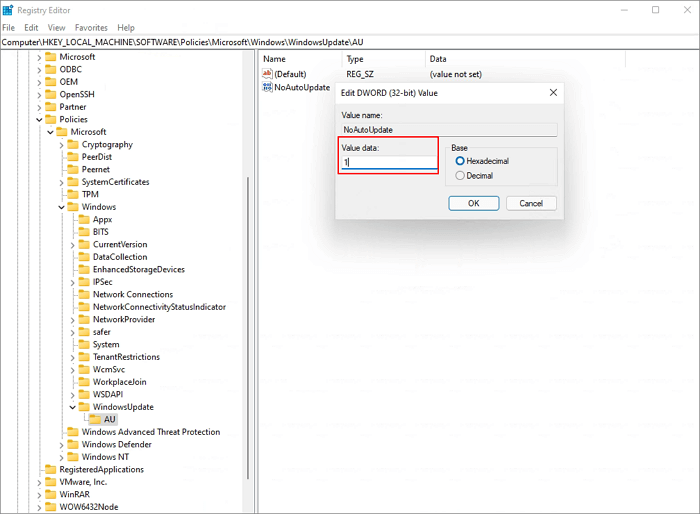
If the value doesn't exist, right-click on Windows Update, select New > Dword (32-bit) Value, and set the value of TargetReleaseVersionInfo to 21H1.
Solution 5. Disable Windows 11 Update with Third-party Tool
If you're looking for an easy way to stop Windows 11 updates, you can use third-party software like Qiling Clean Genius, which allows you to disable automatic updates permanently without wasting time. Simply run the tool and follow the instructions to achieve this.
Do you prefer a one-To disable the Windows automatic update feature, you can use the Qiling CleanGenius toolkit, which allows you to disable/enable Windows Update, repair hard drives, remove/enable write-protection, and more with just a few clicks.
To disable Windows Update:
Step 1. You can download Qiling CleanGenius for free and install it on your computer.
Step 2. Launch Qiling CleanGenius and go to "Optimization".
Step 3. The tool will automatically detect the status of the Windows Update service. If it's currently enabled, a switch will be available to click on and stop the service.
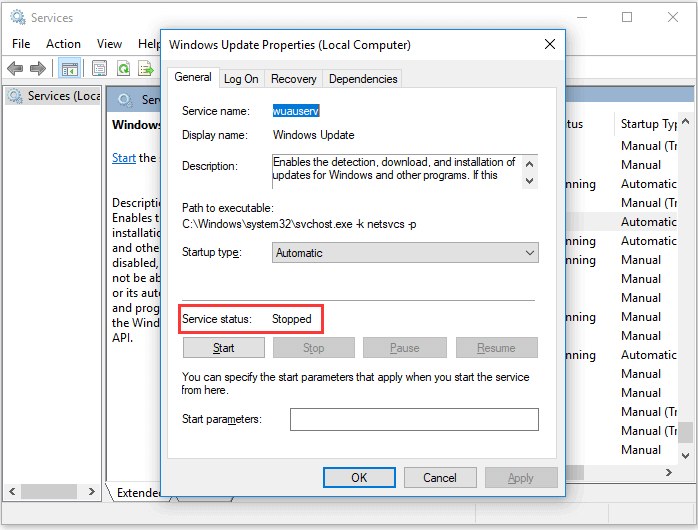
Step 4. To check if the service is disabled automatically, go to the "Start" menu, type "Services", right-click on "Services" and select "Run as administrator".
Step 5. To check the status of the Windows Update service, right-click on it in the list of services, select "Properties", and verify that it has been stopped in the "Service status" section.
Additional Help - How to Recover Data on Windows 11/10
You can recover deleted files with Qiling data recovery software, which works well in getting back lost/deleted files on a Windows or Mac PC, including Windows 11.
Step 1. Select file types
Launch Deep Data Recovery, select the file types you want to recover, and click "Next" to begin the process.

Step 2. Select a location and start scanning
Choose the partition where you lost data. Then, click "Scan".

Step 3. Filter and preview files
To find the files you need, use the file format filter on the left or upper right corner. After selecting the desired files, you can click the "Preview" button or double-click a file to preview its content.

Step 4. Recover lost data or files
To recover lost data from a corrupted file, select the file by clicking the checkbox next to it, then click the "Recover" button. This will restore the lost data to a secure location.
Conclusion
I personally like to keep all my devices up-to-date and activate Windows 11 to enjoy the latest features of Windows 11. But Windows updates could be useless sometimes. Keep an eye on what you are downloading and installing on your PC. If you want to disable the automatic update, you can try these solutions above.
Related Articles
- Windows 11 Is Not Activated: How to Activate Windows 11 OS for Free
- Rollback from Windows 11 to Windows 10 - 2 Methods
- [3 Ways] How to Uninstall Apps on Windows 11
- Windows 11 Free Upgrade from Windows 10 [How-to] Step by Step
- 3 Easiest Ways to Run USB Speed Test in Windows 10 in 2024
If you want to run a speed test of your USB drive on your Windows 10 PC but don't know how, this article is for you. We'll share everything you need to know about running a speed test and also provide bonus tips to improve USB speeds. - What Is USB Write Protected Formatter and How to Use It? [2024 Guide]
Does your USB drive get write-If your USB drive is protected and you need to format it, you're in luck! There are reliable tools available to help you remove write protection and format your USB drive.