How to Install A New CPU on A Motherboard? [Fresh Guideline]
AMD and Intel have recently released new CPUs with significant performance gains over previous generations, making it a compelling time for those still using older computers to consider upgrading.
Upgrading a CPU on a motherboard can be a complex process, especially for new users. It requires understanding the compatibility of the new CPU with the motherboard, as well as the proper installation procedures, which can be difficult to learn without hands-on experience or proper guidance.
When installing a new CPU on a motherboard, there are a few key things to consider. First, ensure the CPU is compatible with the motherboard and that the cooler is properly seated. Next, apply a thin layer of thermal paste to the CPU die and secure the cooler using the provided screws.
An Overview of CPU
AMD released their Zen 4 processors, also known as Ryzen 7000 series, on September 27th, 2022, which quickly gained popularity. In contrast, Intel released its 13th Gen CPU on October 20th of the same year.
Upgrades from both the red and blue brands have been competing in gaming, productivity, and everyday use, leading people to seek ways to upgrade their CPUs and install new ones on their existing motherboards.
But it's important to understand two things about these two new architectures:
- AMD's Zen 4 architecture upgrades to the AM5 CPU socket, an improvement from the previous generation's AM4 socket.
- 13th Gen CPUs from Intel can be paired with either z690 or 12th Gen motherboards.
Upgrading to a new AMD processor requires a new motherboard and DDR5 RAM, as AMD processors are only compatible with DDR5, whereas Intel motherboards can support newer CPUs with DDR4 memory.
If you continue reading this article, make sure you know the platform (socket) of your motherboard, which could be something like LGA 1700 for Intel or AM5 for AMD's newer processors.
The Benefits of Upgrading CPU
Upgrading any tech component, including a CPU, can significantly improve performance, efficiency, and other aspects, leading to enhanced overall functionality.
Newer AMD and Intel CPUs offer various features, including support for multiple cores, high clock speeds, and advanced power management. They also provide improved instruction sets, such as AVX and AVX-512, which enhance performance in tasks like video encoding and scientific simulations.
- Better performance in productivity applications and tasks
- Improved single-core performance
- Better performance-per-watt percentage
- Higher FPS in gaming
- The latest and upcoming GPUs from Nvidia and AMD can be utilized more efficiently by optimizing software and hardware for their specific architectures, leading to improved performance and power efficiency. This can be achieved through various means such as hardware acceleration, multi-threading, and the use of specialized instructions, allowing developers to tap into the full potential of these powerful processors.
- Higher quality visuals in images, rendering, gaming
- Better start-up timing and increased speed of switching between apps
Upgrading your CPU ensures that it uses your other components, such as SSD, Graphic Card, and RAM, to their full potential, resulting in higher gaming and productivity performance.
Preparations Before Installing A New CPU on A Motherboard
Before installing a CPU on a motherboard, take preliminary steps such as grounding yourself, ensuring the CPU is compatible with the motherboard, and checking the CPU and motherboard for any damage or debris. Additionally, make sure the motherboard is powered off and any power cables are removed to prevent electrical shock. Avoid placing the CPU with excessive force.
Ensuring Compatibility With Your Motherboard:
Before upgrading your CPU, ensure it's compatible with your motherboard by checking its socket type, CPU architecture (e.g., LGA 1200), and any specific requirements for voltage or power management.
- The CPU is installed into the corresponding socket on the motherboard, such as Intel's LGA 1700 (12th and 13th Gen), LGA 1200 (10th and 11th Gen), or AMD's AM4 (Zen 2 and Zen 3) or AM5 (Zen 4) sockets.
- Before purchasing RAM, check if the type of RAM (e.g., DDR4, DDR5) is compatible with the CPU you plan to use. This ensures that the RAM is supported and will function properly with the CPU.
- Check if your motherboard's bios supports the CPU on the manufacturer's website. If it doesn't, update the bios before attempting to upgrade the CPU.
Before ordering a CPU, make sure to check the information to ensure accuracy.
Necessary Equipment:
Here are the necessary pieces of equipment you will need:
- Thermal paste, also known as thermal interface material (TIM), is a substance applied between the CPU and the CPU cooler to ensure maximum heat transfer and prevent overheating. It fills microscopic gaps between the two surfaces, allowing for 100% contact and efficient heat dissipation.
- Screwdriver or any toolkit with Phillip head screwdriver
- A grounding cable to keep you grounded
Having the necessary equipment, such as a screwdriver, thermal paste, and a CPU cooler, will make the process of installing a CPU much smoother and less complicated.
Creating A Backup Just In Case
To ensure a smooth CPU upgrade, create a backup of your system before proceeding. This is crucial as installing a newer CPU might require reinstalling Windows, potentially losing existing data. Utilize a professional backup tool to safeguard your system and ensure a seamless transition.
We suggest using Qiling Disk Master, as it is a reliable tool that can help you with your disk-related needs. Its capabilities and effectiveness make it a suitable choice for managing and maintaining your disks.
- It helps you clone the operating system image or clone system.
- It helps backup data a lot more efficiently.
- This software is designed to save time by providing a quick backup and recovery solution.
- It is supported on Windows 7, 8, 10, and 11.
- It offers a 250-GB cloud storage.
Make sure to create a backup of your important files or clone your operating system image before installing your CPU to ensure you have a copy in case something goes wrong.
[Full Guide] Install A New CPU on A Motherboard
Now that we have all the prerequisites, let's proceed with upgrading the CPU on your motherboard. This process involves installing a new CPU on your motherboard, which can be done for both Intel and AMD processors, and will be covered in the following sections.
Now, it's worth noting that newer AMD processors use the same method as Intel platforms, utilizing the LGA socket, so the processor doesn't have any pins; the motherboard does. As a result, we'll focus on AM4 instead of AM5.
Intel's LGA 1700 socket is compatible with both 12th and 13th Gen CPUs.
Intel: Installing a new CPU on an Intel Motherboard
To install a new CPU, first, ensure your motherboard and CPU are compatible. Then, unplug the power cord, and ground yourself to prevent static electricity damage. Next, remove the CPU cooler, and locate the CPU socket on the motherboard.
Step 1. To unlatch the socket arm on your Intel motherboard, press it down and move it sideways. This action releases the socket arm from its locked position, allowing you to remove the CPU from the socket.
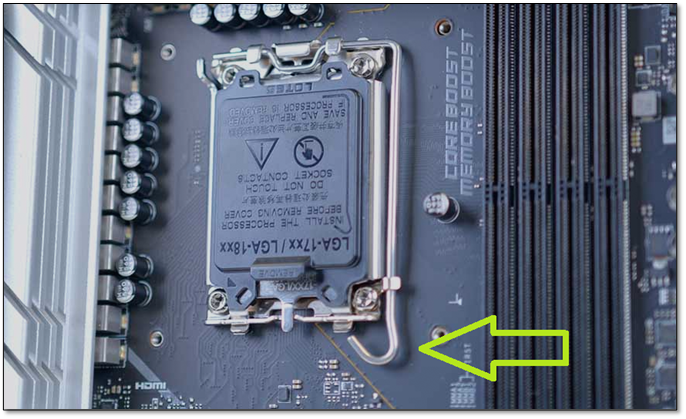
Step 2. Once the socket is open, you can carefully pull your CPU out of the box.
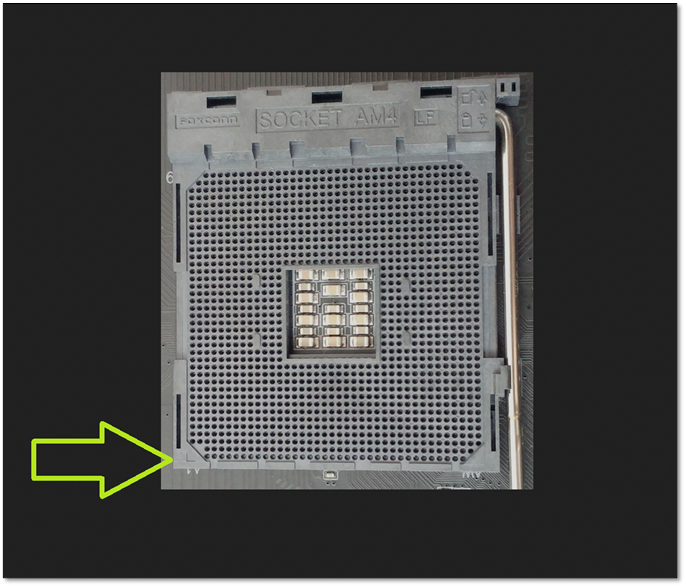
Step 3. Locate the golden triangle on the bottom-left of your CPU
Step 4. Align the triangle with the one on the motherboard socket
To align the four dots/hatches on each side, place them down in a straight line, ensuring they are evenly spaced and symmetrical. This will help create a balanced and visually appealing design.

Step 5. Place the socket back on your CPU and close the hatch until it's in the bracket.
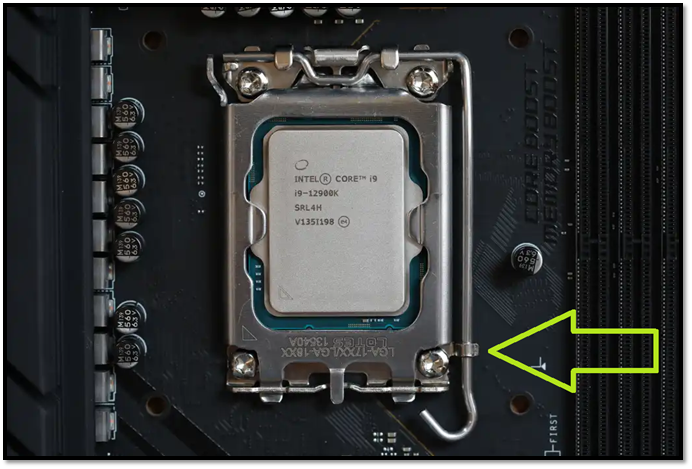
To secure the CPU in the socket, place it in the socket and gently push it until it clicks into place. Then, apply a small amount of thermal paste to the CPU die (the top surface of the CPU). Next, place the CPU cooler back on, ensuring it is properly seated and secured with screws. Make sure the cooler is aligned with the CPU's pins and the screws are tightened evenly to avoid any damage to the CPU or the cooler.
AMD: Installing a new CPU on an AMD Motherboard
To install an AM4 CPU, start by ensuring the motherboard is powered off and unplugged from the power source. Locate the CPU socket, which is usually marked with a small icon of a CPU. Remove the protective covering from the CPU, and gently place it into the socket, ensuring the CPU's pins are aligned with the socket's holes.
If you're upgrading to Zen 3, i.e., AMD's 5000 series processors, you'll need to update your motherboard to a compatible one that supports the new architecture. This typically involves purchasing a new motherboard, as the older boards may not have the necessary features or BIOS updates to support the Zen 3 processors.
Step 1. Unlatch the CPU arm on your AM4 socket
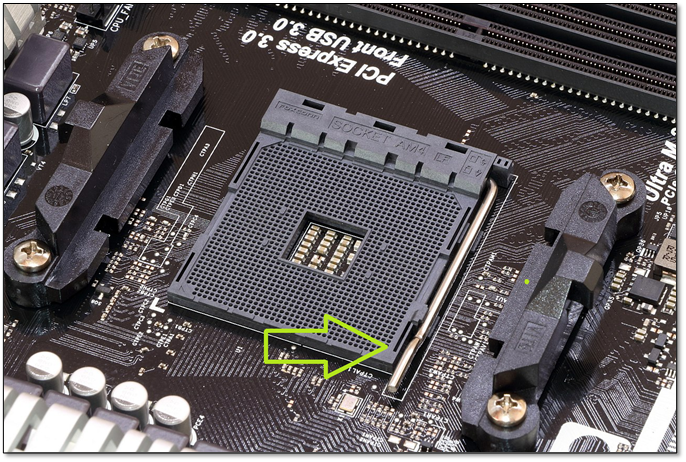
Step 2. To remove the old CPU, lift the socket retention arm all the way back so the socket pins are exposed.
Step 3. Locate the triangle on the bottom-left of your CPU
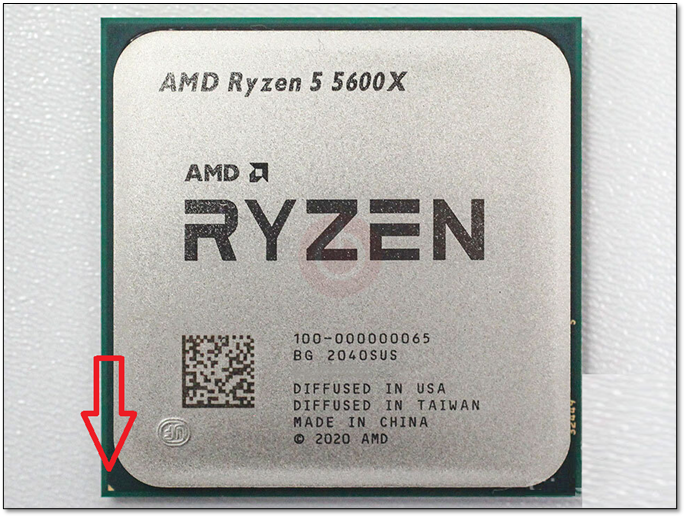
Step 4. Locate the same triangle on the socket of your motherboard
Step 5. To properly install the CPU, first make sure the CPU is facing the correct direction and is seated in the socket. Gently push the CPU into the socket until it's fully seated, but do not force it.
Step 6. Close the latching arm
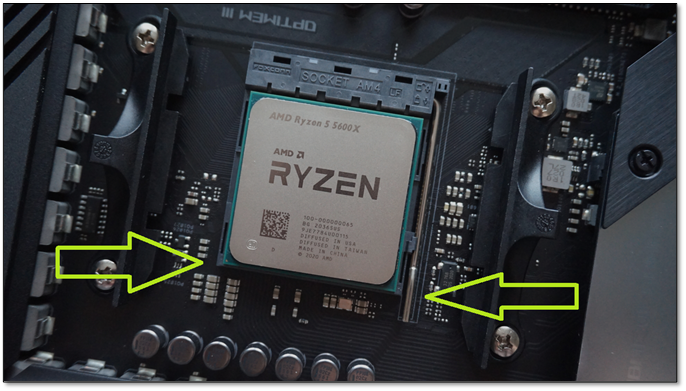
After upgrading the CPU, apply thermal paste to the new CPU and install the CPU cooler. Once this is done, start up your PC again and you'll see that your CPU has been upgraded.
The Bottom Line
To upgrade your CPU, start by checking the compatibility of the new CPU with your motherboard. If it's compatible, you can proceed with the upgrade. This typically involves removing the old CPU, applying a small amount of thermal paste to the new CPU, and securing it to the motherboard using the provided mounting system. Be sure to handle the CPU by the edges to avoid damaging the pins.
To ensure a successful backup, you should follow the prerequisites mentioned earlier, such as using a professional tool like Qiling Disk Master, to create a reliable backup of your important data. This will help prevent data loss and ensure you can recover your information in case of a system failure or other issues.
To upgrade your CPU, first, ensure you have the correct CPU for your motherboard. Then, follow the steps outlined in this article to install the new CPU and upgrade your system.
FAQ on Installing A New CPU on A Motherboard
If you have further queries, then let's hope these FAQs will answer them.
1. Can I put a new CPU in my motherboard?
You can install a new CPU as long as it's compatible with your motherboard, and you may also need to update your BIOS to ensure proper functionality.
2. Do I need to remove the motherboard to install a new CPU?
You can switch the CPU on most motherboards without having to pull it out of the case. Simply remove the CPU cooler and install the new CPU.
3. How do I switch from the old CPU to the new CPU?
To replace an old CPU with a new one, first determine which new CPUs your motherboard is compatible with. Then, follow the steps in the provided article to switch to the new CPU from the old one.
Related Articles
- [Steam Tutorial] How to Backup and Restore Steam Game Files
- 5 Best Photo Backup Software for PC in 2024
- Quick & Easy: Fix Cannot Download from Google Drive Problem
- How to Backup NAS? Top 3 Strategies
To back up your NAS, you have three options. You can simply copy your NAS data to an external hard drive, use backup software to securely transfer your files, or back up your NAS to a cloud drive for remote access and protection. - How to Format the USB Drive Used as ChromeOS Recovery Medium
We usually back up computer data with a USB and the data take up all the storage of it. But what if we want to use it for other purposes? Maybe formatting it after transferring the data is a good choice. Today we will show you how to format the USB drive that you used as a ChromeOS recovery medium. - How Do I Upgrade My Hard Drive Without Losing Data?
Searching for a way to upgrade a hard drive without losing data? Look no further. This short post provides the full guide to clone hard drive without losing any data by using Qiling Disk Copy. - How to Backup Windows to Box - Safe & Quick Solutions
Learn how to back up Windows files to Box safely. Use Box Drive, manual upload, or backup software to protect important data in the cloud.