QuickBooks Unable to Backup Company File - What to Do?
QuickBooks is a popular accounting tool that helps with payroll, payments, and invoice management, storing data on local computer storage, which is vulnerable to data loss due to hardware failure or malware.
To avoid issues like data loss, it's essential to back up your QuickBooks company file. QuickBooks provides a straightforward method for backing up the file, and you can also set up scheduled backups at regular intervals. However, if you encounter the "QuickBooks unable to backup company file" or "QuickBooks backup failed" error, there are steps you can take to resolve the issue.
How to Fix QuickBooks Unable to Backup Company File Error
If you're experiencing the QuickBooks unable to back up the company file error on a Windows computer, don't worry, there are 6 practical ways to help you fix it. You can try any of these methods when QuickBooks cannot copy the company file. Let's dive into the details.
- Fix 1. Run Anti-Virus Scan
- Fix 2. Update QuickBooks to the Latest Release
- Fix 3. Use QuickBooks Rebuild Data Utility
- Fix 4. Check the Backup Path
- Fix 5. Check and Rename the Company File (.QBW)
- Fix 6. Rename Network Data File
Fix 1. Run Anti-Virus Scan
Run a comprehensive PC check using a reliable antivirus or anti-malware tool to detect and remove malware or viruses, which may be causing the "QuickBooks is unable to backup the company file" error. You can use Windows built-in tools to help with this process.
Step 1. Head for Windows settings, and click on "Update & Security".
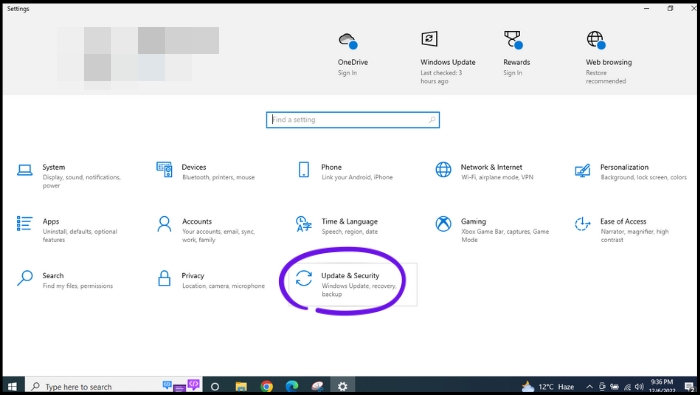
Step 2. Click on "Windows Security".
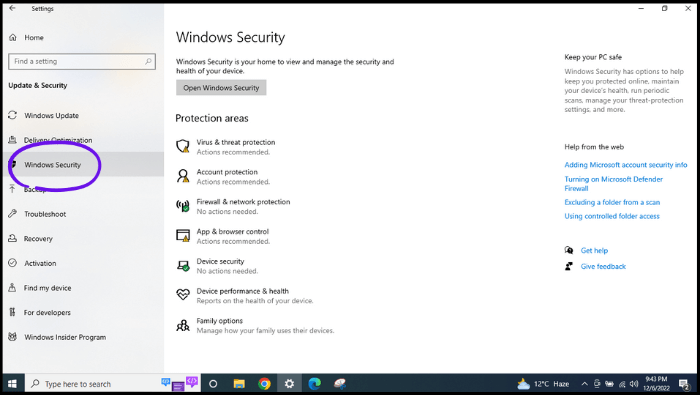
Step 3. Click on "Virus & threat protection".
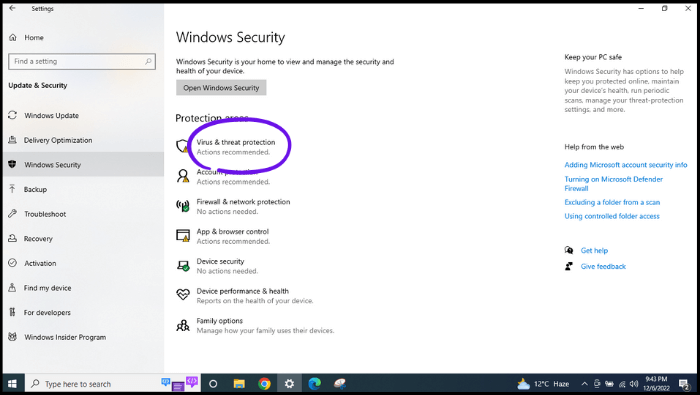
Step 4. Click on "Scan options".
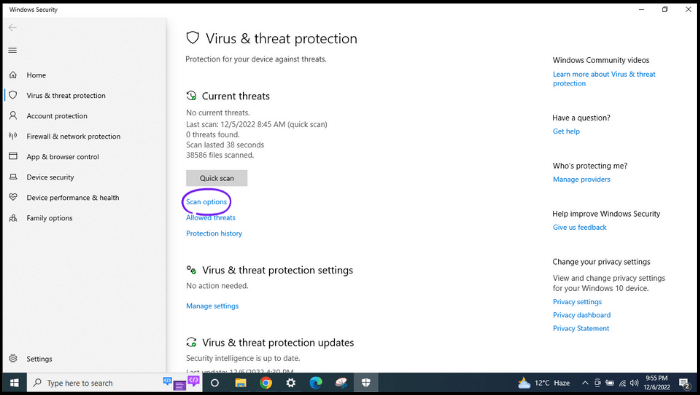
Step 5. Click on "Full scan" and then "Scan now".
Step 6. Wait for the scan to complete. Once finished, check if QuickBooks can now back up your company file.
Fix 2. Update QuickBooks to the Latest Release
If the "QuickBooks file is open and cannot be backed up" error persists, you should consider updating QuickBooks to the latest release. This can resolve compatibility issues and bugs that may prevent backups.
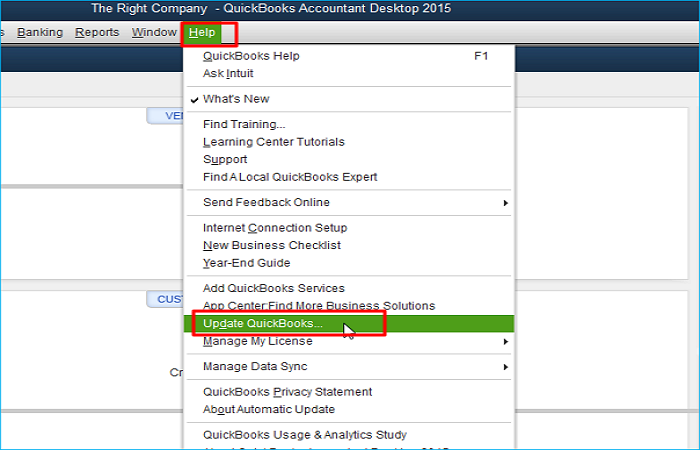
Step 1. Launch QuickBooks and go to Help > Update QuickBooks.
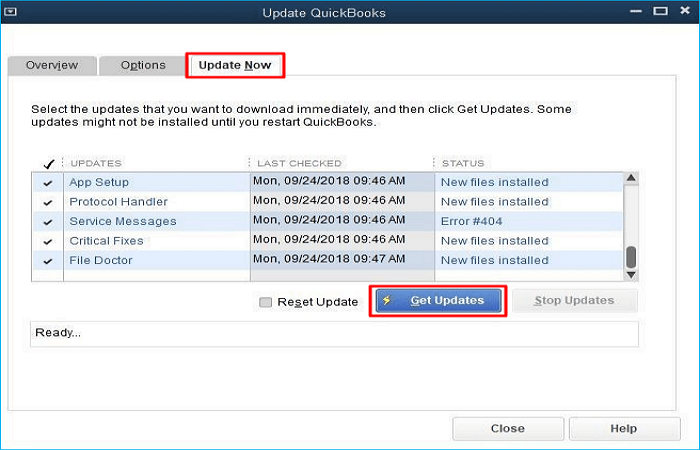
Step 2. Click Update Now.
Step 3. Select the available updates and click Get Updates to download them.
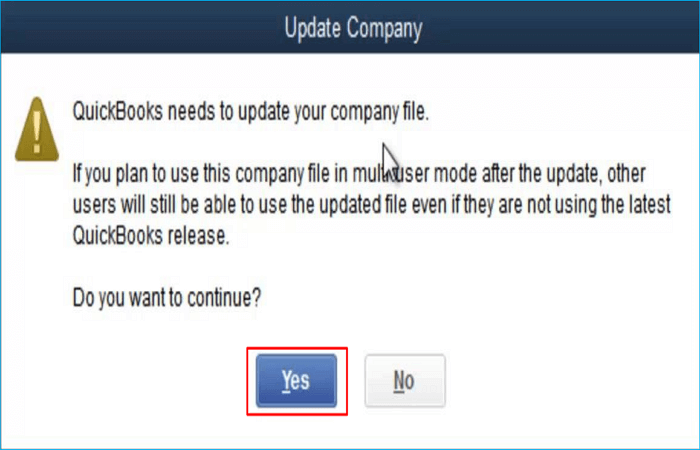
Step 4. Restart QuickBooks and click Yes to update it, following the installation wizard.
Step 5. Reboot the system after installing the updates.
Step 6. Open the software again and try to back up the company files.
Fix 3. Use QuickBooks Rebuild Data Utility
QuickBooks allows users to rebuild their company files, which can resolve issues like "Backup Failed" or "QuickBooks cannot back up company files." To rebuild company files, follow these steps.
Step 1. Head for File > Utilities and click Rebuild Data.
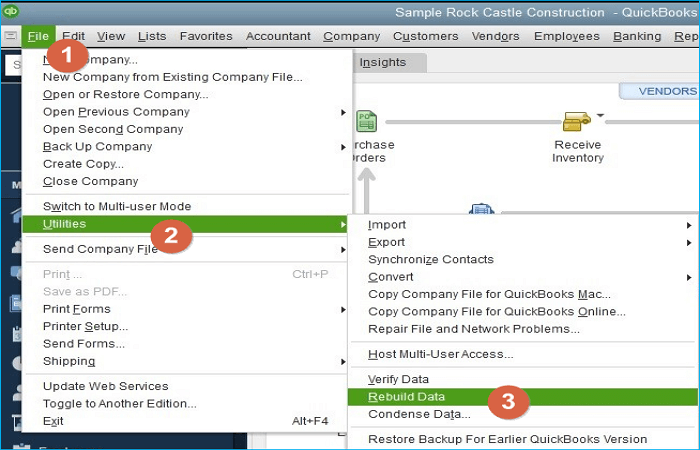
Step 2. If a request to back up the company file appears, click OK.
Step 3. Wait for minutes and click OK when the notice "Rebuild has completed" displays.
After the rebuild is finished, go to File > Utilities > Verify Data to check if the rebuild was successful. Then, attempt to back up the company files again.
Fix 4. Check the Backup Path
QuickBooks may fail to back up the company file if the backup path is unreliable or unavailable. To resolve this, ensure the backup location disk or directory is correct and the external drive is securely plugged into the system if the backup directory is located there. You can check by following these steps.
Step 1. Launch QuickBooks.
Step 2. Go to Preferences and select the backup path or directory where you want to store the backup.
Step 3. Verify that the path exists and is accessible. You can do this by opening File Explorer and navigating to the specified location.
Fix 5. Check and Rename the Company File (.QBW)
To ensure the QBW file name is correct, it's recommended to check and rename it if necessary, as special characters and exceeding the 65-character limit can cause issues.
Step 1. To find the company file location and name, navigate to the folder C:\Users\Public\Public Documents\Intuit\QuickBooks, and check the file name within that folder.
Step 2. Right-click on the file. Then, choose the Rename option.
Step 3. You can remove extra and special characters from the file name or even rename the company file altogether.
Step 4. Press Enter.
Fix 6. Rename Network Data File
To resolve the issue of not being able to back up the company file due to a broken network data file or moving the .QBW file without the corresponding one on your computer, try renaming the network data file.
Step 1. To find the network data file in QuickBooks, open Windows File Explorer and navigate to the C:\ Users\ Public\ Public Documents\ Intuit\ QuickBooks\ directory, and locate the file there.
Step 2. If your company file has the same name as the .ND file, rename the company file to a different name to prevent conflicts when saving.
Step 3. Right-click on the .ND file and select Rename.
Step 4. To save the file with a new name, add .old at the end of the file name and then press Enter to save the file.
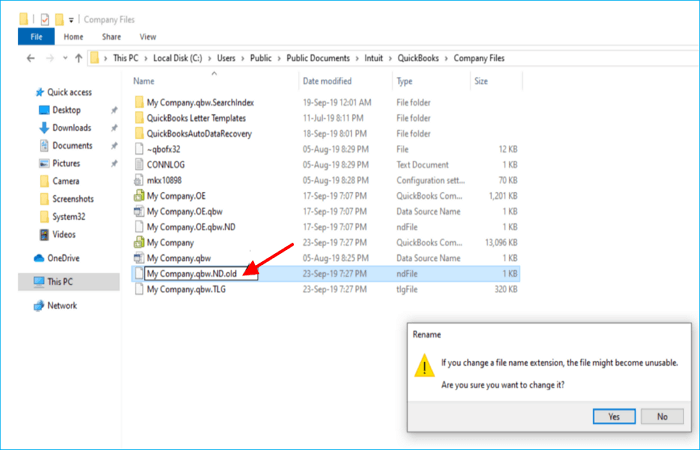
Copy the QBW file and put it in the same place if you have changed the QBW file to a different location, then try to create a backup once again.
If you like this post, share it on your social media to help more people.
Alternative to QuickBooks Built-in Backup Feature: Using APP Backup Software
You can also use third-party backup software like Qiling Disk Master to back up your QuickBooks company file, which may be more reliable and flexible than the built-in QuickBooks backup feature. This way, you can ensure that your QuickBooks data is safely backed up and can be easily restored in case of any issues.
Qiling Disk Master Pro is an all-in-one backup and restore tool for Windows, allowing users to create backups of files, systems, and disks, including automatic QuickBooks backups, and supports various backup types such as scheduled, full, incremental, and differential backups.
You can install Windows on new SSDs without a USB, create an iso image of your hard drive, and take advantage of powerful cloning features to clone a hard drive. Additionally, you can enjoy a security zone and 250G free cloud storage to better protect your backups.
To back up your QuickBooks company file with Qiling Disk Master, follow the steps below.
Step 1. Download and install Qiling Disk Master on your computer, then click the "Backup" tab page.
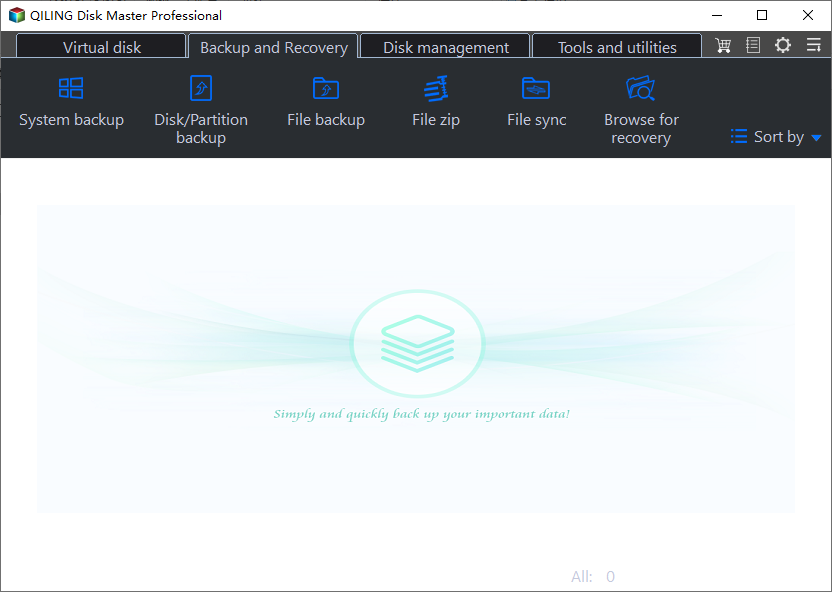
Step 2. Go with the option by clicking "File backup" to make a backup of your software applications.
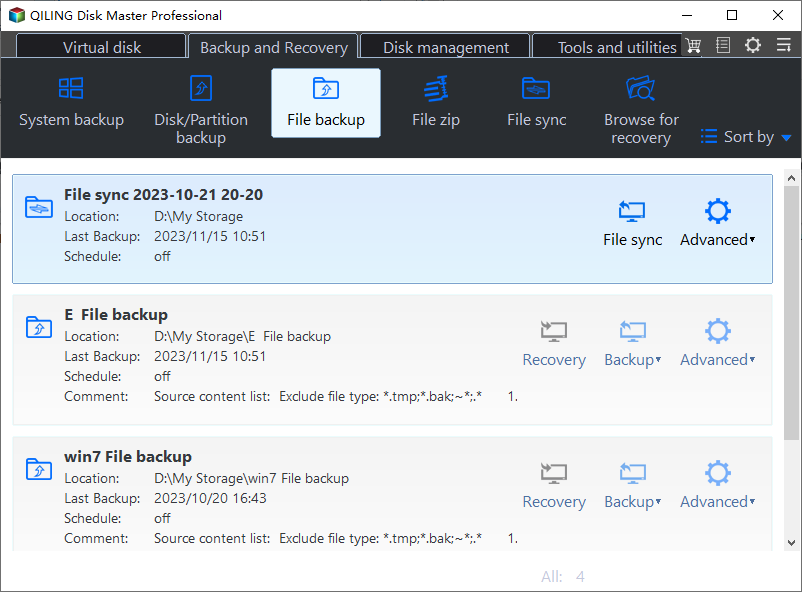
Step 3. All the apps that can be backed up are shown on the screen. Scroll down to find the app you need to back up.
Step 4. Choose a secure location for the backup, such as a cloud service, NAS, or external hard drive, to prevent data loss in case of computer failure or crash.
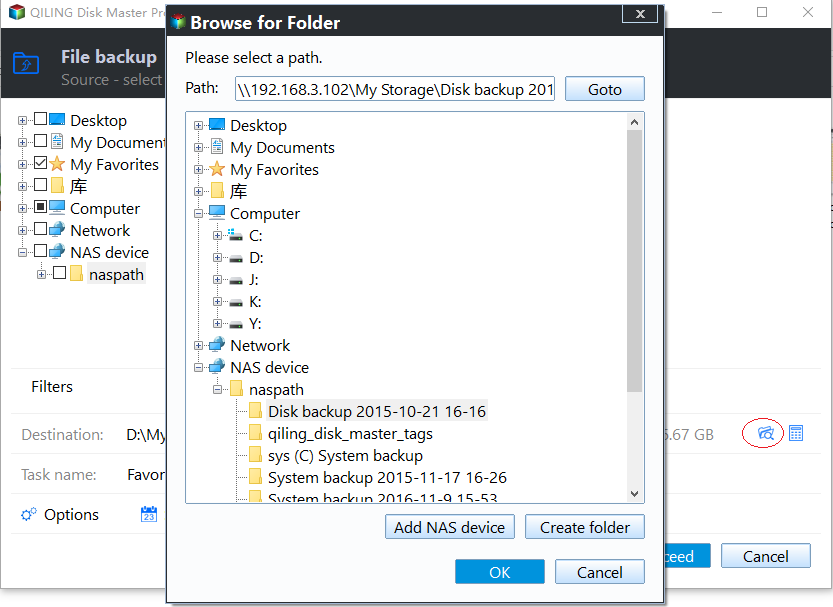
Step 5. You can customize your backup schedule by clicking the "Option" button, which allows you to set a daily, weekly, monthly, or event-based backup. Additionally, you can choose between differential or incremental backup methods to suit your needs.
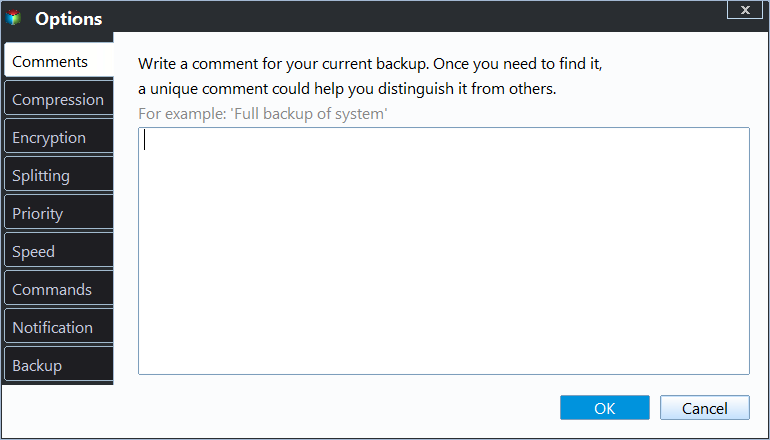
Step 6. When you're done setting things up, click "Proceed" to start the backup process. The time it takes will depend on the size of your source data, but it shouldn't take too long.
What Is QuickBooks Unable to Backup the Company File Error & Its Causes
The QuickBooks unable to back up company file error occurs when QuickBooks is unable to update the data and create a backup, resulting in a failure to create a backup of crucial QuickBooks data.
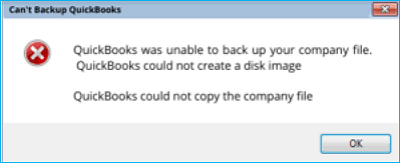
The primary cause behind this error is the unavailability of the storage device storing the backup file, typically an external storage device connected to the computer, which is no longer connected, causing the backup file to be inaccessible.
- Corrupt company file.
- Damaged network data file.
- Wrong backup path in QuickBooks settings.
- Company backup files exceeding the 3 GB size limit.
- Company file name exceeding the 65-character limit.
- Another program uses QuickBooks files during the backup process.
- The issue is likely due to insufficient storage space on the device's memory to save the backup file.
The Final Say
To resolve the QuickBooks unable to backup company file or QuickBooks backup not working error, try the 6 methods covered in this guide, such as running an anti-virus scan, updating QuickBooks, or verifying the backup location. If the issue persists, using a professional backup software like Qiling Disk Master Pro can help you bypass the problem entirely and ensure a successful backup of your QuickBooks company file.
Qiling Disk Master Pro is a versatile tool that not only backs up QuickBooks data but also performs other tasks. For example, you can use it to back up PST files and compress backups. Just give it a try!
FAQs
1. Why can't QuickBooks find my company file?
When QuickBooks can't find the company file, it's usually because the file was moved, renamed, or deleted, or the computer lost connection to its location.
2. Where are QuickBooks backup files stored?
QuickBooks saves backup files on your hard drive in a folder called "Auto Backup" located beneath the QuickBooks directory, and you can find them by searching for this folder on your PC.
Related Articles
- How to Backup Programs Before Reinstalling Windows 10/11 [3 Quick Ways]
- Can You Backup C Drive to OneDrive in Windows 10/11
- How to Copy/Move Recovery Partition to USB or Another Hard Drive [2 Ways]
- Top 10 Best Free Open Source Backup Software | 2024 Selections
- How to Create Disk Image Windows 10 for Free on Laptops & PCs
This article provides a step-by-step guide on how to create a system image on Windows 10, using both the Qiling Disk Master software and the built-in Backup and Restore tool on Windows 11/10. - 2 Ways | How to Create System Image Windows 10 on External Hard Drive
Learn how to create a Windows 10 system image on an external hard drive with Backup and Restore or Qiling Disk Master.
Products
Articles & Tutorials
- Data Recovery
- Data Backup
- File Recovery
- File Backup
- System Backup and Restore
- Disk and Partition Clone
- Technical articles
- Mobile articles
- Disk Master Help
- Windows Data Recovery Tutorials
- Windows Secure Delete Tutorials
- Windows Partition Management Tutorials
- Windows File Backup and Restore Tutorials
- Windows System Backup and Restore Tutorials
- Windows Disk Backup and Restore Tutorials
- Windows Clone Tutorials