How to Backup An External Hard Drive to Another External Hard Drive in Windows 10
- How Do I Backup Everything from One External Hard Drive to Another
- Back-Up An External Hard Drive to Another External Hard Drive
Introduction
Upgrading to a new external hard drive is often necessary when the old drive is nearly full, slow, or showing signs of failure. To make the move safely, back up the data from the old external drive to the new one before you retire or reformat the original drive. In Windows 10, this can be done with backup software, File Explorer, or a transfer tool, depending on how complete and automatic you want the backup to be.
Before you start, connect both external hard drives to your computer and make sure Windows can detect them correctly.
See also:
How Do I Backup Everything from One External Hard Drive to Another
Every hard drive has a limited service life. As it ages, it may slow down, run out of space, or develop errors. Backing up files to a second external drive reduces the risk of data loss and gives you a usable copy if the old drive fails.
Before copying large amounts of data, check the file system on the destination drive. NTFS is usually the better choice for Windows backups because it supports large files, permissions, and more reliable disk management. FAT32 cannot store a single file larger than 4GB.
If the new drive contains no important data, formatting it as NTFS is usually the simplest option. If it already contains files, back them up first before changing the file system.
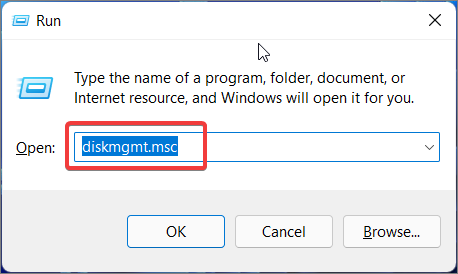
Step 1. To open Disk Management, press the "Win+R" keys on your keyboard, type "diskmgmt.msc" in the Run dialog box, and then press the "Ok" button. This will launch the Disk Management utility.
Step 2. Right-click on the new drive and then click on "Format".
Step 3. Set a clear volume label and choose NTFS as the file system.
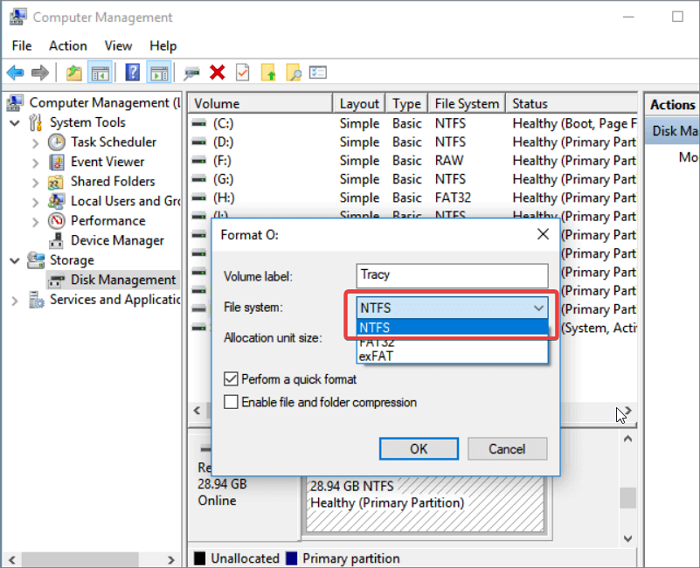
Step 4. To change the drive to NTFS format, click on the "OK" button.
Once the destination drive uses NTFS, it can store large backup images and large personal files without the 4GB file-size limit.
To back up an external hard drive to another external hard drive in Windows 10, you can use three practical methods: create a structured backup with Qiling Disk Master, copy files manually in File Explorer, or use Windows Easy Transfer on older Windows systems that still include it.
How to Back Up An External Hard Drive to Another External Hard Drive in Windows 10
If you want to know how to backup an external hard drive to another external hard drive in Windows 10, we have three excellent solutions with which you can transfer all your files to your new drive.
- Method 1. Back-Up An External Hard Drive to Another with Qiling Disk Master
- Method 2. Back-Up An External Hard Drive to Another By Copying Data
- Method 3. Back-Up an External Hard Drive to Another via Windows Easy Transfer
Method 1. Back-Up An External Hard Drive to Another External Hard Drive with Qiling Disk Master
If you value your data and want to ensure it's safe, Qiling Disk Master is a top-notch free backup software that offers more than just data backup. This award-winning program for Windows 11 allows you to create a bootable rescue media, store files in the cloud, protect against ransomware, backup an external hard drive to another in Windows 10 or older, schedule backups, and more. With its comprehensive features, Qiling Disk Master is the ideal tool to safeguard your important data.
Step 1. Start with selecting the backup tab page.

Step 2. There are four backup categories, File, Disk, OS, and Mail, click Disk backup.
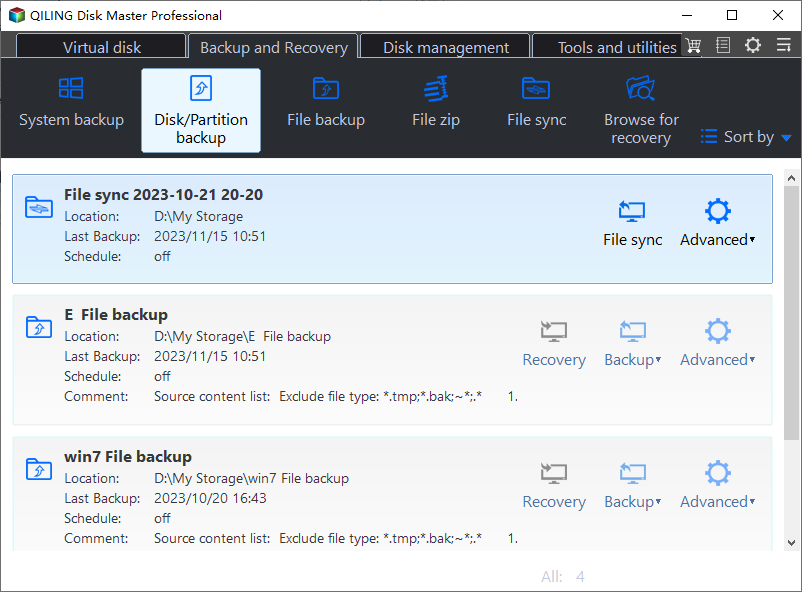
Step 3. The user can choose to back up a whole disk or a specific partition, depending on their needs.
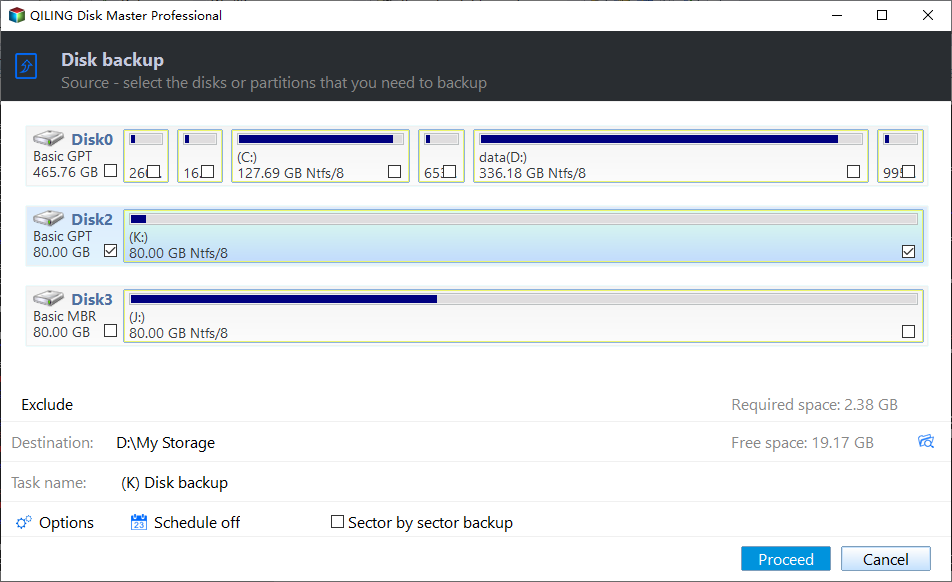
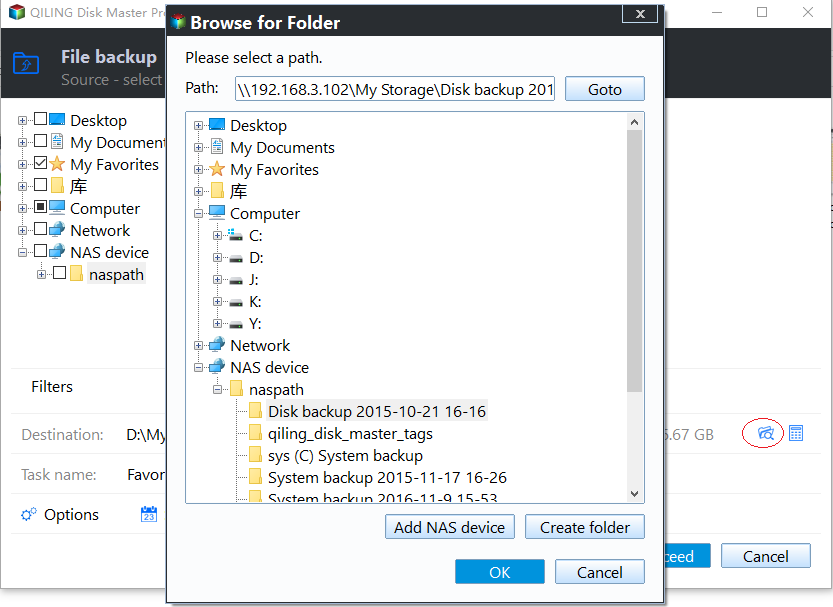
Step 4. Select the destination where you want to save the backup.
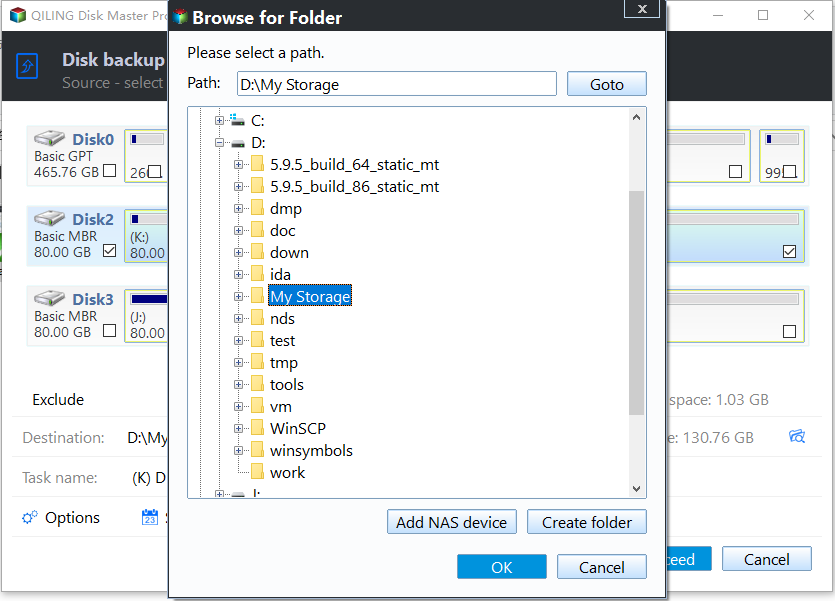
Step 5. For disk/partition backup, you can save the backup to either a local drive or a network-attached storage (NAS) device.
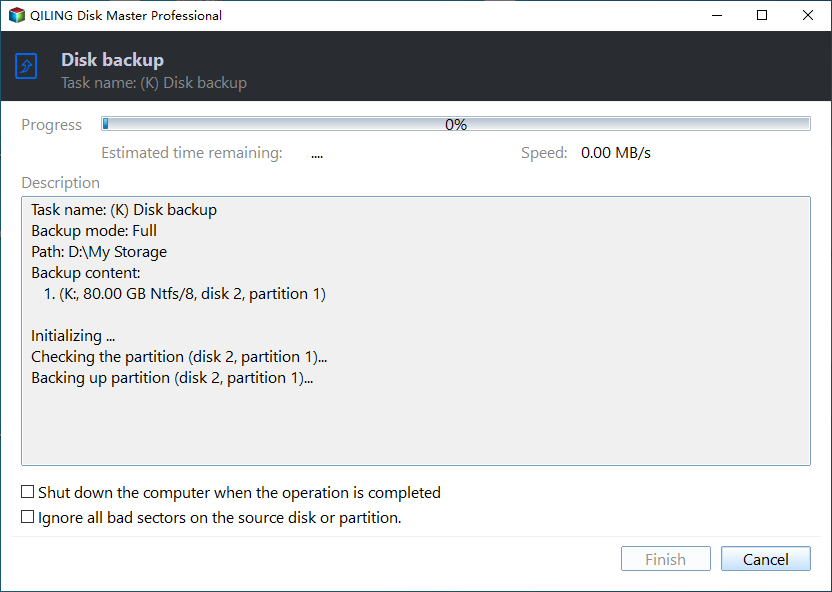
Step 6. After the backup process is completed, your task will be displayed at the left. You can right-click on any task to further manage your backup, such as recovering it or creating an incremental backup.
Method 2. Back-Up An External Hard Drive to Another External Hard Drive By Copying Data
To make a backup of your files, the simplest method is to copy-paste them from the old drive to the new one. This involves selecting all the files you want to transfer, right-clicking on them, and choosing the "copy" option. Then, navigate to the new drive, right-click, and select "paste" to copy the files.
Step 1. Connect both the old and the new drive to the computer. This will allow the operating system to recognize the new drive and prepare it for cloning.
Step 2. To compare the contents of the two external hard drives, open both of them in separate windows on your computer. Keep both windows open side-by-side so you can easily view the files and folders on both drives at the same time.
Step 3. To transfer files from your old drive to your new drive, select the files you want to copy/move, then press "Ctrl+C" to copy or "Ctrl+X" to cut the files.
Step 4. To copy files from one external drive to another, click on the new external drive window and press "Ctrl+V" to paste the files.
The process of copying or moving files from an older external hard disk to a newer one can be time-consuming, depending on the size of the files and the physical write and read speeds of both disks. This is due to the varying speeds at which data is written to and read from the disks, which can impact the overall duration of the process.
- Notice:
- When copying files to another drive, ensure a sturdy and strong USB cable is used and is securely connected to prevent backup failure and potential hard disk corruption.
Method 3. Back-Up an External Hard Drive to Another External Hard Drive via Windows Easy Transfer
If you're running Windows 8 or earlier, you can use Windows Easy Transfer to back up files and settings from one computer to another. This tool is not built into Windows 10, so Windows 10 users should choose Qiling Disk Master or File Explorer instead.
It transfers the following data:
- Windows settings
- User Accounts
- Desktop
- Taskbar options
- Emails
- Documents
- Pictures
To use Windows Easy Transfer, connect both drives, open the tool from the Start menu, choose the source and destination, select the data you want to transfer, and save the transfer file to the new external drive. Large data sets may take much longer than a few minutes.
Step 1. Connect both the external hard disks to the PC.
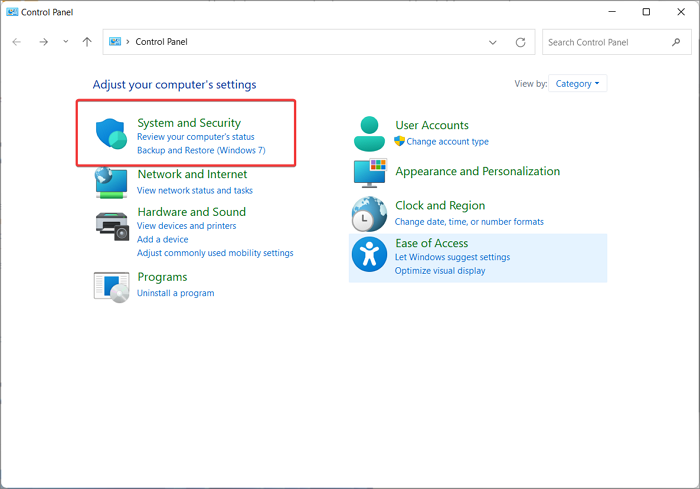
Step 2. Click on the "Start" menu and then open "Control Panel".
Step 3. Select "System and Security", followed by "Backup and Restore".
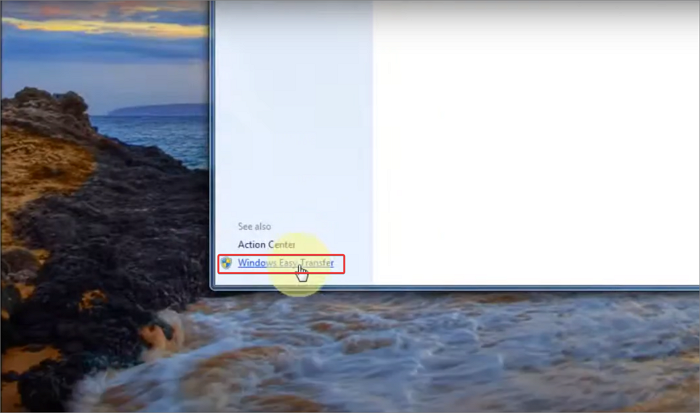
Step 4. On the left-bottom window pane, click on "Windows Easy Transfer".
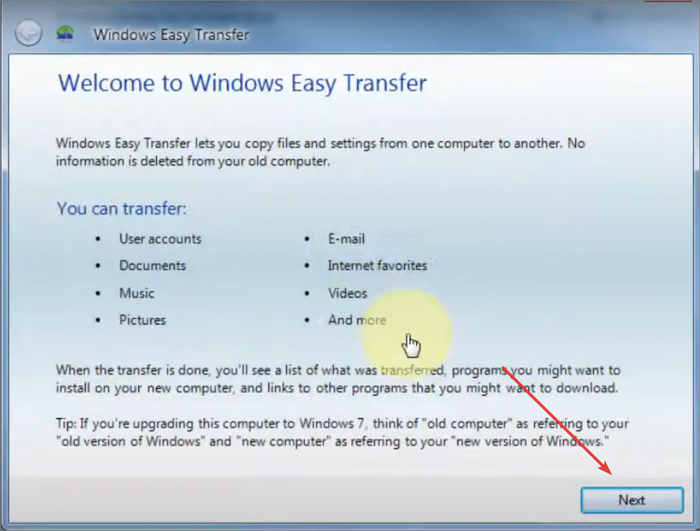
Step 5. Once the Windows Easy Transfer window opens, click on "Next".
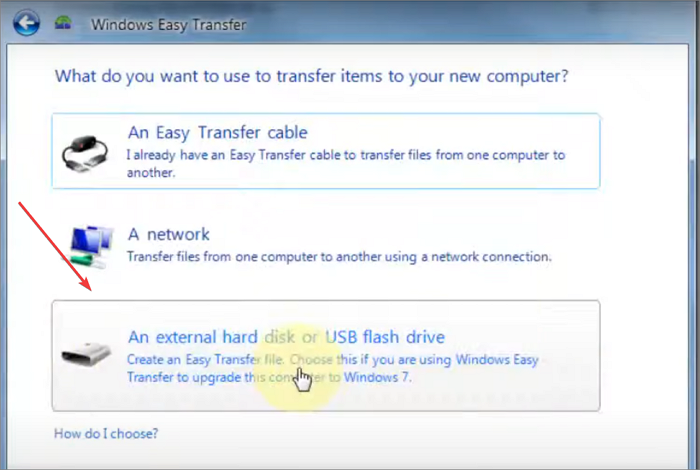
Step 6. To start the process of transferring your files to the new external hard drive, ensure that it is properly connected to your computer. Once connected, select the option that says "An external hard disk or USB flash drive" from the available choices.
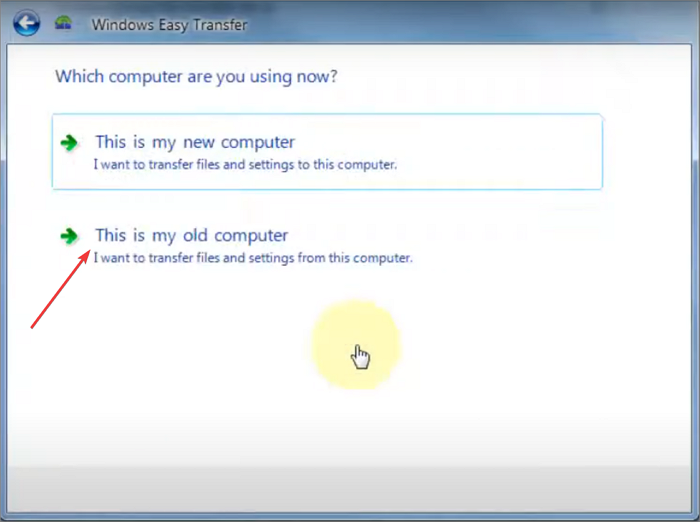
Step 7. Now select "This is my old computer".
Step 8. After scanning, your PC will estimate the size of the selected files so you can confirm the destination drive has enough free space.
Step 9. Click on "Next" and enter your Windows password, then click on "Save".
Step 10. Now, save the file onto the new external hard disk.
Once you've backed up your files on the new drive, you can use Windows Easy Transfer to restore the data.
Here's how to do that:
Step 1. Open Windows Easy Transfer.
Step 2. To continue, click on the "Next" button, and then select the option for an external hard disk or USB flash drive.
Step 3. On the target computer, choose "This is my new computer" and confirm that you already have a transfer file.
Step 4. To open the file, go to the hard disk where you saved it and select "Open".
Step 5. Now the data will be restored.
Final Verdict
Qiling Disk Master is an all-in-one backup and clone solution for Windows 11. It can create rescue media, back up hard drives, SD cards, disks, files, and partitions, and help restore data when needed.
With Qiling Disk Master, you can schedule automatic backups of your entire hard drive or specific folders/files, and easily restore backups. You can also encrypt backups and save them on the cloud, hard disk, or external drive.
The Qiling Disk Master program offers various tools with its free version and also provides a free trial period where users can access all its premium features for a limited time.
Back-Up An External Hard Drive to Another External Hard Drive in Windows 10 FAQs
1. Can you clone a hard drive to an external hard drive?
You can clone your hard drive to an external hard drive by creating a system image of your PC, which is a complete copy of your hard drive's contents, including your operating system, programs, and data. This allows you to create a backup of your entire system, which can be restored in case of a hardware failure or other issues.
2. How do I backup my Dell computer to a flash drive?
Step 1. Click on the "Windows" button, and open "Control Panel".
Step 2. To access the Backup and Restore (Windows 7) feature, select "System & Security" from the Control Panel, and then choose "Backup and Restore (Windows 7)" from the options that appear.
Step 3. To create a system image, click on the "Create a system image" option from the left window pane of the Backup and Restore (Windows) utility. This will initiate the process of creating a system image, which includes the operating system, device drivers, and other system files.
Step 4. To backup your Dell computer to a flash drive, select the external hard drive, click "Next", and then choose "Start backup" to initiate the backup process.
3. How do I transfer files from my old Dell computer to my new Dell computer?
You can transfer files from your old Dell computer to your new Dell computer by using one of three methods: using a USB drive, transferring files wirelessly via Wi-Fi, or using a cable connection. Each method allows you to easily move your files to your new computer, making the transition smoother and more efficient.
Related Articles
- How to Move Files to External Hard Drive Without Copying - 2 Alternative Ways
- How Do I Clone M.2 SSD to Larger M.2 SSD on Laptop/PC
- 2024 Complete Guide: How to Boot from SSD After Cloning
- Top 2 Ways to Create Recovery Partition for Windows 7/8/10/11
- How to Move/Switch from Internet Explorer to Microsoft Edge - Qiling
Internet Explorer is nearing its end of support on June 15, 2022, and users may want to switch to Microsoft Edge or other browsers. Fortunately, it's possible to transfer favorites/bookmarks, accounts and passwords, and Downloads to Edge with ease. - How to Move Games to Another Drive Windows 11 [Beginner's Guide]
If your system drive (C drive) is running low on space, consider moving games to another drive in Windows 11. This will free up space for your operating system and ensure it continues to run smoothly, even with a good hardware setup.