How to Backup Windows 10 Before Upgrading to Windows 11✅
Windows 11 Windows 11 is the latest operating system update by Windows, touted as more secure, reliable, stylish, and faster than its predecessor, Windows 10. This has led to a growing desire among users to switch from Windows 10 to Windows 11.
Before installing a major Windows update, back up your data to reduce the risk of losing important files, applications, and system settings.
Before upgrading to Windows 11, it is a good idea to back up Windows 10. If the upgrade fails or you decide to return to Windows 10, a backup gives you a safer recovery option.
📖You may be interested: Revert Windows 11 to 10? How to Downgrade Windows OS
What content should be backed up?
When planning a system backup, include anything that would be difficult or impossible to replace. This includes documents, photos, videos, music, work files, project data, application data, and operating system files. backup everything you care about.
The backup content can be of 3 types:
- 🗂️Data Files: The package includes all necessary documents, pictures, songs, videos, and other files.
- 🖥️Operating System and Apps: Windows program files, setups, and installed application updates are stored in a specific directory on the computer. This directory is usually located in the C:\Program Files or C:\Program Files (x86) folder, depending on the system architecture.
- ⚙️Customize Settings: If you've made any changes to your operating system or apps, such as installing new software or modifying system settings, it's essential to include this information in your backup content. This will ensure that your backup is comprehensive and can be used to restore your system to its previous state in case of a disaster or system failure.
3 Ways to Backup Windows 10 Before Upgrading to Windows 11
Before upgrading to Windows 11, back up your Windows 10 data, including files, system files, registry entries, and other important settings. The three methods below help you create a safer upgrade fallback.
Here's a summary of the methods in one paragraph:
| Methods | 🎨Effectiveness | ⏰Time | 🎗️Difficulty |
|---|---|---|---|
| High This software is highly effective in backing up all types of files with ease. | Minimum with excellent accuracy | Extremely easy, hard drive and cloud backup available | |
| File History | Medium - Highly effective, and doesn't require other software. | The speed depends upon system specs | The backup option is relatively easy, but it's only available for hard drives. |
| Backup and Restore | Moderate - Moderately effective, ideal for old-school backup | The speed depends upon system specs | The system has a relatively easy backup process, but it only offers a hard drive backup option, which might not be as convenient as other methods such as cloud or external drive backups. |
Method 1. Best Windows 10 Backup Software – Qiling Disk Master👍
To shift to Windows 11, it is most effective to use a quality software like Qiling Disk Master to back up Windows 10 first. This ensures a fast and secure system backup with no hiccups, similar to the functionality provided by the Qiling Disk Master.
The software offers easy backup of files, disks, partitions, hard drives, and operating systems, storing backups in local drives, external hard drives, NAS, and cloud storage, with one-click backup and instant recovery features for high speed.
To save a replica of your system, you can create a system image, which also offers options for disk cloning, making the system bootable, and serving as a disaster recovery tool. This ensures that you can upgrade to Windows 11 without losing any data.
Step 1. Launch Qiling Disk Master and choose the "Backup and recovery" tab page.
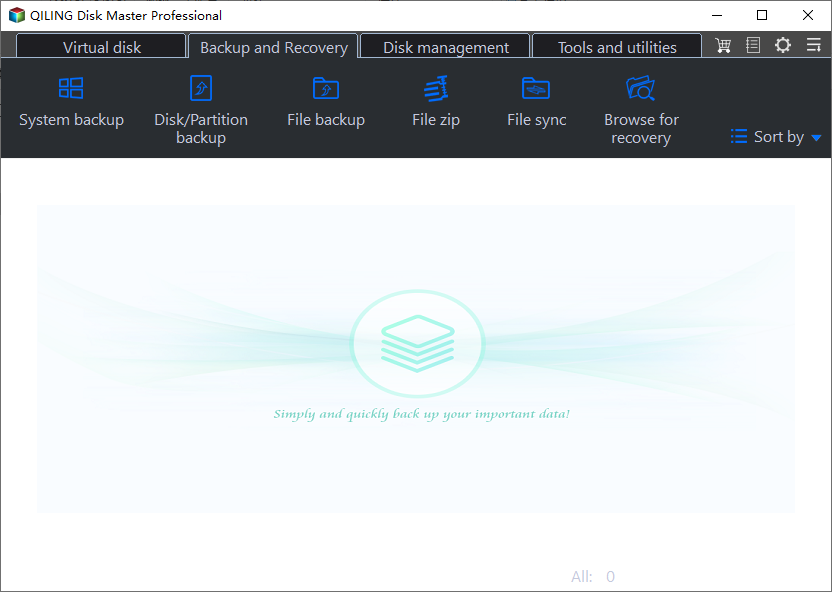
Step 2. To start the system backup, click on the "System backup" category.

Step 3. The system partition will be automatically selected, you only need to select the location where you want to install the operating system.

Step 4. You can save the backup file to your local drive, cloud storage, or network-attached storage (NAS), or even connect an external hard drive to store system backup files.
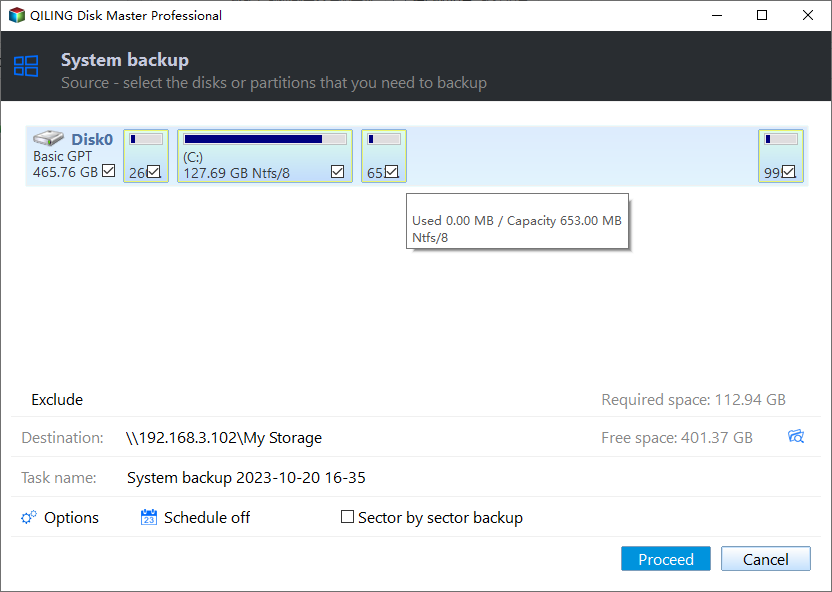
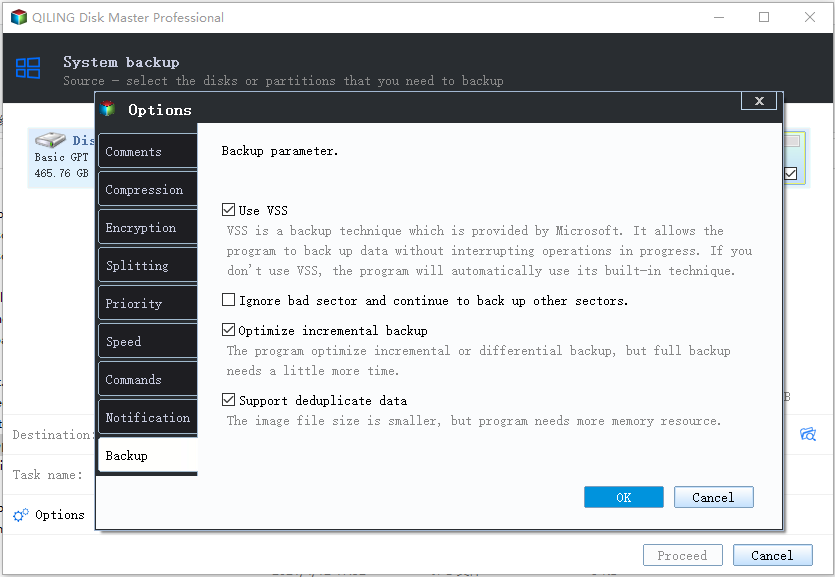
Step 5. You can customize the settings in "Options" at the left bottom, click "Proceed", and the process will start.
After completing the backup process, you can view the backup status, restore, access, or remove the backup by right-clicking on the backup task in the left panel.
The Qiling Disk Master is a comprehensive backup tool that is compatible with Windows 7/8/10/11, providing a solution for all backup and data recovery needs.
To back up your Windows 7 computer before upgrading to Windows 10, you'll need to create a system image and a backup of your files. You can use the built-in Windows Backup and Restore feature to create a system image, which will capture the state of your computer, including installed programs and settings.
To back up a Windows 7 computer before installing Windows 10, you have two options. You can use the built-in Windows backup and restore feature to create a backup of your data, or you can use a third-party backup and restore tool to protect your Windows 7 data before upgrading to Windows 10.
Method 2. Backup Windows 10 via File History
Windows 10 has a built-You can use the File History feature in Windows to create backups of your important data and program files on an external hard drive or a network location. This way, you can copy the backed-up files after upgrading to Windows 11.
Follow these steps to Backup Windows 10 via File History:
Step 1: Connect an external hard drive or a NAS to your PC.
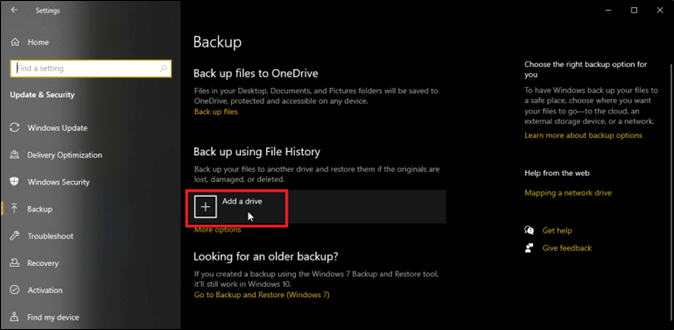
Step 2: Go to Settings > Update & Security > Backup, click on "add a drive" in the Backup Using File History heading, and select an external hard drive or NAS as the backup location.
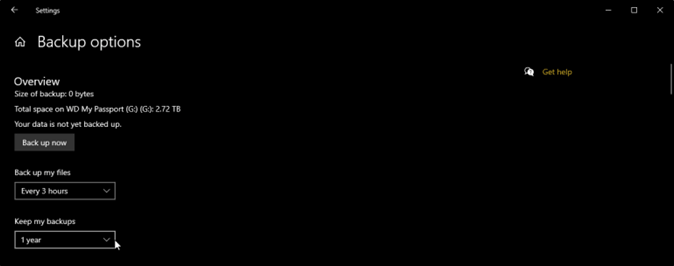
Step 3: Click More Options The best time to visit the park depends on your personal preferences and what you're looking for. If you're looking for a peaceful and serene experience, consider visiting during the early morning or late evening when the park is less crowded. If you're looking for a more lively atmosphere, visit during the day when the park is open and there are more people around. Back up My files (To select a timeline for period backup) and Keep My Backups (for how long you want to keep it there). Select as per requirement.
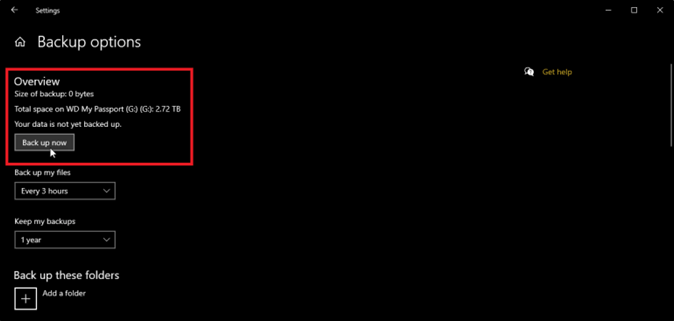
Step 4: The Windows will start selecting folders to back up. You can review the folders in the Backup Options window, where you can choose to remove or add specific folders.
Step 5: After setting up the backup process, click "Proceed" to start the backup. Once it's finished, you can access the backed up files on the external drive.
Method 3. Backup Windows 10 via Backup and Restore (Windows 7)
Backup and Restore The primary backup feature in Windows 7 was Backup and Restore, which was replaced by File History in Windows 8. Despite this, some users still find Backup and Restore the most reliable option.
To backup Windows 10 via the Backup and Restore feature, go to Settings > Update & Security > Backup, then select Add a drive to choose a location for your backup. You can also select On a network to save your backup to another computer on your network.
Step 1: Go to Windows Backup Settings. In the Backup menu, choose Go to Backup and Restore.
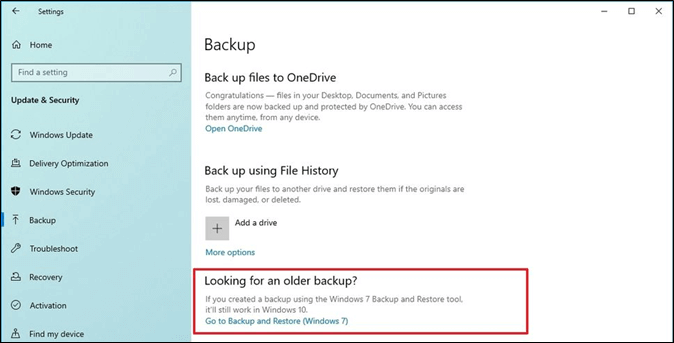
Step 2: Here, click the Set up Backup option.
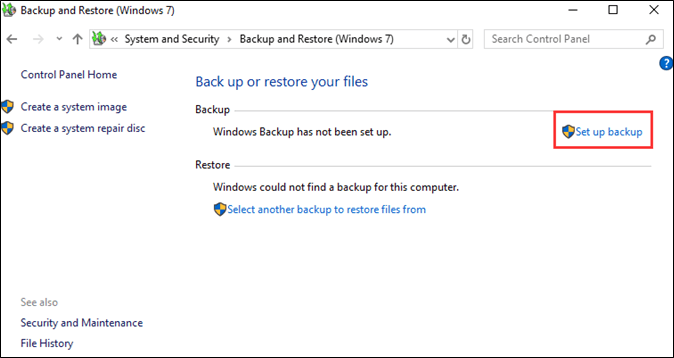
Step 3: Choose a backup drive to store your files. You can select an internal or external hard drive for this purpose.
Step 4: Select the let me choose option and click on the Next button.
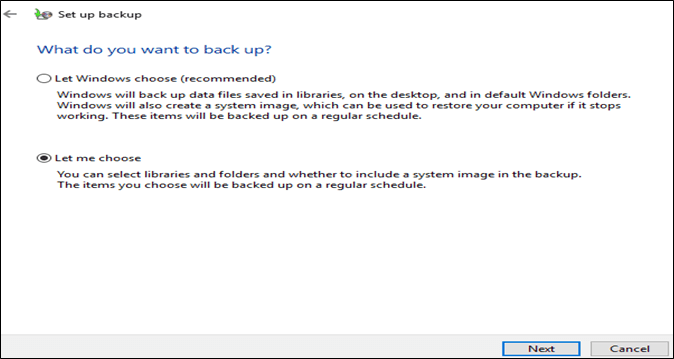
Step 5: Select all the files you want to backup. Then, click on the Next button again.
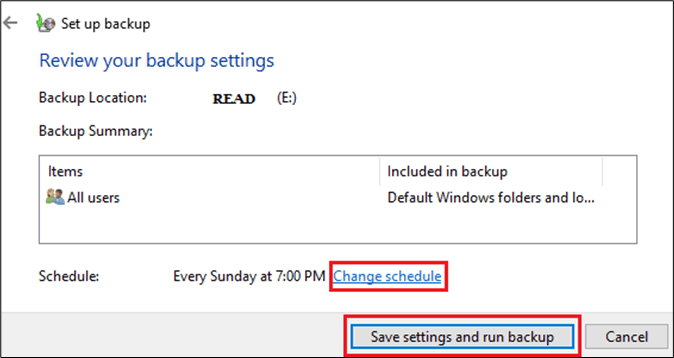
Step 6: Click the "Save settings and run backup" option. The Windows will back up all the data.
Tips to Upgrade from Windows 10 to 11 Smoothly and Effectively
Windows 11 has specific requirements for PC hardware, and if your system doesn't meet these minimum system requirements, the upgrade process can be problematic.
🎨To ensure a smooth transition to Windows 11, follow these tips. First, check if your device is compatible with the new operating system.
- Windows 11 requires a minimum 1 GHz processor, 4 GB RAM, 8 GB storage, and a DirectX 12 compatible graphics card.
- The Trusted Platform Module (TPM) version 2.0 or above should be used.
- Run the PC Health Check app to see if it can run on your PC.
- Check if the update is ready for your PC.
- Set up a Microsoft account for file transfer.
- Get knowledge of Windows 11 tools.
The Wrap Up
Windows 11 is the latest update offering maximum processing speed, app performance, support system, and security. Before upgrading from Windows 10, backup all critical data and program files to ensure a smooth transition.
The blog provides a step-by-step guide on three ways to back up Windows 10, recommending Qiling Disk Master as the most feasible option due to its data security and versatility, making it the ideal choice for users to get started with backing up their data right away.
Don't forget to share this post if it is helpful:
FAQs on Backup Windows 10 Before Upgrading to Windows 11
1. Can you backup Windows 10 and restore it to Windows 11?
You can backup Windows 10 and restore it to Windows 11 using tools like Qiling Disk Master or the Windows File History feature.
2. What to backup before reinstalling Windows 11?
Before reinstalling Windows 11, it's a good idea to back up all your important data files, operating system, installed apps, and customized settings to prevent losing any valuable information.
3. Can I upgrade from Windows 10 to 11 without losing my programs?
During a Windows 10 to Windows 11 upgrade, program files are generally recovered. However, to avoid data loss, it's recommended to backup your programs before the upgrade.
Related Articles
- Sync Files Between Desktop and Laptop | Easy!
- Backup Guide: System Image Backup on Windows 7
- Clone GPT Disk in Windows 10 - This Method Would Work!
- [2 Ways] How to Create Windows 10 Image with Pre-Installed Software
- How to Backup Hard Drive to Another Hard Drive 2024 [Windows & Mac]
- Create Portable Windows 11/10/8/7 USB Drive in 2 Ways
- Qiling Disk Master VS Zinstall: What Difference Between Them and Which Is Better
When it comes to data migration tools, you may wonder which software to choose. The hit data transfer software is Qiling Disk Master and Zinstall. This article will focus on the Qiling Disk Master vs. Zinstall. Go on to learn the main features, cost, specifications of both software.
Products
Articles & Tutorials
- Data Recovery
- Data Backup
- File Recovery
- File Backup
- System Backup and Restore
- Disk and Partition Clone
- Technical articles
- Mobile articles
- Disk Master Help
- Windows Data Recovery Tutorials
- Windows Secure Delete Tutorials
- Windows Partition Management Tutorials
- Windows File Backup and Restore Tutorials
- Windows System Backup and Restore Tutorials
- Windows Disk Backup and Restore Tutorials
- Windows Clone Tutorials