How to Back Up Windows 10 to Synology NAS (2 Ways)
Saving your Windows 10 files and data to a Synology NAS ensures their safety and accessibility, as it provides a safeguard against system failure or malware attacks that can occur on your Windows 10 computer. This backup solution protects your system settings, programs, and personal files, ensuring they remain intact and accessible even in the event of a system failure or cyber attack.
You can back up Windows 10 to a Synology NAS using Qiling Backup Home software and Backup and Restore (Windows 7). With Qiling Backup Home, you can follow the steps to set up and use the software to back up your Windows 10 system to your Synology NAS. Alternatively, you can also use Backup and Restore (Windows 7) to back up your Windows 10 system to your Synology NAS.
What Is Synology NAS
Synology NAS is a Network-Synology DiskStation Manager (DSM) is a web-based interface that allows users to perform multiple tasks on files using a Synology NAS, including syncing files with a cloud station and sharing files via FTP.
In Windows 10, Synology provides a convenient environment to store system settings, personal files, and important programs. It also allows you to manage and back up files through a web-based file station, either from a computer or server, making it a great file backup option.
Why Do You Back Up Windows 10 to Synology NAS
To ensure a backup of your Windows system, you can use Synology NAS to back up your files, providing a second or third option in case of system failure or malware attack that may lead to data loss.
Synology NAS stands out as a unique Windows 10 backup option compared to other methods like local hard drives, external drives, or cloud storage. It offers a reliable and scalable solution for data backup, allowing users to store and manage their files in a centralized and secure manner.
With Synology NAS, you don't need to keep a physical connection with your computer like you would with a USB drive. The Synology DiskStation is always on, so you can connect to it from your computer anytime without having to move an inch.
Synology NAS has multiple internal hard drives, which provides improved resiliency against data loss. If one hard drive fails, the other drives can still access the files, ensuring security and reliability of stored data.
Synology NAS provides a centralized storage location for all files, allowing for easy management of computer backups from a single device, reducing the need for multiple backup locations and minimizing the risk of losing files by keeping them in one secure location.
How to Back Up Windows 10 to Synology NAS
There are two primary ways to backup Windows 10 files to Synology NAS, allowing you to protect your important data.
1. Using the software, i.e., Qiling Backup Home
2. Using Windows 10 built-in tools.
Backing up Windows 10 to a Synology NAS can be done using two methods. To achieve this, you can use either the built-in Windows Backup and Restore feature or a third-party software.
Method 1. Back Up Windows 10 to Synology NAS with Software
The best software to back up Windows 10 to a Synology NAS is Qiling Backup Home, which enables a complete system backup and safeguards files and data in case of computer damage or malware attack.
Qiling backup software securely stores and restores backups from Synology NAS, allowing you to safely back up your files daily, weekly, or monthly to keep their latest copies on Synology NAS, provided you have the correct login credentials.
You can also perform multi-To ensure the accessibility of your data, consider saving your files to different drives on a Network-Attached Storage (NAS) device. This way, if one drive were to fail accidentally, your files would still be accessible from the other drives, guaranteeing their availability and minimizing data loss.
Main Features of Qiling Backup Home
Qiling Backup Home is the best backup and restore software, offering a range of features that make it stand out. With its robust capabilities, it provides users with a reliable and efficient way to protect their data.
- Intelligent backup: Qiling saves storage space and time by only backing up used parts of the file system, eliminating the need to back up the entire system.
- Hot backup: This software allows you to back up your files and data while the computer system is in use, eliminating the need to stop activities before backing up your device.
- Secure backup and recovery: The software securely backs up your entire system to a Synology NAS, keeping a complete image of your system that can be easily reverted to in case of a malfunction or virus attack.
- Offsite copy: Once you've backed up your files and data to Synology NAS, the software automatically keeps an offsite copy on a different platform, such as FTP, providing an extra layer of backup in case all systems fail.
- Security zone backup: Qiling Backup Home allows you to save your files to a security zone that is inaccessible to anyone apart from you, such as a partition on your computer or NAS, to protect them from ransomware or malware attacks.
- Free disk cloning software allows you to create copies of your hard drive or other storage devices, providing a backup plan in case of system failure. This ensures you have a safe and reliable way to revert to a previous state.
To back up Windows 10 to Synology NAS using Qiling Backup Home, download and install the software on your computer. The trial version provides access to many advanced features, allowing you to get started with the backup process.
Steps to Backup Windows 10 to Synology NAS with Qiling Backup
Saving your files and data to Synology NAS using NAS backup software is a straightforward process. To get started with Qiling Backup Home, follow these simple steps below.
Step 1. To initiate a backup, click the File backup button option.

Step 2. On the tree view, both local and network files will be shown, allowing you to browse and select the desired backup files by extending the directory.

Step 3. Choose a location to store the backup, following the on-screen instructions.

Step 4. To encrypt the backup with a password, click on "Options" in the "Backup Options" section. This will allow you to secure your backup with a password.

To set up a backup scheme, click on the "Backup Scheme" option, and then select the desired schedule and start the backup at a specific event. Additional options can be chosen to customize the backup process according to individual needs.

Step 5. The backup may be stored on a local disk, Qiling's online service, or a Network-Attached Storage (NAS) device.

Step 6. Qiling Backup allows customers to back up their data to both a third-party cloud drive and Qiling's own cloud drive.
To back up data to a cloud drive, select Local Drive, scroll down to add Cloud Device, and then add and log in to your account provided by a third party.
Step 7. After clicking Proceed, the backup job will be initiated, and once it's completed, it'll be displayed as a card on the left side of the panel. To further manage the backup job, right-click on it.

Method 2. Back-Up Windows 10 to Synology NAS with Built-in Tools
One of the Windows 10 built-The Backup and Restore feature in Windows 7 can also be used to back up a Synology NAS, although it was initially designed for Windows 7, it was later included in Windows 8 and Windows 10 as well.
Microsoft introduced the Backup feature on Windows 10, allowing users to save files and data to local hard drives, external hard drives, the cloud, and even Synology NAS. To back up Windows 10 to Synology NAS using Backup and Restore (Windows 7), select it as an option and provide network credentials, enabling the system to automatically save files.
You can back up personal files, system settings, and program files to a Synology NAS, and also create a System Image, a snapshot of your entire computer, to easily recover it if needed.
To backup Windows 10 to Synology NAS, you can follow these steps: First, ensure that the Synology NAS is connected to the same network as the Windows 10 computer. Then, download and install the Synology Drive app on the Windows 10 computer.
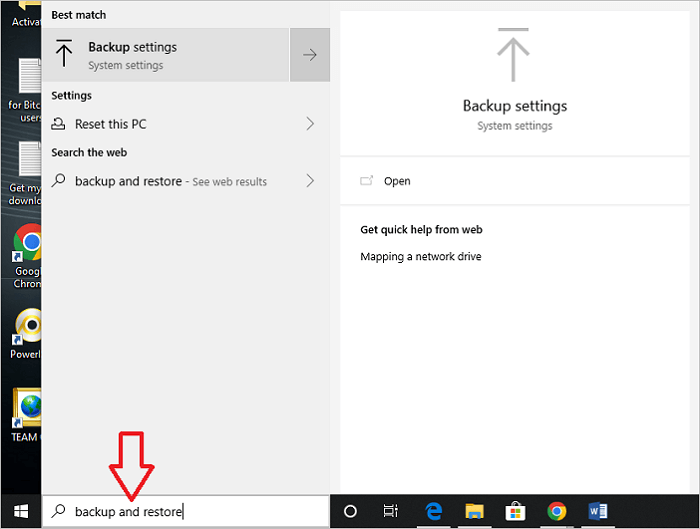
Step 1. To backup and restore your device, type "backup and restore" on the search bar and hit Enter. This will open the Backup and Restore settings page, where you can select the type of backup you want to create (e.
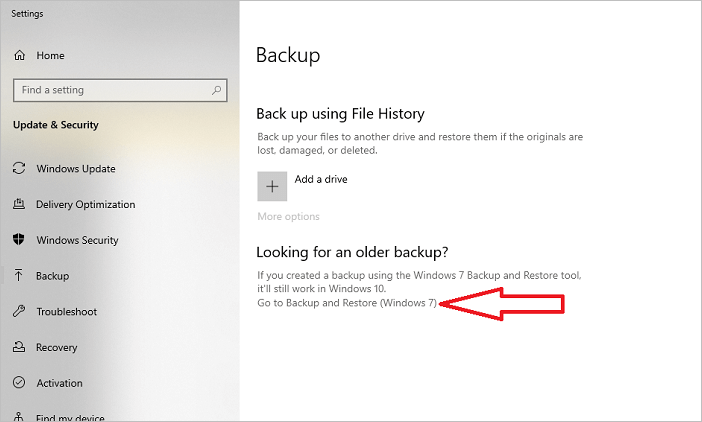
Step 2. On the Windows that opens, click on "Go to Backup and Restore (Windows 7)" under "Looking for an older backup?".
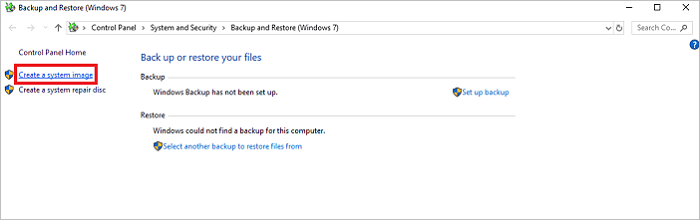
Step 3. Click on "Create a system image".
Step 4. To save the backup, select "On a network location" under "Where do you want to save the backup", click the "Select" button, and input the Synology NAS credentials for the network location where you want to save your backup files and data.
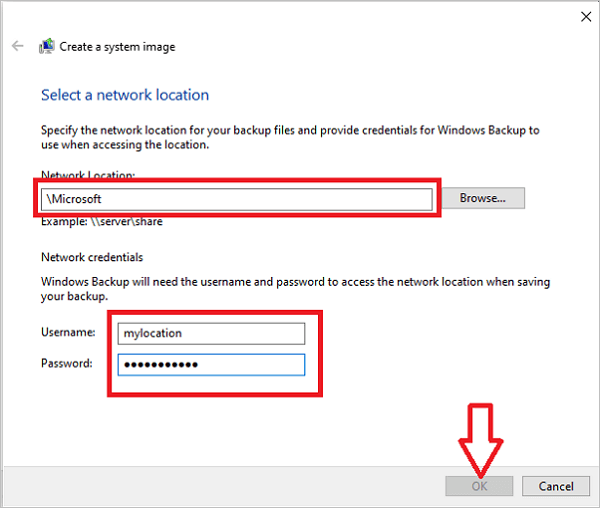
Step 5. Once you've entered your network details, including username and password, click "OK" and then "Next".
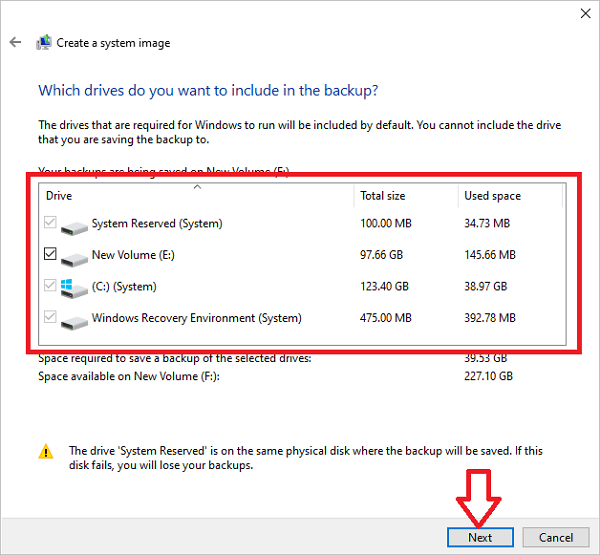
Step 6. Select the drives you want to include in the backup, then click Next.
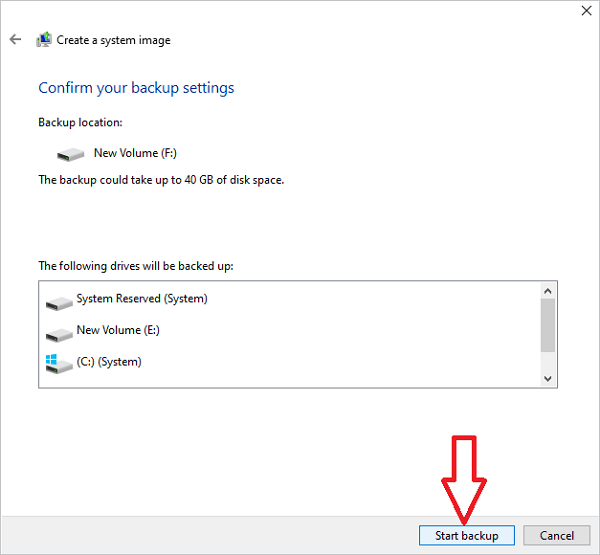
Step 7. Confirm your backup settings on the next window, then click "Start backup".
Files from the selected drives will back up to the Synology NAS, a process that may take some time, requiring patience until completion.
Conclusion
Synology NAS allows you to manage your files using a web-based interface called Synology DiskStation Manager (DSM). This enables you to safely back up your Windows 10 files, access them easily, and sync files on a cloud station. Additionally, you can save and share files over the internet via FTP.
Using Synology NAS as a backup location offers several benefits, including a centralized storage location, resilience to data loss, and enhanced data security. You can back up Windows 10 to Synology NAS using Qiling Backup Home and Backup and Restore (Windows 7), with Qiling Backup Home being the recommended method.
With Qiling Backup Home, you can securely save and retrieve backups from your Synology NAS by logging in with your account credentials. This software allows you to schedule backups daily, weekly, or monthly, ensuring your files are always up-to-date on the NAS. Try the trial version today to experience its benefits.
Backup Windows 10 to Synology FAQs
To help you understand further about Windows 10 backup to Synology NAS, we've provided a list of related questions and their answers below.
1. How Do I Backup My PC to Synology NAS?
You can use a third-party tool or Windows built-in tools to back up your files, with Qiling Backup Home being the most recommended software. This tool allows you to save all your files and data, making it easy to recover them whenever needed.
One built-To back up your PC to a Synology NAS, you can use the built-in Backup and Recovery tool in Windows 7. This tool is user-friendly and allows you to save your files to a network location, making it a convenient option for backing up your PC to your Synology NAS.
2. Does Synology Have a Backup App?
Synology offers several backup applications that protect multiple devices, DSM applications, and online services, providing alternative ways to secure backup tasks.
3. How Do I Connect Windows to Synology NAS?
You can achieve this through the following steps:
1. Open Windows Explorer and click on "Computer" or "This PC".
2. Next, click on "Map Network drive".
3. The user needs to select a drive letter from the drop-down menu on the next window.
4. Enter the server name and shared folder name for your Synology NAS, i.e., "\\DiskStation\Share1" and click Finish.
5. Enter the username and password for your DSM. Click OK.
6. You'll now have your shared network folder mapped and accessible under "Computer" or "This PC".
Related Articles
- How to Backup Data from Hard Drive without OS in 3 Ways
- Top 10 Best Email Backup Software in 2022 [New]
- Ghost Windows 7 Using Hard Drive Ghost Software
- How to Clone Windows 10/8/7 to Another Computer
- How Do I Create an ISO Image of my Hard Drive?
An ISO image is also referred to as an ISO file. But how do I create an ISO image of my hard drive? This guide can help. This post will tell you how to create an ISO image of your hard drive and offer a backup tool called Qiling Disk Master to help you. - How Do I Transfer Windows OS to a Different SSD?🔥
How do I transfer Windows OS to a different SSD? Do you want to get the answer? This article will tell you how to transfer your Windows to a new SSD and introduce a tool to help you.