Execute Bootable Clones on Windows 11 Without Losing Data
You might be eager to try out Windows 11 for the first time, with its new user interface and exciting features like running Android apps natively in Windows.
You can clone Windows 11 to a USB drive using a third-party software, as Windows doesn't have a built-in clone feature. This requires enough capacity on the USB drive.
Cloning a hard disk is different from backing up data, as it produces a bootable digital copy that can be used to start a system, whereas a backup cannot. To create a bootable clone on Windows 11, Qiling Backup can be used.
Necessary Tool for Cloning - Qiling Backup
Making a bootable clone on Windows 11 involves cloning the entire system, preserving both the system disk layout and data. Qiling Backup is a recommended tool for this purpose, offering a range of functions to cater to various Windows 11 user needs.
- Clone a disk, partition, or operating system
- To migrate Windows 11 to a new hard disk drive (HDD) or solid-state drive (SSD), you can use the built-in Windows 11 feature called "Windows 11 Transfer" or a third-party cloning software. This process will transfer your operating system, settings, and applications to the new drive, while preserving your data.
- Transferring Windows 11 to a new PC
- Data backup and recovery involves creating and storing copies of data to protect against loss or corruption in case of a disaster, hardware failure, or other unexpected events. This includes backing up disks, partitions, files, operating systems, and emails, as well as restoring them when needed.
- To copy the Windows 11 operating system and programs to a USB flash drive, you can use the built-in tool called "Windows To Go" or a third-party software like Rufus. First, ensure your USB drive is at least 32GB in size and is formatted as NTFS.
How to Perform Bootable Clone of Windows 11
Download Qiling Backup from the button above and follow the detailed guide to create a bootable clone of Windows 11.
Step 1.To clone a system using Open Qiling Backup, navigate to the "Tools and utilities" page, then select the "System clone" option. This will allow you to clone your system.

Step 2.Qiling Backup will automatically select the boot and system partition. Simply choose the target disk and click "Next" to proceed.
Make sure the partition style of the source disk and the target disk are the same.
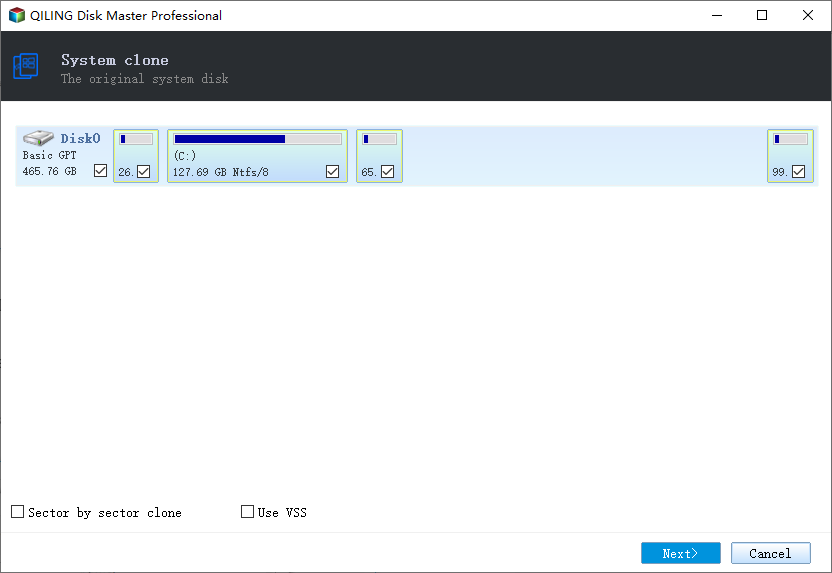
Be aware that system cloning will completely erase all data, so it's essential to back up your data beforehand to avoid any loss.

Step 3.If you want to clone your system to an SSD, you can choose "optimize for SSD" in the advanced options.

Step 4. Click "Proceed" to start cloning.
Once you've copied the Windows OS to the new SSD, you can proceed to the next step to make the SSD bootable on your computer. This typically involves setting the SSD as the primary boot device in your computer's BIOS or UEFI settings.
How to Boot Windows 11 from a Newly Cloned SSD
If you need to boot from the cloned drive, you can do so by setting the cloned drive as the primary boot device in your computer's BIOS settings. This typically involves entering the BIOS settings by pressing a key such as F2, F12, or Del, then navigating to the boot order settings and selecting the cloned drive as the primary boot device. Once you've made the change, save the settings and exit the BIOS, and your computer should now boot from the cloned drive.
To make a cloned SSD bootable on a Windows PC, change the boot order in BIOS to prioritize the SSD over the original hard drive. This involves accessing the BIOS settings, navigating to the boot order section, and selecting the SSD as the primary boot device. After making this change, save the settings and restart the PC.
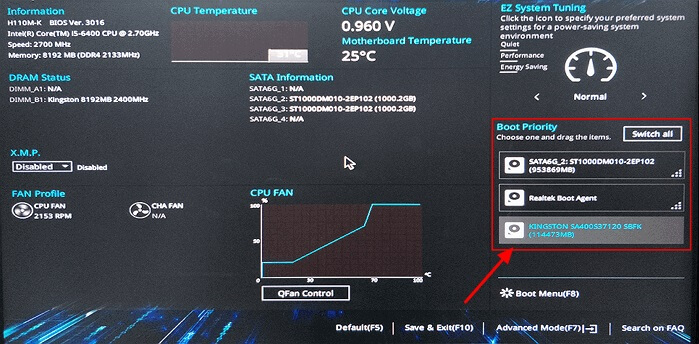
Step 1.To restart the computer, press the power button, and then immediately enter the BIOS environment by pressing the designated key, such as F2, F8, F11, or Del, to access the settings.
Step 2.To set the cloned SSD as the boot disk in BIOS, navigate to the boot section and select the cloned SSD as the boot device. This will instruct the computer to start up from the cloned SSD instead of the original drive.
Step 3. Save your modifications and restart your computer.
To successfully boot the machine from the cloned SSD, follow these steps: 1) Connect the cloned SSD to the machine, 2) Enter the BIOS settings, 3) Set the cloned SSD as the primary boot device, and 4) Save the changes and exit the BIOS settings. The machine should now boot from the cloned SSD.
Conclusion
To execute a bootable clone on Windows 11 without losing data, use the method outlined in this article, which is significantly easier than recovering data from a failed Windows installation. We recommend utilizing Qiling Backup to ensure data safety.
Windows 11 Bootable Clone FAQs
1. How do I clone a drive in Windows 11?
You can only rely on third-Qiling Backup is a user-friendly software that enables a quick and efficient disk clone in Windows 11, making it a convenient tool for users.
- Step 1. Click "Tools" and choose system clone.
- Step 2. Qiling Backup will automatically select the boot and the system partition, choose the target disk, and click "Next."
- Step 3. If the target disk is an SSD, select optimize for SSD in the advanced options.
- Step 4. Click "Proceed" to start cloning.
2. Can I clone Windows 11 to SSD?
You can clone Windows 11 to a solid-state drive (SSD) for faster performance and smaller storage size.
Using an SSD as your primary drive can significantly boost your PC's performance, with even basic models being up to five times faster than traditional HDDs. This means faster data transfer, quicker boot times, and a snappier overall experience. For gamers, an SSD can be a game-changer, providing lightning-fast load times and improved in-game performance.
However, the advantages of an SSD don't stop there. Since it's more dependable, compact, and consumes less power, switching from an old-school HDD is a no-brainer, especially since Windows 11 is new, you'll want to start with the best possible setup.
The only drawback of choosing an SSD over a hard drive is that you get less storage space for your money, as larger SSDs are more expensive than comparable hard drives. However, smaller SSDs have become more affordable, with a 128GB model available for around $30. Larger capacities, such as 1TB or 2TB, are still pricier than their HDD counterparts.
3. Can I clone to an unallocated disk?
After cloning a hard disk to a larger HDD or SSD, the unallocated disc space remains unused. You have several options for utilizing this space, depending on your specific situation.
If you have unallocated space just beneath the cloned partition, use Disk Management to extend the volume. Right-click the partition closest to the unallocated space, select Properties, and then click Extend Volume from the drop-down menu. You can then drag the arrow to the end of the box in the pop-up window.
To use unused space to construct a new basic volume, right-click on the empty space with your mouse. This will allow you to create a new volume from the available space.
Related Articles
- Quick & Easy: Fix Cannot Download from Google Drive Problem
- Lenovo OneKey Recovery Free Download for Windows 10 64 Bit/32 Bit
- Try the Best Alternative of Norton Ghost Windows 11!
- Does Windows File History Backup Everything? Know More About File History
- Quick Fix: No Restore Previous Versions Option in Windows 10
Why is there no Restore previous versions option? Here you can learn how to recover it. To retrieve files easily, you can use Qiling Disk Master Standard. - (Solved) Outlook Not Showing Old Emails | 6 Ways
you can find all the possible reasons for Outlook 2016 or Windows 10 not showing old emails and 6 effective methods to fix it. To keep your emails safe, please back them up.