Change Motherboard Without Reinstalling Windows 7
Windows 7 may fail to boot after a motherboard replacement because the storage controller, chipset, BIOS mode, and drivers have changed. A full backup and hardware-aware restore reduce the risk.
Before Replacing the Motherboard
- Check whether the old system uses IDE, AHCI, or RAID mode.
- Confirm BIOS/Legacy boot mode and disk partition style.
- Back up Windows and personal files to an external disk.
- Prepare network and chipset drivers for the new board.
Create and Restore a System Image
Step 1. Before removing the old motherboard, open Qiling Backup and choose System Backup. Confirm that the Windows 7 system partition and boot partition are selected.

Step 2. Save the backup image to an external drive or network location, then click Proceed. Do not store the only backup on the system disk you are about to move.

Step 3. Create Qiling bootable media. After replacing the motherboard, boot the computer from this media if Windows 7 cannot start normally.
Step 4. In the recovery environment, choose Restore and browse to the Windows 7 system image.

Step 5. Select the target disk and enable Universal Restore for the new motherboard. This helps Windows load on different storage controllers and chipset hardware.
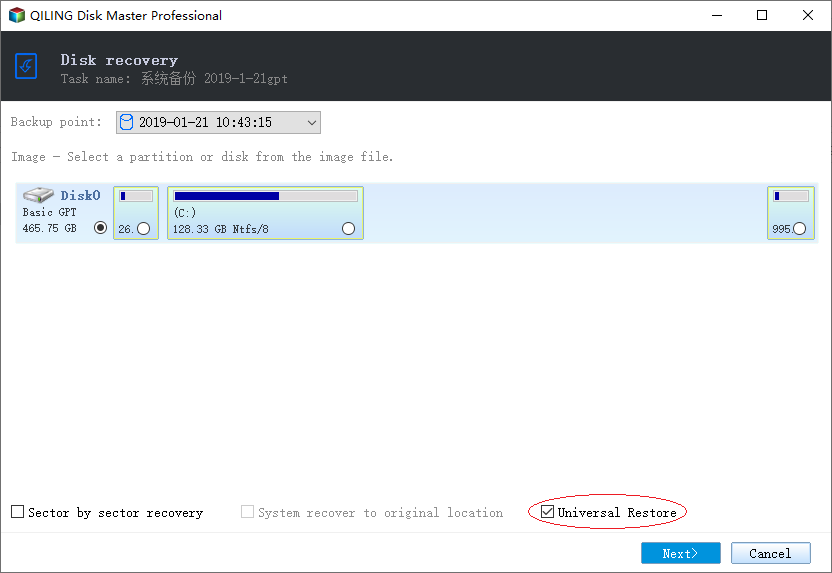
Step 6. Click Proceed. After Windows starts, install LAN, chipset, USB, audio, and graphics drivers for the new motherboard.
Motherboard Replacement Steps
- Record the current BIOS boot mode and storage mode before removing the old motherboard.
- Create a system backup and save it to an external drive.
- Create bootable recovery media so you can restore the image if Windows 7 cannot boot after the hardware swap.
- Install the new motherboard, CPU, memory, and storage cables carefully.
- Enter BIOS and set the same boot mode used by the old Windows 7 installation.
- Restore the system image with dissimilar hardware support if Windows does not boot directly.
- Install LAN, chipset, audio, USB, and graphics drivers after Windows starts.
- Reactivate Windows 7 if the hardware change triggers activation.
Windows 7 is sensitive to storage controller changes. If the old system used IDE and the new board uses AHCI or RAID, Windows may show a blue screen until the driver and mode are corrected.
Conclusion
You may change a motherboard without reinstalling Windows 7, but driver and boot mode differences matter. A system image gives you a safer way back.
For Windows activation after a motherboard change, read Do You Need to Buy Windows Again After Changing a Motherboard?
Related Articles
Products
Articles & Tutorials
- Data Recovery
- Data Backup
- File Recovery
- File Backup
- System Backup and Restore
- Disk and Partition Clone
- Technical articles
- Mobile articles
- Disk Master Help
- Windows Data Recovery Tutorials
- Windows Secure Delete Tutorials
- Windows Partition Management Tutorials
- Windows File Backup and Restore Tutorials
- Windows System Backup and Restore Tutorials
- Windows Disk Backup and Restore Tutorials
- Windows Clone Tutorials