How to Create a Scheduled Backup in Windows 10 [Utimate Guide]
Setting up a backup schedule will automatically back up your files at regular intervals. If you're using Windows 10, you may be wondering how to create a scheduled backup. Fortunately, there are four ways to do so, and this article will provide the best solutions for your backup needs.
Benefits of Creating Scheduled Backup in Windows 10
Setting up a scheduled backup can save you time and energy, as it automates the process of backing up important data. By specifying the time, content, and destination of the backup, you can let your files run the backup task at the designated time without any manual intervention, freeing you up to focus on other tasks. This approach offers numerous benefits, including increased efficiency and reduced risk of data loss.
- Avoid data loss due to forgotten backups.
- Save backup time and increase backup efficiency.
- Increase data security and reliability.
- Eliminate complex tasks that can be affected by human error.
Setting up a backup plan is crucial, and fortunately, there are many software options available that can provide automatic backup. On Windows 10, you can utilize the built-in backup tools, as well as reliable third-party software, to ensure your important files and data are safely backed up.
Four Ways to Create a Scheduled Backup in Windows 10
When choosing software for a scheduled backup, consider factors such as ease of use and data security. To create a scheduled backup in Windows 10, consider using either built-in tools like Windows Backup or third-party software like Qiling Backup, which can help protect your data and provide peace of mind.
- Qiling Backup Home
- Backup and Restore
- File History Windows 10
- OneDrive
While all four solutions can set a scheduled backup, they differ in four key aspects when it comes to doing so.
| Comparison | ||||
|---|---|---|---|---|
| Cycle time | Daily, weekly, monthly | Daily, weekly, monthly | Daily, hours and minutes | Every minute |
| Space | 250GB free space | No free space | No free space | 5GB free space |
| Speed | Quick | Slow | Quick | Quickest |
| Content | Files and system | Files and system | Files | Files |
By comparing these four elements, we can see that:
1. OneDrive is the fastest cloud storage option, but it is primarily used for file backups and may not be the best choice for storing and sharing files with others.
2. Backup and Restore can be used for system backups, but the process is slower and requires no free backup space, limiting its effectiveness for system backups.
3. File History backup is used for file backups and does not offer free backup space. It can only be used for backing up files.
4. Qiling Backup is the most comprehensive backup method.
OneDrive is a better choice for basic file backup needs, offering 5GB of free storage space. However, Qiling Backup is a more reliable alternative when File History and System Restore fail on Windows 10, and is also a good option for incremental backups.
I will introduce the simple steps of these methods, and you can choose the one you prefer. Next, I will introduce the simple steps of these methods, and you can choose the one you prefer.
Method 1: Use Qiling Backup to Create a Scheduled Backup in Windows 10
Qiling Backup is a professional tool for rapid backup and restore, with a scheduled backup feature that allows users to set up automatic backups by setting the backup time and content, including files, folders, and systems, as well as disk and partition backups.
Besides, it is an easy-The software is user-friendly and can be mastered without professional help. It offers a straightforward and easy-to-follow process, making it accessible to anyone who wants to use it. The steps to use the software are simple and can be completed by following a series of clear instructions, eliminating the need for technical expertise.
Step 1. To begin the backup process, click the File backup button.

Step 2. The left-hand side of the screen displays lists of both local and network files, allowing you to expand the directory and select the files you want to back up.

Step 3. Follow the on-screen instructions and select the desired location for storing the backup.

Step 4. To ensure your backup is encrypted and set a schedule, click on the "Options" button within the "Backup Options" section.

You can also choose to start the backup at a certain time in Backup Scheme by clicking Options, where you can find many other customizable options.

Step 5. You can store the backup file on your computer, in Qiling's cloud service, or on a network-attached storage device (NAS).

Step 6. Qiling Backup allows customers to store backup copies of their files on either a third-party cloud drive or the company's own cloud storage.
To back up data on a third-party cloud drive, select Local Drive, scroll down to add Cloud Device, and fill in your account information.
Step 7. To start a backup, click on "Proceed". Once the backup process is complete, it will be displayed as a card on the screen, and clicking on it will allow you to view more details about how to handle the backup job.

Qiling Backup has various functions beyond its scheduled backup feature, allowing users to manage and customize their backups according to their needs.
- It supports system clone and disk clone.
- It supports rapid system image recovery when the system crashes
- The new algorithm will optimize the data storage by filtering out unnecessary information, thus maximizing the available space.
- It can automatically backup files to cloud, NAS, or a flash drive when plugged in.
Method 2: Use Backup and Restore to Create a Scheduled Backup in Windows 10
To create a scheduled backup in Windows 10 using Backup and Restore, you can use the built-in tool to save files and folders and create a system image. This allows you to back up your files to a removable drive or network share folder on a NAS server, and can also be used to create a scheduled backup. You can follow the steps to set up a scheduled backup using Backup and Restore.
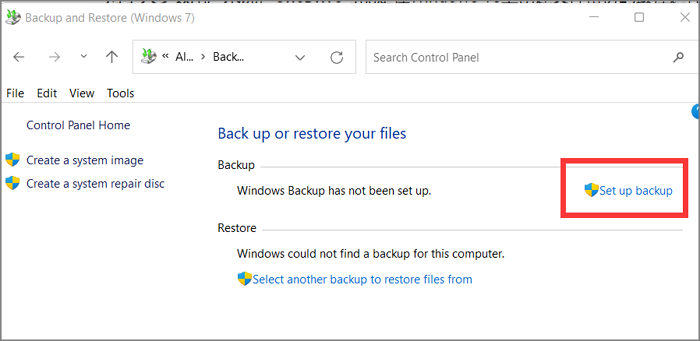
Step 1: Open "Control Panel" and choose "Backup and Restore(Windows7)."
Step 2: Click "Set up backup" to create a scheduled backup.
Step 3: Choose the backup destination and click "Next."
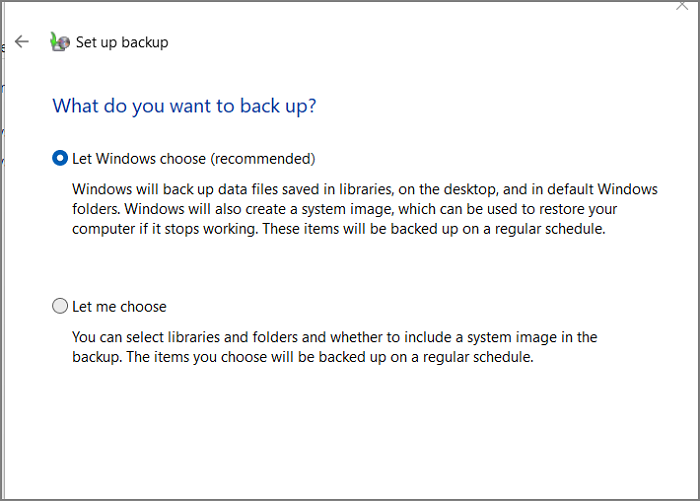
Step 4: Windows will create a system image and a backup of your files. You can either make a custom backup or let Windows choose. Click "Next" to proceed.
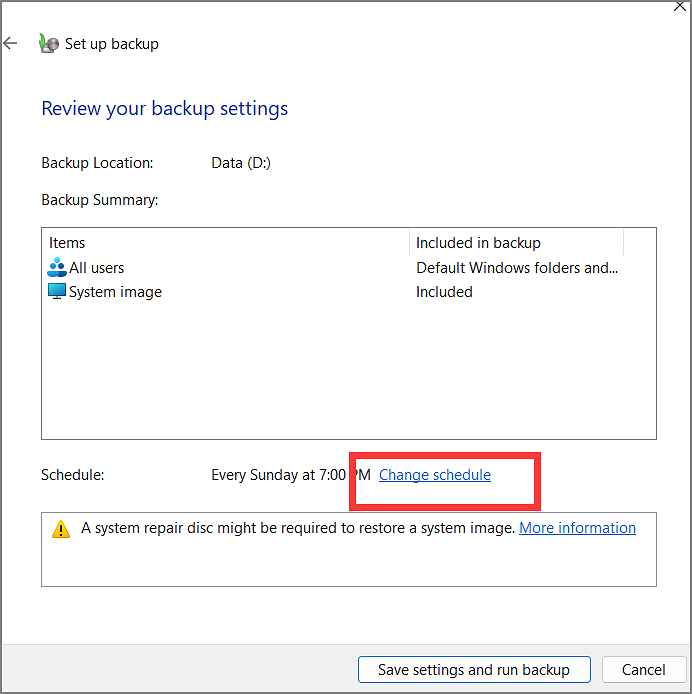
Step 5: Review your backup settings and click on "Change schedule" to set the time.
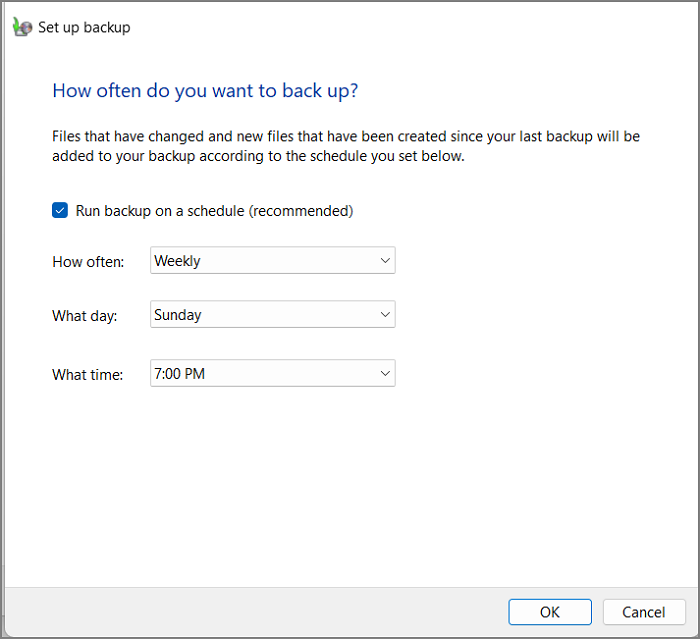
Step 6: You can choose to back up your files daily, weekly, or monthly, depending on your preferences. Some people prefer to back up their files every day, especially if they work on important projects or have a lot of data.
Step 7: I've created a scheduled backup for you. It will run automatically at the specified time.
Method 3: Use File History to Create a Scheduled Backup in Windows 10
File History can be used to create a scheduled backup to save files and folders, including changed files, by default backing up every hour and saving them in your user folder. To create a scheduled backup, you can follow these steps.
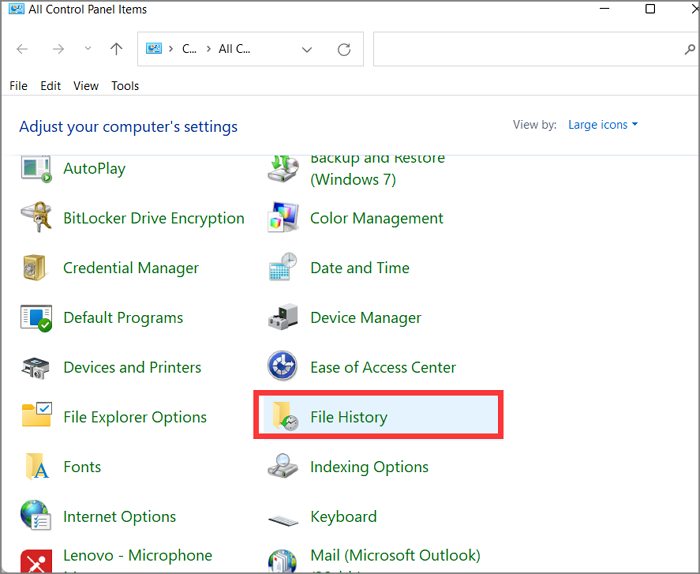
Step 1: Open "Control Panel" and choose "File History."
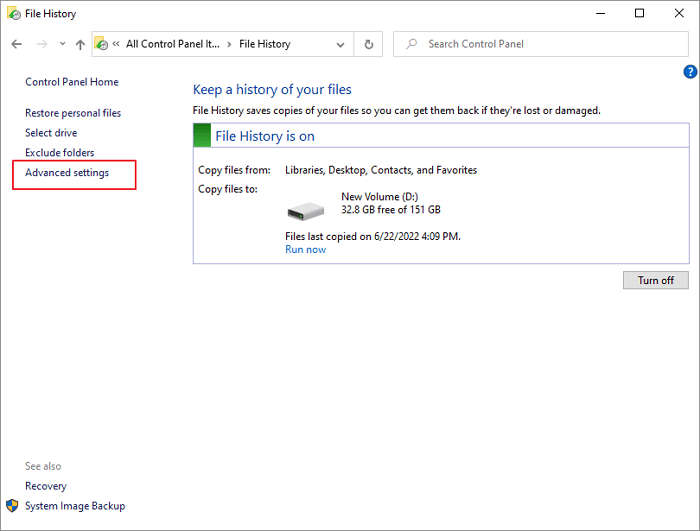
Step 2: To create a scheduled backup, click on the "Advance settings" option located on the left side of the interface. This will allow you to set up a regular backup of your data.
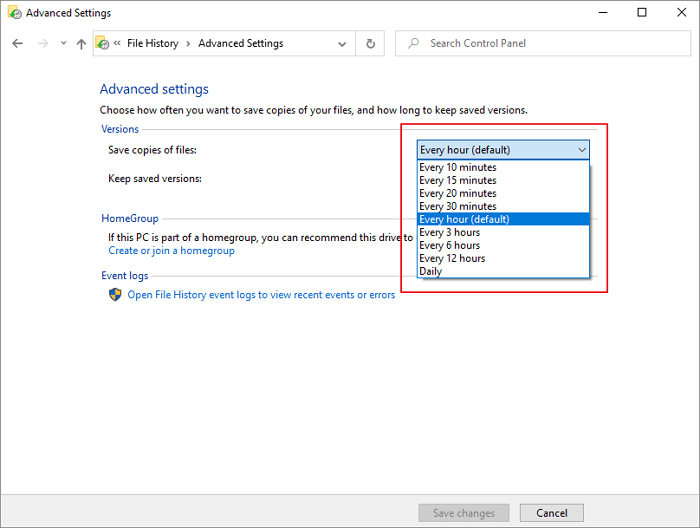
Step 3: Choose how often and how long you want to save the files. And click "Save changes."
Step 4: You can choose an external hard drive or a network location to select a drive to install the operating system on.
Step 5: To successfully create a scheduled backup, select a drive, click "OK", and turn on "File History".
Method 4: Use OneDrive to Create a Scheduled Backup in Windows 10
To create a scheduled backup using OneDrive, simply log in and save your files and folders in the OneDrive folder. Once you've done this, OneDrive will automatically begin backing up your files, storing them in the cloud for safekeeping. No additional steps are required, as the backup process is triggered by the act of saving files in the OneDrive folder.
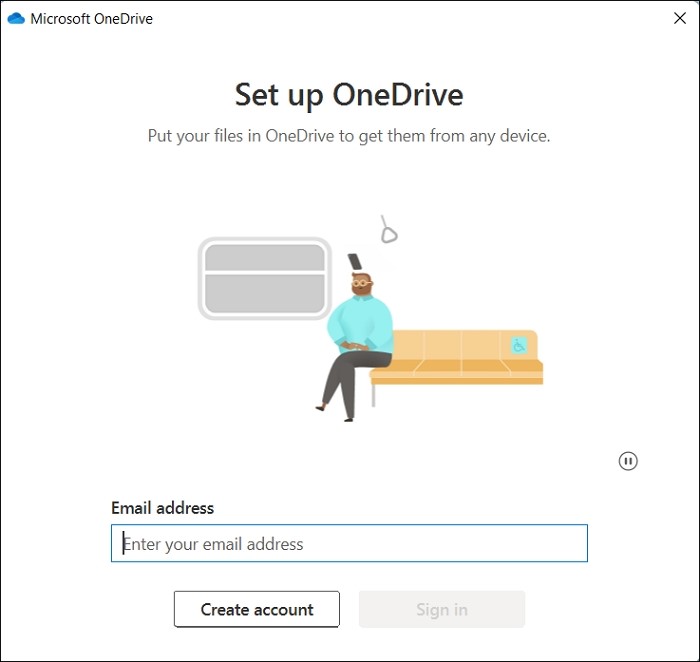
Step 1: Open OneDrive and sign in to your account.
Step 2: To set up a scheduled backup, click on the pattern in the upper right corner and select "Settings".
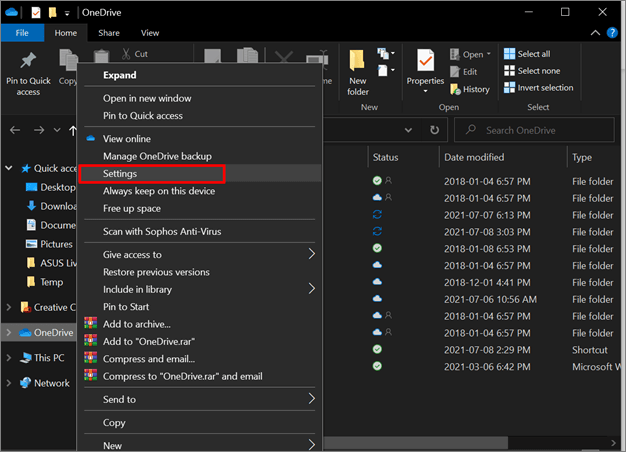
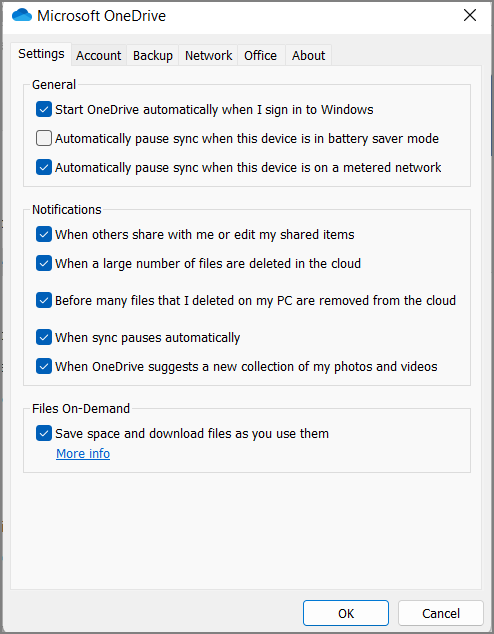
Step 3: Click "Settings" to choose when you want to back up.
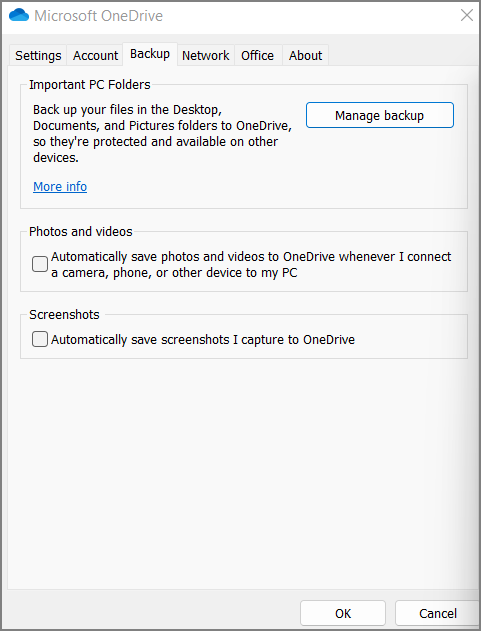
Step 4: Choose "Backup" to create a custom backup.
Step 5: The task was created and scheduled to run at the desired time. The backup will be executed automatically at the specified interval.
Conclusion
This guide will show you four ways to create a scheduled backup on Windows 10, with Qiling Backup being a comprehensive choice that you can download and try.
FQAs About How to Create a Scheduled Backup in Windows 10
To create a scheduled backup in Windows 10, simply follow the guide provided, which will walk you through the process. If you have any questions or need further clarification, the frequently asked questions section is also available to help.
1. Does Windows 10 backup overwrite old backups?
If you use File History to back up files, it will save all files, including new ones, without overwriting old backups. To free up storage space, you'll need to manually delete the old backups.
2. How do I automatically backup my files to external hard drive Window 10?
You can use File History to automatically back up your files to an external hard drive.
Step 1: Choose "Backup" on the settings window and click "Add a drive."
Step 2: Select the external hard drive and turn on the "Automatically back up my files" option.
Step 3: Click "More options" to set the backup interval.
3. How do I change my Windows backup schedule?
You can change the Windows backup schedule on the "Control Panel."
Step 1: Click "File History."
Step 2: Click "Select drive" and "Advanced settings" to change the schedule.
Related Articles
- How to Ghost Hard Drive in Windows 10
- Free! How to Backup Windows 10 to DVD [Windows 10 Backup]
- How to Install an SSD without Reinstalling Windows
- How to Backup Only New or Changed Files in Windows 10 [2 Ways]
- How Can You Transfer Files from an SD Card to a Desktop Computer?
How can you transfer files from an SD card to a desktop computer? Do you want to get the answer? This article will tell you how to transfer files from an SD card to a desktop computer. - How Do I Backup All My Programs in Windows?
If you want all the programs to be protected for security, you have to create a backup for all of them. This post will give you a simple answer and an easy-to-follow guide on how do I backup all my programs in Windows. Read on to learn more.