Disk Cleanup Not Working Windows 10/8/7? Here Are the Free and Easy Fixes!
Disk Cleanup is a utility built into Windows that is used to delete unnecessary and junk files from disks and make your computer run faster. Disk Cleanup is a very popular tool, and thus, Disk Cleanup not working on Windows 10/8/7 properly is a frequent problem for Windows users. Disk Cleanup can sometimes not respond/will freeze, or does not actually delete/remove files. If you are facing one of these problems, what to do? How to fix Disk Cleanup files to work effectively? Read on and use the free solutions offered here to get Disk Cleanup to work properly.
The Best Alternative to Disk Cleanup on Windows 10/8/7
Built-in Windows tools are always the most secure of any utility you could use. But they can sometimes be hard to use and not be stable. In this case, you can get all of the qualities you need by using a third-party software to clean up junk files on your PC: Qiling CleanGenius. This software enables you to optimize your system via junk file cleanup and large file cleanup.
What makes using Qiling CleanGenius a great way to optimize a disk?
- No command lines are needed
- No need to clean files manually
- No risk to delete wrong files mistakenly
- All optimization features are consolidated into one program
It is powerful and completely free, so download and have a try. In this way, you won't have to worry about Disk Cleanup troubles anymore.
Step 1. Download and install Qiling Partition Master Suite.
Step 2. Click PC Cleaner and install Qiling CleanGinus. Then, click "Cleanup" and click "Scan" to start cleaning up the system and make your PC as good as new.
Step 3. The software will scanning all over your computer to find idle data files that take a huge amount of disk space, you can select useless large files, system junk files and Windows invalid entries and click "Clean" to start system cleanup process.
Step 4. When the scan is complete, click "Done" to finish cleaning system junk files.
Possible solutions to Disk Cleanup Not Working in Windows 10/8/7
When you run Disk Cleanup to remove junk files, it may work not work correctly. Disk Cleanup could not delete files or completely freeze up. To troubleshoot these issues, try the quick fixes blow.
Fix 1. Use Windows Update Troubleshooter
On Windows 7
1. Click the "Start" menu, then type "troubleshooting" in the search box and select "Troubleshooting".
2. Find "System and Security" and choose "Fix problems with Windows Update". Then, click "Advanced".
3. Select "Run as administrator", and ensure the checkbox next to "Apply repairs automatically" is selected.
4. Click "Next" and wait for the process to complete. After this, restart your computer and run the Disk Cleanup again.
On Windows 8/8.1
1. Press and hold Windows +W. Type and search for Troubleshooting.
2. Click on "View all" on the left sidebar. Find and click "Windows update".
3. Click "Advanced" > "Run as Administrator" > "Next". Then, follow the on-screen instructions to complete the process. When this is finished, restart your computer and rerun Disk Cleanup.
On Windows 10
Go to "Settings" > "Update & Security" > "Troubleshooter" > select and run the troubleshooter. Then, reboot your computer and run the Disk Cleanup again.
Fix 2. Run an SFC Scan
1. Press and hold Windows+X and select "Command Prompt (Admin)" from the pop-up.
2. Type sfc /scannow, and then follow the screen instructions to finish the scan. After the scan, reboot your computer and Disk cleanup again.
Fix 3. Delete Temporary Files
If you have a corrupted temporary file on the computer, the Disk Cleanup won't work well. You can try to delete the temporary files to fix the problem.
1. Go to "Start" menu, type %temp%, and press Enter.
2. Select all the temp files, right-click and select "Delete". Then, restart your computer and rerun Disk Cleanup to check if this solved the problem.
As you can see from the above contents, although you can use the three quick fixes to repair Disk Cleanup not working in Windows 10/8/7, you need to either use the command prompt or manually remove the files, which may lead to more severe issues if you do anything wrong accidentally. Therefore, to avoid any unexpected risk, we highly recommend you use Qiling Partition Master to quickly solve low disk space and resize partitions on hard drives in Windows 10/8/7/Vista/XP.
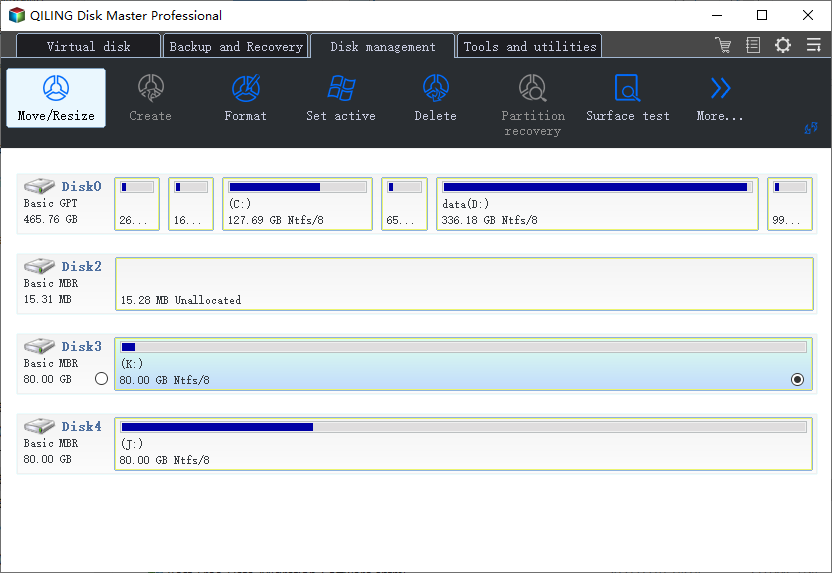
Step 1. Locate the Target Partition.
To start extending partition, you should first locate the target partition and select "Resize/Move".

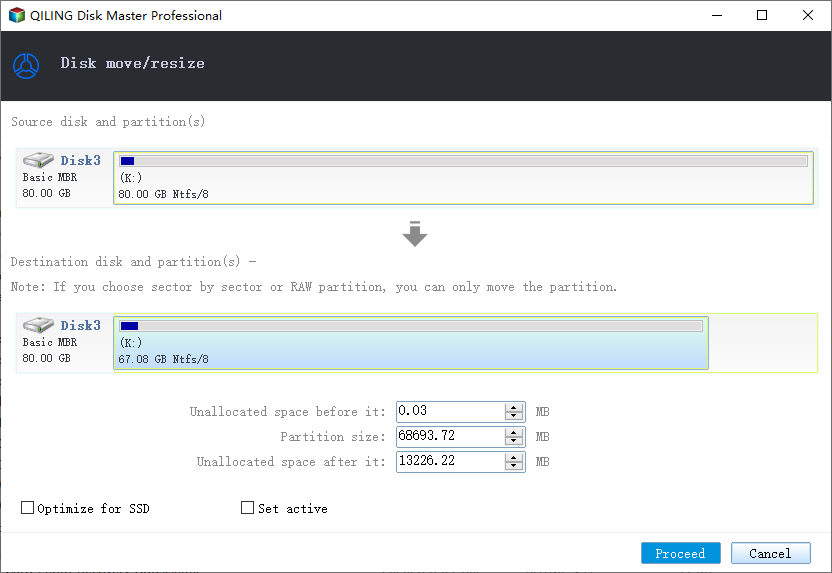
Step 2. Extend the Target Partition.
Drag the partition panel rightward or leftward to add unallocated space into your current partition and click "Proceed" to confirm.

Extra Option: Get Space from Another Drive
If there is not enough unallocated space on your disk, click on a big partition with enough free space, select "Resize/Move".
Drag the dots of the bit partition to shrink it for the unallocated space and click "Proceed".
Related Articles
- [Fixed] Destination Folder Access Denied You Need Permission to Perform This Action in Windows 10/8/7
- How to Fix Microsoft Excel Has Stopped Working 2007/2010/2013/2016
- Full Guide: How to Fix HP Laptop Black Screen
- Fix 'Windows Can't Find A System Image on This Computer' Error