Fixed: The Disk Is Write Protected Windows 11
SD cards, external hard drives, or USB flash drives are convenient devices for storing a large amount of data and files. However, users may encounter the error "The disk is write-protected" when trying to make changes to stored files, and this issue can be addressed with the proper troubleshooting steps.
To make your storage drive workable again, you can try one of the three effective solutions compiled in this guide. No matter which solution you choose, you can quickly remove the write protection and make your disk functional again. Each of these solutions can help you achieve the desired result flawlessly.
What is the "The Disk is Write Protected" Issue?
When you encounter the issue of a "write-protected" disk, whether it's an SD card or hard drive, it can be difficult. But what does this error actually mean? In simple terms, a write-protected disk is one that has been set to prevent any new data from being written to it, often due to a physical switch or setting on the device itself.
When your internal hard drive, external hard drive, USB flash drive, or SD card is write-protected, you can't write data or perform any operation on it, making it inaccessible for data access or changes.
If you're experiencing issues with a write-protected disk in Windows 11, try resolving the problem by following these hassle-free solutions. These steps are designed to help you overcome the "the disk is write protected" issue, making it easier to access and modify the contents of the disk.
Solution 1: Check the Lock Switch and Toggle it to Unlock Position
To fix the "the disk is write-protected" issue on Windows 11, check if the USB flash drive, SD Card, or Pen Drive has a lock switch and set it to write, not read-only, to enable writing to the media.
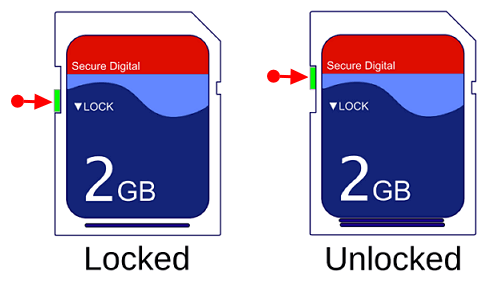
If the switch is set to read-To unlock the drive, simply toggle it to the unlock position, and you'll be able to access the stored data and make changes to it.
Solution 2: Remove Write Protection Using Diskpart
If the lock switch on your SD card or USB flash drive is turned on, but you still can't make any changes to the files stored on your disk, you can try removing the write protection using Diskpart, a less intimidating method.
Here's how it works!
Step 1: Insert the USB drive into the appropriate USB port on your Windows 11 PC.
Step 2: Now, press the "Win+X" key and select "Run."
Step 3: Enter "diskpart" in the Run box and then select "OK."
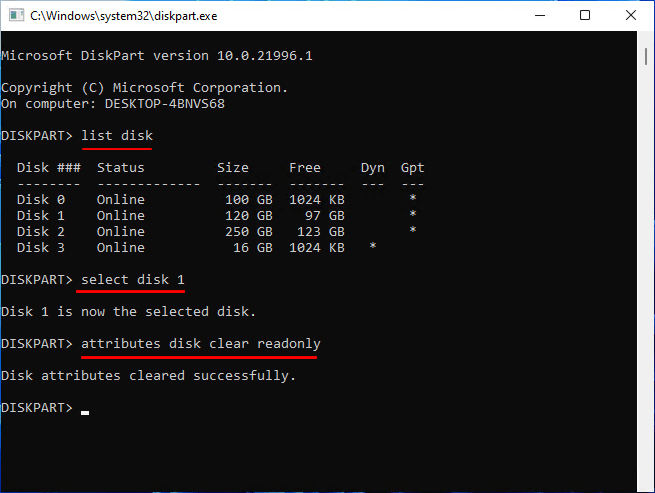
Step 4: Next to "DISKPART >," enter "list disk" and press the "Enter" key.
Step 5: Now, in the list of mounted disks, locate your USB drive and note the disk number.
Step 6: Here, enter the command "select disk disk_number" and then press the "Enter" key.
If your drive number is 1, enter "select disk 1".
Step 7: When the disk is selected, diskpart displays a message that reads like the disk is now the selected disk.
Step 8: Now, enter the command "attributes disk clear readonly" and then press the "Enter" key.
Step 9: When write protection is removed from the disk, diskpart displays a message stating the "disk attributes were cleared successfully," and the disk is no longer write-protected.
Step 10: Finally, close the diskpart window by typing "exit" and pressing the "Enter" key.
Diskpart is a tool that helps remove write protection from a USB flash drive. Here's how it works.
Solution 3: Remove Write Protection in Registry
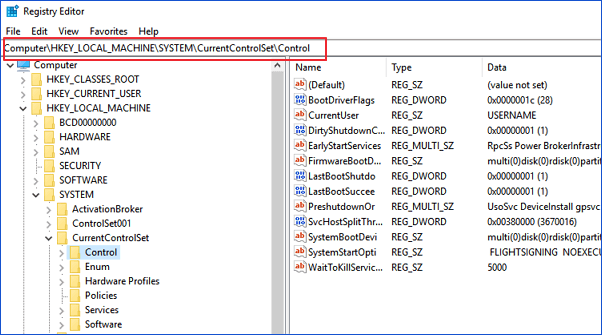
To remove write protection from a disk using the Registry, one must first create a backup of the Windows registry to prevent any potential damage. Then, navigate to the "HKEY_LOCAL_MACHINE\SYSTEM\CurrentControlSet\Control\StorageDevicePolicies" key, and in the right-hand pane, look for the "WriteProtect" value. If it exists, double-click it and set its value to 0.
To remove write protection on a Windows 11 PC, you can use the built-in tool called Command Prompt. First, open Command Prompt as an administrator by searching for it in the Start menu, right-clicking on the result, and selecting "Run as administrator".
Step 1: Connect the write-protected removable disk to Windows 11 PC.
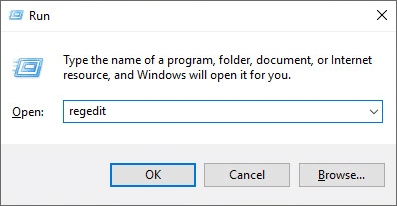
Step 2: Press the "Win+R" keys simultaneously and type "Regedit" in the Run box to open the "Registry Editor."
Step 3: Now, tap on "HKEY_LOCAL_MACHINE" and expand System.
Step 4: Here, click on "Current Control Set" and then tap on "Control."
Step 5: Now, check "Storage Device Policies" and change the "DWORD" value to 0. Later, click on the "OK" button.
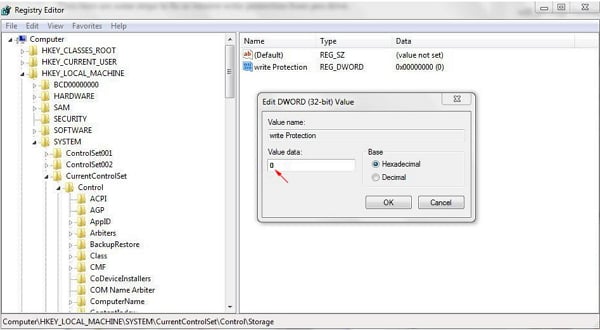
Step 6: Finally, exit the "Registry Editor" and reboot your Windows 11 PC.
To resolve the issue, you can try restarting your PC. Once your PC has restarted, check if your device is accessible.
How to Format A Write Protected USB Flash Drive or SD Card in Windows 11
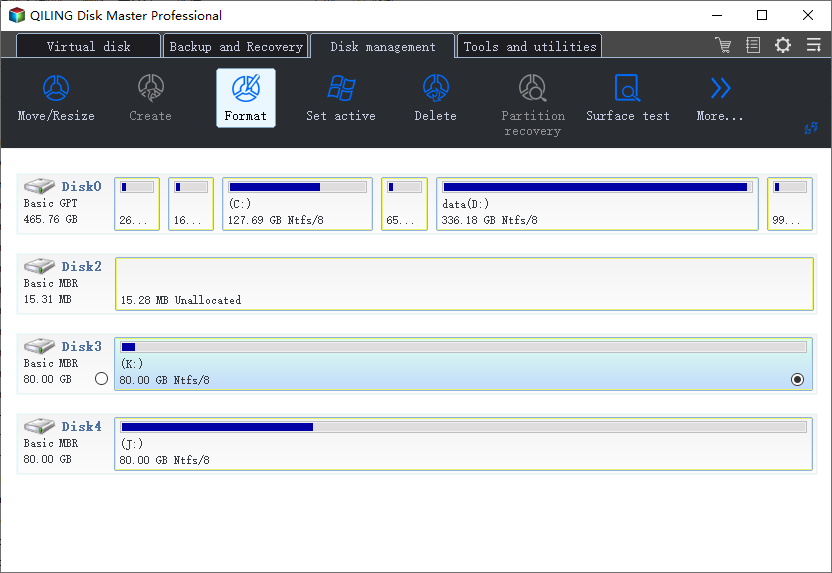
If all the previous methods fail to disable or remove the write protection, it's likely that the device is not truly write protected but corrupted. In this case, using Qiling Partition Master to format the problematic flash drive or SD card may be the solution to regain access and save data.
Qiling Partition Master is a highly advanced tool that offers a range of features for managing disks, including essential disk formatting and maintenance, which can be completed in just a few minutes.
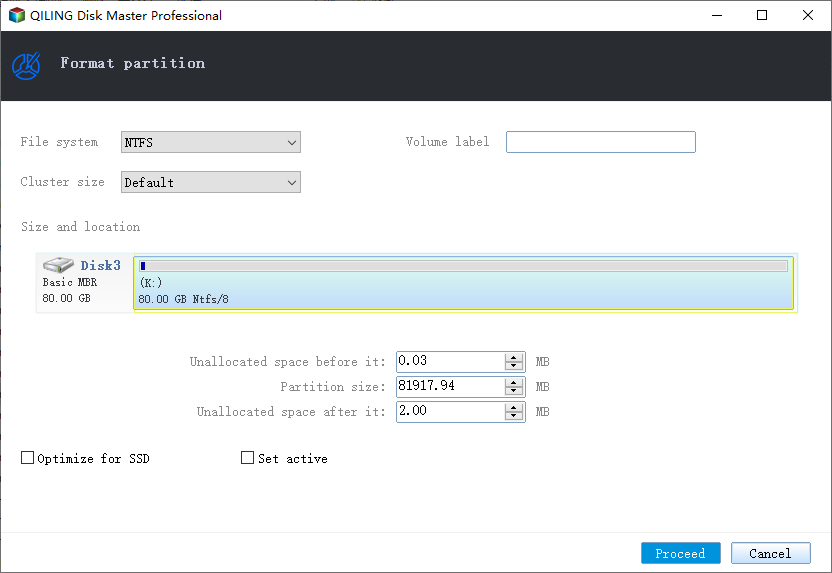
Step 1. Select the partition which you want to format, click on it and select "Format" in the "Disk management" page.
Step 2. In the next window, enter the partition label, select the NTFS file system, and set the cluster size according to your needs, then click "Proceed".
Qiling Partition Master is a professional tool that offers great value for its affordable price. It allows you to easily format a write-protected SD card or USB flash drive, making it an ideal choice for those looking for a budget-friendly solution.
Bonus Tip: How to Remove Write Protection on a Single File/Folder
If you're looking for a way to remove write protection on a single file or folder, I've got a BONUS TIP for you!
If you're unable to make changes to a single file or folder due to write protection, you can grant writing permissions to it. This allows you to make specific changes to the file or folder that were previously restricted. To do this, you can follow the steps to remove the write protection and gain the necessary permissions to modify the file or folder as desired.
Step 1: Insert the SD card or USB drive into the correct port on your Windows 11 PC.
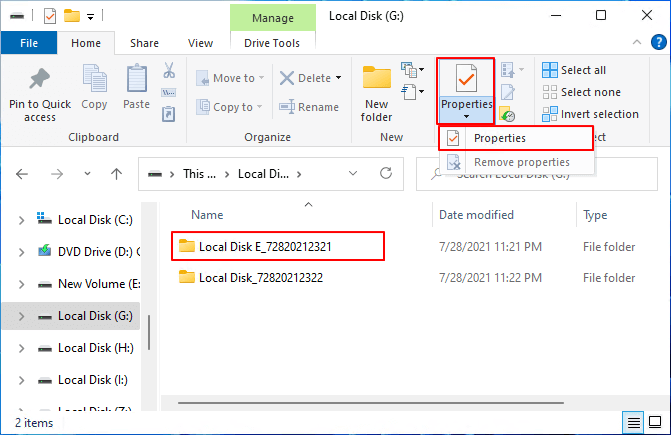
Step 2: Open "Windows File Explorer" and navigate to the device and folder consisting of the file.
Step 3: Select the file and then select the "Home" tab. Later, select "Properties"> "Properties".
Step 4: In the "Properties" dialog box, choose "Read-only" to remove the checkmark as shown below.
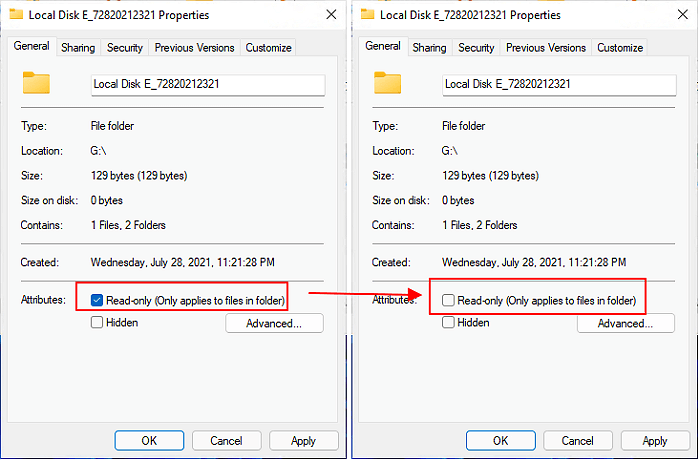
Step 5: Finally, hit the "OK" button to save the changes.
To remove write protection from a file or folder on a Windows 11 PC, first, right-click on the file or folder and select Properties. In the Properties window, click on the General tab and look for the Attributes section. If the file or folder is write-protected, you will see a checkmark next to "Read-only.
Conclusion
Removing write protection from a USB flash drive, internal/external drive, or SD card is possible using various methods. Each approach has its pros and cons, allowing you to choose the one that best suits your needs and system requirements. Whether you're looking to restore functionality to a previously write-protected device or simply need to access its contents, there's a method that can help.
If you need to format your disk after removing write protection, Qiling Partition Master is the best tool for the job. Remove the write protection from your disk now and make it accessible again.
Related Articles
- How Do I Partition SSD on Windows 11? 5 Things You Need to Know
- Partition Manager for Windows 11 Free Download in 2021
- 2 Best Disk Manager for Windows Server Free Download [Free & Paid]
- How Do I Clone HDD to SSD in Windows 11 and Make It Bootable? 2022 Complete Guide
- How to Format USB Flash Drive to FAT32 (Applies to 32GB/64GB/128GB)
- 4 Solutions To Fix Bootmgr Is Missing Windows 11
- Paragon Backup & Recovery Review in 2022: Pro, Cons and All-around Alternative for You
Are you not content with the Paragon Backup & Recovery software? If yes, check out where Paragon fails and which tool is the all-around alternative for Paragon.