Short DST Failed! How to Fix Hard Disk DST Short Test Failed
When a hard disk short DST check fails, it typically indicates that the drive has encountered a problem with one of its components. This can result in a "short DST failed" error message from the BIOS, signaling that the hard drive is no longer functioning correctly.
3 Best Ways to Fix DST Short Test Failed (Quick Navigation)
To resolve the DST short test failed error, you can try the following fixes:
| Workable Solutions | Step-by-step Troubleshooting |
|---|---|
| Fix 1. Update the HDD Driver | Right-click This PC > click "Manage". On the left side, click "Device Manager"...Full steps |
| Fix 2. Replace the HDD | Open Qiling Partition Master. Right-click the disk that you want to copy or clone...Full steps |
| Fix 3. Take Out the Disk | Take out the disk and connect it to another computer. If the hard drive can be recognized...Full steps |
What Is Hard Disk DST Short Test Failure
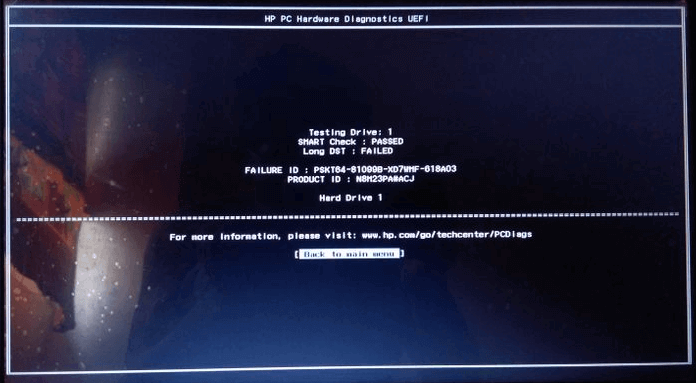
A short DST failure occurs when the drive self-test (DST) fails to complete a test of the physical integrity of a hard drive, often resulting in an error code, such as 0141, 0142, or 0146, when a laptop is trying to boot Windows. This failure can indicate a problem with the hard drive.
Seeing a DST short test failed error on your HP laptop or notebook is not a good sign. This error is often accompanied by symptoms such as the laptop shutting down or restarting unexpectedly, and consequences like data loss or corruption. Next, we'll explain the potential causes and solutions to this issue.
Symptoms of Hard Drive Short DST Check Failed Error
DST stands for Daylight Saving Time. When DST is implemented, people set their clocks forward by one hour in the spring, typically in March or April, and then set them back by one hour in the fall, usually in September or October.
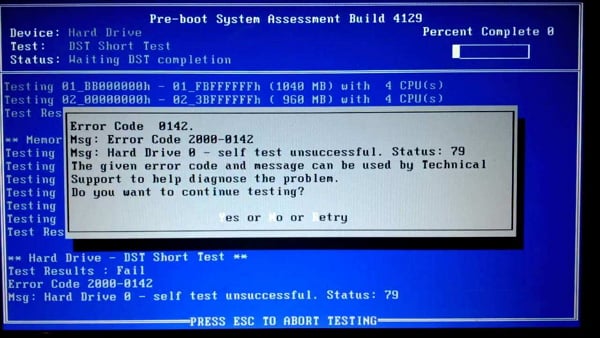
You ran a diagnostic on your hard drive and found that the DST (Disk Self-Test) short test failed, resulting in error code 0142, which is also referred to as error code 2000-0142. The diagnostic also indicated that the hard drive 0 self test was unsuccessful with a status of 79. You have a screenshot of the exact error information. Is that correct?
When the DST (Daylight Saving Time) short test fails, it can cause your computer to malfunction in various ways, including but not limited to, system crashes, freezes, and erratic behavior.
- The computer stops working, with all things become oddly sluggish.
- The computer keeps restarting and the hard drive light is flashing on and off, which could indicate a hardware issue such as a faulty hard drive or a problem with the computer's power supply. This could be due to a failing hard drive or a power supply issue, and it's recommended to run a diagnostic test or seek professional help to identify and resolve the issue.
- The computer hard drive won't boot at all, with a blank screen showing up. This is likely due to a hardware issue, such as a faulty hard drive or a problem with the computer's BIOS.
The Result of Short DST Failed Error
The DST short test has failed to indicate a problem with your hard drive, but unfortunately, this suggests that you're likely to get poor results from it. Since the test didn't check the hard drive's health, it's likely that the hard disk is nearing the end of its lifespan. This means you'll need to diagnose and fix any hardware issues or, in the worst-case scenario, replace the failing or failed hard drive.
- Tip
- Want to recover data from a dead or damaged hard drive? Try Qiling, a free data recovery software!
Before giving up on this problematic hard disk, let's try some conservative treatment by applying the following troubleshooting solutions to see if they can resolve the issue.
Fix 1. Update the HDD Driver to Fix Short DST Failed
Applies to: You can boot into the computer
Here are the steps to update the HDD driver to fix hard drive DST short test failure:
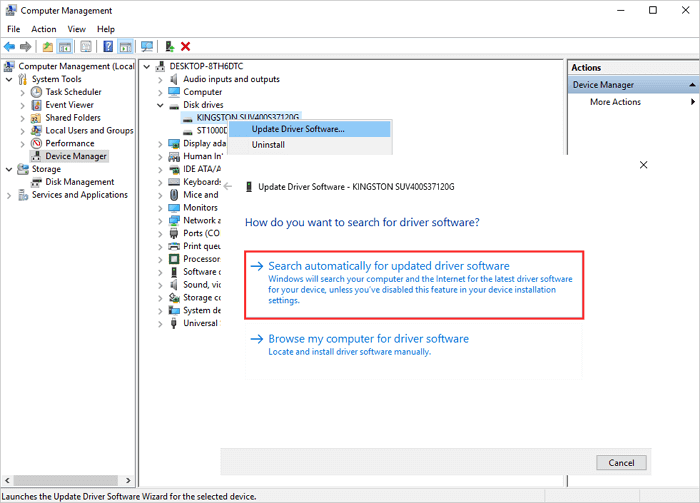
Step 1. To access the Device Manager, right-click on "This PC" and select "Manage". From the resulting window, click on "Device Manager" on the left side.
Step 2. Right-click on your disk driver, choose "Update Driver Software" from the context menu, and then follow the prompts to update the disk driver.
Step 3. In the pop-up window, select "Search automatically for updated driver software". This will prompt the computer to search and install the latest driver software, making the necessary updates to ensure smooth device functionality.
Fix 2. Replace the Old Hard Drive with a New One
Applies to: You can boot into the computer
If the first solution doesn't work, you can replace the short DST failed HDD with a good one. You can use Qiling Partition Master to clone the hard drive and replace it with a good one, which has the "Clone" feature to upgrade the hard disk to a bigger one. This software also has many other highlights.
- Migrate OS to SSD
- Resize, create, extend or format a partition
- Combine partitions without losing data
- Convert MBR to GPT or GPT to MBR...
Steps to upgrade a hard drive with the clone feature:
Step 1. Select the source disk.
Right-Click the disk that you want to copy or clone. Select "Clone" from the menu.
Step 2. Select the target disk.
Select the desired external drive (HDD/SSD) as the destination and click "Next" to proceed.
Step 3. View the disk layout and edit the target disk partition size in one paragraph shortly:
To proceed, click "Continue" when the program warns that it will erase all data on the target disk, taking care to back up any valuable data on the disk beforehand.
The options for customizing the disk layout include "Autofit the disk", "Clone as the source", and "Edit disk layout", with the last one recommended for leaving more space for the C drive.
Step 4. Click "Proceed" to start the disk cloning process.
Fix 3. Take Out the Hard Drive and Check It
Applies to: The computer cannot start
If you're unable to boot into Windows 10, 8.1, 8, or 7, you can try this solution to get your system up and running again.
Step 1. Take out the disk and connect it to another computer.
Step 2. If the hard drive can be recognized, copy the disk data to another place as soon as possible. This will help prevent data loss in case the drive fails completely.
Step 3. If a hard drive cannot be recognized, it's best to contact the manufacturer for repair.
Bonus Tip - Back Up Hard Drive Data to Avoid DST Failure
To prevent data loss, it's essential to back up your data in time or clone your system drive to another disk in case of sudden corruption. Regularly backing up files is the best way to avoid further data loss, and using Qiling Backup, a professional backup and recovery software, makes this process easy and fast. You can also create a backup schedule to automate the backup process, ensuring your data is safely backed up without any manual intervention.
Step 1. To initiate a backup, click on "File backup" in the "Backup and recovery" page.

Step 3. Local and network files will be displayed on the left side, allowing users to extend the directory to select which files to back up.

Step 4. To store the backup, select the location where you want to save it by following the on-screen instructions.

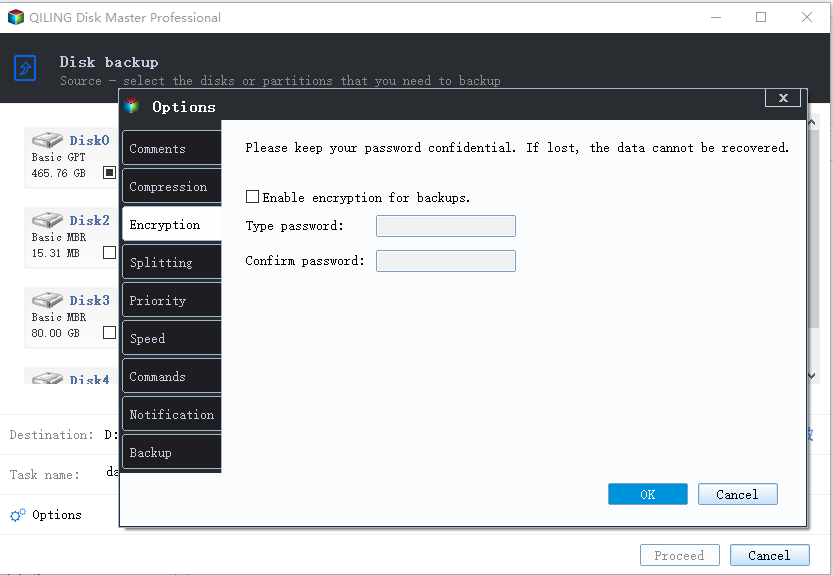
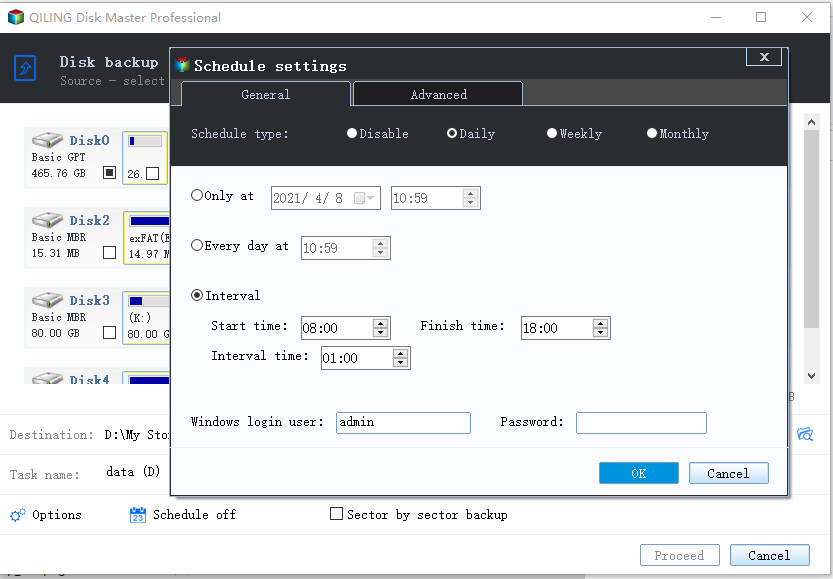
Click "Options" to customize the backup process, including setting a password for encryption, scheduling backups, and choosing events to initiate backups, and to access additional customization options.
Step 5. You can save the backup to a local disk, Qiling's online service, or a NAS.
Step 6. To start the backup process, click "Proceed". Once the backup is complete, it will be displayed as a card on the left side of the panel. You can further manage the backup job by right-clicking on it.
Conclusion
If your hard drive is failing or has failed, there are three methods to recover your data. If you can still boot into Windows, try Fix 1 and Fix 2. If you're unable to boot into Windows, you can remove the hard drive and connect it to another computer. It's essential to make a backup of your data to prevent loss.
Related Articles
- Fix HDD Hard Drive Not Showing Up in Windows 10 Error
- Fixed: Windows 10 File History Doesn't Recognize the Hard Drive
- Adobe Illustrator AutoSave, Backup and Protect Illustrator from Crash Error
- [Solved] Windows 10 Fails to Shut Down
- How to Backup Computer to SanDisk Extreme Portable SSD [Windows & Mac]
Here is a guide to tell you how to back up computer to SanDisk Extreme Portable SSD. This guide will explain why we should do an external drive backup. Of course, it provides you five easy methods to back up an external hard drive. Hoping these methods can fix your issues. - How to Backup Dropbox to External Drive [2 Tested Ways]
Do you know how to backup Dropbox to external drive? This article will describe two typical ways for you to back up Dropbox to an external drive. You can use one to create a backup of Dropbox to the external hard drive according to your needs.