How to Backup SD Card to Google Drive
| Workable Solutions | Step-by-step Troubleshooting |
|---|---|
| Part 1. Backup SD Card on Android |
Method 1. Backup with Google Drive App...Full steps Method 2. Backup with Android Photo Gallery...Full steps |
| Part 2. Backup SD Card on PC |
Method 1. Backup with Google Drive Folder...Full steps Method 2. Backup with Backup and Sync...Full steps Method 3. Backup with Third-Party Software...Full steps |
With the increasing popularity of cloud storage, people are opting to store their important files on cloud drives rather than on their computers or portable storage devices. This shift is largely due to the perceived safety and convenience of cloud storage, which surpasses traditional methods of using hard drives or external flash drives to store data.
- 1. There are numerous cloud services available, many of which are offered for free, including Google Drive, Dropbox, and OneDrive.
- 2. To upload files from a local drive to the cloud, a cloud account and password are the only requirements.
- 3. You'll have the least chance of data being damaged due to hard drive error issues or computer won't boot error that frequently happen.
To benefit from the cloud drive and make it an ideal backup place, consider using it to backup your SD card. For example, with Google Drive, you can follow a detailed guide to backup your SD card to the cloud, providing a secure and accessible copy of your data.
How to Backup SD card to Google Drive from Android
To backup an SD card on an Android device, you can use either the Photo gallery app or the Google Drive app on your mobile phone. The Photo gallery app can be used to backup the contents of the SD card, while the Google Drive app can also be used to backup and store files from the SD card. We will explore both options in more detail.
Method 1. Backup Android SD Card with Google Drive app
Step 1. Download and install the Google Drive app on your Android.
Step 2. Once the app is finished installing, open it and log in to your Google account.
Step 3.To upload a file, tap on the "+" icon located in the lower right corner of the panel, and then select "Upload".
Step 4. To back up files from your SD card, start by clicking the Open button, then select the files you want to back up and click Done.
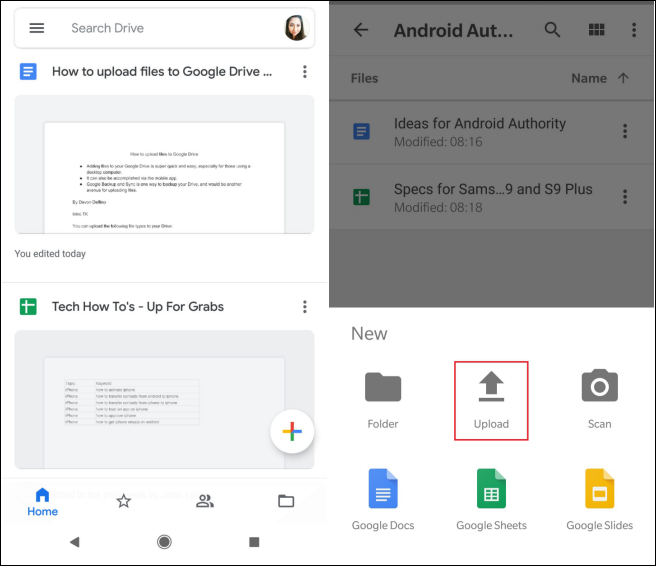
Google Drive will begin immediately backing up the selected files to the Google Drive cloud.
Method 2. Backup SD Card with Android Photo Gallery
If you only need to backup SD card photos on Android, you can also choose the Photo Gallery to backup your photos, in addition to the other options.
Step 1. To access the Android Photo Gallery, open it and click the "Send" or "Menu" button. If you're using a Samsung device, click SHARE to proceed.
Step 2.To upload selected pictures or videos to Google Drive, click "Save to Drive".
Step 3. The backup progress will be displayed on your phone, waiting for all photos to be uploaded to Google Cloud.
One problem with uploading SD card files to Google Drive
You can't set the SD card as a backup location in Google Photos, but you can manually move your photos to the SD card and then sync them with Google Photos from there. To do this, go to your device's file manager, navigate to the SD card, and move your photos to that location. Then, open Google Photos, tap the three horizontal lines, and select "Settings" and then "Backup & sync". From there, you can select the Google Photos folder on your device as the location to backup and sync.
The issue with cloud backup from Android devices is a common problem that many users face. If you're experiencing difficulties with cloud backup, there are alternative ways to perform the backup. For example, you can use a computer or a different device to access your Google account and manually back up your data. Alternatively, you can use a third-party backup app that supports Android devices.
How to Backup SD Card to Google Drive on PC
You can also back up your SD card data from your computer, in addition to backing it up to Google Drive on your mobile phone. You have multiple options to choose from, so select the one that best suits your needs.
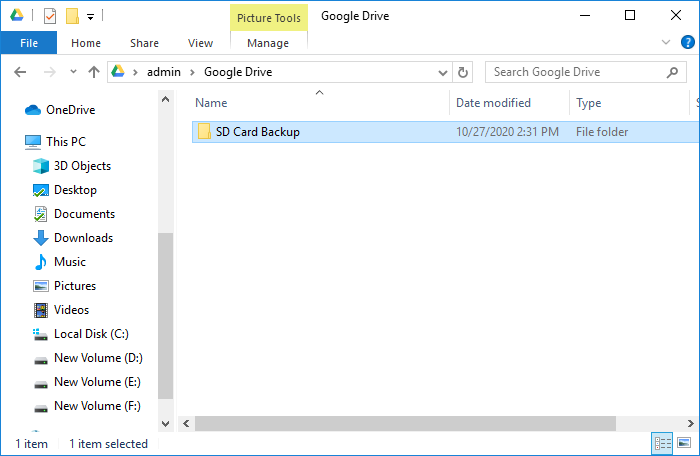
Method 1. Backup SD Card with Google Drive Folder
This method allows you to copy and paste SD card data directly to the Google Drive folder on your computer. To do this, follow the detailed steps. (Note: I removed the "shortly" part as it's not a complete sentence)
Step 1. Download and install Backup and Sync on your computer.
Step 2. Connect your SD card to your computer.
Step 3. Navigate to the "Google Drive" folder.
Step 4. Copy and paste the data you want to backup from your SD card to the "Google Drive" folder.
To create a new folder in Google Drive to store backup data, you can simply create a new folder within the Google Drive interface. This folder will then be used to automatically synchronize and store your backup data.
Method 2. Backup SD Card with Backup and Sync
You can also change the settings in Backup and Sync to instruct it to backing up your SD card. Here are the detailed steps.
Step 1. Download and install Backup and Sync on your computer.
Step 2. Connect your SD card to the computer.
Step 3. Right-click the software icon and go to Settings > Preferences.
Step 4. Under the "My Computer" tab, find and click USB Devices & SD Cards at the bottom of the window.
Step 5. Choose the SD card you want to backup and click OK to confirm.

Method 3. Backup Data on SD Card with Third-Party Software
To backup an Android SD card to the cloud, you can use Qiling cloud backup software, which allows you to back up hard drives, SD cards, USB flash drives, and selected files, folders, or emails to Google Drive, Dropbox, or OneDrive.
If you're experiencing issues backing up and syncing SD card data to Google Drive on your Android device, you can resolve the problem on a PC using Qiling Backup, which offers a safe, quick, and easy solution.
To backup your SD card data, connect it to your PC, and use the built-in Windows File Explorer or a third-party software like Qiling Disk Master to transfer files from the SD card to your computer. Make sure to select the correct drive letter and navigate to the SD card folder to access its contents.
Step 1. To start the backup process, click the File backup button to backup your files.

Step 3. Lists of both local and network files are shown on the left-hand side of the screen, allowing you to expand the directory and choose the files to back up.

Step 4. Please select a location to store the backup. You can choose from the options provided on the screen.

The backup should be encrypted and the schedule set by clicking on Options in Backup Options, with other customizable options available.

You can also choose to start the backup at a certain time by clicking Options in Backup Scheme.

Step 5. To store a backup file, you can save it to your computer, use Qiling's cloud service, or store it on a network-attached storage device (NAS).

Step 6. Qiling Backup allows customers to store backup copies of their files on a third-party cloud drive or the company's own cloud storage.
To back up your data on a third-party cloud drive, select Local Drive and scroll down to add Cloud Device, then fill in your account information.
Step 7. To start a backup, click on the "Proceed" button. Once the backup process is complete, it will be displayed as a card on the left-hand side of the screen. You can then right-click on the backup job to view additional information and options for handling it.

Related Articles
- Solved 2022: Windows 10 File History Not Working
- Should I Backup Before Windows 10 Upgrade/Reinstallation? 2022 New!
- Imaging Software Disadvantages VS Advantages, Show I Have It [2022 Thorough Reviews]
- How to Copy/Clone Bootable USB Drive in Windows 10/8/7 (2022 Tips)
- 5 Steps to Move/Transfer Office 2016 to New Computer (Windows 11 Available)
To move and transfer Office 2016 to a new computer without reinstallation, you can use Qiling Disk Master, a data and application transfer software. This process is relatively straightforward and only requires five steps. By using this software, you can easily transfer Office 2016 to your new computer without having to reinstall it. - How to Transfer Apex Legends to Another PC or Hard Drive
If you are looking for a complete way of transferring Apex Legends to another PC or hard drive, stay here. On this page, we'll show you how to effectively transfer Apex Legends to another new computer or hard drive with ease.