How to Cancel Windows 10 Updates Once Started
To cancel Windows 10 updates once they've started, you can try the following: Press the Windows key + X and select Task Manager. In the Task Manager, go to the Processes tab and look for the Windows Update process (it might be listed as "wuauclt.
You're frustrated with Windows 10 updates automatically downloading and installing without permission, and you'd like to remove unwanted updates that have already been downloaded, without disabling all automatic updates. You're looking for a way to cancel Windows updates once they've started. Is that correct?
Can You Disable an Automatic Windows 10 Update on Your PC/Laptop
It's helpful to know how Microsoft delivers Windows updates to your computer and how they are installed beforehand.
Here's the overall process:
When a new Windows 10 update is released, Microsoft automatically pushes it to its insiders, who will have the update downloaded in the background by default. Once the download is complete, users will be prompted to either install the update immediately or schedule the installation to occur during a shutdown.
Where Can You Interrupt the Ongoing Update
There are three stages where people can cancel an unwanted update, and solutions for each stage can be found at the provided link.
To completely disable Windows 10 automatic updates, you need to follow these steps: go to Settings, then Update & Security, and finally, toggle off the switch next to "Get updates automatically" under the "Windows Update" section. This will prevent Windows 10 from automatically installing updates in the future. Note that this change is permanent, so you should carefully consider whether you're willing to forgo future updates before proceeding.
To stop the Windows 10 update in progress, you can click on the Start Menu, then click on the Power button, and finally select "Restart" instead of "Install Updates and Shut Down". This will allow you to bypass the update and shut down your computer normally.
Once the update is officially launched after the computer shutting down, there is no 100% secure way to make it stop. This is where the trouble starts. When the update begins installing, it usually takes some time, and many people lose patience, eventually forcing a shut down to abort the updating process.
When you force stop the Windows Update while it's updating, it may leave your system in an unstable or inconsistent state. This can cause issues with the update process, and you might encounter problems with your system's functionality, such as crashes, errors, or even a failed update.
Any interruption during a system update can cause damage to your operating system, leading to various disasters, including but not limited to, corrupted files, system crashes, and even complete system failure.
- A computer hard drive that won't boot and displays a black screen with or without a cursor is likely experiencing a boot failure. This can be due to a variety of reasons such as a faulty hard drive, corrupted boot sector, or a malfunctioning motherboard.
- The Blue Screen of Death (BSOD) appears with error messages indicating that the operating system is not found or system files have been corrupted, suggesting a severe system failure.
Best Way to Cancel a Windows 10 Update Once It Has Started
Canceling an update while it's installing can be a high-risk move, potentially bricking or killing your computer. To avoid this, we have some alternative ideas that might be more suitable for you.
This is how you should put this idea into effect.
To ensure your Windows 10 operating system is safe, regularly backup your system using Qiling Backup, a reliable backup software that can handle disk/partition backup, file backup, and system backup. Store the system backup image on an external storage device like a USB drive or in the cloud for added security.
If a Windows 10 update is trying to install on your PC without your permission, simply wait patiently until the update is complete. Once the update is finished, you can restore your computer to an earlier system state from a backup you had created using Qiling Backup. This will return your PC to its previous state, undoing any changes made by the unwanted update.
To perform system recovery on a non-bootable machine, try to boot the computer through the Windows Recovery Environment (WinRE) or by creating a bootable Windows installation media, such as a USB drive or CD/DVD. This can be done by inserting the media and restarting the computer, or by accessing the WinRE by pressing the F8 key during boot.Qiling Backup emergency disk.
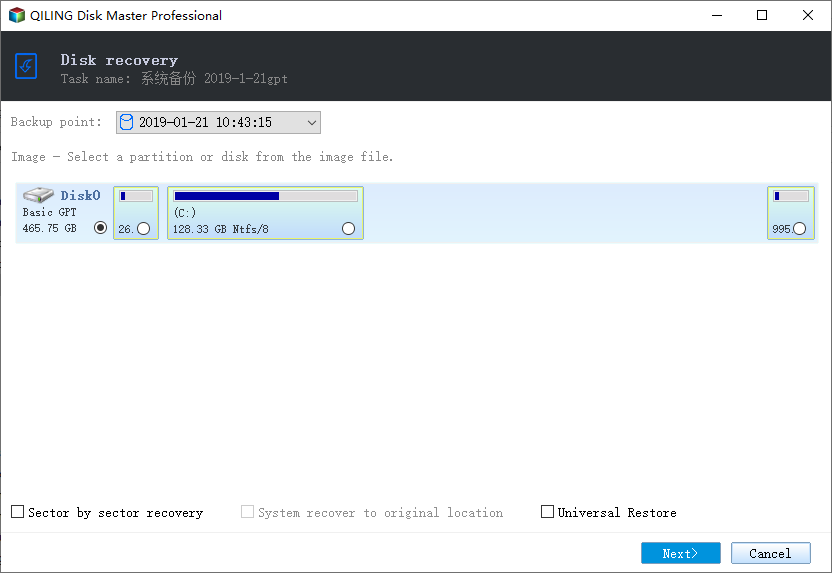
Step 1. Launch Qiling Backup, click "Browse for Recover".

Step 2. Choose the system backup file you need from the backup destination, which is a .dfg file created by Qiling Backup.

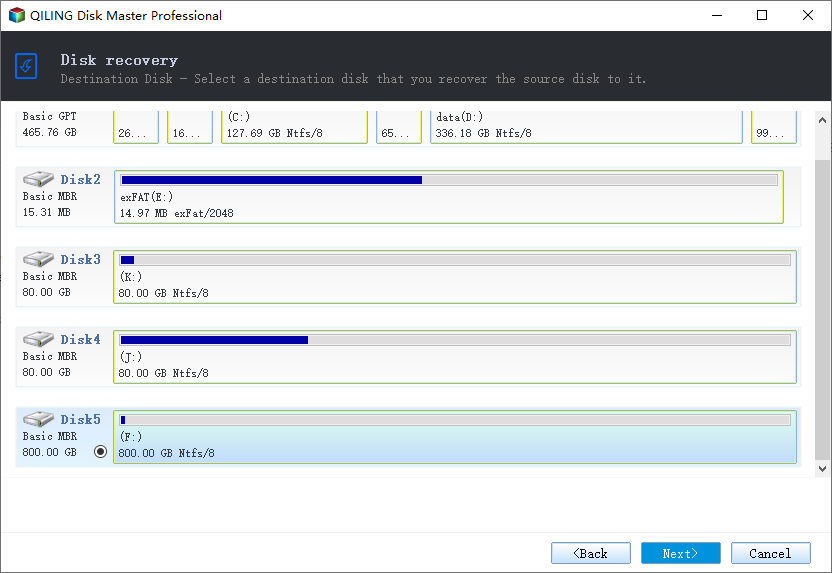
Step 3. Choose the recovery disk.
Step 4. Choose the target disk where you want to clone the source disk, ensuring that the partition style of the source disk and the target disk are identical, typically both being either MBR (Master Boot Record) or GPT (GUID Partition Table).
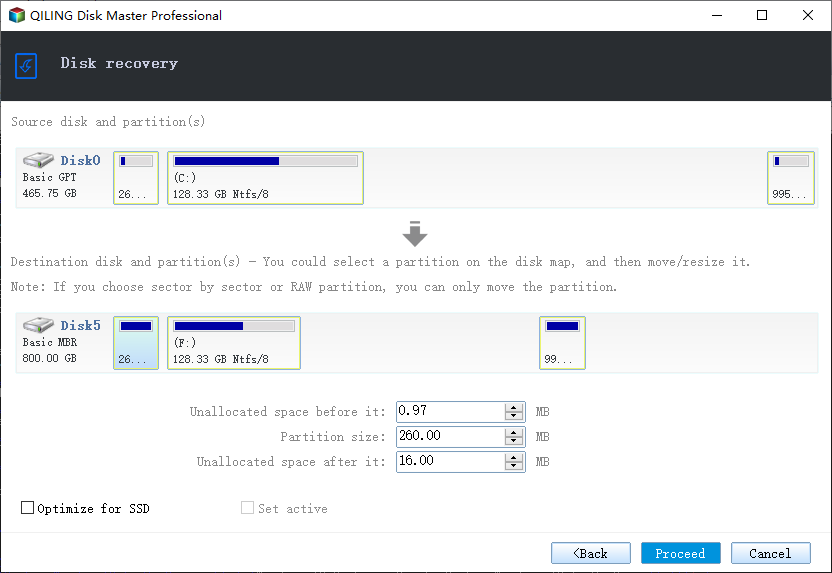
Step 5.To personalize the disk layout, click on "Proceed" and begin the system backup recovery process.
Related Articles
- Fix USB Flash Drive Not Working on Windows 10/7
- How to Fix PS4 Safe Mode Loop Without Losing Data
- How to Fix File Explorer Keeps Popping Up Without Losing Data
- How to Fix Windows 10 Upgrade Error Code 0xc0000017
- Transfer MSXML 4.0 to Another Computer
If you're looking to transfer MSXML 4.0 to another computer or need reliable download options, this guide includes can help. It provides the best methods for safely and quickly migrating MSXML, ensuring a smooth transfer process. - How Do I Transfer My Netflix from One Device to Another?
If you're switching devices or PCs, you can easily transfer your Netflix videos to the new device without having to download them again. Follow a simple guide to move the files, which involves using tools and methods that will make the process easy and hassle-free.