How to Fix File Explorer Keeps Popping Up Without Losing Data
| Workable Solutions | Step-by-step Troubleshooting |
|---|---|
| Fix 1. End process in Task Manager | Press Ctrl + Alt + Delete to open Task Manager > click Details > select explorer.exe...Full steps |
| Fix 2. Repair corrupted file system | Run cmd as administrator > type sfc /scannow and hit Enter ...Full steps |
| Fix 3. Remove AutoPlay | Open Control Panel > choose AutoPlay > uncheck "Use AutoPlay for all media and devices"...Full steps |
File Explorer Keeps Opening by Itself
Have you ever experienced this kind of thing? Every time you try to close File Explorer, it keeps opening automatically. When you type something on your document, File Explorer keeps popping up, interrupting your typing. It's very frustrating. You might have scanned for the virus, but nothing found. In general, File Explorer keeps opening results from the following causes.
- There is something wrong with the file explorer, or the file explorer is crashing.
- The system files have missing or corrupted.
- AutoPlay is a feature that, when enabled, allows Windows to automatically open a specific program or action when a removable drive, such as a USB drive, is inserted. By default, AutoPlay is set to open File Explorer, which displays the contents of the external drive.
How to Fix File Explorer Keeps Popping Up Without Losing Data
If your File Explorer keeps crashing or popping up, don't worry, there are ways to manually fix it. You can resolve this issue by trying out the methods below.
Method 1. End File Explorer in Task Manager
- Pressing Ctrl + Alt + Delete on your keyboard will open the Task Manager, a utility that allows you to view and manage running processes on your computer.
- To stop explorer.exe, click on the "Details" tab in the Task Manager, select "explorer.exe" from the list, and click the "End task" button at the bottom right corner of the screen.
- Click "File" and click "Run new task".
- Type explorer.exe and click on "OK".
- Restart your computer.
If the File Explorer still keeps opening on its own, move to method 2 to restore and repair missing or corrupted system files.
Method 2. Repair Corrupted System Files
SFC is a command-line utility that scans for corruptions in Windows system files and restores corrupted files, potentially resolving issues such as "File Explorer keeps opening".
- Click the Start button and type cmd. Right-click the Command Prompt and choose "Run as administrator".
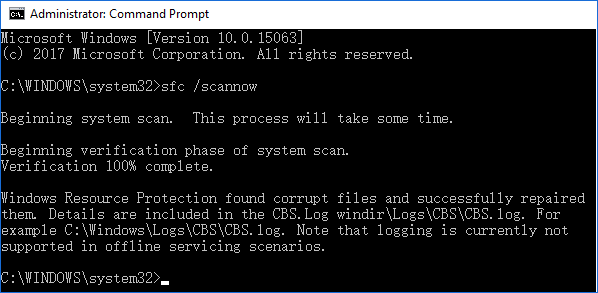
- Type sfc /scannow and press Enter to run a full system scan.
After running the Command Prompt, which may take around 5-10 minutes, if everything goes well, you'll see the message "Windows Resource Protection did not find any integrity violations". On the other hand, if you see "Windows Resource Protection found corrupt files and successfully repaired them", it means that you've successfully repaired missing or corrupted system files in Windows 10 with SFC.
Method 3. Remove AutoPlay
If you're experiencing File Explorer opening randomly when connecting an external drive, the issue might be caused by the AutoPlay feature. This can lead to File Explorer popping up constantly due to the external drive's loose connection, which causes it to disconnect and reconnect, triggering File Explorer to open each time.
- Open the Control Panel and choose AutoPlay.
- Uncheck the option "Use AutoPlay for all media and devices".
- To resolve the issue of File Explorer opening every time you insert a USB device, click on the Start menu, type "gpedit.msc" in the search bar, and press Enter. In the Local Group Policy Editor, navigate to Computer Configuration > Administrative Templates > System > File Explorer.

How to Recover Lost Files with Data Recovery Software
Although File Explorer keeps opening, it usually won't cause data loss, but other issues on Windows computers can lead to data loss. To recover lost files, try Qiling data recovery software, which can easily recover permanently deleted files in Windows 10.
Download this data recovery tool and start to restore your data now!
Step 1. To recover lost data, launch Deep Data Recovery, select the desired file types, and click "Next" to initiate the recovery process.

Step 2. Choose the place where you lost data. Then, click "Scan".

Step 3. After scanning, use the file format filter to find the desired files, and then click the "Preview" button or double-click a file to view its content.

Step 4. To recover a lost file, select the file by clicking the checkbox next to it, then click the "Recover" button to restore the file to a secure location.
Related Articles
- [Fixed] CHKDSK Stuck at 10%, 11%, 12%, 100% in Windows 10/8/7
- Microsoft Outlook Has Stopped Working 2016/2013/2010 in Windows 10/8/7
- Fix System Restore Failed and Did Not Complete Successfully Error in Windows 10
- Solution for Windows 10 Reset Stuck Issue
- Can I Upgrade My Laptop Processor | Your Answer Is Here
A laptop's CPU is a remarkable piece of tech. It performs on the same level as many desktop computers while consuming only a quarter of their power. So, is it possible to upgrade the processor on a laptop and take the performance even higher? This article will help you answer this question and more. - How to Upgrade Processor on Laptop [i5 to i7/i3 to i5/i3 to i7]
Learn how to upgrade a laptop processor from i3 to i5 or i7, what risks to check first, and how to back up data before hardware changes.