How to Clone to NVMe M.2 SSD in Windows 10/11 (2026 Guide)
Upgrading to an NVMe M.2 SSD is the single biggest performance boost you can give your PC. NVMe drives are 5 to 10 times faster than SATA SSDs and up to 25 times faster than HDDs, delivering boot times under 10 seconds and near-instant application launches. But reinstalling Windows and all your apps from scratch takes hours—and NVMe M.2 cloning avoids all of that.
This complete guide shows you how to clone an existing HDD, SATA SSD, or old NVMe drive to a new NVMe M.2 SSD without reinstalling Windows. We cover hardware selection, M.2 installation, BIOS settings, the cloning process, and how to fix common boot issues after cloning.
PAGE CONTENT
- NVMe M.2 SSD: What You Need to Know
- Step 1: Choose and Install the NVMe M.2 SSD
- Step 2: Prepare for NVMe M.2 Cloning
- Step 3: Clone to NVMe M.2 SSD with Qiling Disk Copy
- Step 4: Configure BIOS to Boot from NVMe M.2
- Step 5: Verify and Optimize the Cloned NVMe SSD
- Troubleshooting: Cloned NVMe M.2 Won't Boot
- FAQs About NVMe M.2 Cloning
NVMe M.2 SSD: What You Need to Know
Before cloning, it helps to understand what an NVMe M.2 SSD is and how it differs from older storage types.
M.2 Form Factor
M.2 is a small, stick-shaped form factor that plugs directly into the motherboard. M.2 drives come in different lengths (2230, 2242, 2260, 2280, where 2280 means 22mm wide × 80mm long). Most consumer M.2 SSDs are 2280.
NVMe vs SATA M.2
Not all M.2 drives are the same. There are two main types:
- SATA M.2 SSD: Uses the older SATA interface. Max speed around 550 MB/s. Same speed as a 2.5-inch SATA SSD.
- NVMe M.2 SSD: Uses the PCIe interface. Speeds range from 1500 MB/s (PCIe 3.0) to 7000+ MB/s (PCIe 4.0) or 12000+ MB/s (PCIe 5.0).
To get the speed benefit, make sure you buy an NVMe M.2 SSD, not a SATA M.2 SSD. Check the product description for "NVMe" or "PCIe".
M.2 Key Types
M.2 drives have different notches (keys) that determine which slot they fit into:
- M key: NVMe SSDs (PCIe x4). Fits into M-key slots.
- B key: SATA M.2 SSDs or older PCIe x2 drives. Fits into B-key slots.
- B+M key: Fits into both B-key and M-key slots.
Most modern NVMe M.2 SSDs use the M key. Check your motherboard's M.2 slot to confirm compatibility.
Step 1: Choose and Install the NVMe M.2 SSD
Choose the Right NVMe M.2 SSD
Consider the following when buying an NVMe M.2 SSD:
- Capacity: The SSD must have enough space to hold all used data from your source drive. A 500GB or 1TB NVMe SSD is a good upgrade for most users.
- PCIe Generation: PCIe 4.0 and 5.0 drives are faster, but only if your motherboard supports them. PCIe 3.0 drives work on PCIe 4.0/5.0 motherboards (at PCIe 3.0 speeds).
- Brand: Samsung, WD Black, Crucial, Kingston, and ADATA all make reliable NVMe SSDs.
Install the NVMe M.2 SSD
Step 1. Power off your PC, unplug the power cable, and open the case.
Step 2. Locate the M.2 slot on your motherboard (usually near the CPU or under the chipset heatsink).
Step 3. Insert the NVMe M.2 SSD into the slot at a 30-degree angle, then press it down and secure it with the mounting screw.
Step 4. If your M.2 slot has a heatsink, reattach it to keep the SSD cool.
Step 5. Close the case, plug in the power cable, and boot your PC. Windows should detect the new NVMe SSD as an unallocated disk.
- Note
- If your PC only has one M.2 slot and the source drive is also M.2, use a USB-to-M.2 adapter to connect the source drive externally, or clone to an intermediate drive first.
Step 2: Prepare for NVMe M.2 Cloning
Before cloning, make sure you are ready:
- Install the new NVMe M.2 SSD and confirm Windows detects it (check in Disk Management).
- Ensure the NVMe SSD has enough capacity for all used data on the source drive.
- Back up important files on the NVMe SSD, as cloning will erase it.
- Download and install Qiling Disk Copy, the cloning software we will use.
Step 3: Clone to NVMe M.2 SSD with Qiling Disk Copy
Qiling Disk Copy supports cloning from any source (HDD, SATA SSD, or NVMe) to an NVMe M.2 SSD. The process is the same regardless of source drive type.
Step 1. Launch Qiling Disk Copy. Click "Clone" on the left panel, then select "Disk Clone" (to clone the entire disk) or "System Clone" (to migrate only the Windows system).

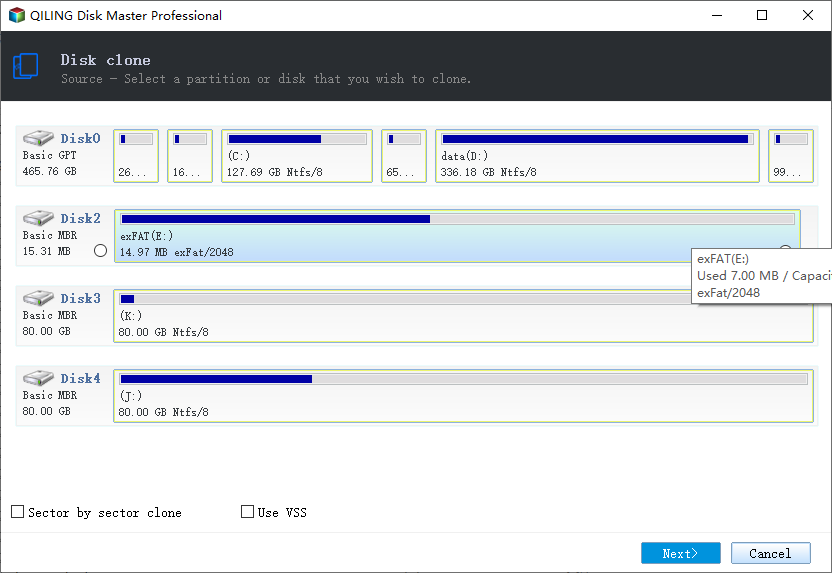
Step 2. Select your source disk (the current HDD, SATA SSD, or old NVMe drive) and click "Next".
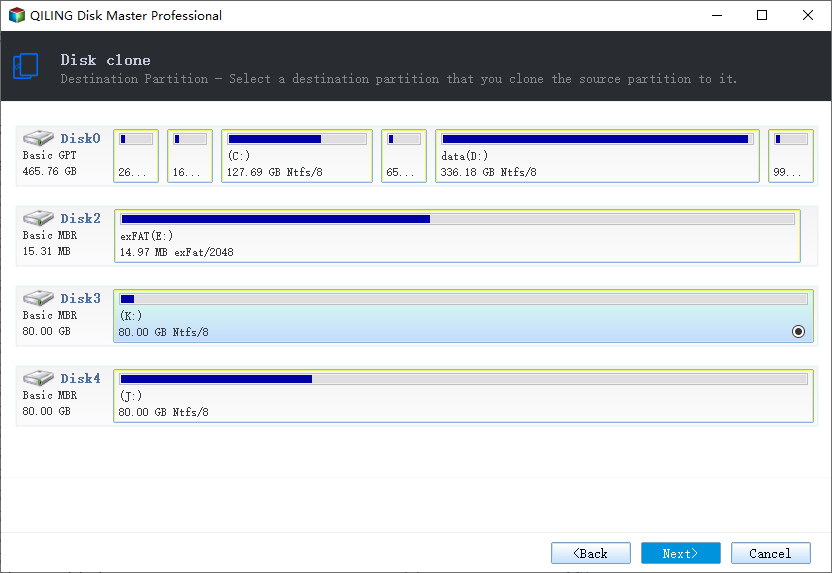
Step 3. Select your destination disk (the new NVMe M.2 SSD) and click "Next". Warning: all data on the NVMe SSD will be erased.
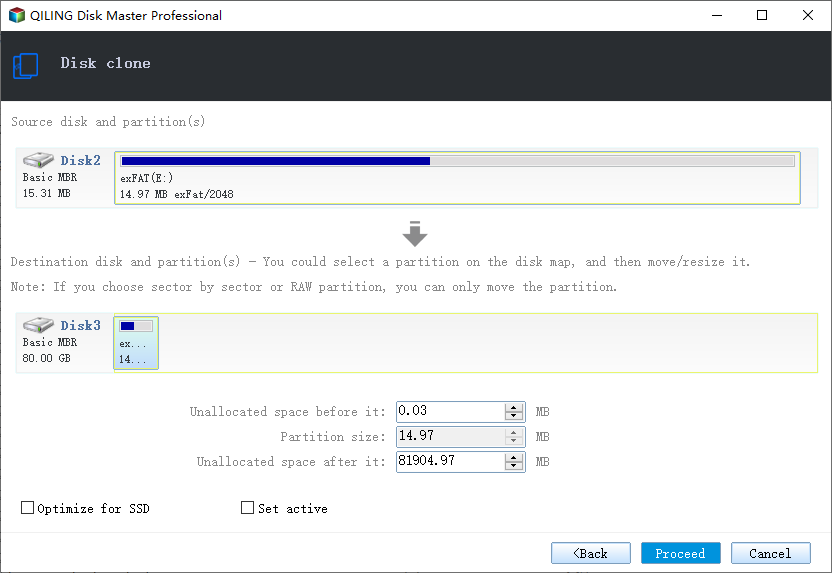
Step 4. In the disk layout editor, you can resize partitions to fit the NVMe SSD. Qiling Disk Copy automatically aligns partitions to 4K boundaries for maximum NVMe performance. Click "Proceed".
Step 5. Confirm the operation and wait for the cloning to finish. This usually takes 10 to 60 minutes depending on the amount of data.
Step 4: Configure BIOS to Boot from NVMe M.2
After cloning, set the NVMe M.2 SSD as the boot drive in BIOS/UEFI:
Step 1. Restart your PC and press the BIOS key during startup (usually Del, F2, F10, or F12, depending on the motherboard).
Step 2. Go to the "Boot" tab or "Boot Order" section.
Step 3. Set the NVMe M.2 SSD as the first boot device.
Step 4. Ensure the boot mode is set to UEFI (not Legacy BIOS). NVMe SSDs require UEFI to boot.
Step 5. Save the changes and exit BIOS. Your PC will boot from the NVMe M.2 SSD.
Step 5: Verify and Optimize the Cloned NVMe SSD
After booting from the NVMe SSD, verify everything works and optimize performance:
- Verify boot: Confirm Windows boots successfully and your files, apps, and settings are intact.
- Confirm 4K alignment: Press Win + R, type
msinfo32, go to Components > Storage > Disks, and check "Partition Starting Offset". It should be divisible by 4096. - Enable TRIM: Open Command Prompt (Admin) and run
fsutil behavior query DisableDeleteNotify. If it returns 0, TRIM is enabled. - Check speed: Use a benchmark tool like CrystalDiskMark to confirm the NVMe SSD is running at expected speeds.
- Format old drive: Once everything is confirmed working, you can format the old source drive to use it as extra storage.
Troubleshooting: Cloned NVMe M.2 Won't Boot
If your PC does not boot from the cloned NVMe SSD, try these fixes:
1. Set Boot Mode to UEFI
NVMe SSDs require UEFI boot mode. Enter BIOS and change "Boot Mode" or "SATA Mode" from Legacy/CSM to UEFI. Save and restart.
2. Ensure the EFI System Partition Was Cloned
On UEFI systems, the EFI System Partition (ESP) must be present on the NVMe SSD. Qiling Disk Copy clones it automatically during System Clone. If you used Disk Clone, verify the ESP is on the destination drive.
3. Rebuild Boot Configuration
Boot from a Windows installation USB, open Command Prompt (Shift + F10), and run:
bootrec /fixmbr
bootrec /fixboot
bootrec /rebuildbcd
If bootrec /fixboot returns "Access is denied", try:
diskpart
list disk
select disk X (replace X with your NVMe disk number)
list vol
select vol Y (replace Y with the EFI partition volume number)
assign letter=Z
exit
bcdboot C:\Windows /s Z: /f UEFI
4. Check the M.2 Slot's PCIe Mode
Some motherboards share bandwidth between M.2 slots and SATA ports. If the NVMe SSD is not detected, check the motherboard manual and ensure the M.2 slot is set to PCIe/NVMe mode (not SATA mode) in BIOS.
FAQs About NVMe M.2 Cloning
Can I clone an HDD to an NVMe M.2 SSD?
Yes. Qiling Disk Copy supports cloning from HDD, SATA SSD, or NVMe to an NVMe M.2 SSD. The cloned NVMe drive will boot directly after you set it as the boot device in BIOS.
Do I need to reinstall Windows after cloning to NVMe M.2?
No. A proper system clone copies Windows, all installed applications, settings, and personal files to the NVMe SSD. You can boot directly from the cloned drive without reinstalling anything.
Can I clone a larger drive to a smaller NVMe SSD?
Yes, as long as the used space on the source drive fits on the NVMe SSD. Qiling Disk Copy clones only the used data and resizes partitions automatically.
Why is my cloned NVMe SSD not booting?
The most common reasons are: BIOS boot mode set to Legacy instead of UEFI, missing EFI System Partition, or the M.2 slot set to SATA mode. Set the boot mode to UEFI and ensure the ESP was cloned.
Is 4K alignment important for NVMe SSDs?
Yes. Proper 4K alignment ensures the NVMe SSD runs at maximum performance and lasts longer. Qiling Disk Copy automatically aligns partitions to 4K boundaries during cloning.
Can I use the M.2 slot if my old drive is also M.2?
If your PC has only one M.2 slot, you can connect the old M.2 drive using a USB-to-M.2 adapter, clone it to the new NVMe SSD, then replace the old drive with the new one.
Conclusion
NVMe M.2 cloning is the fastest way to upgrade to a high-speed NVMe SSD without reinstalling Windows or your applications. With Qiling Disk Copy, the process is simple: select the source drive, select the NVMe M.2 SSD as the destination, enable SSD optimization, and start cloning. After setting the NVMe drive as the boot device in BIOS (UEFI mode), your PC will boot in seconds with all your data intact.
Download Qiling Disk Copy today and experience the speed of an NVMe M.2 SSD.
Related Articles
- How to Clone Windows OS from HDD/SSD to M.2 SSD
- How to Clone Windows to NVMe SSD
- Clone NVMe SSD to NVMe SSD in Windows 11/10
- How to Clone HDD to SSD in Windows 10/11/7
- Best Free SSD Cloning Software of 2026: Top 6 Picks
Looking for the best free SSD cloning software? Compare the top 6 free tools to clone HDD to SSD, migrate Windows, and copy NVMe drives without paying. - M.2 vs NVMe: What's the Difference and Which Should You Choose?
Confused about M.2 and NVMe? Learn the difference between M.2 form factor and NVMe interface, and which SSD you should buy for your upgrade.
Products
Articles & Tutorials
- Data Recovery
- Data Backup
- File Recovery
- File Backup
- System Backup and Restore
- Disk and Partition Clone
- Technical articles
- Mobile articles
- Disk Master Help
- Windows Data Recovery Tutorials
- Windows Secure Delete Tutorials
- Windows Partition Management Tutorials
- Windows File Backup and Restore Tutorials
- Windows System Backup and Restore Tutorials
- Windows Disk Backup and Restore Tutorials
- Windows Clone Tutorials