How to Clone Windows to NVMe [2024 Full Guide]
NVMe refers to Non-The NVMe interface has replaced SATA in many instances due to its high read speeds, low latency, and low consumption, allowing for optimized and enhanced booting times from NVMe SSDs, which are now often built into computers as a standard.
If you want to improve your computer's read and write speeds or upgrade your Windows 11/10 system, consider cloning Windows from an SSD to an NVMe drive. This process allows you to run Windows on an NVMe SSD without reinstalling the operating system.
How to Clone Windows to NVMe
To clone Windows to NVMe, you need to prepare the destination NVMe drive by formatting it with the NTFS file system, and then use professional disk cloning software to clone the Windows installation to the NVMe drive. This process involves creating a bootable USB drive with the cloning software, booting from it, and then selecting the source and destination drives. After the cloning process is complete, you can remove the USB drive and boot from the NVMe drive to use the cloned Windows installation.
Preparations for Cloning Windows to NVMe
1. NVMe storage is more efficient with Skylake chipsets or higher, making it a good choice for newer computer hardware.
2. The motherboard needs to have an M.2 slot that supports NVMe, specifically an M.2 PCI-E x4 slot, to accommodate the SSD.
3. The computer supports UEFI boot mode and needs UEFI firmware.
4. If it's a new NVMe SSD, initialize it to GPT format.
5. Ensure that the destination NVMe SSD has enough free space to accommodate the data from the source disk within Windows.
6. Backup all essential data on the target NVMe SSD before cloning to avoid data loss.
7. To quickly clone Windows to NVMe, download the professional cloning software Qiling Disk Master, which can save you time and effort.
To clone Windows to an NVMe drive, first, you'll need to prepare the target drive by creating a bootable USB drive with a compatible operating system. Next, you'll need to download and install the Qiling Partition Master, which will guide you through the cloning process.
Steps for Cloning Windows to NVMe
Qiling Disk Master can clone partitions and systems, supports SSD 4K alignment, and has a user-friendly interface, making it suitable for all Windows users.
Before using Qiling Disk Master, please connect NVMe to the M.2 PCI-E x4 slot and make sure your computer can detect the NVMe SSD. Then, follow the steps below to clone Windows to NVMe.
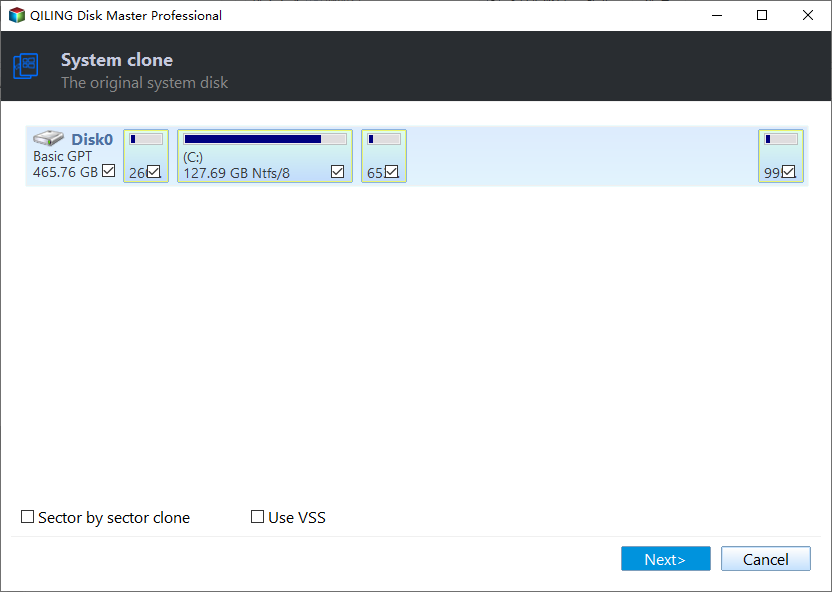
Step 1. Launch Qiling Disk Master, go to the Tools tab, select the "System Clone" button.
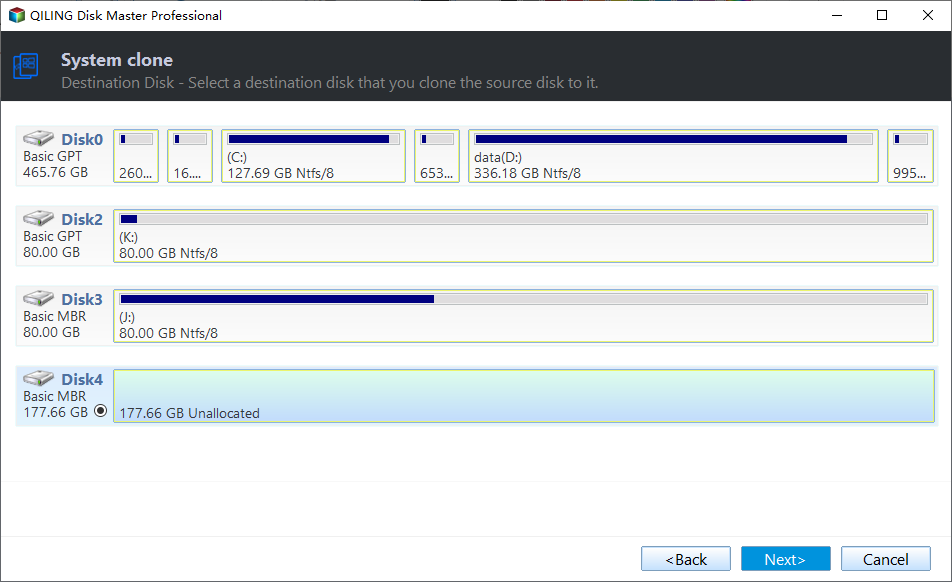
Step 2. Select the target new drive where you want to clone the OS to, and click "Next".
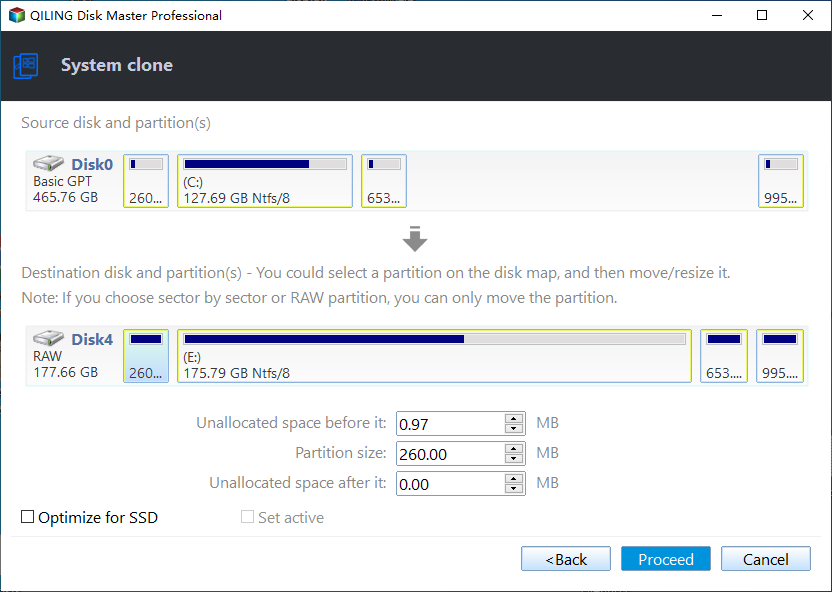
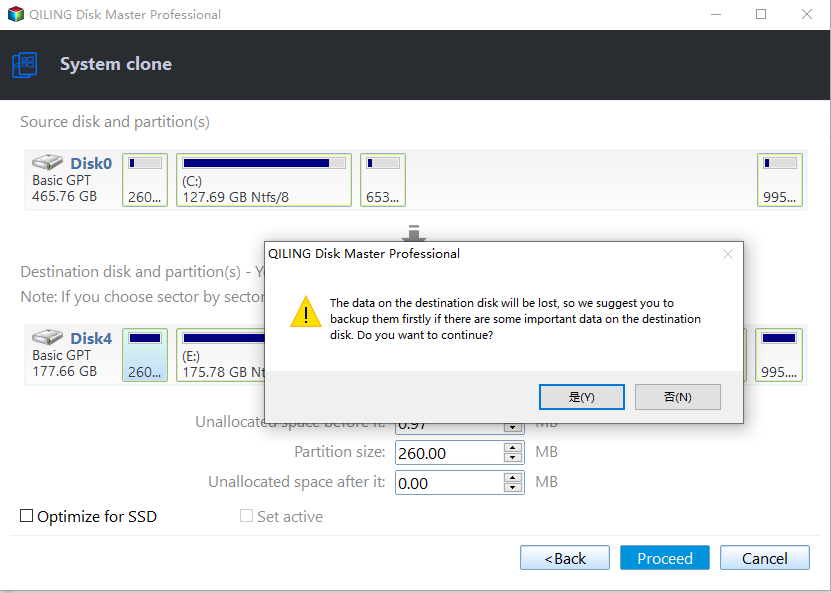
Step 3. The disk layout will be viewed, and then the user will click "Proceed" to initiate the OS cloning process.
Click "Yes" to confirm that you want to continue the OS disk cloning process.
Step 4. When the process completes, you'll see a confirming message, asking if you want to start up your computer from the clone target disk.
- Reboot Now To reboot your PC and configure it to boot from the new disk immediately, you would perform a cold boot and set the BIOS to prioritize the new disk as the primary boot device. This process involves shutting down the computer, entering the BIOS settings, and adjusting the boot order to prioritize the new disk.
- Done means you want to make the changes later.
If you meet any problems during this process, click the following link to get help.
Qiling experts are available 24/7 to provide one-on-one manual services, helping with system or disk cloning startup issues, and offering free evaluation services to diagnose and resolve disk cloning or system disk boot problems with their extensive experience.
- 1. Target disk becomes unbootable or SSD won't boot after clone.
- 2. The target disk is unable to boot after performing customized partition operations. This issue typically occurs when the disk's boot configuration is altered in a way that prevents the system from loading the necessary boot files.
- 3. To seamlessly clone OS disk to new drive and boot PC without any issues.
After completing the cloning process, you can set the NVMe SSD as the boot disk and boot your computer from it. If you're unsure how to set up the boot disk, refer to the simple steps below.
Step 1. Click F2/F8/Del to enter BIOS setup.
Step 2. To change the boot disk and set the NVMe SSD as the boot drive, you'll need to enter the BIOS settings, locate the boot order, and set the NVMe SSD as the primary boot device. This is typically done by pressing a specific key (such as F2, F12, or Del) as the system boots up, and then navigating to the boot settings.
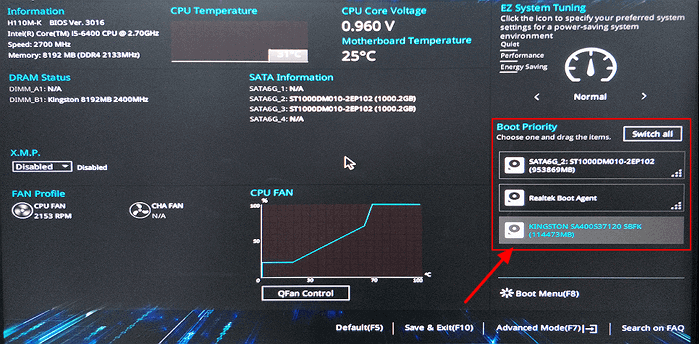
Step 3. Save the settings and exit.
- Tip
- If the cloned SSD won't boot, check if the system has been cloned and the target disk is set as a bootable drive.
Qiling Disk Master allows you to clone Windows to an NVMe drive, and you can also set the target drive as a bootable drive. This cloning feature is just one of the many capabilities of the software, which offers a range of additional features.
If you're interested, click the link above to see the exact cloning method. If you have other disk partition-related issues, you can download Qiling Disk Master for assistance.
Conclusion
If you want to clone Windows to an NVMe drive for faster read/write speeds, you can use Qiling Disk Master. This tool allows you to clone your Windows installation, and the article provides detailed tutorials on preparing for cloning before using it. Additionally, if you have any cloning-related or partition-related issues, such as formatting partitions or resizing partitions, Qiling Disk Master can also help you solve these problems.
FAQs About How to Clone Windows to NVMe
This section addresses other frequently asked questions about cloning Windows to an NVMe drive. If you have additional questions, please refer to the following Q&A for answers.
1. Can you put Windows on NVMe?
You can install Windows on an NVMe drive, and there are two ways to do it. You can download and reinstall Windows directly onto the NVMe SSD, or you can use a cloning tool like Qiling Disk Master to transfer your existing system and partitions to the NVMe drive.
2. How do I convert Windows to NVMe?
Qiling Disk Master allows for easy migration of Windows to an NVMe SSD without reinstalling the system, making the process straightforward and user-friendly.
Step 1. Launch Qiling Disk Master and select "Disk Clone" on the Tools tab page.
Step 2. Choose "System Clone" button.
Step 3. Select target drive and click "Next" to continue.
Step 4. Click "Proceed" to begin the cloning process.
3. Can you make NVMe bootable?
To make an NVMe drive bootable, you need to clone your operating system to the NVMe SSD, then change the boot order in your BIOS settings to prioritize the NVMe drive, and finally enable booting from the target drive in the BIOS settings.
Related Articles
- Sony VAIO Boot Menu: Everything You Should Know
- 5 Methods to Fix Bootrec /Fixboot Access Is Denied Windows 11
- How to Fix Bad Sectors on External Hard Drive [Full Guide]
- How to Check Hard Drive Health in Windows [Six Working Solutions]
- DiskPart Force Delete Partition: How to Force Delete Partition on Windows 11/10/8/7
cannot delete a system-protected partition on Windows 11/10/8/7? You can get a complete guide on using Diskpart force delete partition. - FIXED: DISM /Online/Cleanup-Image/Restorehealth Stuck🔥
If DISM /Online/Cleanup-Image/Restorehealth is stuck, try running the command with the /forcerestore option, or use the System File Checker (SFC) tool to scan and replace corrupt system files, and if that doesn't work, consider using a more comprehensive tool like the System Update Readiness Tool or