How to Create an Image Backup in Windows 10 [ 2022 Update]
Introduction
Creating an image backup for your Windows 10 device is crucial to safeguard your data and important files against malware attacks, system crashes, and hardware failures. It's essential to know the best ways to back up your data, including programs, settings, and files on your Windows 10 computer, to ensure their safety and integrity.
You can create an image backup in Windows 10 using either a third-party tool or built-in features, allowing you to restore the data whenever you want. This guide will walk you through the process of creating an image backup using both methods, as well as restoring the backup if your current OS fails.
- Image Backup with Qiling Backup Free
- Image Backup with Windows Backup Features
- Bonus Tip Restore an Image Backup in Windows 10
Create an Image Backup in Windows 10 with Qiling Backup Free
To create an image backup in Windows 10, you can use software, which is a more reliable method than other techniques. Software image backups offer a wide range of features, and one effective option is Qiling Backup Free, which can help you back up your Windows 10 device.
This software offers a one-click backup and instant recovery solution for your OS, disks, partitions, and files, allowing you to save backups to the cloud, network, NAS, or local drives. In addition to image backup, it also enables you to make backups of other types, such as.
- Incremental and differential backups
- Scheduled backups
- Encrypted backups, etc.
Qiling Backup Free allows for quick restoration of backed-up files in case of a Windows 10 computer crash or malware attack, with fast recovery speeds and the option to restore data to its original or specified location.
Qiling Backup free allows you to make bootable backups, which are essential in case of hardware corruption or virus attack, making it possible to recover your system even if your computer fails.
Main Features of Qiling Backup Free:
- Bootable backup and recovery. The software enables users to create a bootable disk in a few easy steps, which can then be used to repair or reinstall a computer after a malfunction.
- Multi-path backup storage. Qiling Backup Free allows you to make Windows 10 image backups in multiple locations, such as a network drive, external hard drive, or cloud drive.
- Disk and partition clone. This software enables users to create an exact replica of a hard drive or partition, allowing for a seamless replacement of a failing drive without losing any data.
- Restore the system to dissimilar hardware. Qiling Backup Free enables users to restore their system image to a computer with different hardware, ensuring that their programs and files continue to function properly on the new hardware.
- Free cloud storage. The software offers a free 250GB cloud storage space, allowing you to store large files and minimize cloud storage limitations when making a backup image for Windows 10.
Steps to Create an Image Backup with Qiling Backup
Getting started with Windows 10 image backup using Qiling Backup Free is a straightforward process. After downloading and installing the software, you can follow the easy-to-follow steps to complete the backup process. If you encounter any issues, you can refer to the step-by-step guide provided for assistance.
Step 1. Click the "File backup" button to start backup.

Step 2. Files from both local and network directories will be displayed on the left side, where you can expand directories to select the files you want to back up.

Step 3. Select the destination where you want to save the backup.

Step 4. Click "Options" to encrypt the backup with a password in the "Backup Options" section, and explore other customizable options to tailor the backup task to your needs.

Set the backup schedule and choose to start back up at certain event in "Backup Scheme".

Step 5. You can store the backup to local drive, Qiling's cloud service, and NAS.

Step 6. Qiling Backup allows users to back up data to both external third-party cloud drives and its own cloud storage service.
To back up data to a third-party cloud drive, select Local Drive, then scroll down and add a Cloud Device, after which you can add and login to your account.
Step 7. Click "Proceed" to start the backup task, which will then be displayed as a card on the left side of the panel. Once the task is completed, you can right-click on the backup task card to manage it further.

Qiling Backup helps you with backup also in those articles:
Create an Image Backup in Windows 10 with Windows Backup Features
In addition to creating an image backup with Qiling Backup Free, we'll show you how to do the same with Windows backup features. The Windows 10 System Image Backup feature can help you immediately create a backup for your applications and settings, which can be restored if your computer encounters any issues. This feature is particularly useful for users who want to ensure a quick and easy recovery process in case of a system failure or other technical difficulties.
Although Microsoft no longer supports this feature, it still works for most Windows users and ensures safety. To save the image backup to an external hard drive, connect it before starting the process, and then follow the steps below.
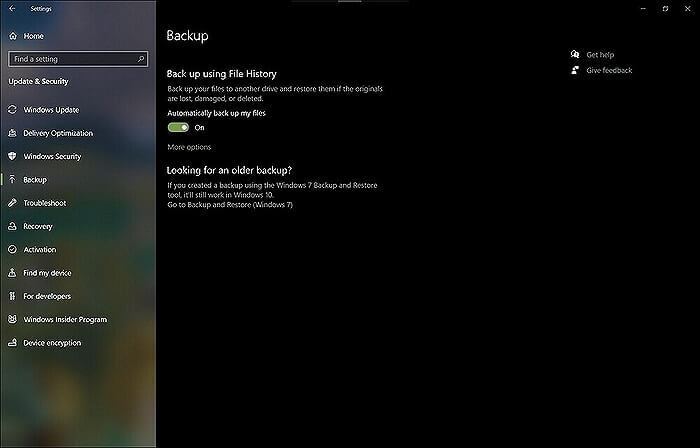
Step 1. Open the "Settings" menu by pressing the "Windows logo key + I".
Step 2. Click on "Update and Security".
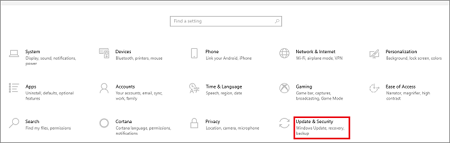
Step 3. In the next Window, navigate to the left panel and select "Backup".
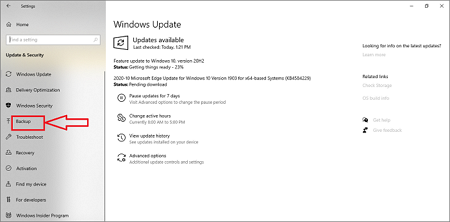
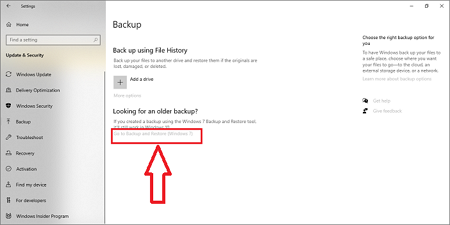
Step 4. To access the "Looking for an older backup" section, click on "Go to Backup and Restore (Windows 7)" in that area. This feature still functions on later Windows versions beyond Windows 7.
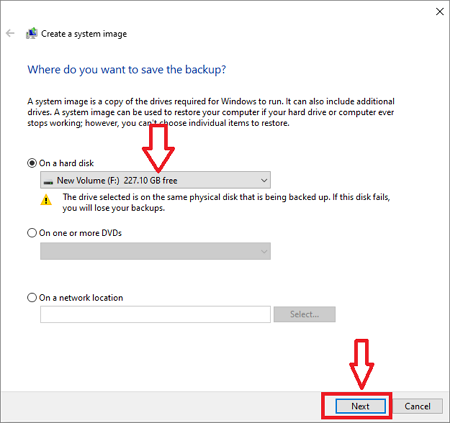
Step 5. When the Control Panel opens, navigate to "Create a system image".

Step 6. Choose the location where you want to save the backup, such as an internal or external hard drive, DVD, or LAN network, and then click "Next".
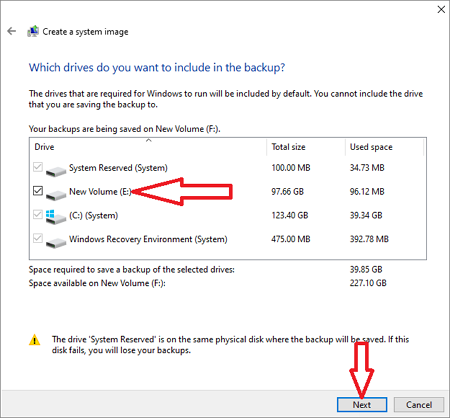
Step 7. Select the drives you want to include in the backup and click "Next".
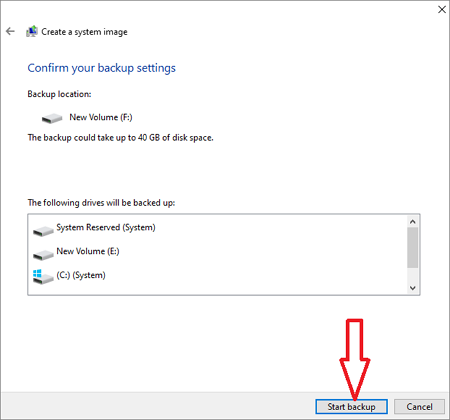
Step 8. Re-confirm your selections and click "Start backup".
Step 9. If you have an optical drive, the system provides you the option to create a system repair disk. You'll be asked to select either "Yes" or "No" and then click "Close".
The backup process for your device starts, taking time based on the backup data size and speed. You can use your drives as normal during this time, and the system will notify you once it's complete.
In situations where you used an external drive for backup, ensure you disconnect it once the process finishes and store it safely.
Other Windows Backup Software of 2022 you may want to know:
Looking for free Windows 11 backup software? Look no further!
To back up your data on Windows 11, use the built-in File History feature or third-party software like Qiling Backup, which offer automatic backups and can be easily set up to protect your files and system.
Bonus Tip: Restore an Image Backup in Windows 10
Restoring a Windows 10 image backup is a straightforward process that can be necessary if your current system fails or experiences a virus attack. To restore an image backup, you simply need to follow a series of steps, which include using a bootable media to access the recovery environment, selecting the correct backup image, and then beginning the restore process. This process can help you quickly recover your system to a previous state, minimizing downtime and data loss.
Step 1. Connect your computer with the drive (external or internal) that contains the system image backup.
Step 2. Boot your computer and press the "F8" key until the troubleshooting menu appears.
Step 3. Select "Troubleshoot".
Step 4. Go to "Advanced options" > "System Image Recovery" > "Windows 10".

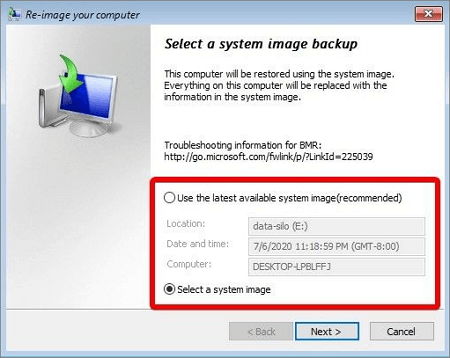
Step 5. When the "Select a system image backup" window appears, you can either click on the option "Use the latest available system" or manually select the backup location you want your device to boot from, depending on whether you have one or multiple backups.
Step 6. To proceed, click "Next". If you're restoring the backup image to a new drive, select the "Format and Repartition Disks" option. Otherwise, choose "Only Restore System Drives".
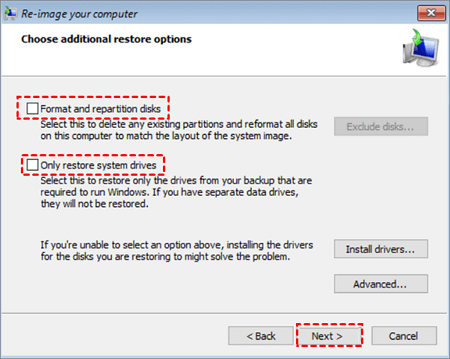
Step 7. Click on "Next" again and then "Finish" to start the restore process.
- Notice:
- This process may take varying lengths of time depending on the speed of the backup drive and the size of the image, so be patient until it completes.
Once you've set everything up, you can boot your system with the restored image file. Everything should work fine, but if you encounter problems during bootup, confirm your boot settings in the system boot menu.
You may be interested in more information about image backup:
Conclusion
Qiling Backup Free is a recommended tool for securely backing up Windows 10 image files, allowing backups to the cloud, network, or local drives, and offering a user-friendly interface with a trial version available.
Qiling Backup Free offers various features, such as multi-path backup storage, free cloud storage, and bootable backup and recovery. To create a Windows image backup, go to Settings>Update and Security>Backup, and follow the steps to back up your programs and settings.
To restore your computer's backup data, connect your computer to the specified internal or external storage device, boot it, and follow the steps outlined in the article to troubleshoot your device and recover the system image.
FAQ About Image Backup for Windows
1. What does Windows image backup include?
An image backup copies everything on your drive, including partitions and the boot sector, making it the only way to properly back up a Windows installation, including all programs and settings, as opposed to a file backup which only copies data files.
2. How long does a Windows image backup take?
10 minutes is a short time to finish creating one.
3. Can I use a system image on a different computer?
With the help of reliable Windows backup software, transferring the operating system to a new computer is possible.
4. What happens if I delete the Windows image backup?
You can delete them just like any other folder or file in Windows. To create another system image, use the Windows 7 Backup Restore application to select the option to create an image.
Related Articles
- How to Backup a File with 3 Free Ways in Windows 11/10/8/7
- Essential Guide to Windows 10 Backup and Restore in 2022 [ All You Need to Know]
- 7 Best Windows 10 Backup Utility [Features and How-to Guide]
- Top 10 Database Backup Software in Windows and Linux [2022 Reviews]
- WD Smartware Software for Windows 10 not Compatible
As many people are using wd smartware software, you may find it's not working for Windows 10. So another alternative backup tool will be introduced here. - Windows Backup Did Not Complete Successfully-Explained
What can you do when Windows backup did not complete successfully? This article will break it down to you and provide a solution.