Make External Hard Drive Bootable in Windows 10
PAGE CONTENT:
- Make External Hard Drive Bootable with Qiling Backup (Easiest Way)
- Create a Bootable External Hard Drive via CMD
- Install Windows 10/8 on External Hard Drive (Edition Limited)
To make an external hard drive bootable, you can use the built-in Windows tool called "Disk Management" to clone the existing boot drive or create a new bootable drive. Alternatively, you can use a third-party tool like Qiling Backup to create a bootable drive. Simply connect the external drive, launch the tool, and follow the prompts to create a bootable drive. You can also use the Windows command line to copy the necessary boot files to the external drive. This way, you can boot Windows 10 from the external drive. I hope this helps.
Creating a bootable HDD or USB drive with a customized Windows operating system offers several significant advantages. In the event of a PC shutdown due to hard disk failure or system corruption, a bootable drive can help you start the computer again. A bootable external hard drive is also useful when a computer is dead or crashed. Additionally, a bootable external USB drive allows you to use your own operating system anywhere, anytime. To take advantage of these benefits, you have three methods to choose from.
Method 1. How to Make an External Hard Drive Bootable with Qiling Backup
Applies to: Windows 10/8.1/8/7/Vista/XP (32-bit and 64-bit)
To make an external hard drive bootable, you can use the Windows backup software Qiling Backup, which is recognized as the best system backup software and disk/partition clone utility. It has a feature called "Create Portable Windows USB drive" in its "System Clone" function that allows you to clone all system files, boot files, and personalized data files to the target drive. Simply prepare your external hard drive and follow the steps in Qiling Backup to make it bootable in Windows 10 or other supported OS.
Notice:
To make an external hard drive bootable, ensure its free space is larger than the system's, delete all partitions, and have the same partition style as the source disk, allowing you to back up files in advance.
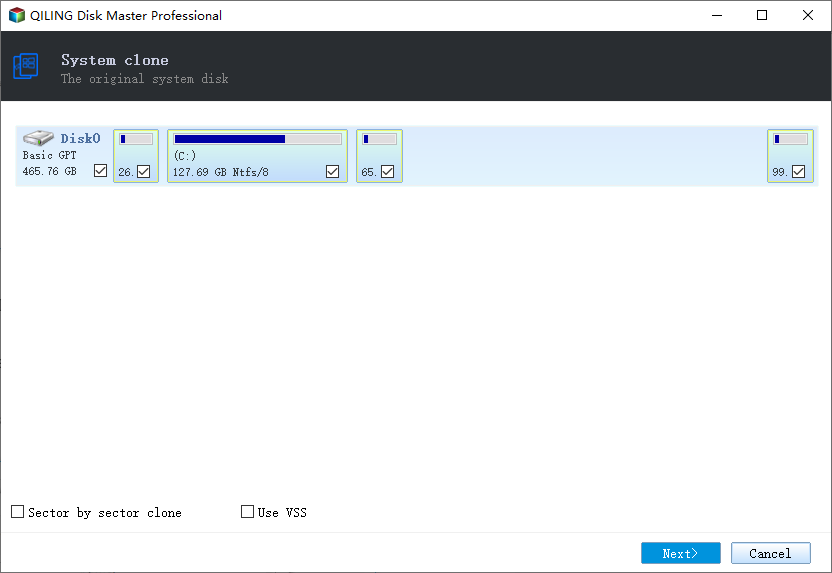
Step 1. Connect the external hard drive to your computer and make Windows recognize the drive. Then, launch Qiling Backup and click "System Clone".

Step 2. The software has chosen the entire Windows 10 system partition and boot partition by default, click to next
Windows 10 offers three additional system clone features that you can choose from.
If you wish to clone everything from the source disk, including the blank space, tick this option. This will clone the entire sector by sector, including any unused or empty space on the source disk.
If the destination hard disk is a Solid State Drive, select the "Optimize for SSD" option.
To enable the cloned hard disk to boot normally in MBA mode, select the "Set active" option during the cloning process. This ensures that the cloned disk is recognized as the active boot device, allowing it to boot properly in MBA mode.
You choose the external hard drive as the destination drive to back up your files. This means you will be copying your files from your computer to the external hard drive, creating a backup of your data.

Step 4. To clone Windows 10 to an external hard drive, first preview the disk layout to confirm the settings of the source and destination disk. Then, click "Proceed" to immediately clone Windows 10 to the external hard drive.

1. Create a bootable hard drive with Qiling Backup software. 2.
- Connect the external hard drive to the computer
- To restart the computer and access the BIOS settings, simply shut down the computer, then press the "F2" or "Del" key (depending on the computer model) as soon as it starts booting up again. This will take you to the BIOS settings menu, where you can make any necessary changes to the settings.
- Select the external hard drive as the new boot drive in the Boot option and save all the changes.
- After exiting the BIOS and restarting the computer, you should be able to see Windows 10 running on your new disk without any issues.
Qiling Backup is a versatile tool that not only creates bootable drives but also effectively backs up or clones hard drives, SSDs, and external storage devices. It enables users to migrate Windows 10 to an SSD, back up and restore computer hard drives, partitions, files, and Outlook emails, providing a reliable safeguard against data loss.
Method 2. Make an External Hard Drive Bootable with CMD
Applies To: Windows 10/8/7
While Windows Command Prompt can also be used to create a bootable external hard drive in Windows 10, 8 or 7, this method is more complex and may result in a boot failure, making it less reliable than the simpler method described earlier.
1. Format the external hard drive
To format a drive using the Command Prompt, follow the diskpart commands carefully to avoid mistakes. Start by typing "diskpart" and pressing Enter, then follow the commands in order: "list disk" to list all available disks, "select disk X" (where X is the number of the drive you want to format), "list partition" to list all partitions on the selected disk, "select partition Y" (where Y is the number of the partition you want to format), "delete partition override" to delete the selected partition, "create partition primary" to create a new primary partition, "format fs=ntfs quick" to format the partition with the NTFS file system, and finally "assign letter=G" (or any other letter you prefer) to assign a drive letter to the formatted partition. Be cautious and ensure you select the correct drive and partition before proceeding.
Step 1. To run Command Prompt as administrator, type "cmd" in the search box, select the best match called Command Prompt, and right-click on it to choose "Run as administrator".
Step 2. On the Command Prompt black window, enter the following commands in the same order here:
- Replace X and other sample values with the correct disk number, partition number, or drive letter from your own system before running each command.
- Press "Enter", every time you enter your command
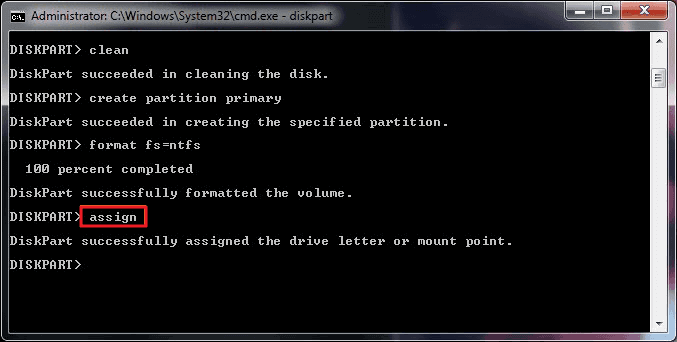
diskpart
list disk
select disk X
clean
create partition primary
format fs=fat32
assign
exit
If everything goes smoothly, your cmd screen will be displayed with a clean and organized layout.
2. Copy the Windows 10 installer files
To install Windows, insert your Windows DVD into the optical drive. Open Command Prompt as Administrator (Windows + X), then enter the command "dism.exe" to access the Windows Deployment Image Servicing and Management tool. This will allow you to perform various operations on Windows images, including installing, uninstalling, and servicing features, drivers, and packages. Simply type the command in the Command Prompt window to open the tool.
g:
cd boot
G:\bootbootsect /nt60 d:
Note:
"g" is your DVD drive letter
"d" is your external drive letter
Step 2. Copy all files from the Windows CD to the drive using xcopy by entering the command in the following:
cd\
G:\xcopy g:\*.* /s/h/f d:\
To make your external hard drive bootable, use commands like those listed. Once booted, select the drive at Windows startup to immediately boot Windows. If you receive a "Could not open the BCD template store" message with status [c000000f], try repairing the console to rebuild BCD or watch a video to fix boot problems, including BCD issues.
attrib c:\boot\bcd –h –r –s
bootrec /rebuildbcd
Method 3. Install Windows 10/8 on External Hard Drive with Windows Built-in Feature
Applies To: Windows 10 Enterprise/Education/Pro and Windows 8/8.1 Enterprise
In Windows 10 Enterprise/Education/Pro and Windows 8/8.1 Enterprise, you can create a Windows To Go workspace by imaging Windows on a certified USB drive, but this feature is limited to Enterprise/Education/Pro and 8/8.1 Enterprise users.
Requirements for USB Drives:
- The device has high random read and write speeds, making it suitable for running Windows workloads smoothly.
- Windows 7 and later versions are supported by these operating systems, which have been optimized to boot and run on hardware certified for use with Windows 7 and later.
- This product is supported by manufacturer warranties and is designed to operate normally under regular usage, ensuring continued performance and reliability.
If you have the right Windows version and a certified external hard drive, you can make the external hard drive bootable, but it will format the drive and you should back it up first.
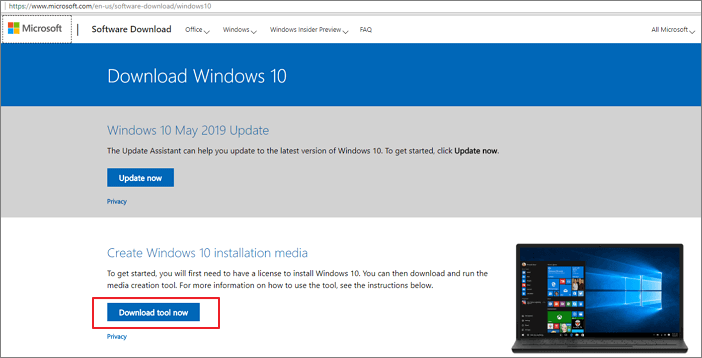
Step 1. Download the related installation ISO file from Microsoft and connect the hard drive to your computer.
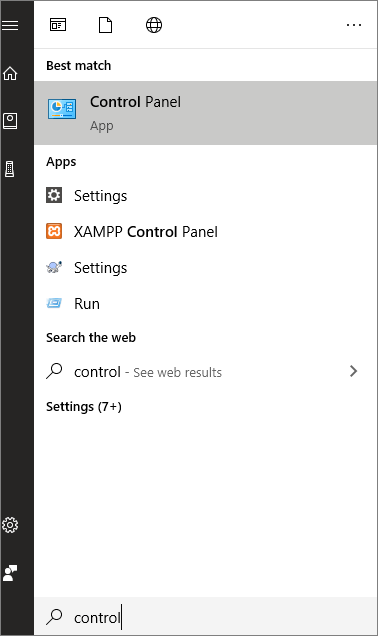
Step 2. Go to "Control Panel" and find "Windows To Go".

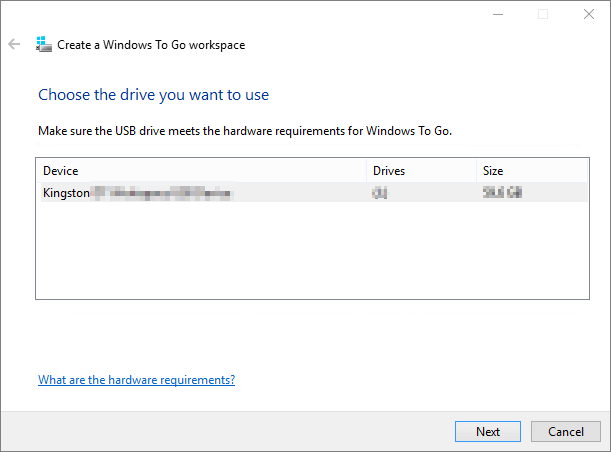
Step 3. Choose the external hard drive and click "Next".
Step 4. Click "Add search location" to search for the ISO file.
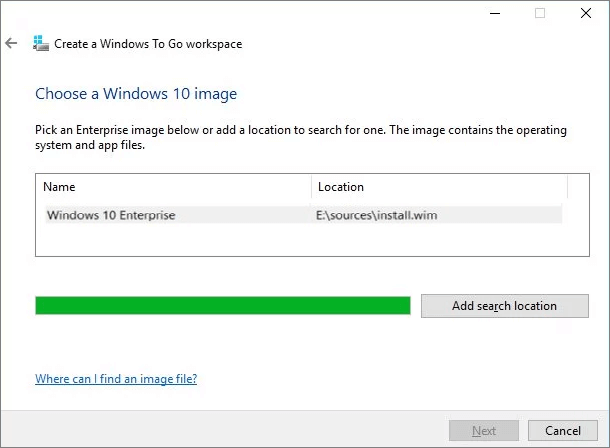
Step 5. Select the ISO file to make the external hard drive bootable.
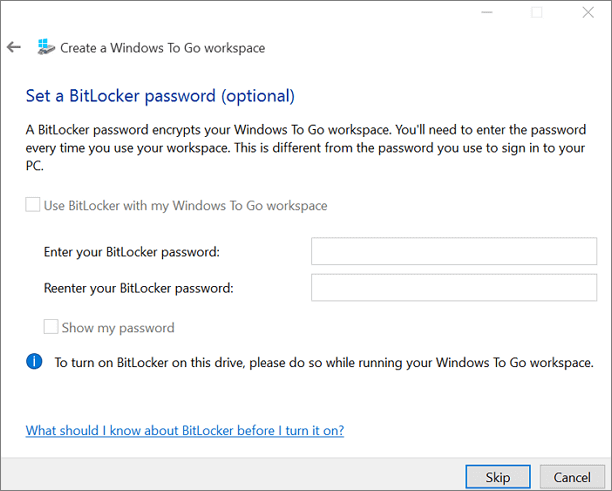
Step 6. Choose whether to use BitLocker or not. If you do, be sure you won't forget the password.
Step 7. The process of converting a USB drive to a Windows to Go drive involves formatting the drive, which will erase any existing data. To confirm, click "Create." This will initiate the formatting process, which will take some time. During this process, the drive will be reformatted to be compatible with Windows To Go. Once the process is complete, the drive will be ready to be used as a Windows To Go drive, allowing you to boot from it and run a self-contained version of Windows.
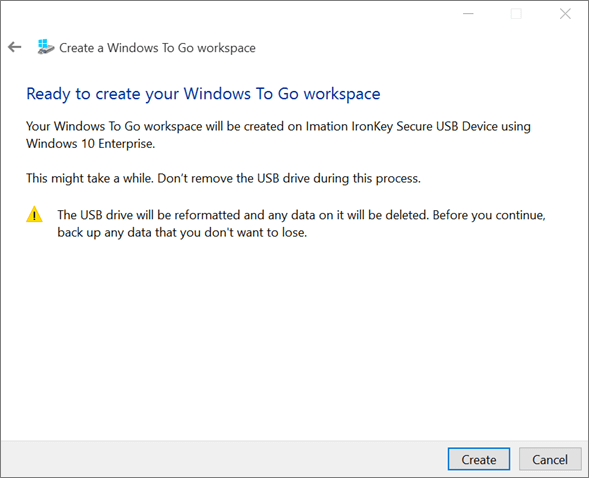
Step 8. Wait for the process to finish. When it's done, a bootable external hard drive is successfully created.
To Sum Up
To make an external hard drive bootable, three methods can be used, each offering different choices. Method 1 clones the system to the external disk using system cloning, providing a simple and safe solution. Method 2 copies the startup file to the external disk using the command line, while Method 3 utilizes Windows 10's built-in features, although this method has limitations and may cause data loss. If you're looking for a hassle-free solution, Method 1 is recommended, but if you're comfortable with the command line or have a good knowledge base, all three methods are applicable. Additionally, if the drive fails to boot, you can refer to the video in Method 2 to troubleshoot the issue.
Related Articles
- [Free] How to Make a Full Backup of Windows 10/8/7
- How to Backup Files to OneDrive with OneDrive Backup Software
- How to Create a Windows 10 Recovery USB for Another Computer
- How to Clone Windows 10 to USB Drive on Your Own
- [Solved] This Application Was Unable to Start Correctly (Error Code: 0xc000007b)
- Best PC Backup Cloud Storage: Preview and Full Tutorial
Have a preview of PC backup cloud storage and follow the best solutions to achieve backing up PC files or entire PC to cloud. See the solutions below.