Secure Boot | How to Clone Lenovo HDD to SSD Without Reinstalling OS and Applications
The Lenovo G70, Lenovo y580, Lenovo z510, and Lenovo Ideapad are all Lenovo computers that can be used with the Lenovo Support Tool. This tool allows users to manage and troubleshoot their Lenovo devices, including updating drivers, checking system health, and more.
PAGE CONTENT:
- Free Download Lenovo Clone HDD to SSD Software
- How to Clone Lenovo Hard Drive to SSD
- Clone Lenovo Hard Drive to SSD FAQs
Lenovo is a world-Lenovo is a well-known manufacturer that produces laptops, tablets, PCs, and other electronic devices. Their laptops, in particular, are very popular. In the past, many laptops came with a built-in hard disk drive (HDD) as their primary storage, which often had limited space. As time passes and data accumulates, older laptops with HDDs can become slow due to the lack of storage space.
Many users choose to upgrade the HDD on their Lenovo computer to an SSD or larger HDD to improve performance, rather than replacing the computer itself.
Lenovo Clone HDD to SSD - Free Download Disk Cloning Software
SSDs outperform HDDs in speed, security, reliability, and lifespan, while also being lighter and taking up less space. If you want to upgrade your Lenovo laptop from a HDD to an SSD without reinstalling Windows and applications, cloning the drive with a professional disk clone software is the best option.
Qiling Disk Copy is a simple-to-use and competent tool to upgrade your Lenovo hard drive from an old disk to a new one or from HDD to SSD. It allows you to use this disk clone tool to clone your hard drive.
- Upgrading to a faster storage drive like an SSD or HDD can breathe new life into your old computer without requiring a complete reinstall of your operating system and applications. This process, often referred to as a "storage upgrade," allows you to swap out your existing hard drive for a newer, faster one, effectively giving your computer a performance boost without the hassle of reinstalling everything from scratch.
- Clone Lenovo hard drive to smaller SSD
- Cloning Lenovo laptop hard drive to a bigger hard disk drive
- Back up Windows operating system for later use
Now, free download this ultimate disk copy program to replace Lenovo's hard drive.
How to Clone Lenovo Hard Drive to SSD in Windows 10/8/7
To clone your Lenovo laptop hard drive from an HDD to an SSD or another HDD using Qiling Disk Copy, follow these steps: clone your Lenovo laptop's hard drive from an HDD to an SSD or another HDD using Qiling Disk Copy. This program allows you to clone a hard drive with bad sectors. Firstly, download and install Qiling Disk Copy on your laptop. Next, connect the target SSD or HDD to your laptop and launch the program.
Tools You Need
An SSD
A SATA cable was used to connect the SSD to the laptop.
Disk cloning software - Qiling Disk Copy
Requirements for the SSD
- Ensure the SSD has enough space to hold all the data on the HDD, and if the HDD's used space is larger than the SSD's total space, clone the OS to the SSD first using the "System Clone" feature.
- Ensure the SSD displays as unallocated space in Disk Management. If it doesn't, back up the SSD using Qiling Backup and delete all partitions on the SSD.
- Ensure the SSD has the same partition style as the HDD, and convert it if necessary.
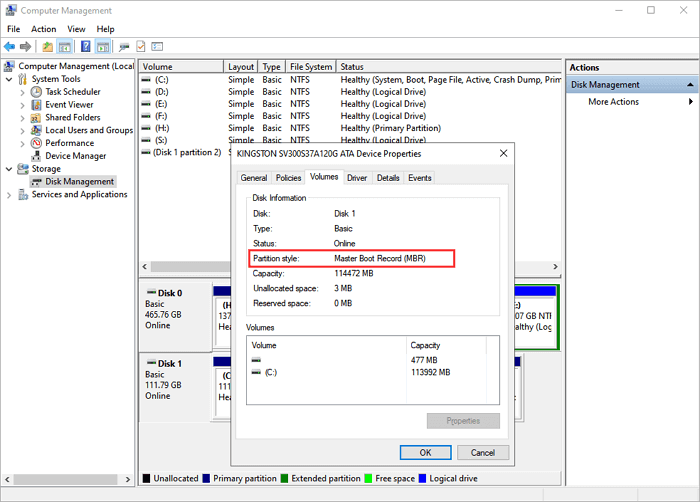
To check the partition style of a disk:
Step 1. Connect the HDD/SSD to a computer.
Step 2. Right-click "This PC" and choose "Manage" > "Disk Management".
Step 3. Right-click on your disk and choose "Properties".
Step 4. Switch to the "Volumes" tab. Under Disk Information, you can see the partition style of your disk.
Step-by-Step Guide to Clone Lenovo HDD to SSD
After making the preparations above, you can follow detailed steps below to clone the Lenovo hard drive to SSD.
If you are performing Lenovo system hard drive replacement, after cloning, you need to manually set your computer to boot from the cloned SSD. While If it is a data disk cloning, there is no need to change the boot settings.
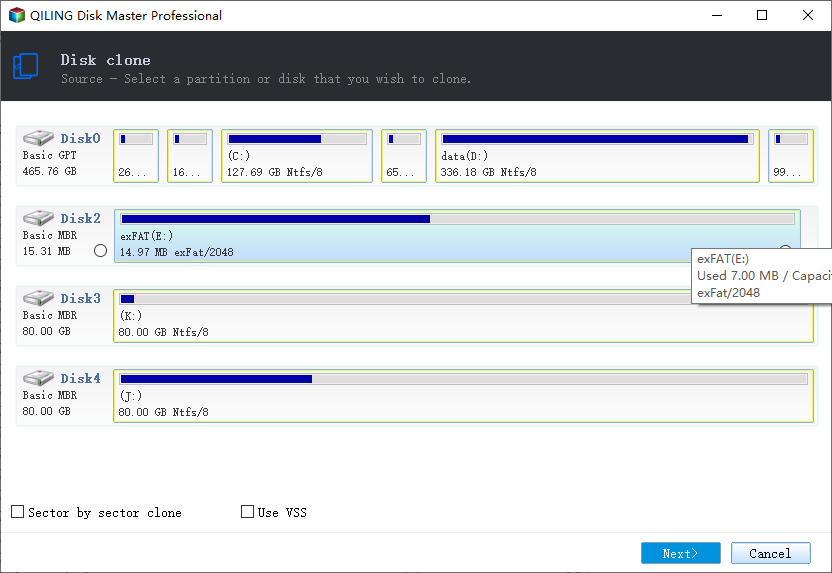
Step 1: Choose "Disk/Partition clone" to start.

Step 2. Select the smaller hard drive as the source disk that you want to clone and click Next.
Step 3: Choose the bigger hard drive to save the data and then click "Next".
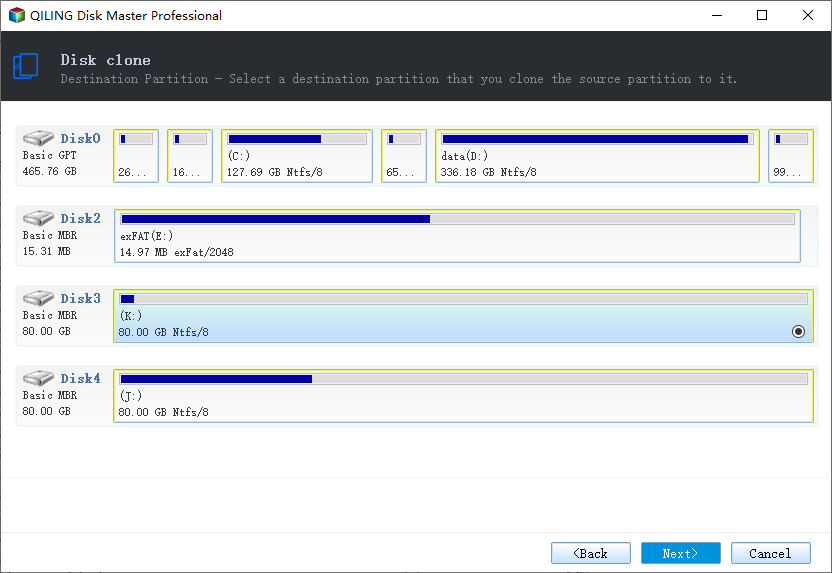
Step 4: Edit the disk layout and then click "Proceed" to continue.

A warning message tells you that the data on the destination disk will be overwritten. Click "OK" to continue if you do not have important data on the destination disk.
Set Up Lenovo Boot from SSD
If you cloned a data disk to the SSD, you could skip this part. If you cloned a system disk to the SSD, you would need to set your computer to boot from it. Here are the steps:
Step 1. Restart PC and press F2 or F8 to enter BIOS settings.
Step 2. In the Boot option, select new HDD/SSD as the new boot drive and save all the changes.
Step 3. Exit BIOS and restart the computer.
Problems You May Encounter for Lenovo Clone HDD to SSD
Although in the minority, some of you may encounter the following issues after cloning Lenovo hard drive to SSD.
Issue 1. Disk Boot Issue
Disk boot issue is the most common problem after cloning. There are three main causes:
1. While cloning the disk, you manually select the system drive (C drive only).
2. You connect the HDD to the computer and make it a USB drive.
3. The computer lacks the necessary drivers.
For situation 1: When using Qiling Disk Copy cloning your system, make sure you choose disk cloning instead of partition cloning. This prevents the system partition and the boot partition from not being together and causing an unbootable problem. If you have selected partition cloning, you can contact our support team (support@idiskhome.com) for remote assistance. They will help you create the system partition, which will solve the boot issue.
For situation 2: You need to edit BCD (Boot Configuration Data, which helps to make the Windows system partition bootable) on the cloned SSD. For a detailed guide on how to edit BCD, you can refer to the official document from Microsoft.
For situation 3: You can use DSIM (Deployment Image Servicing and Management), a Windows built-in command-line tool, to add the driver. Also, you can refer to the official document from Microsoft for help.
If there is any situation you cannot handle after cloning your HDD to an SSD using Qiling Backup, feel free to contact our support team (support@idiskhome.com) for assistance.
Issue 2. Software Asks or Reactivation
Depending on the design of the software, some utilities will ask for reactivation when they detect changes in hardware. In such cases, contact the software producer and let them reset the activation code for you to solve the problem.
Issue 3. Get a Misaligned SSD After Cloning
It happens that your SSD is misaligned after the disk cloning. You can check the alignment of your SSD following the steps below:
Step 1. Press "Windows + R" and enter msinfor32.
Step 2. Go to "Components" > "Storage" > "Disks".
Step 3. Check the value of "Partition Starting Offset". If the value is not divisible by 4096, your SSD is misaligned.
Misalignment will reduce the performance of your SSD. Therefore, if you find your SSD is misaligned, you can use the 4K alignment feature in the free partition manager - Qiling Partition Master to align sectors on your SSD.
How to Get Most from the SSD
Now that you have installed an SSD on your computer, to help you make the best use of an SSD and extend its durability, there are some tips for you.
Enable Trim
TRIM command can improve the writing speed of the SSD and extend its life. Thus, to maintain the peak performance of your SSD, you should enable TRIM on it.
Update the Firmware
SSD manufacturers continuously release updates that can fix technical issues and bugs or even optimize the SSD performance. Therefore, it's a good choice to keep the SSD firmware updated.
Always Keep Some Space Free
When an SSD is out of space, issues related to performance may occur. Besides, if the SSD is the system disk on your computer, you should also consider that the system and the applications need free space to function properly. Thus, always leave some free space on the SSD.
There are many other tips on how to get most from the SSD, like don't defrag the SSD, don't store large files on it, and don't wipe the drive. Keep these tips in mind; you can prosper the SSD performance and extend its life at the same time.
The Bottom Line
Cloning an HDD to an SSD on a Lenovo laptop could be effortless with the help of software like Qiling Disk Copy. In most of the cases, as long as your SSD meets the requirements listed above, you can finish the task smoothly. If you have come across some unexpected issues and can't figure out how to fix them, feel free to contact our support team for assistance.
Clone Lenovo Hard Drive to SSD FAQs
Here are a few questions highly related to cloning Lenovo laptop hard drive. If you also have any of these problems, you can find the methods here.
How do I replace the hard drive in my Lenovo laptop SSD?
Follow the simple steps here to replace the HDD with SSD on your Lenovo laptop.
Tools:
- A hard drive or SSD
- Small screwdriver
Step 1. Make sure the notebook is powered off and unplugged. Remove the battery.
Step 2. Remove the screw that secures the hard-drive slot cover.
Step 3. Connect the SSD to your laptop. Connect the cable and slide the drive into the slot. Screw the cover back on. Reattach the battery.
How do I transfer my OS from HDD to SSD in laptop?
Connect the SSD to your laptop, and use Qiling Disk Copy to migrate OS from HDD to SSD without reinstalling.
Step 1. Run the program, choose your system disk as the source disk under "Disk Mode" and click "Next".
Step 2. Choose the target disk as the destination disk.
Step 3. Check the disk layout of the destination disks. Click "Proceed" to officially execute the task.
Step 4. Set up Windows OS boot from the cloned hard drive.
How do I clone Windows from HDD to SSD?
To clone Windows OS from HDD to SSD, Qiling Disk Copy will help you make it without any effort. You can do as shown in the tutorial to clone Windows to even smaller SSD. After cloning, you need to do the rest operation to ensure a smooth start.
How do I clone a Lenovo hard drive?
Step 1. Download, install and run Qiling Disk Copy on your PC. Click "Disk Mode" and select the hard drive that you want to copy or clone. Click "Next" to continue.
Step 2. Select the destination disk. Click "OK" to confirm if the program asks to erase data on the destination disk.
Step 3. Check and edit the disk layout. Click "Proceed" to start the hard drive cloning process.
Related Articles
- How to Clone IDE to SATA HDD/SSD (2 Ways)
- How to Migrate Linux Installation to New Drive
- [Windows Clone] How to Clone OS in Windows 10/8/7
- How to Copy Hard Drive to New Computer
- How to Replace/Upgrade Laptop HDD with an SSD
- Free USB Image Tool Bootable for Windows 10
To prevent boot files on USB from being lost, users usually back them up with a free USB image tool bootable. Qiling Disk Master can help you backup your USB easily.