How to Partition SD Card for Android
To extend your Android device's storage, you'll need to prepare an SD card, select a partition tool to partition it, and set it up as internal memory or storage. First, prepare your SD card by formatting it. Next, choose a partition tool, such as MiniTool Partition Wizard or SD Card Formatter, to partition the SD card.
PAGE CONTENT:
- Part 1. Prepare SD Card
- Part 2. Pick Up SD Card Partition Tool
- Part 3. How to Partition SD Card for Android
- Part 4. Extend Android Storage/Internal Memory with Partitioned SD Card
How can I partition SD card for Android
To free up internal memory on your Samsung Galaxy device, you can use Link2SD to move apps to an SD card. However, before doing so, you need to partition your SD card. To partition your SD card, follow these steps: 1) Go to Settings > Storage > SD card > Partition SD card. 2) Choose the size for the system partition (usually 256MB) and the size for the data partition (usually the remaining space). 3) Confirm the changes. This will create a separate partition on your SD card where you can move apps using Link2SD.
To add a new SD card and extend your Android phone's internal storage, follow these steps: insert the new SD card into the phone's SD card slot, go to Settings > Storage, and select the new SD card to format it as internal storage. This will allow you to use the SD card as part of your phone's internal storage, freeing up space on your phone. You can then move files, photos, and videos to the SD card to free up space on your phone. This will also help you to use your phone to shoot videos without running out of space.
A partition is a logical division of mass storage or memory into isolated subdivisions, typically done to reduce the burden of internal storage on a device, such as an Android phone with limited internal memory, where partitioning an SD card can extend internal storage. (Note: I condensed the text into a single paragraph as per your request)
To partition an Android SD card and free up internal storage, you can follow these simple steps. You can partition the SD card to use it as a second storage location for files like pictures, music, and videos, or to move installed applications to the card. The process may vary depending on your specific needs, but the general steps remain the same. You can partition your SD card to make it a secondary storage location for files, move installed applications to the card, or use it as a backup storage location. The process is straightforward and can be completed in a few simple steps.
Part 1. Prepare SD Card
To protect your SD card data, you can prepare by backing up your data, removing any unnecessary files, and ensuring the SD card is empty or has enough free space for partitioning. This will help prevent any potential data loss during the partitioning process.
# 1. Prepare Used or Old SD Card - Back Up Data
In order to avoid unexpected data loss, it's recommended to backup data on an SD card to an external storage device or computer first.
Step 1. Extract the used SD card and connect to your computer.
Step 2. Extract all valuable data to PC via Copy & Paste or using reliable backup software.
To backup data on your SD card, first, ensure that your device is fully charged. Next, insert the SD card into a card reader or a USB adapter, and connect it to your computer.
Step 3. After the backup, empty the SD card by deleting all partitions and data.
To delete an SD card partition, open Disk Management, right-click on the partition you want to delete and select "Delete volume".
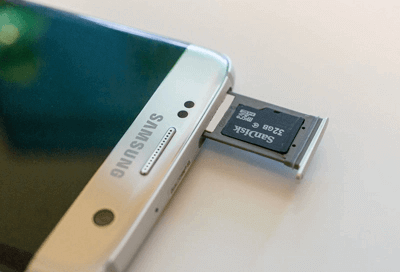
# 2. Select A Right New SD Card
If you need to purchase a new SD card, make sure to choose the correct type and capacity to match your device's requirements. There are various types of SD cards, each with different storage capacities, so it's essential to select the right one to ensure compatibility and sufficient storage space.
- SD card: 128MB - 2GB, FAT32
- SDHC card: 2GB - 32GB, FAT32
- SDXC card: 32 - 2TB, exFAT
- SDUC card: 2TB - 128TB, exFAT
For the average storage needs, SDXC card is preferable.
Part 2. Pick Up SD Card Partition Tool
After preparing the SD card, you can partition it using a reliable SD card partition tool. This allows you to create partitions on the card, effectively funneling a rooted device's applications to the card. As a result, you can install and run your programs directly from the card.
Here are two SD card partition tools that can help you extend Android storage:
1). Partition Software - Qiling Partition Master (100% Work & Professional)
Qiling partition software makes SD card partitioning easy by creating a FAT 32 primary partition for the SD card and a second EXT partition for internal memory.
2). Windows Built-in Tool - Disk Management (Free)
Windows Disk Management is a built-in tool that allows users to manage their hard drives and create a new FAT32 partition on SD cards for Android users to extend storage.
Part 3. How to Partition SD Card for Android
To extend your Android phone's capacity or internal memory, you can apply to partition your SD card using one of the two methods recommended in Part 2. Follow the tutorial steps in this part to increase your phone's storage space now.
Method 1. Partition Android SD card with Qiling partition tool
To resolve the issue, I will work to repartition the old SD card and partition the new SD card. This will extend both the Android storage and the internal memory.
If your SD card still contains a partition, you can delete the whole partition using Qiling Partition Master to leave unallocated space on the SD card.
To delete the SD card partition, launch Qiling Partition Master, select the SD card partition, and then click "Delete".
After this, you can repartition the SD card and create the new partition for extending internal storage on Android SD card with the following guidelines using Qiling partition tool:
To extend Android storage, you need an FAT32 partition, while to increase internal memory, you need an EXT partition for installed apps, requiring two separate partitions.
To set up multiple partitions with different capacities, create a new partition by running `sudo parted -a none /dev/sda mkpart name=partition1 file-system-type=ext4 1 1000` (replace `/dev/sda` with your actual disk device and `1000` with the desired capacity in MB). Repeat the process for each partition, changing the name, capacity, and file system type as needed. Once all partitions are created, verify them and their capacities with `sudo parted -a none /dev/sda print`.
Step 1. Open Qiling Partition Master. Connect the hard drive or SSD to PC.
Select the target HDD or SSD and click "Create" accordingly.
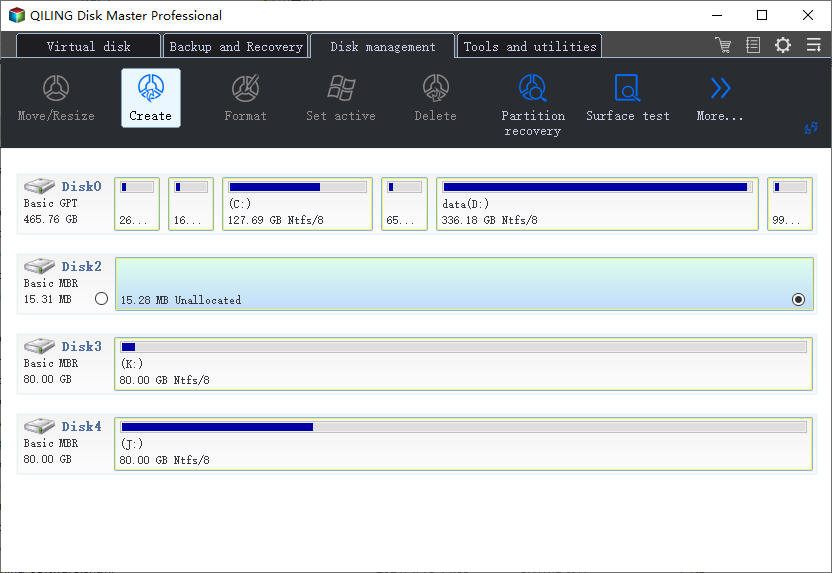
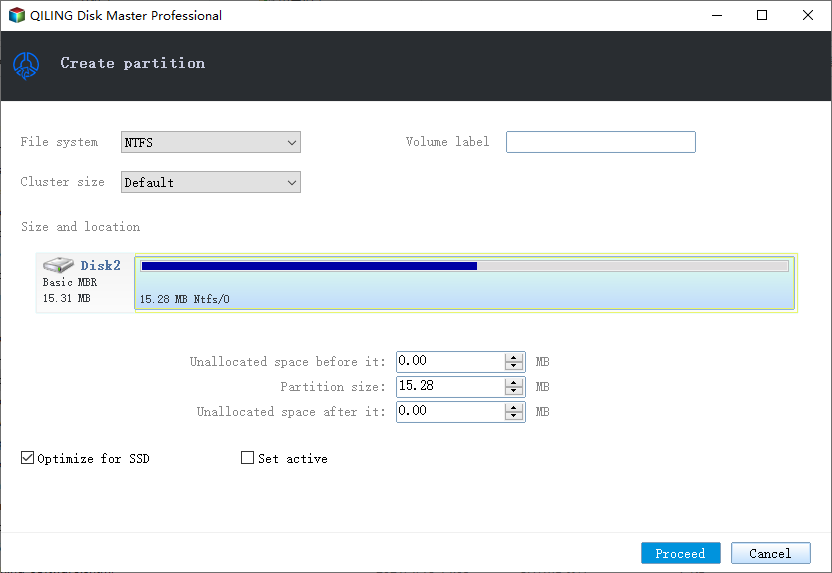
Step 2. Enter the Partition label, choose the MBR or GPT disk type, and set the cluster size according to your needs, then click "Proceed" in the next window.
Method 2. Partition SD Card as Android Data Card with Disk Management
The software works to partition an SD card as a data card for Android phones, allowing users to store and manage their data on the SD card, freeing up internal storage space on their device.
Disk Management can be used to extend Android storage as a data card, allowing you to create a single FAT32 partition to save data like photos, videos, and music.
Here are the steps to create a partition on an SD card using Disk Management:
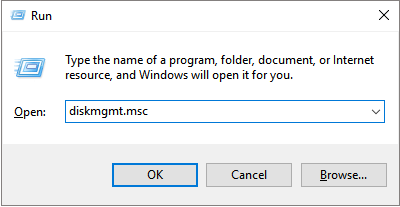
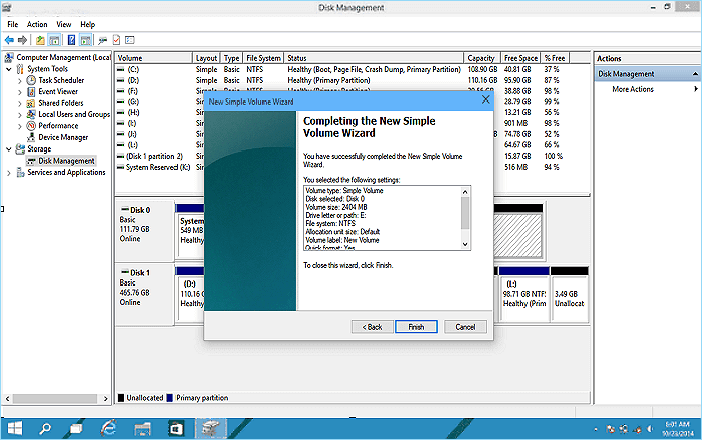
Step 1. Press Windows + R keys to bring up the Run box, type diskmgmt.msc and hit Enter to open Disk Management.
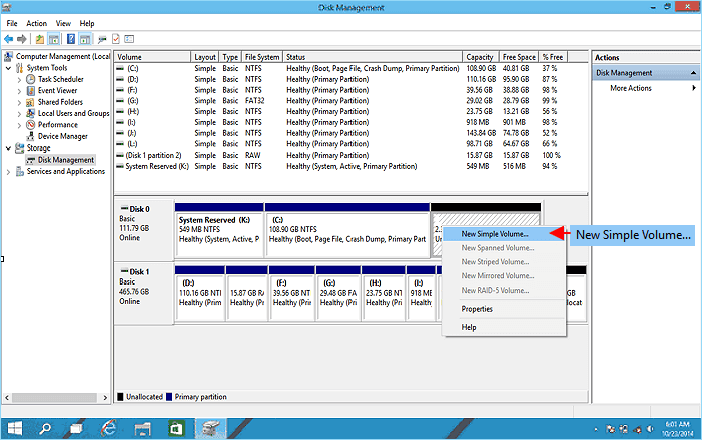
Step 2. Right-click on the unallocated space of your SD card and select "New Simple Volume".
Step 3. Enter the New Simple Volume Wizard interface by clicking "Next" and specify a volume size.
Step 4. Assign Drive Letter or Path, then format the partition into FAT32. Click "Finish" to complete the process.
After this, you can follow Part 4 to extend Android storage or memory.
Part 4. Extend Android Storage/Internal Memory with Partitioned SD Card
To extend your Android phone storage and internal memory after partitioning your SD card, you can follow these steps. First, ensure your phone is connected to a power source.
Step 1. Shut down your phone and insert the SD card to your SD card slot correctly.
Step 2. Reboot your Phone.
Step 3. Set up SD card on Andriod phone:
If you have an Android 6.0 or later device, you don't need to do anything as the card will be automatically detected and formatted once you insert it and reboot your phone. The FAT32 partition will be used as a data card and the EXT partition will be used as internal memory.
If you're still using an old device with Android 5.0 or an even older version, it's time to upgrade your setup with these tips. First, make sure your device is updated to the latest version of Android, which is Android 10.
1. Go to Settings > Storage > Tap your SD card.
2. To change the format of a file, tap the three dots in the top right corner of the screen and select "Format as internal" or "Format as portable" from the dropdown menu. This will allow you to choose how the file is stored and accessed on your device.
3. Select the desired option to format your sd card and finish the process.
Step 4. After this, you can use your SD card as internal or portable storage on your Android phone now.
Conclusion
Partitioning the SD card is a simple and effective way to free up internal memory on an old Android phone, resulting in a faster and more responsive operating system.
On this page, we introduced two SD card partition tools that can help extend Android internal memory or storage by partitioning the SD card as a storage card, making it easy and efficient to use.
To extend Android internal memory, you need to use a tool like Qiling Partition Master to create an EXT partition, which allows the Android phone to detect it as internal memory, due to the shortage of Disk Management.
Related Articles
- Should You Or Should You Not Defrag SSD
- Two Easy Ways to Wipe Data from Hard Drive in Windows 11/10
- How Do I Fix Windows 10 BSOD: Blue Screen of Death Error? Here Is The Guide
- Step-By-Step Guide: How to Install Windows 11 on a GPT Partition
- Fixed: Windows Could Not Format A Partition on Disk 0 (Error Code 0x80070057)
- How to Fix Extend Volume Greyed Out in Windows 11?
- How to Do Onekey Recovery Initial Backup
You can easily create onekey recovery initial backup with Lenovo OneKey Recovery and a third party software – Qiling Disk Master.