Windows 10 File History vs Backup: Which One Works for Me?
| Workable Solutions | Step-by-step Troubleshooting |
|---|---|
| 1. Enable File History in Windows 10 | Click on Start menu and open Settings> Update & Security> Backup...Full steps |
| 2. Restore Files from File History Backup | Connect the device with backup data to the computer. This backup can also be created...Full steps |
| 3. Backup Files with Qiling Backup | Click the "Select backup contents" button to start backup; There are four data backup...Full steps |
What Is File History? How Does It Work
Computers running Windows 8/8.1 or Windows 10 have a built-in backup function called File History, while earlier versions use Backup and Restore. This feature allows users to enable and use a built-in backup tool to protect their files, and we will explain its usage and capabilities before proceeding.
File History in Windows creates automatic backups of your files, focusing on keeping your files safely backed up. Once you set up the folders you want to backup and a destination drive, it will automatically create backups as scheduled, including previous versions of the file. This allows you to quickly revert a file into one of the backed-up previous versions, providing a convenient way to recover from changes or errors.

Guide: How to Enable File History in Windows 10
To start using File History to backup files on your Windows computer, first, enable the tool in Settings by going to Update & Security, then Backup, and finally turning on File History, which will allow you to select a backup drive and set a backup schedule.
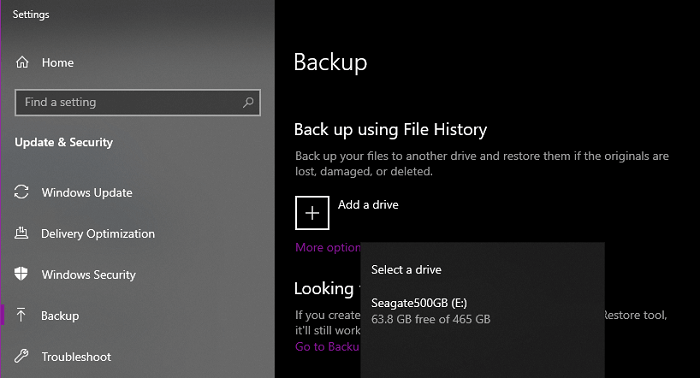
Step 1. Click on Start menu and open Settings> Update & Security> Backup.
Step 2. To back up your data using File History, click on the "Back up using File History" option and then click on "Add a drive" to select an external drive where your backups will be stored.
Step 3. After selecting a drive, choose the option to automatically back up your files when it's connected to your computer.
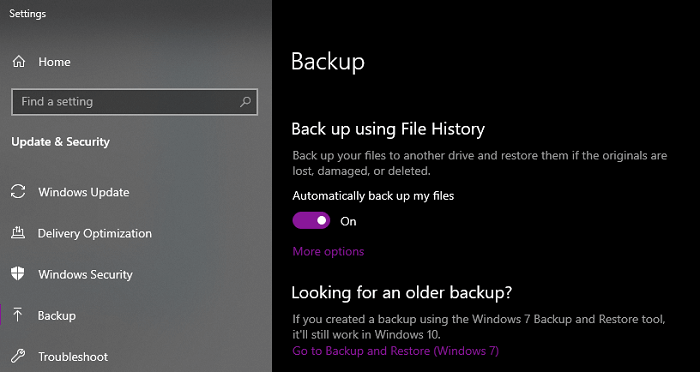
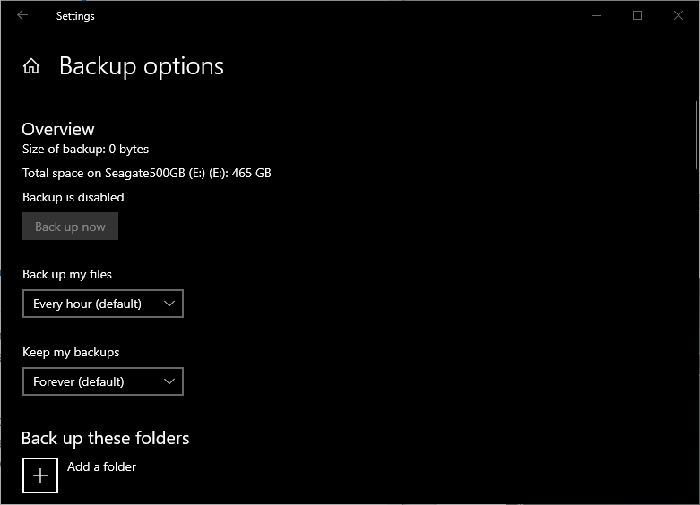
Step 4. You can click on "More options" to configure backup plans and folders you want to be backed up.
Guide: How to Restore Files from File History Backup
Step 1. Connect the device with backup data to the computer. This backup can also be created on another computer.
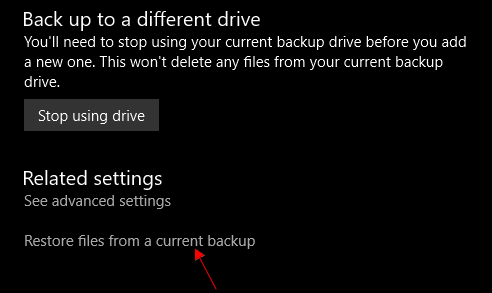
Step 2. Go to Backup settings, click "More Options", scroll down to the bottom, and select "Restore files from a current backup".
Step 3. A list of backed-up files appears, allowing you to preview files or folders by right-clicking and selecting "Preview." You can also navigate through multiple backups made at scheduled times using the arrow buttons.
Step 4. Select the needed files, click Restore, and the files will be restored to their original locations. Alternatively, right-click a file, select "Restore previous versions," and choose from available backups. A window will appear showing all available backups, which can be previewed or restored to a different location if needed.
Data Backup? What Is It?
File History is a way to protect your files from potential data loss issues by creating copies of your data and storing them separately from the original. This approach ensures that if the actual data is lost or becomes inaccessible due to an issue, you can restore it from the backup you created beforehand. This concept of data backup is detailed and versatile, allowing you to safeguard your important files and maintain their integrity.
There are alternative ways to backup data that don't involve making exact copies of files. Incremental and differential methods, for instance, only backup specific parts of the file, reducing the complexity of the process. To further simplify data backup management, various tools are available on the market that can help streamline this process.
Qiling Backup is a user-friendly software that can automatically back up large amounts of data on a scheduled basis, track changes to files with restore points, and more.
The Difference Between File History and Data Backup

Windows 8/8.1 and Windows 10 have an automated file backup system called File History, which allows you to restore previous versions of files and serves as a competent backup tool.
File History is a useful tool for backing up files, but it may not be sufficient for all data backup needs, particularly for critical data and operating system protection, which may require more specific or advanced tools.
There are many other ways to backup your data, such as using a third-party dedicated data backup software like Qiling Backup, which allows you to manage your data backups more flexibly and access other valuable utilities such as creating a system restore point, OS migration, partition backup, disk clone, and many more.
File History is a simple and accessible method for backing up data, but there are more efficient alternatives for backing up files, as well as other critical backups such as the operating system, disk partitions, and emails.
Data Backup and Restore Software – Qiling Backup
Qiling Backup is a user-friendly Windows backup software that simplifies data backup management. This tool can automatically backup large amounts of data on a scheduled basis, track changes with restore points, and more, all while maintaining a simple interface that ensures complication-free backups.
When comparing Qiling Backup with File History, there are some notable differences. While both tools aim to provide a backup solution, they have distinct characteristics.
- With Qiling Backup, you can choose between full, incremental, and differential backup methods to suit your needs.
- Qiling Backup supports data encryption for confidential data.data.
- Qiling Backup offers more than just basic data backup capabilities. It allows users to backup entire disk partitions, clone the operating system onto another drive, and even create a portable Windows USB drive, among other advanced features.
- Qiling Backup has the ability to intelligently manage backups, prioritizing frequently used or modified files, allowing for a quick restoration of previous versions when needed.
Our 24/7 technical support team is available to assist with data backup issues, and we provide a detailed user guide for Qiling Backup features, including file backup. We recommend backing up your Windows 10 operating system to prevent sudden OS crashes.
How to Backup Files with Qiling Backup
Step 1.To start a backup, click the "File backup" option in the "Backup and recovery" page.

Step 2.The top side of the interface displays a list of local and network files, which can be expanded to select the desired files to be backed up.

Step 3.Follow the instructions on the screen to select the location where you want to store the backup.

In the Backup Options, you can encrypt the backup with a password, set a backup schedule, and choose to start the backup at a specific event in the Backup Scheme. This allows for a high degree of customization to meet individual needs.

Step 4.Backups can be stored on a local disk, in Qiling's cloud service, or on a network attached storage device (NAS).

Step 5. Qiling Backup offers customers the ability to back up their data to either a third-party cloud drive or the company's own cloud storage.
To back up your data to a third-party cloud drive, select Local Drive, scroll down to add Cloud Device, and enter your account information.
Step 6.To start a backup, select Proceed. The backup will be visible on the left-hand side as a card once it has been completed successfully. For more detailed information about the backup job, click on it.

Visit our product page for detailed information on the tool, including a comparison of Free, Home, and Business plans. You can also try the software with our Free Trial to see its capabilities firsthand.
File History vs Qiling Backup: Which One Will You Choose?
Data security requires keeping backups of important files, and various methods and tools can be used for this purpose. For Windows users, the built-in File History tool allows for automated backup and easy file restoration. However, other approaches to data backup also exist, each with their own advantages and disadvantages, which may make advanced features overwhelming for beginners.
For users seeking more advanced or efficient backup tools without hassle, we've created software to facilitate quick data backup and restore operations, accessible to any computer user.
Qiling Backup is a clean, easy-Qiling Backup is a user-friendly tool that caters to both beginners and advanced users, offering a wide range of features beyond simple file backups. With its capabilities, you can easily make system backups or clones, and perform other tasks such as data wiping with ease. By installing Qiling Backup, you can make these tasks trivial, and experience its full potential for yourself.
Related Articles
- How Long Does it Take to Install Windows 10/11
- How to Clone C Drive to SSD in Windows 10
- How to Download Windows 11 for HP Laptop (2022)
- How to Clone Windows 11/10 to USB Drive on Your Own
- NAS Backup to Cloud: the Most Efficient Solution
NAS (Network-Attached Storage) provides a secure and convenient way to store and share data, but unexpected events can still cause data loss. To mitigate this risk, backing up NAS data to the cloud is a crucial step in data protection. This article will delve into the details of NAS backup to cloud, highlighting its importance and benefits. - How to Create a NAS to NAS Backup for Synology/QNAP/Buffalo [2022 Tips]
There are two ways to create a NAS to NAS backup: using a manufacturer's appliance or running a NAS backup and recovery software. Qiling Backup is a tool that allows for a NAS to NAS backup with a few clicks, making it easy to back up your NAS data.