Fix Windows 11 Won't Boot After Update/Not Booting Black Screen
Quick Navigation
- 1. Why Is Windows 11 Not Booting/Not Restarting/Not Loading/Not Turning on
- 2. Troubleshoot Your Computer When Windows 11 Won't Boot (6 Methods With Specific Instructions!)
- 3. Important: How to Create a Bootable Backup for Windows 11 (Try an Easy-to-Use Tool)
If your Windows 11 won't boot or you're experiencing a black screen, this article is for you. It also addresses issues with Windows 11 not booting after an update. The solutions presented have been tested by professionals and are 100% effective, so keep reading to fix your unbootable Windows issues.
Why Is Windows 11 Not Booting/Not Restarting/Not Loading/Not Turning on
Windows 11 not booting or turning on, resulting in a black screen, is a common issue that can be caused by several factors, including hardware problems, corrupted system files, or a faulty BIOS update. Other reasons may include a failing hard drive, a malfunctioning power supply, or a graphics card issue, which can prevent the operating system from loading properly.
- Power failure/faulty cables
- Faulty monitor
- Problem with connected external devices
- Disk errors
- Missing operating system files
- Corrupted hard drives
Whenever a Windows won't boot error occurs, the first step should be troubleshooting the PC for likely problems such as a faulty power supply, hard drive issues, corrupted software files, and malfunctioning external devices.
How to Backup Data without Booting into Windows
When a hard drive failure or Windows fail-to-boot issue occurs, reinstalling the operating system can help to rebuild the OS.
Troubleshoot Your Computer When Windows 11 Won't Boot
Following methods may offer help to troubleshoot your computer when Windows 11 won't boot.
- Method 1. Windows 11 Won't Boot and No Sign of Power
- Method 2. Windows 11 Won't Boot After Update
- Method 3. Windows 11 Won't Boot After Install
- Method 4. Windows 11 Not Booting Black Screen
- Method 5. Windows 11 Won't Boot to Safe Mode
- Method 6. Windows 11 Won't Boot from USB or SSD
Method 1. Windows 11 Won't Boot and No Sign of Power
If Windows 11 won't boot or show signs of power, try any of the following: Try booting in safe mode, which can help identify if the issue is hardware or software related. You can also try booting in a minimal environment without any third-party drivers or programs.
Solution 1. Check the Power Cables
Step 1. If your computer won't turn on, try pressing the power button and listen for the sound of cooling fans or running hard drives. If you don't hear any sounds, it's likely that the PC isn't receiving power.
Step 2. If your device is not turning on, try a simple troubleshooting step by disconnecting the power cable and reconnecting it. If it's a laptop, you can also try charging it for an extended period of time to see if that resolves the issue.
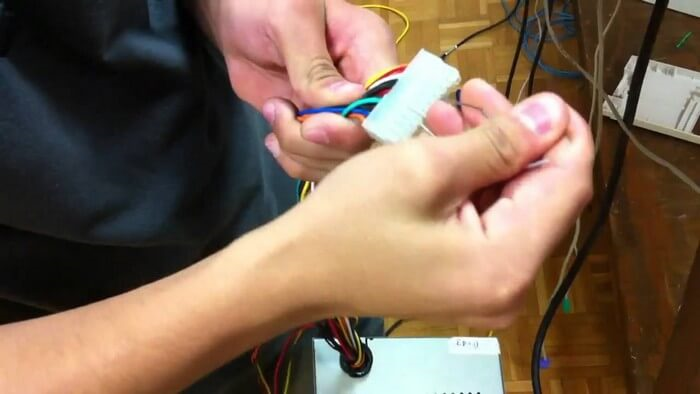
Step 3. To determine if the original power cable is faulty, try using a different power cable to see if the issue persists. This will help isolate the problem and confirm whether the original cable is indeed the cause of the issue.
Solution 2. Check the Monitor Connections
Step 1. If the PC sounds like the internal system is running, the next step is checking the monitor to see if it's displaying anything.
Step 2. Reconnect the monitor power cables. Also, try out new ones.
Step 3. Unplug and reconnect system peripherals.
Method 2. Windows 11 Won't Boot After Update
If Windows 11 won't boot after an update, there's no need to panic. To resolve the issue, follow these steps: [insert steps here].
Solution 1. Restart the PC
Check the system requirements: To verify that your PC meets the minimum requirements for the recently updated version of Windows, check the system specifications, including the processor, RAM, and storage capacity. Ensure that your PC has a 64-bit processor, at least 4 GB of RAM, and a minimum of 64 GB of storage.
Restart the system: The boot error might be temporary. Try turning off the PC and restarting it to see if that resolves the issue.
Solution 2. Run a Repair Command
If Windows 11 won't boot after an update, you can try to resolve the issue by restarting your computer in Safe Mode, then uninstalling the problematic update. To do this, press the Windows key + X and select Restart while holding the Shift key.
Step 1. Force shutdown, and restart the system several times to force it to enter Automatic Repair mode.
Step 2. Click Advanced Options > Troubleshoot > Command Prompt.
Step 3. Enter chkdsk c: /f /r and press Enter.
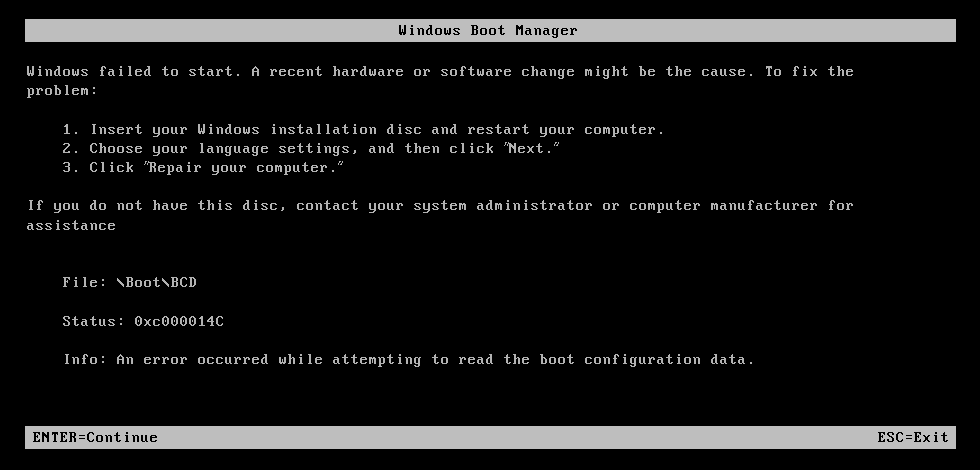
Step 4.The previous step should fix the unbootable Windows issue if the problem were the disk. Otherwise, it might be the MBR. Follow the previous steps, but enter a different command line. Type the following and press Enter after each line: bootrec /fixmbr, bootrec /fixboot, and bootrec /scanos. If the issue persists, it may be due to a corrupted Windows installation or other system issues.
bootrec /FixMbr
bootrec /FixBoot
bootrec /RebuildBcd
Step 5. Restart the system and see if Windows boots properly.
Solution 3. Run Windows 11 Startup Repair
Step 1.To force shutdown your PC repeatedly, press the power button down for about 5-7 seconds, turn it back on, and force another shutdown. Repeat this process about four times, and the next time you turn it on, it should automatically boot into Automatic Repair mode.
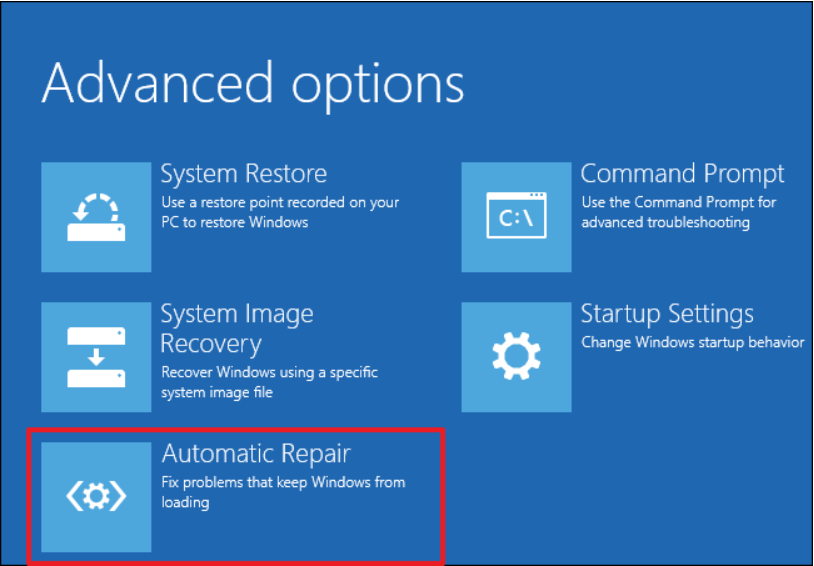
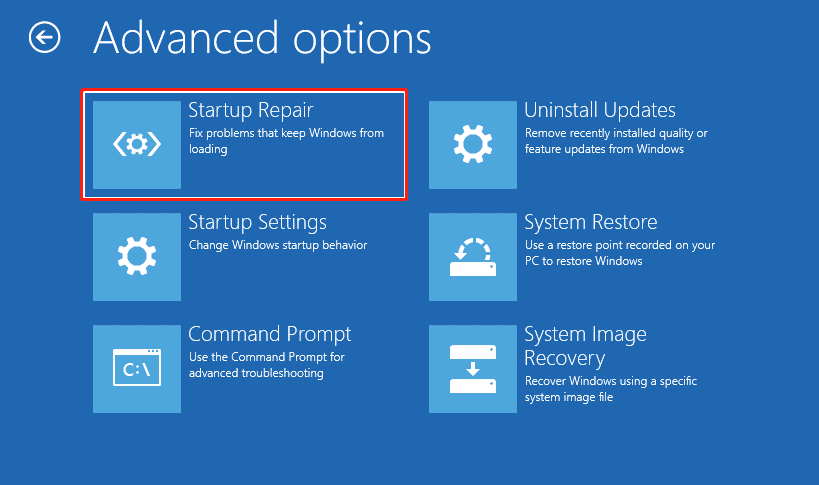
Step 2. Once the Automatic Repair Mode display opens, click on Advanced Options.
Step 3. To troubleshoot issues with Windows 11, go to Troubleshoot, then Advanced options, and finally Startup Repair. Follow the on-screen instructions and see if Windows 11 boots normally after the next startup.
Method 3. Windows 11 Won't Boot After Install
Use any recommended fixes below if Windows 11 won't boot after installation.
Solution 1. Run CMD Command
If Windows 11 won't boot, it might be due to issues with the Master Boot Record (MBR). To resolve this, you can launch the Command Prompt through an installation media. This allows you to run commands to fix the MBR, potentially resolving the boot issue.
Step 1. Insert and boot the system from Windows Installation Media.
Step 2. To access the Command Prompt in Windows, go to Repair your computer, then Troubleshoot, followed by Advanced options, and finally Command Prompt.

Step 3. Under CMD, enter the following commands. Ensure you hit Enter after each command.
bootrec /fixmbr
bootrec /fixboot
bootrec /rebuildbcd
Step 4. Restart your PC and see if the booting problems persist.
Solution 2. System Restore
Perform a system restore to bring your PC to its initial state before installing the new Windows.
Step 1. To enter Automatic Repair mode, repeatedly force shutdown and restart your PC. This involves shutting down your computer and then immediately restarting it, repeating this process several times.
Step 2. Select Troubleshoot > Advanced Options > System Restore.
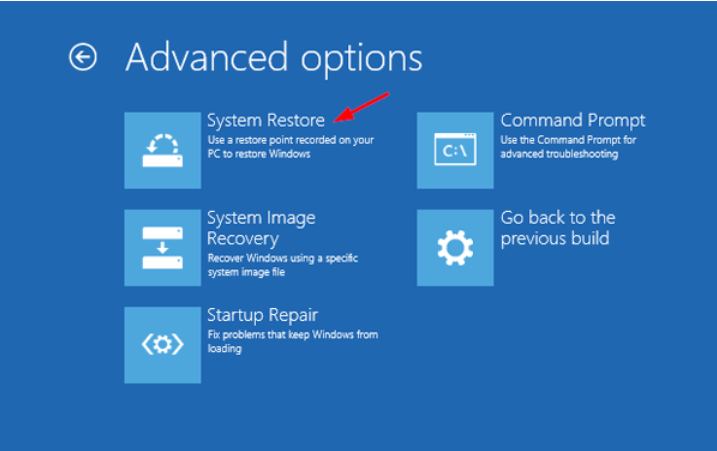
Step 3. Click Next when System windows open.
Step 4. Select the most recent restore point and click Next to proceed.
Step 5. Select Finish.
Method 4. Windows 11 Not Booting Black Screen
If your Windows 11 isn't booting up with a black screen, don't worry! Even though the fans are working and the system is running, the screen remains black with only the mouse cursor visible. The lack of an error message can be frustrating, but there are solutions to fix this issue.
Solution 1. Check PC connections
Restart the computer: Press the power button for about 5 seconds to force shut down the computer and restart it.
Check the connections: Check if the video card or other port connectors are properly plugged in. If not, try using a different connector to rule out any issues with the original one.
Reconnect peripherals: If you've recently changed the peripherals or disconnected one, try reconnecting them to see if that resolves the issue. Sometimes, a simple reconnection can resolve connectivity problems.
Solution 2. Use Windows Startup Repair
Follow Solution 3 under Method 2.
Method 5. Windows 11 Won't Boot to Safe Mode
If Windows won't boot after updating, try switching to safe mode. This can help identify if the issue is with the update or a third-party driver.
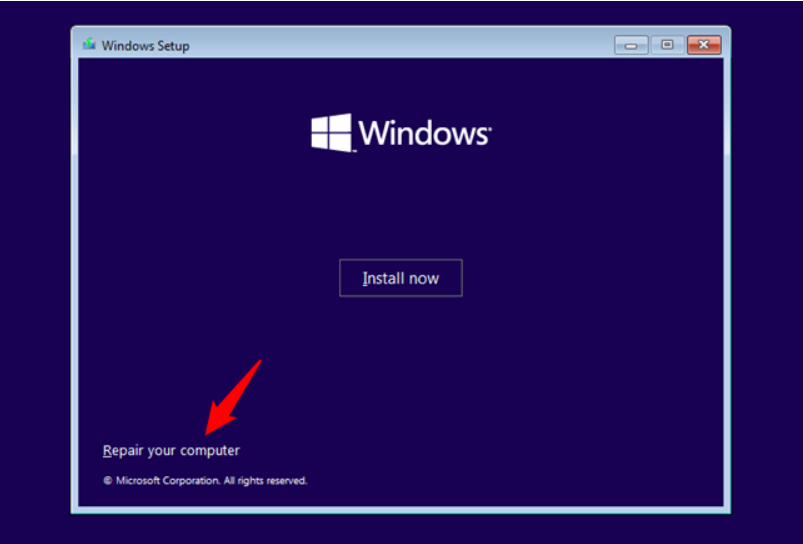
Solution 1. Repair Windows with Recovery Disk
Step 1. Insert the Windows installation media and restart the PC.
Step 2. Click the "Repair your computer" option to enter the "Choose an Option" menu.
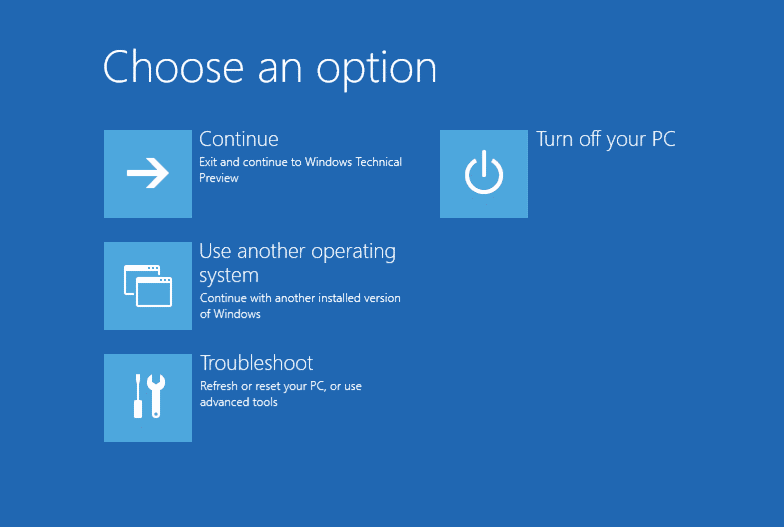
Step 3. Select Troubleshoot > Advanced Options > Startup Repair.
Step 4. Choose the operating system and wait for Windows to complete the repair process.
Solution 2. Fix with Windows Startup Repair
Follow Solution 3 under Method 2.
Solution 3. Carry out System Restore
See Solution 2 under Method 3 for help.
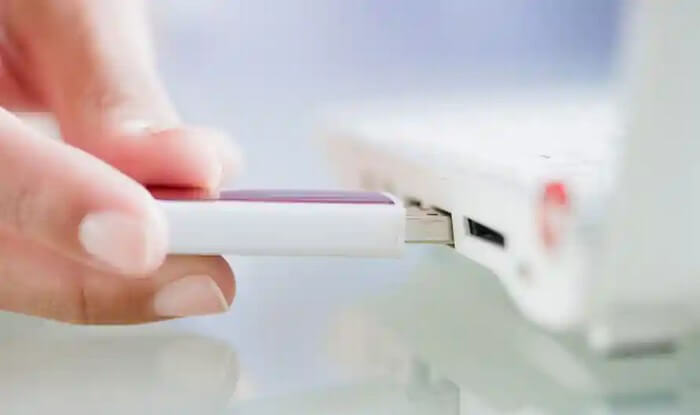
Method 6. Windows 11 Won't Boot from USB or SSD
If Windows 11 won't boot from a USB or SSD, there are several troubleshooting steps you can take to resolve the issue. First, ensure that the USB drive or SSD is properly connected and recognized by the system.
Boot Windows from BIOS
Step 1. Connect the USB or SSD to your computer using a SATA cable.
Step 2. To access the BIOS setup on your PC, simply restart your PC and repeatedly press the F2, F8, F10, F12, or Del key as it boots up. This will take you to the BIOS setup screen, where you can make various settings and configurations.
Step 3. Select the Boot option, and set the USB or SSD boot disk as the first option in the boot order.
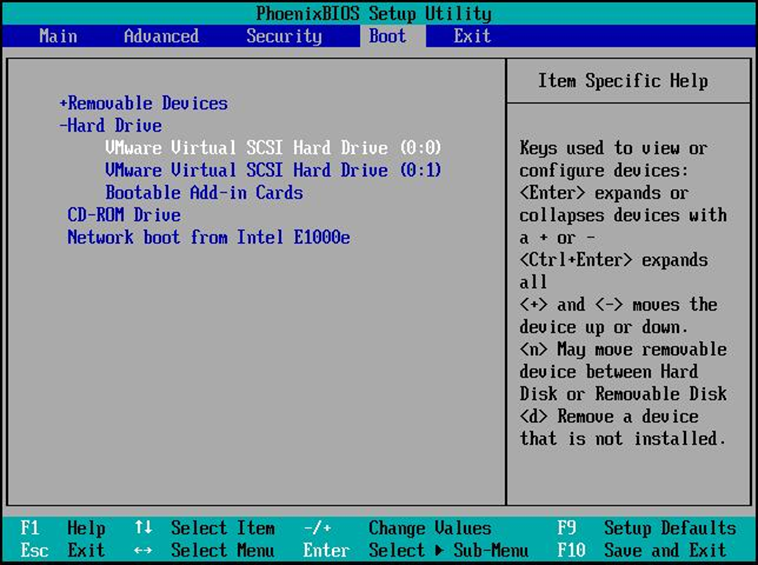
Step 4. Save the changes.
Step 5. Restart the PC.
See Also Other Related Guides:
Important: How to Create a Bootable Backup for Windows 11
If your Windows 11 computer becomes unbootable, you risk losing access to your important data. To prevent this, it's crucial to create a bootable backup, which can help you recover your data in case of a permanent shutdown, black screen, or crash. If your computer is no longer bootable, you may need to reinstall Windows 11 to get it up and running again.
Qiling Backup can make a bootable backup for you, which allows you to restore the backups without booting into Windows 11, providing a convenient and self-contained recovery solution.
- 30-day money-back guarantee
- One-click backup and quick recovery
- Partition/Disk backup
Follow the steps below to make a bootable Windows 11 backup:
Step 1. Prepare a USB drive which can be written and read.
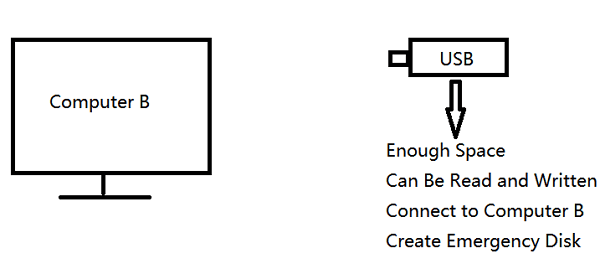
Step 2. Launch and install Qiling Backup on the Computer B.
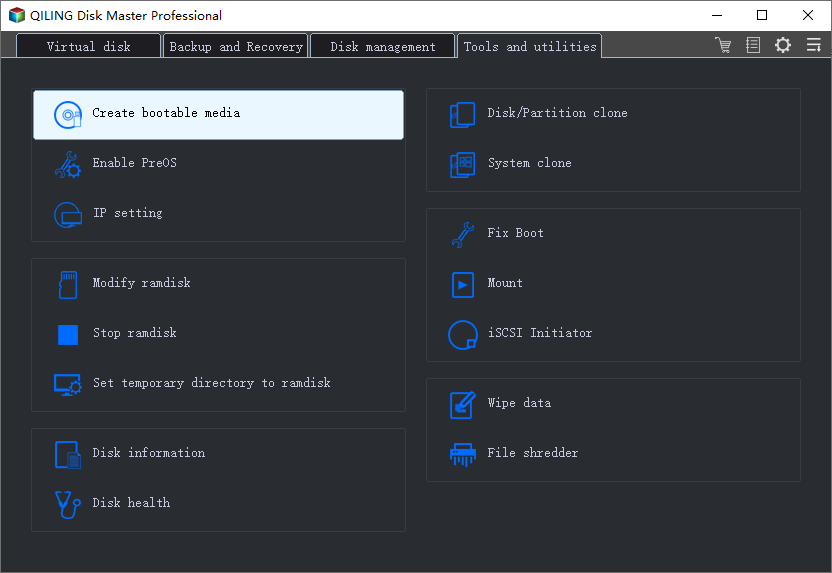
Step 3. Click on the "Tools and utilities" page and select "Create bootable media" from the options.
Step 4. To proceed, select the preferred method for creating a bootable medium, such as an ISO file, a bootable USB drive, or a CD/DVD disc.
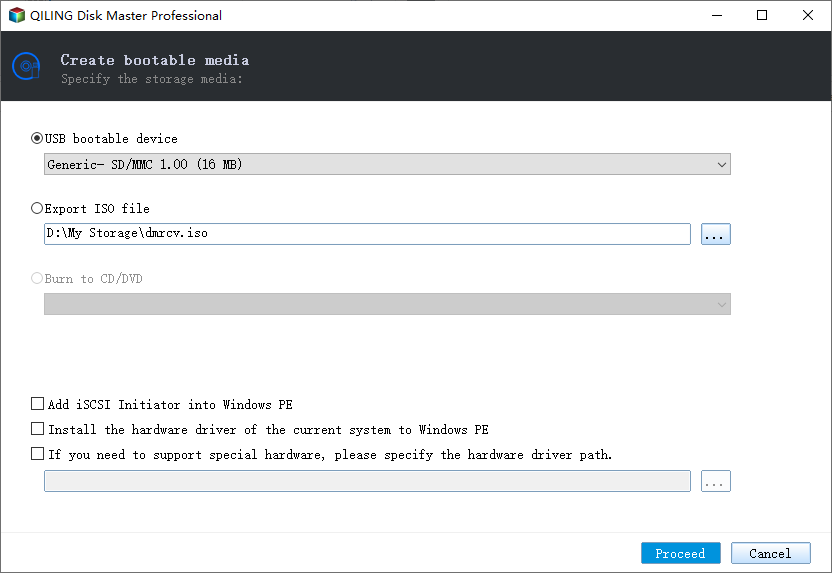
Step 5. Then click "Proceed" to start.
Related Articles
- Upgrade 32 Bit to 64 Bit in Windows 10 Without Losing Data
- Top 3 Reasons to Download Qiling Cloning Software for HDD SSD Clone/OS Migration
- Free Download PXE Boot Server to Boot Multiple Computers on Network
- 2022 Fix: Windows 11 Cumulative Update Failed to Download and Install
- Why Clone Hard Drive to SSD | How to Clone Hard Drive to SSD in Windows 10
Why clone hard drive to SSD? As we know, SSD has better performance than HDD. Because of upgrading HDD to SSD, replacing a failing HDD, or getting better hard drive performance, you may want to clone a hard drive to SSD. Stay on this article, you can get a helpful method to get a smooth cloning process. - Will Upgrading A Hard Drive To An SSD Make An Old PC Run Like New?
SSDs outperform traditional hard drives in terms of faster speed, more stable reliability, compact size, improved performance, and so on. Do you want to know if switching from an HDD to an SSD makes an old PC run like new? Read this post to find your answer.