How to Backup Zoom Recordings? A Detailed Guide with Steps
Zoom is a web and video conferencing platform that offers features such as HD video and audio, screen sharing, and chat, making it a popular choice for businesses and individuals to hold online meetings, presentations, and training sessions.
Zoom recordings contain all data from conference calls or meetings, and it is essential to create a backup in case the original file is lost, deleted, or corrupted.
To access Zoom recordings, you'll need to know where to find them and how to download them from the Cloud to your local drives. We'll show you how to locate Zoom meeting recordings and provide step-by-step instructions on how to download and backup your Zoom recordings, ensuring you have a secure and accessible archive of your virtual meetings.
Why You Need to Back Up Zoom Recordings
Creating a backup of your Zoom recordings is a good idea, whether you use the platform for work or personal purposes. Having a copy of your recordings ensures that they are preserved in case something happens to the originals, providing peace of mind and protecting valuable information.
A backup of your Zoom recordings protects you from data loss in several ways:
- To protect against the original recording being accidentally deleted or corrupted, which could result in permanent data loss.
- To access your Zoom meeting recordings even if Zoom's servers are down or your account has issues. You can save recordings locally by clicking the "Save to Computer" option under the "Recordings" tab in the Zoom web portal.
- To share a meeting recording with someone who could not attend. You can simply send them the link to the recording, usually found in the meeting's chat or notes section.
- To edit the recording for future use.
- To prevent data loss when Zoom Cloud storage reaches its limit. If you run out of cloud storage space, you can upgrade your storage plan or delete unnecessary files and recordings to free up space.
Where to Find Zoom Recordings
Zoom offers two types of recordings: Cloud recordings, which are stored on Zoom's servers, and local recordings, which are saved on the user's device.
Cloud recordings are stored on Zoom's servers and can be accessed from any device with an internet connection, while local recordings are stored on your computer's hard drive and can only be accessed from that computer.
Cloud Recordings:
Zoom offers two cloud storage options for recordings: Basic and Pro. Basic accounts get 40 minutes free per month, while Pro accounts have unlimited recording time. Recordings are stored for 30 days on Basic and indefinitely on Pro.
To find your Cloud recordings, log in to the Zoom web portal, click on "My Recordings", and view the list of all your Cloud recordings with the date and time they were recorded.
Local Recordings:
Zoom also allows users to store recordings locally on a computer or device, as MP4 files, which can be useful for keeping a copy offline or sharing with non-Zoom users.
You can find the records files by default:
For Windows: C:\Users\[Username]\Documents\Zoom;
For Mac: /Users/[Username]/Documents/Zoom;
For Linux: home/[Username]/Documents/Zoom.
How to Download Zoom Recordings from Cloud to Local Drive
To backup Zoom recordings stored in the Cloud, you'll need to first download them to a local drive, and then use a backup utility to secure them.
To download Zoom recordings stored in the Cloud on a Windows PC, you can follow these steps. First, log in to your Zoom account and navigate to the "Recordings" section.
Step 1. To access your Zoom recordings, log in to the Zoom web portal, then click on "My Recordings".
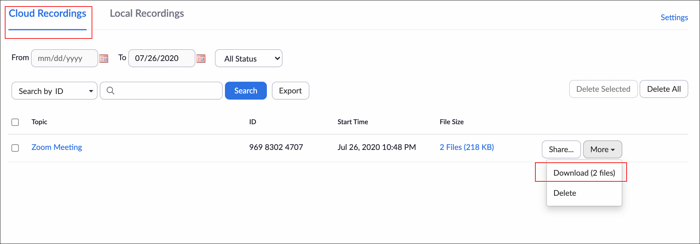
Step 2. To download a recording from the Cloud Recordings tab, click the tab, find the recording you want to download, hover your mouse over the "More" option on the right side, and select "Download" from the dropdown menu.
Step 3. Click on the "Download" button that appears.
Step 4. The recording will download to your computer as an MP4 file.
Step-by-Step Guide to Back Up Zoom Recordings
You can back up your Zoom recordings in a few ways, including saving them to a local device or computer, or using a cloud-based storage service like DropBox, Google Drive, or OneDrive. Alternatively, you can also use a third-party cloud service like Qiling Cloud.
Saving Zoom recordings to a local drive can consume a lot of space, especially if you have limited storage. For better protection and more storage capacity, consider using cloud storage services which offer ample space and allow access from any device with an internet connection.
Here is a brief summary of the free cloud storage space provided by each of the four commonly used cloud backup servers:
- DropBox - 2GB of free Cloud storage space
- OneDrive - 5GB of free Cloud storage space
- Google Drive - 15GB of free Cloud storage space
- Qiling Cloud - 250GB of free Cloud storage space
We recommend using Qiling Backup to back up your Zoom recording due to the free Cloud storage space it provides, and we'll guide you through a step-by-step process.
Qiling Backup Home is a reliable software that helps back up Zoom recordings and important data with simple clicks, offering Disk/Partition backup, File backup, and System backup to safeguard your system and data regularly.
Besides, it has features like Schedule, Incremental & Differential Backup, and Email Notification, ensuring the recording backup process is automatic and smooth.
Qiling Backup's free cloud storage allows you to store up to 250GB of backup recordings without taking up local storage space.
To start backing up your Zoom recordings with Qiling Backup software, follow these steps: First, install Qiling Backup software on your computer. Next, configure the software to automatically backup your Zoom recordings.
Step 1. When using Qiling Backup for the first time, click on "File backup" on the home screen to select the files you want to back up, including pictures, videos, documents, and more.

Step 2. Select all the files, folders or directories you want to back up, following the paths to locate them.

Step 3. To ensure the backup process is successful, select a backup location where the backup file will be saved and retained. This could be an external hard drive, a cloud storage service, or another location on your computer.

Step 4. Qiling Backup allows users to save backup files to various devices, including local hard drives, external USB drives, SD cards, network drives, NAS drives, and Qiling cloud drives. We recommend saving backups to cloud drives for their greater accessibility, flexibility, and safety.

Step 5. If you want an automatic and intelligent backup schedule for the next file backup task, go to the "Options" setting. There, you can encrypt confidential files, compress the backup image size, or customize a backup schedule to specify when the next backup should start.

Customize an advanced and automatic backup task here:

Step 6. The file backup process can be initiated by clicking the "Proceed" button. This will allow the user to view their completed backup files in a card-style format on the left-hand side of the interface.

The Wrapping Up
We hope you have a clear understanding of how to backup Zoom recordings through this guide. You can back up your recordings in many ways, but we recommend using Qiling Backup for its ease of use, automatic scheduling features, and 250GB of free cloud storage space.
If you're looking for a reliable backup solution, try Qiling Backup software, which is fully compatible with Windows 11/10/8/7.
If you have any questions or need help, please feel free to reach out to us via email or contact our support team directly. We're always here to assist you.
How to Backup Zoom Recordings FAQ
1. Does Zoom have a backup of recording?
Zoom does not have a built-in backup feature for recordings, but users can download and store them on cloud storage platforms like Dropbox or Google Drive, or use third-party backup software like Qiling Backup to back up their recordings. Alternatively, users can export recordings as MP4 files and save them to their computer.
2. How do I permanently save a Zoom recording?
When you finish recording a Zoom meeting, the video file is automatically saved to your computer. You can find it in the Zoom folder, where it will be saved as an MP4 file. If desired, you can rename it and store it in a different location.
3. Where are my Zoom recordings stored?
Zoom recordings are automatically saved to your computer as MP4 files in the Zoom folder, which is typically located at C:\Users\[Username]\Documents\Zoom on Windows, /Users/[Username]/Documents/Zoom on Mac, and home/[Username]/Documents/Zoom on Linux.
4. How do I get old Zoom recordings back?
If you've accidentally deleted your Zoom recording, you can try recovering it from the recycle bin. If that doesn't work, you can use data recovery software to scan your hard drive and look for the lost file.
Related Articles
- Copy a Flash Drive to Another Flash Drive on Windows & Mac
- How to Create a Scheduled Backup in Windows 10 [Utimate Guide]
- Create Windows 7 Recovery Disk from Another Computer In-Depth Guide 2022
- How to Backup Entire PC to External Hard Drive on Windows? Best Solutions
- How Long Does It Take Google Drive to Process a Video
Want to know how long it takes Google Drive to process a video? For that and more, including how to quickly process videos on Google Drive, click on the post to find out. - How to Back up Windows 10 to Network Drive: 3 Ways Explained
This post covers three methods for backing up Windows 10 to a network drive: using File History, Backup and Restore (Windows 7), and third-party Windows backup software. We'll provide step-by-step instructions for each method, making it easy for both new and experienced users to find a solution that suits their needs.