Windows 11 Backup Options are Missing? Your Ultimate Guide Is Here
Windows 11 users are experiencing issues with accessing backup features, with some options missing entirely, preventing them from creating or restoring backups.
According to rumors, Microsoft has relocated some backup features on Windows 11, making them harder to find. If you're also missing these options on your PC, don't worry - I've got some possible workarounds to get them back. I've compiled a detailed guide that covers all the tried and tested solutions to help you resolve the Windows 11 backup options missing issue.
Windows 11 Backup Options Missing, What'll Happen
The new Windows 11 offers several backup options, allowing you to create backups and restore previous backups seamlessly. One of the useful backup features is Backup and Restore (Windows 7), which enables you to create fresh Windows backups and restore previous Windows backups.
Windows allows you to store and restore all versions of your system files and folders through the "File History" option, and also enables you to generate and keep backups of your system on an external drive using integrated backup features.
Microsoft has introduced new backup options in the latest Windows 11, allowing users to save backups in cloud storage services like OneDrive and Google Drive. In addition, various Windows backup tools enable users to create regular and automated backups of system files and folders.
What Will Happen If Windows 11 Backup Options are Missing
Without a backup option like File History, you may face difficulties in keeping a record of all system file versions and storing them for later use.
In the absence of some backup options, you can encounter different problems.
- Can't Create Backup Windows 11 Essentials
- Can't Quickly Restore Windows 11 Backup
- If your computer is unable to recover from a virus infection, system crash, or disk failure, you may be unable to access your files or programs. This can be a frustrating and potentially costly experience, especially if you have important data that is inaccessible.
- System Data Will Always Be at Risk
- Won't Be Able To Create System Image
Fret not! Just stay calm because I've got you covered. I've already found some tried and tested solutions to get missing backup options back on your Windows 11 PC. Keep following this guide to effortlessly resolve the Windows 11 backup options missing issue.
How to Fix Windows 11 Backup Options Missing on Your Own
Resolving the Windows 11 backup options missing issue is relatively simpler and can be done yourself. To get the missing Windows 11 backup options available again, follow the solutions outlined below.
#1. Backup Windows 11 Essentials
If some of the backup options are missing on your Windows 11 PC, I recommend using a third-party backup tool instead. These tools are a more reliable option for creating fresh backups and keeping them for future use, as they are professional, easy to use, and automated, with all the essential features you need.
Among all third-party backup tools, we recommend choosing Qiling Backup Home. It's great for generating backups of your Windows 11 PC and restoring them anytime and anywhere. I've chosen this tool over others because it creates a Windows system image in just a few minutes without any errors.
I highly recommend the Qiling Backup tool, which efficiently generates backups without data loss, and offers 250GB of free cloud space to store all your backups for decades without storage worries. With its impressive features, you can download the tool and follow a simple guide to get started.
Step 1. On the main page, click "System backup" button.

Step 2. Qiling Backup will automatically select your system partition, requiring only the selection of a backup destination.

Step 3. You can save the backup file on either your local drive or a network-attached storage (NAS) device.

Step 4. After completing the backup process, you can check the backup status, recover, open, or delete the backup by clicking on the backup task on the left.
#2. Address and Fix Windows 11 Backup Options Missing Error
Before trying the solutions below to resolve the issue of a missing backup option in Windows 11, it's crucial to identify which backup option is missing from your PC. Once you've determined which one is missing, you can follow a specific guide to fix and enable the backup option again.
1. Fix Windows 11 Backup and Restore Missing
If the Backup & Restore (Windows 7) feature is missing from your Windows 11 system, you can try enabling it by going to Settings > Update & Security > Backup, or by running the Windows Features troubleshooter. Alternatively, you can try installing the Windows 7 Backup feature from the Control Panel, or by running the Windows 10/11 Backup feature.
Solution #1. Enable Volume Shadow Copy
To resolve the Backup and Restore missing issue, enable the Volume Shadow Copy service by following these steps:
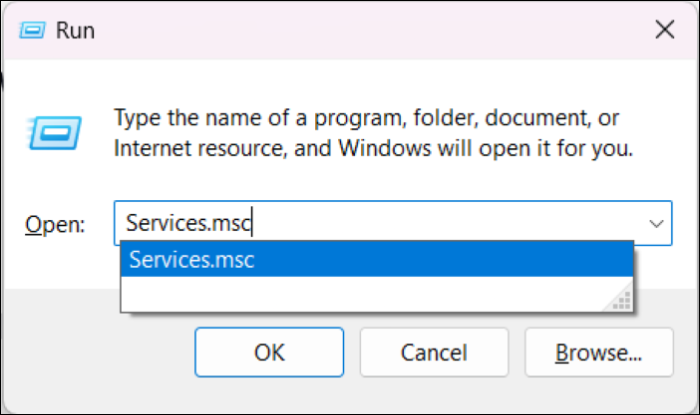
Step 1. Press "Win + R" to open the "Run" program. Then type "Services.msc" in the search bar.
Step 2. Search for "Volume Shadow Copy" in the Services tab.

Step 3. Right-click on "Volume Shadow Copy" and select "Properties."
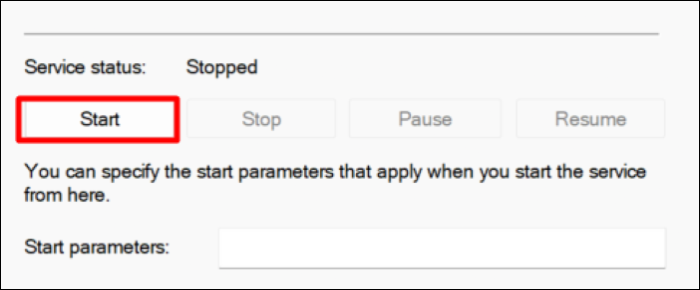
Step 4. If the service is not running, click the "Start" button to activate it. If the service is already running, you can click "Stop" and then "Start" to restart it.
Step 5. Click on "Apply" and close the window.
Solution #2. Use chkdsk Command
You can run the command `chkdsk /f` in the Command Prompt to check and fix any disk errors. This command will scan the entire disk for errors and fix them automatically. To access the Command Prompt, press the Windows key + R, type `cmd`, and press Enter. Then, type `chkdsk /f` and press Enter.
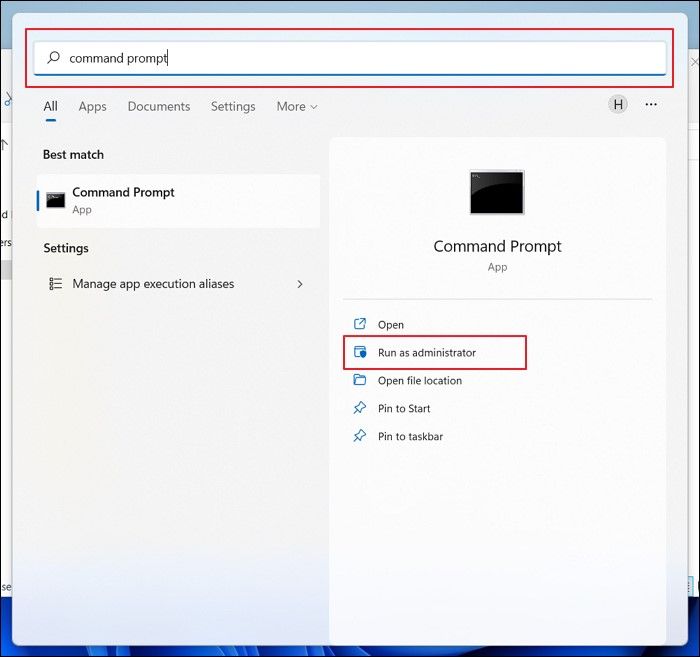
Step 1. Open the Command Prompt with admin rights.
Step 2. Copy and then paste the mentioned command in the console:
chkdsk /r X:
- Note:
- Replace X in the command with your hard drive letter.
Step 3. To begin the scanning process, hit the "Enter" key and then type "Y" to confirm.
Step 4. After the scanning process is done, reboot your system and verify if the "Backup and Restore" option has been restored or not.
Solution #3. Disable System Protection
System Protection might be the culprit behind the missing options, so try disabling it to see if the options reappear. To do this, follow these steps: disable System Protection.
Step 1. To access the Control Panel, follow these steps: Open the Control Panel and navigate to the "System and Security" tab.

Step 2. Then, move to the "System" tab. Now, select "System Protection."
Step 3. To disable system protection, first click on the "Configure" option, and then select "Restore Settings" to "Disable system protection."
Step 4. Click on "Apply" and then "OK."
2. Fix Windows 11 File History Missing Error
If you're experiencing issues with the File History feature being missing on your Windows 11 PC, you can try the following fixes: check if the feature is enabled in the Settings app, ensure that the drive where File History is supposed to save backups is not full or malfunctioning, and check if the File History service is running in the Services console. You can also try restarting the File History service, checking for any system updates, and reinstalling the File History feature. If none of these steps resolve the issue, you may want to consider seeking further assistance from a Microsoft support representative.
Solution #1. Enable File History Service
To enable the Windows File History service, follow these steps:
Step 1. Search for "File History Service" within the Services tab.
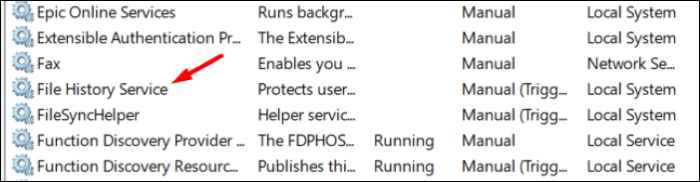
Step 2. To access the File History Service properties, double-click on the "File History Service" to open its properties.
Step 3. To start the "File History" service, click on the "Start" button.
Step 4. In the end, set the "Start Type" option to "Automatic (Delayed Start)".
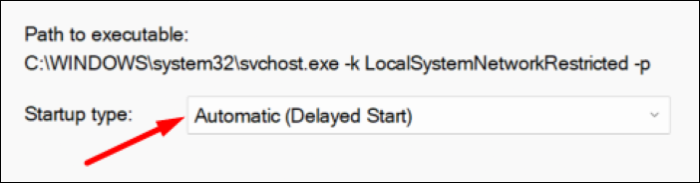
Step 5. Finally, click on "Apply" to save all the settings.
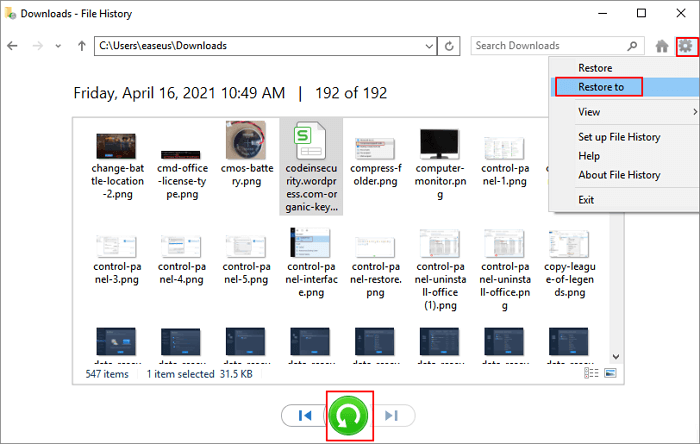
Solution #2. Turn On the File History Option
If the File History backup function is missing, it might be disabled on your Windows 11 system. To enable it, follow the steps to turn on the File History option.
Step 1. Press the "Windows" key and type File History in the Windows Search Bar.
Step 2. To open the File History settings, type "File History" in the Search bar, and then click on the "File History" result in the Search Results.
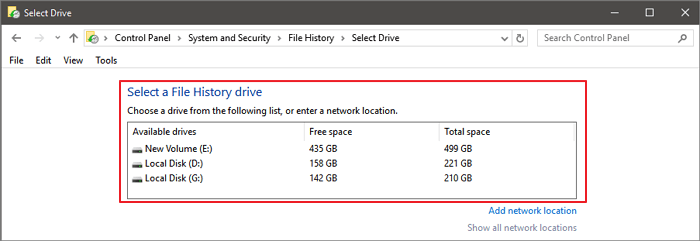
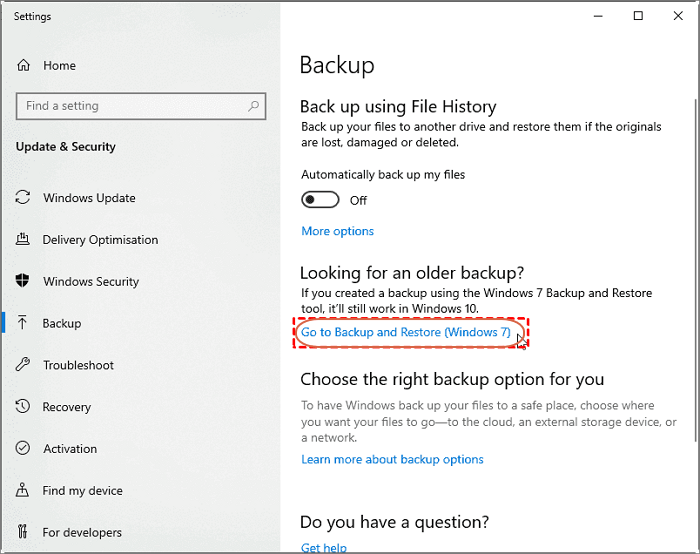
Step 3. To enable File History on your PC, click on the "Start" button, then select "Settings". In the Settings window, click on "Update & Security". Next, click on "Backup" (or "Backup settings" in some versions of Windows), then click on "Go to Backup settings" or "Set up" to configure File History.
Step 4. Reboot the PC, and then check if the File History backup option is visible at its designated location.
Solution #3. Format the Drive
If you're experiencing issues with your computer, it's possible that the problem lies with the hard drive. In this case, formatting the hard drive and resolving any issues with it at the same time might be the best course of action. This could potentially resolve the problems you're experiencing. Would you like me to guide you through the process?
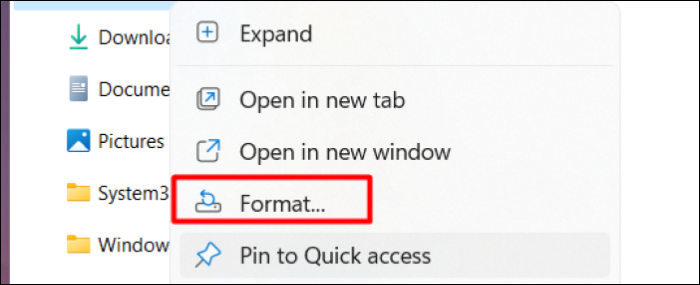
Step 1. Open the "This PC" app, select the external hard drive from the left navigation pane, and right-click on it.
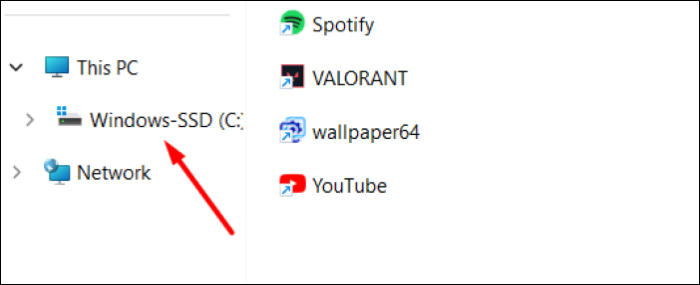
Step 2. Now, click on the "Format" option and then select "Quick Format" from the given options.
Step 3. Click on the "Start" button to begin formatting the drive. Wait for the formatting to complete.
Step 4. Once the process is completed, restart the PC and verify if the issue persists.
Solution #4. Run SFC Scan Command
To repair or replace corrupted system files, execute the System File Checker Scan command, which scans for all system errors and fixes them immediately. You can do this by running a command that fixes or replaces all corrupted files in a matter of seconds.
Step 1. Run the Command Prompt with admin privileges.
Step 2. Copy and then paste the mentioned command in CMD:
sfc /scannow
Step 3. Hit the "Enter" key and wait a while to let the scanning process begin. Once done, reboot the system and check the status of the issue.
How Do I Automatically Backup Files to External Hard Drive on Windows 11
Using manual methods to create backups in Windows 11 is a very hectic and time-consuming process. This is the reason it's always recommended to create automated system backup plans. In this section, I've explained two different methods to automatically generate system backups. Follow me along to know more about it.
1. Auto Backup Files to External Hard Drive via Qiling Backup
To automatically create backups and store them directly on an external hard drive, you can use a third-party backup tool like Qiling Backup to perform Windows 11 automatic backup.
The Qiling Backup tool comes with a Basic Backup Scheduling feature that allows you to create a backup plan tailored to your needs. You can choose to generate a new update every day, week, or month. To create backups, simply select the Windows 11 content to back up and where it should be saved. Then, choose whether the backup should be incremental or differential, and the tool will automatically generate backups once all settings are confirmed.
Step 1. To start backup, click the File backup button.
Step 2. On the left-hand side, select the files to be backed up by expanding the directory and choosing the desired files.

Step 3. Follow the instructions on the screen to choose a location to store the backup.

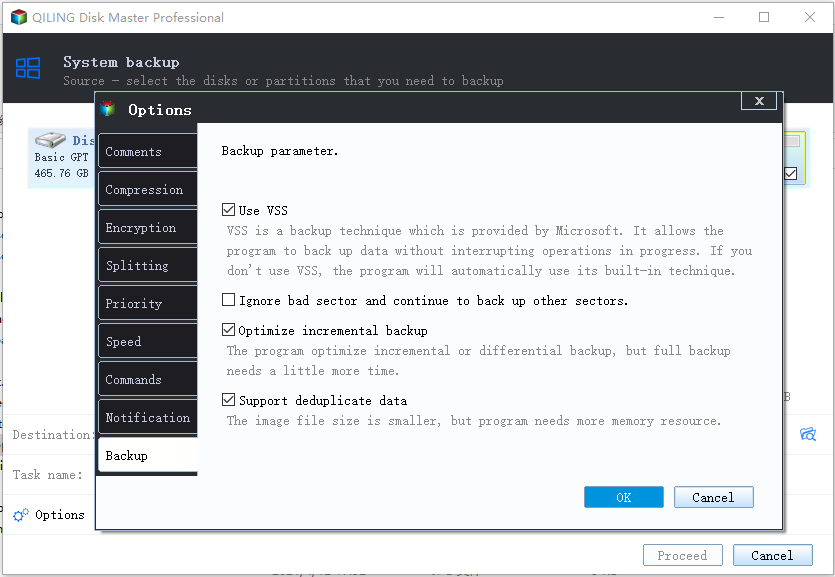
Step 4. In the Backup Options section, click Options to encrypt the backup with a password, and you can customize various features to suit your specific needs.

To specify the backup schedule and choose whether or not to start the backup at a certain event, go to the Backup Scheme section. Here, you can set the frequency of backups, such as daily, weekly, or monthly, and also decide if you want to start the backup process at a specific event, like a certain date or time.

Step 5. Backups can be stored on a local disk, in Qiling's cloud service, or on a network attached storage device (NAS).

Step 6. Qiling Backup enables customers to securely back up their data to either a third-party cloud drive or Qiling's own cloud storage, providing a convenient and reliable way to safeguard their digital information.
To back up your data to a third-party cloud drive, choose Local Drive, scroll down to add Cloud Device, and enter your account information.
Step 7. To start a backup, click on Proceed, and once it's done, the backup job will be listed on the left-hand panel. You can then click on it to view more details.

2. Set Up Automatic Backup Plan of Windows 11 Data to External Hard Drive/USB
Windows 11 offers various backup options, including File History and Backup and Restore, allowing you to set up an automatic backup plan on your PC. You can use any of these options to create a backup plan, and I've demonstrated how to set up automatic backups using the Backup & Restore feature in this section.
Step 1. First, open the "Control Panel" on your PC.
Step 2. To backup and restore Windows 7, click on "Backup and Restore (Windows 7)" under the "System and Security" section.
Step 3. To change the backup settings to store the content on an external hard disk, click on the "Change settings" option and select the external hard disk connected to your system.
Step 4. Now, click on the "Next" button.
Step 5. To continue with the setup process, click on the "Let me choose" option and then "Next."
Step 6. Select the files and folders that you want the system to automatically generate a backup of at a specific interval.
Step 7. Then, click on "Next."
Step 8. To change your schedule, click on the "Change schedule" option, then select the time frame you'd like to schedule from the available options.
Step 9. Click on "OK" and then "Set settings and run backup."
Step 10. The system will now automatically back up your Windows 11 content according to your saved settings.
To Wrap Up
Many users are experiencing issues with Windows 11's backup options, which are essential for backing up data and files. Unfortunately, some users are missing these options on their PC, making it difficult to generate backups. To help resolve this issue, we've shared some fixes that can be tried to get the backup options working again. If the issue persists, it's recommended to use a third-party backup tool like Qiling Backup to ensure data safety.
FAQs About Backup Windows 11 to External Hard Drive
If you have doubts about creating Windows 11 backups on an external hard drive, don't worry! I've got you covered with some commonly asked questions and their answers, helping to clear up any confusion and provide a better understanding of the process.
1. Does Windows 11 Have a Backup Program?
Windows 11 has integrated backup options like Backup & Restore (Windows 7) that allow users to easily create backups of their Windows content.
2. Where Is Backup Option in Windows 11?
Here's how you can access all the backup options on your Windows 11 PC in one paragraph:
- Step 1. To access the storage settings on your device, open the "Settings" app and navigate to the "Storage" section.
- Step 2. Click on the "Advanced Backup" options in the "Storage" section.
- Step 3. You will see all the backup options in the next window, where you can modify them to suit your needs.
3. How To Restore Backup Files From External Hard Drive to Windows 10?
Here's how to restore backup files from an external hard drive in a few steps:
- Step 1. To connect the external drive, simply plug it into a USB port on your Windows 11 PC.
- Step 2. To access the Backup and Restore (Windows 7) option, open the Control Panel and select it.
- Step 3. After the backup process is complete, choose the "Select another backup to restore files from" option and select the external hard drive connected to your system.
- Step 4. Follow the on-screen steps to complete the further process and restore the previous Windows backup.
Related Articles
- How to Backup Data from Hard Drive without OS in 3 Ways
- How to Clone GPT Disk to SSD in Windows Without Boot Failure
- 5 Best Universal Restore Software for Restoring System to Dissimilar Hardware
- Top 10 Database Backup Software in Windows and Linux [2022 Reviews]
- Full Analysis: Is Windows 11 Need Any Antivirus
Windows 11's built-in Windows Defender provides some protection, but it's still essential to use antivirus software to safeguard against malware and cyber threats. Consider using the Qiling Backup tool for comprehensive PC protection. - [2022 Update] How to Use Lenovo Migration Assistant and its Alternatives
Lenovo Migration Assistant is a helpful tool for transferring files from an old PC to a new one. However, if you encounter issues with the assistant not working or getting stuck, there are alternative methods to consider. We'll explore how to use Lenovo Migration Assistant effectively and provide some workarounds for when it doesn't cooperate.