How to Prevent Apple M1 Mac Report Excessive SSD
Despite the improved efficiency of the Apple Silicon M1 chip on the newest MacBooks, it has demonstrated significant usage and wear of SSD, resulting in the Apple M1 Mac report excessive SSD wear, a severe issue that requires necessary techniques to resolve.
| Workable Solutions | Step-by-step Troubleshooting |
|---|---|
| Fix 1. Keep Mac Maintained | This one seems a little too apparent. However, doing your routine Mac maintenance is...Full steps |
| Fix 2. Disable TRIM in Terminal | The purpose of the TRIM command is to streamline the SSD cleanup procedure, increasing...Full steps |
| Fix 3. Check the S.M.A.R.T. Status | Utilizing the Disk Utility tool, this method is compatible with all current macOS versions and can be completed in a few simple steps.Full steps |
| Fix 4. Don't Download from Site | Watch out for any accumulated junk in your Downloads folder, as it's often overlooked and can become cluttered with unnecessary files.Full steps |
| Fix 5. Update your macOS | Keeping your Mac updated is the best way to fix the excessive SSD wear issue. This is because software updates often include improvements to the operating system that help reduce wear on the SSD. By staying up-to-date, you can ensure that your Mac's operating system is running with the latest optimizations, which can help minimize the impact of excessive SSD wear.Full steps |
Due to the M1 chip's polished designs, Mac users often assumed that Apple Silicon Macs would be more durable than previous models. However, some users have reported that their M1 Macs, such as a MacBook Pro, show significant SSD usage and wear after a relatively short period of time. For example, one user's 2 TB 16 GB model had only 3% of its internal SSD space left.
To prevent excessive SSD wear issues and enhance the lifespan of Mac's SSD, it's recommended to regularly clean up unused apps and files, avoid storing large files on the SSD, and use an external drive for storing and transferring files. Additionally, disabling the "Recent Documents" and "Recent Spreadsheets" features, as well as keeping the Mac's system software up to date, can also help reduce wear and tear on the SSD. Furthermore, using an SSD with a higher capacity, such as 512 GB or 1 TB, can also help mitigate the issue.
Reasons: Check Why M1 Mac Has the Excessive SSD Problem
On an M1 Mac, the SSD (Solid-State Drive) operates by creating and deleting data in cycles. Unlike traditional hard drives, SSDs are non-moving components that store data in a matrix of cells. When data is updated, the SSD simply records the new information over the outdated cells, rather than physically moving a read/write head. This process is repeated continuously, allowing the SSD to efficiently store and retrieve data.
Due to the nature of SSDs, frequent writes and deletes can cause them to degrade, and Apple M1 Mac users have reported excessive SSD issues, such as the SanDisk SSD not showing up on Mac.
When Apple's M1 Macs were released, some users experienced severe SSD deterioration, more than comparable Intel machines. This led programmers to quickly identify the issue as software-based, prompting Apple to release a fix through macOS 11.4.
In Advance: How to Recover Lost Data While Mac Has SSD Issued
Some Mac users claim their SSD is experiencing extreme issues, prompting them to reinstall macOS. To alleviate concerns about losing important data, it's recommended to use a data retrieval software to safeguard customers' information. This way, consumers can feel secure and confident in their data protection, even during the process of reinstalling their operating system.
For Mac users, a specialist data recovery tool like Deep Data Recovery Wizard can be a lifesaver. This powerful tool is designed to help recover permanently deleted files and even restore items from the trash, giving consumers a second chance at retrieving lost data.
The software's user-A user-friendly interface enables even beginners to quickly retrieve files, and the software can also recover videos, audio, and photo files, making it a professional data recovery tool.
Some of the top-notch features of Qiling are the following:
- File filter
- Data protection
- Scan mode
- Remote IT support
- File preview
- Bootable media
After using Deep Data Recovery for Mac to recover damaged files, you can easily send them to various cloud storage options like Google Drive, Dropbox, OneDrive, and USB, among others. To get started, simply download the tool and follow a few straightforward steps to recover your data today!
Step 1. Select the drive to be scanned
Select the drive you need to recover lost/deleted files from, and click the "Search for lost files" button in the main Deep Data Recovery window.
Note: Before attempting data recovery, it's recommended to click "Disk Backup" from the left sidebar to create a backup of your Mac, ensuring that your data is safe and preventing further loss. Once backed up, the software can recover data from the Mac backup, allowing your computer to write new data again.

Step 2. Select your lost data/files
Deep Data Recovery for Mac scans the selected disk volume, displaying the results in the left pane, allowing users to sort and find specific files.

Step 3. Recover lost/deleted data
Once you have found the desired files, preview them and then click "Recover" to begin the recovery of your deleted/lost Mac files.

How to Fix and Prevent Apple M1 Mac Report Excessive SSD
While some M1 Mac users have reported excessive SSD wear, taking proactive measures can minimize the impact. By regularly backing up your M1 Mac, securing your data, and having data recovery software ready, you can mitigate potential losses. To fix and prevent excessive SSD issues on your Apple M1 Mac, the following methods can be employed.
Fix 1. Keep Mac Maintained
Performing routine Mac maintenance is a simple way to extend the lifespan of your SSD disk. By keeping your disks optimally maintained and frequently fixing program issues and permissions, you can prevent a number of unpleasant problems from arising. This regular upkeep can help keep your Mac running smoothly and prevent issues that might otherwise shorten the life of your SSD disk.
Mac maintenance only has one drawback: it may be time-consuming. However, Qiling CleanGenius for Mac's Maintenance Module can save you time and space with just a few clicks, performing thorough maintenance on your Mac continuously, even with Apple certification. The steps are straightforward: utilize this utility to perform essential maintenance on your Mac.
Step 1. Install the application, and launch its complimentary version.
Step 2. To view all tasks, go to the sidebar, click on "Maintenance", and select "View All Tasks" from the menu.
Step 3. You can choose to free up RAM, run maintenance scripts, clear purgeable space, and fix disk permissions.
Step 4. Hit the Run option.
Fix 2. Disable TRIM in Terminal on Mac
The TRIM command helps increase the M1 Mac's recording speed by streamlining the SSD cleanup procedure, but it also shortens the lifespan of the SSD by increasing the frequency of P/E cycles, which is directly related to the recording velocity.
To balance speed and data safety, keep TRIM enabled on your Macbook to maintain performance, but disable it to prevent data loss and extend SSD lifespan.
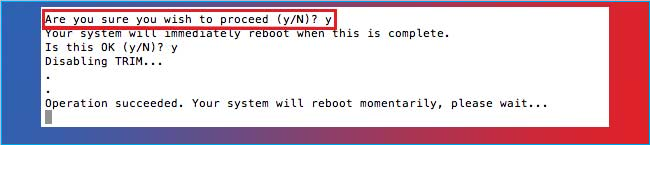
To extend the durability of your SSD on an M1 Mac, disable the TRIM function, which is enabled by default. This can be done using the Terminal application, and the steps to do so are as follows:
Step 1. Open Terminal by selecting it in the Applications list.
Step 2. In the Terminal, you need to keep the command `sudo trimforce disable` to prevent the trim force from being enabled.

Step 3. If prompted, hit Return and input the administrator password.
Step 4. A notification asking to confirm deactivation of the TRIM command will appear. Press Y and then press Return.
Enabling TRIM on an M1 Mac can lead to faster writing performance, but it may reduce the lifespan of the SSD. Disabling TRIM can help extend the lifespan of the SSD, but it may slow down writing performance. This is a trade-off between performance and longevity. If you prioritize performance, enable TRIM.
Fix 3. Check the S.M.A.R.T. Status of Your Mac
The Disk Utility tool can be used to erase and reformat a Mac's startup disk, making it compatible with all current macOS and macOS software releases. This is done by opening Disk Utility, selecting the startup disk, clicking the "Erase" button, and then choosing the desired format. This process can take a few minutes, depending on the size of the disk.
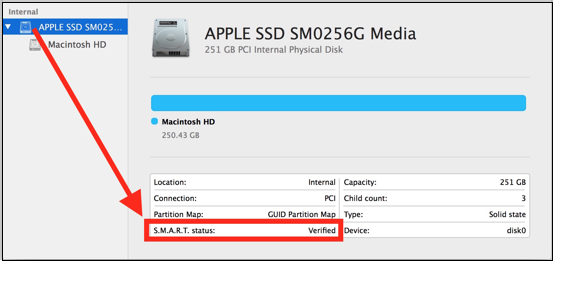
Step 1. Open the Disk Utility app on a Macbook, located in the /Applications/Utilities/ folder.
Step 2. In the Disk Utility window, select the drive from the list on the left, choosing the primary disk itself, not a partition.
Step 3. Check Disk Utility's "S.M.A.R.T. Status" of the disk information screen.
Step 5. The drive is functional if the SMART Status displays "Verified."
Step 6. If the S.M.A.R.T. Status indicates that the drive is "Failing", a backup of the drive is required immediately.
If you receive a notice that your disk drive has a severe hardware issue, it's essential to immediately back up any important data and have the drive repaired or replaced as soon as possible to prevent further damage and potential data loss.
Step 7. Once done, exit the Disk Utility.
Fix 4. Don't Download Files from the Site
Watch out for accumulated junk in your Downloads folder, which is often kept in a location users seldom monitor. Over time, a large number of duplicates and unchecked files can take up a substantial amount of space and resources. To crosscheck your downloads folder, follow these steps: the steps below.
Step 1. To download a file, select Downloads from the side toolbar in Finder after opening it.
Step 2. Files need to be sorted and searched for.
Step 3. It is necessary to drag things to the trash bin.
Step 4. After that, clear the Trash folder.
Fix 5. Update your macOS
To fix the excessive SSD wear issue on your Mac, simply keep your software up-to-date, especially if you're using an M1 MacBook with an earlier OS version. Upgrading your software is a straightforward process that can help resolve this issue.
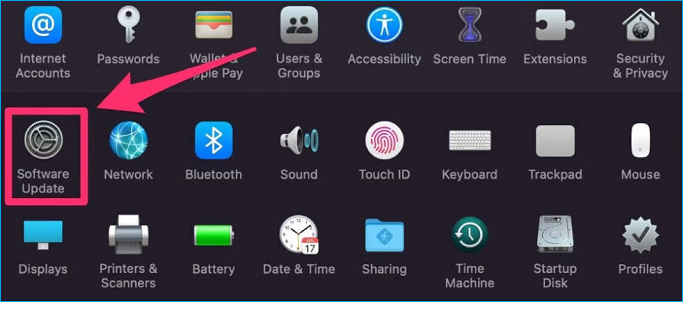
Step 1. To update your Mac, go to the Apple icon menu in the top left corner, select System Preferences, and follow the on-screen instructions.
Step 2. Go to the Preferences window and click on the software upgrade button to check for any available version.
If you're experiencing issues with installing the macOS update, you can attempt to resolve the problem by running the Disk Utility on your Mac. This tool can help identify and potentially fix any issues that are preventing the update from being installed.
Part 5. The Bottom Line
To avoid significant SSD wear on your M1 Mac, try using the built-in Storage tab in the About section of System Information to monitor your SSD's health, and consider running a disk cleanup and disk utility to remove any unnecessary files and repair disk errors. Additionally, avoid running multiple resource-intensive applications simultaneously, and consider using an external SSD or upgrading to a higher-capacity SSD if possible. By taking these precautions, you can help extend the lifespan of your M1 Mac's SSD.
To prevent SSD deterioration on your M1 Mac, consider strategies such as regularly creating backups of your contents to avoid losing them, as your SSD won't last forever.
Deactivating TRIM on your Mac can help prevent wear and tear on your storage drive. Additionally, maintaining an efficient and clutter-free Mac will also contribute to its longevity. If you've already lost data while trying out these prevention methods, consider using professional data recovery software like Deep Data Recovery for Mac to recover deleted files.
Part 6. Apple M1 Mac Report Excessive SSD FAQs
The FAQs about the Apple M1 Mac Report Excessive SSD issue provide a detailed explanation of the problem, which involves the system reporting excessive SSD usage, leading to concerns about data security and potential SSD failure. The FAQs clarify that this issue is not a result of a hardware problem, but rather a software glitch that can be resolved by updating the system software.
1. How do I check the SSD health of Mac M1?
To verify your MacBook's SSD, follow these steps: First, restart your MacBook and immediately hold down the 'D' key to enter the Disk Utility. Next, select the SSD from the list on the left and click the 'Verify' button at the top.
Step 1. Hit the Apple menu, and opt for "About This Mac."
Step 2. Choose "System Report" from the Overview tab of the "About This Mac" panel.
Step 3. Select "Storage" from the left sidebar of the system report.
An SSD is working effectively if it shows a "Verified" S.M.A.R.T. status.
2. How long will MacBook Pro M1 SSD last?
The average lifespan of a MacBook Pro M1 SSD is 4 to 8 years, and its longevity can be calculated using the rated vs actual lifespan formula based on the SMART function's reported utilization as a percentage of the total TBW (terabytes written) rating.
3. What are the signs of an SSD failing?
A deteriorating SSD can be identified by several key indicators. The most prominent signs include sudden slowdowns, crashes, or freezes, especially when performing resource-intensive tasks.
- It operates exceptionally slowly.
- The drives show read-only.
- The applications often get crashed or freeze.
- There is an issue with booting, and you will notice a question mark on Mac.
4. Can I recover data from failed SSD on Mac?
On a Mac, it's possible to retrieve data from a broken, failed, or dead SSD, but only if TRIM hasn't been applied yet. TRIM optimizes the SSD for transferring current information, and once applied, deleted documents can't be recovered. If TRIM hasn't been applied, deleted data can still be retrieved, making it a crucial factor in data recovery.
If your Mac's SSD fails, you can use premium data recovery software like Deep Data Recovery to recover data from the failed drive.
Related Articles
- Fixed: Chrome Browser Not Open/Working in Windows 10 Creator
- How to Install Python Mac on macOS Sonoma/Ventura
- How to Fix Zsh Command Not Found Brew Error [Mac Terminal Guideline]
- How to Factory Reset ASUS Laptop from BIOS🔥
- How to Mirror a Hard Drive in Windows 10 [step by step]
If you want to create a mirrored drive on your existing hard drive, you will first need to partition your hard drive. Want to know how to mirror a hard drive in Windows 10? Read through this detailed guide on the process and related details. - Full Guide: Move Partition Gparted in Windows 11/10/8/7 [Step-by-Step Guide]
You can move a partition using Gparted, a powerful partition editor. While it's essential to understand why partition movement is necessary, this article provides techniques on how to easily use the right tools to move partitions in your Windows computer, utilizing Gparted to achieve this.