[2 Ways] How to Boot Mac into Disk Utility/Recovery Mode with Mac Startup Keys
| Workable Solutions | Step-by-step Troubleshooting |
|---|---|
| 1. Open Disk Utility on Mac |
|
| 2. Boot Mac into Disk Utility |
|
Disk Utility is a Mac storage manager that allows users to manage partitions, erase or repair the startup disk, add new hard drives, and troubleshoot issues like a USB flash drive not showing up on Mac.
To boot Mac into Disk Utility/Recovery Mode, you can either press and hold the power button on your Mac until the login window appears, then click the gear icon in the top right corner and select Restart from the dropdown menu, or press and hold the Command (⌘) + R keys as soon as your Mac starts up. This will open the Disk Utility/Recovery Mode window, where you can access various tools to manage and maintain your Mac's storage.
How to Boot Mac into Disk Utility/Recovery Mode [2 Ways]
When you encounter disk issues, it's lucky that your Mac can still start normally, but sometimes you may be sadly found it's not possible to boot up your Mac. In such cases, we have two methods to boot Mac into Disk Utility, which can help you troubleshoot and resolve the issues.
Method 1. Open Disk Utility on a Working Mac
When your Mac can start up normally, open Disk Utility using Spotlight or the Finder to access it.
Step 1. Open the Finder on Mac.
Step 2. Go to the Applications menu, and click "Utilities".
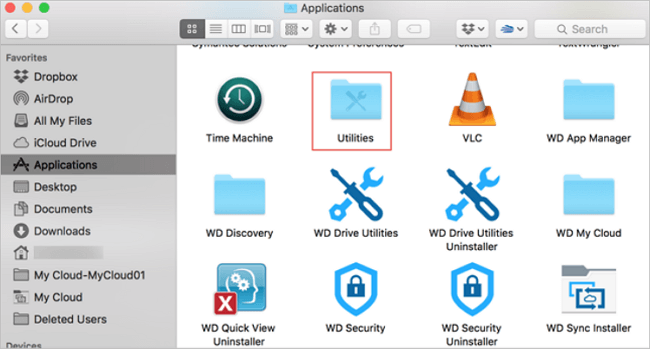
Step 3. Scroll down, and you will find the Disk Utility.
Method 2. Boot Mac into Disk Utility/Recovery Mode with Startup Keys
If your Mac is stuck on the Apple logo or fails to boot, trying to start it up with specific keys may help resolve the issue. The startup keys differ between Apple silicon Macs and Intel-based Macs, so it's essential to know which ones to use. By booting your Mac into Disk Utility using the correct startup keys, you may be able to troubleshoot and fix the problem.
For Apple Silicon Mac:
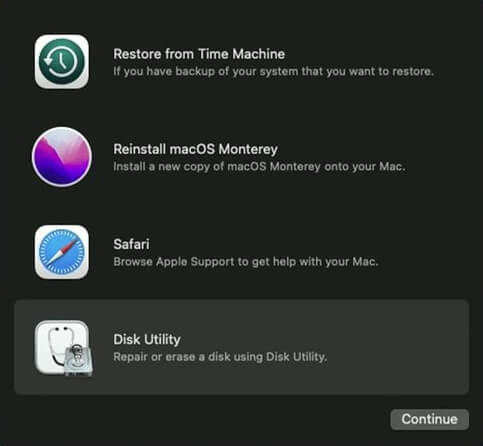
Step 1. To enter Recovery Mode on your Mac, make sure it is shut down, then hold the power button until the Recovery Mode screen appears on the screen.
Step 2. To access the Disk Utility on your Mac, you can click on the "Disk Utility" option from the Utilities folder in the Applications folder. This will open the Disk Utility window, where you can select the drive you want to erase and start the process of formatting your Mac's startup disk. Once you've selected the drive, you can follow the on-screen instructions to complete the erase and format process.
For Intel-based Mac:
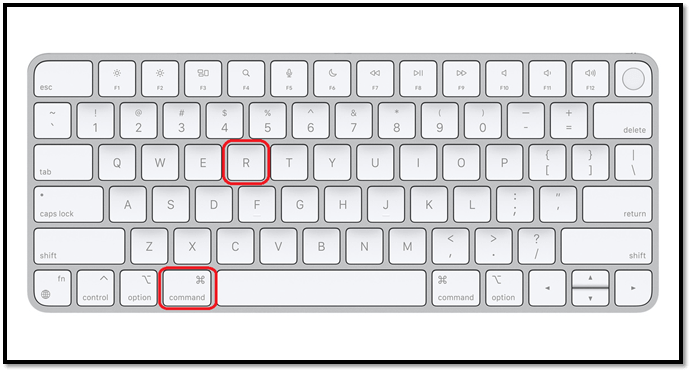
Step 1. To enter Recovery Mode, shut down your Mac, then hold down the Command and R keys simultaneously. Release them when you see the Apple logo and the spinning globe, indicating that your Mac has entered Recovery Mode.
Step 2. To access Disk Utility on your Mac, click on it, and your computer will successfully enter the Disk Utility.
How to Fix Mac Won't Boot into Disk Utility/Recovery Mode
If your Mac won't boot into Recovery Mode or won't boot at all, try booting in safe mode by holding the Shift key while turning it on. If that works, try booting normally again. If that doesn't work, try resetting the System Management Controller (SMC) and the Power Management Unit (PMU) by turning off your Mac, unplugging the power cord, pressing the power button for 20 seconds, and plugging the power cord back in.
- Fix 1. Check the keyboard connection on Mac.
- Fix 2. Create a macOS Ventura bootable USB.
- Fix 3. Boot Mac into Safe Mode.
- Fix 4. Reset NVRAM/PRAM
- Fix 5. Boot into Recovery Mode once again.
- Fix 6. Use Mac Internet Recovery Mode
How to Erase and Repair Startup Disk with Disk Utility
If your Mac's startup disk is not working properly or you're experiencing no startup disk issues, you can use Disk Utility to repair and resolve the problem. This tool allows you to diagnose and fix issues with your startup disk, helping to restore your Mac's performance and functionality.
How to Repair Startup Disk with Disk Utility on Mac
We have taught you how to boot your Mac into Disk Utility. Choose one of the methods to go to the Disk Utility menu.
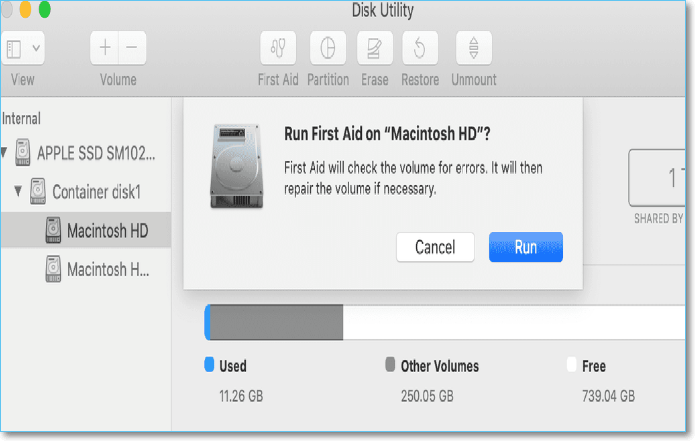
Step 1. To select the startup disk, click on the Apple logo in the top left corner of the screen, then select System Preferences. From there, click on the "Startup Disk" icon.
Step 2. Click the "First Aid".
Step 3. You can repair the startup disk by clicking the Run button.
How to Erase Startup Disk with Disk Utility on Mac
To factory reset a Mac, boot into Disk Utility using the startup keys, then erase the startup disk, which will reinstall the macOS base system.
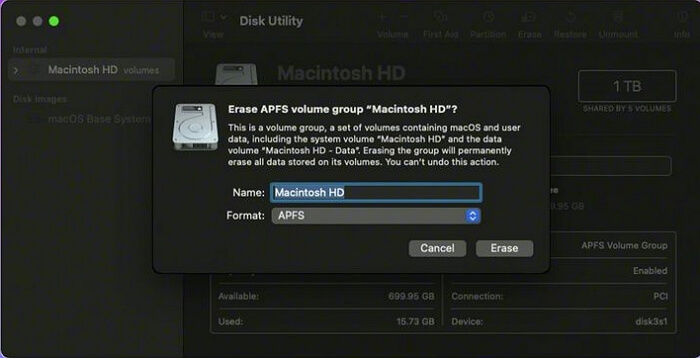
Step 1. To select the startup disk, click on the Apple logo in the top left corner of the screen, then select System Preferences, then click on the Startup Disk icon. The startup disk is normally named Macintosh HD.
Step 2. Click the Erase button to erase Macintosh HD data.
Recover Data After Erase the Startup Disk with Software
After repairing or erasing the startup disk on a Mac to factory reset the device or reinstall macOS, you may lose essential data. However, don't panic! It's still possible to recover lost files on Mac.
Deep Data Recovery for Mac is a professional tool that can recover deleted files on Mac, helping users retrieve data after situations such as upgrading to the latest macOS, reinstalling macOS, macOS crash, or accidental deletion.
This tool can recover various file formats, including DOC, XLS, AVI, MOV, AIF, AAC, CR2, RAW, JPG, and more, from storage devices such as SD cards, USB flash drives, SDHC cards, memory cards, cameras, and others.
To recover data with Qiling Data Recovery for Mac, follow these steps: First, download and install Qiling Data Recovery on your Mac. Then, launch the software and select the drive or volume where your lost data is located. Next, choose the file types you want to recover and click "Scan" to start the scanning process.
Step 1. Select file types
Launch Deep Data Recovery for Mac, select the desired file types, and click "Next" to initiate the data recovery process.

Step 2. Search for lost files
Select the disk location where you lost data and click the "Search for lost files" button.

Step 3. Go through the scanning results
This software will instantly scan your selected disk volume and display pictures, documents, audio, videos, and emails on the left pane, providing a comprehensive view of the contents.

Step 4. Select the file(s) and recover
To recover your deleted data, click on the preview option to view the files you want to recover. Then, click the "Recover" button to restore them to their original location or a new location of your choice.
Summary
You've learned what Disk Utility is on Mac and how to boot into it in normal ways and with Mac startup keys. You can also repair and wipe your startup disk with Disk Utility, and recover data with Deep Data Recovery for Mac. If you have further questions, feel free to keep reading.
Boot Mac into Disk Utility FAQs
This part will display four additional questions and answers about booting Mac into Disk Utility.
How do I factory reset my MacBook Pro with Disk Utility?
To factory reset MacBook Pro, boot it into Recovery Mode by restarting it and immediately holding down the 'Command (⌘) + R' keys. This will open the Utilities window, where you can select 'Disk Utility' and erase the startup disk, effectively performing a factory reset.
- 1. Click the Apple icon and shut down the MacBook Pro.
- 2. Turn on the MacBook Pro, and hold the power button or Command + R keys until you see the Recovery Mode.
- 3. Select "Disk Utility".
- 4. Erase Macintosh HD and quit Disk Utility.
- 5. Reinstall macOS and turn on your Mac.
What can I do if my Command + R keys not working on Mac?
Your Intel-If your Mac won't boot into Recovery Mode because the Command + R keys aren't working, try booting in Safe Mode (hold the Shift key while turning on the Mac), then go to System Preferences > Keyboard > Keyboard Shortcuts and reset the Command + R keys to their default settings. If that doesn't work, try resetting the System Management Controller (SMC) and then booting in Recovery Mode. If none of these steps work, you may need to reset your Mac's NVRAM or seek further assistance from Apple Support.
- 1. Check the keyboard connection on Mac.
- 2. Create a macOS Ventura bootable USB.
- 3. Boot Mac into Safe Mode.
- 4. Reset NVRAM/PRAM
- 5. Boot into Recovery Mode once again.
- 6. Use Mac Internet Recovery Mode
How to repair a Mac startup disk with Disk Utility?
You can open Disk Utility by searching for it in Spotlight or by booting your Mac into Disk Utility using the startup keys.
- 1. Choose the startup disk called Macintosh HD.
- 2. To repair the Mac startup disk, select "First Aid" from the Disk Utility menu and click "Run" to initiate the repair process.
How do I start my Mac in Disk Utility?
If your Mac is running normally, you can find the Disk Utility by searching for it in Spotlight or by navigating to the Utilities folder in Finder. If it's not booting normally, turn it off, hold the power button or Command + R keys, and boot into Recovery Mode, then click Disk Utility.
Related Articles
- (Solved!) How to Backup Gmail Emails with Attachments for Windows 11/10/8/7
- How to Fix macOS Ventura WindowServer Prevents from Sleeping [10 Available Solutions]
- Install IDE Hard Drive
- How to Fix Windows 10 Stuck at Getting Files Ready for Installation
- [Solved] System Image Recovery Not Showing
When system image recovery is not showing, don't panic as it's a solvable issue. This article provides solutions and alternative software to help resolve the error, giving you an overview of the problem. - Solved: System Restore Is Restoring the Registry Windows 11/10/8/7
Have you ever encountered a situation where your PC gets stuck at the System Restore moment, with System Restore restoring the registry? If so, you're not alone. To resolve this issue, follow the steps outlined in the article, which provides a clear and concise guide to help you troubleshoot and resolve the problem.