How to Create macOS Ventura Bootable USB Installer [macOS Ventura Tips]
Create macOS Ventura Bootable USB - 4 Reasons
Creating a macOS Ventura bootable USB can be a helpful process in certain situations, offering several advantages.
- You can install macOS Ventura on multiple Mac devices without having to download it multiple times, making the process more efficient and convenient.
- When performing a macOS upgrade, you don't have to worry about the downloading process getting stuck. The upgrade process is designed to handle interruptions and resume from where it left off, ensuring a smooth and uninterrupted upgrade experience.
- You can upgrade to macOS Ventura without the internet.
- If your Mac with macOS Ventura won't boot or run well, you can easily boot from a USB drive, which can help you troubleshoot the issue or even reinstall the operating system.
We'll be discussing how to create a macOS Ventura bootable USB in the next part, and there's a video that covers the process. To summarize, you can check out the key points related to creating a macOS Ventura bootable USB.
- 01:21 A brief introduction about macOS Ventura
- 04:04 Download macOS Ventura
- 06:11 Open the Terminal on Mac
- 09:32 Boot from USB
How to Create macOS Ventura Bootable USB (with Pictures)
To create a macOS Ventura bootable USB, you'll need a USB flash drive with more than 16GB of storage space, formatted to Mac OS Extended. Ensure you have a stable internet connection before proceeding. Follow the steps to create a bootable USB for Mac.
Step 1. Search for macOS Ventura in Apple Store.
Step 2. Click "Get" to download macOS Ventura.
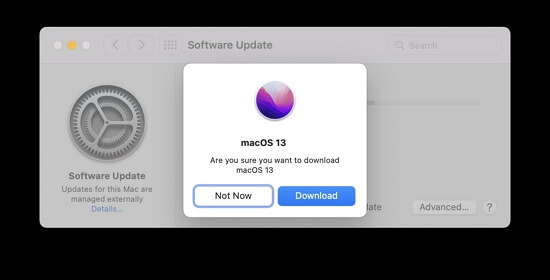
Step 3. Click "Download" to download the file. If you're not ready, you can click "Not now" to cancel the download process.
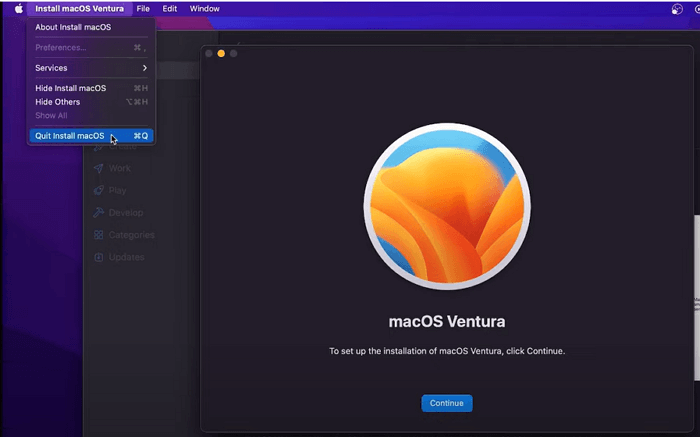
Step 4. When the downloading process is complete, click "Quit Install macOS" from the menu bar.
Step 5. Then you need to run Terminal on Mac. You can find Terminal under the Utilities folder.
Step 6. Connect the formatted USB to your Mac.
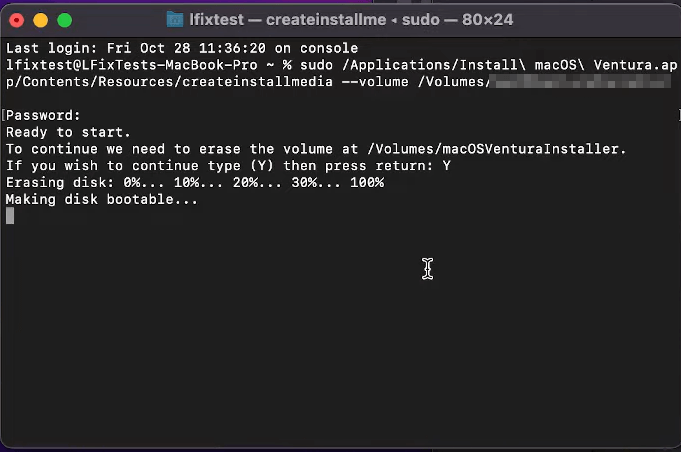
Step 7. To run the command, type: sudo /Applications/Install\ macOS\ Ventura.app/Contents/Resources/createinstallmedia --volume /Volumes/MyVolume, replacing "MyVolume" with the actual name of your USB drive.
Step 8. Press the Return key and enter your password.
How to Install macOS Ventura with Bootable USB
If you've created a macOS Ventura bootable USB and backed up your data on Mac, it's time to install macOS Ventura with a bootable USB. The process differs slightly between Intel Macs and Apple Silicon Macs, but the steps for installation remain the same. To install, insert the bootable USB, restart your Mac, and follow the on-screen instructions to complete the installation.
For Intel Mac:
Step 1. Connect your bootable USB to your Mac.
Step 2. Turn on the Mac and hold the Option key.
Step 3. Release the Option key when you see the startup window on the screen.
Step 4. Choose your bootable USB flash drive you just plug in.
Step 5. To install macOS Ventura, simply select the "Install macOS Ventura" option and click "Continue". From there, just follow the prompts and you'll be able to complete the installation of the operating system.
For Apple Silicon Mac:
Step 1. Connect your bootable USB to your Mac.
Step 2. Turn on the Mac and keep holding the power button.
Step 3. To release the key, press the key you're holding down and let it go. This will allow the computer to boot up normally.
Step 4. Choose your bootable USB flash drive you just plug in.
Step 5. To install macOS Ventura, select the "Install macOS Ventura" option and click "Continue", then follow the on-screen instructions.
Addition Guide: Recover Lost Data on macOS Ventura When Installation Stuck/Fail
When installing macOS Ventura, various problems can arise, leading to a failed installation. If you haven't backed up your data, you may lose everything. Installing with a bootable installer performs a clean installation, erasing all data on your Mac.
If the macOS Ventura installation is stuck or after a clean installation, you can recover lost data by downloading Deep Data Recovery for Mac.
macOS Ventura Data Recovery Software
- To recover deleted files on macOS Ventura, you can use the built-in "Time Machine" feature or third-party software like Disk Drill, Deep Data Recovery Wizard, or PhotoRec. If you have a Time Machine backup, you can restore your files from the backup.
- When your MacBook Pro or Air won't turn on, this tool can help recover data from your unbootable MacBook by creating a bootable USB drive that can access your MacBook's internal drive, allowing you to retrieve your files and data even when your MacBook won't boot up normally.
- Data recovery services involve retrieving lost or deleted data from various storage media, including SD cards, external hard drives, and more, often using specialized software and techniques to recover files and information that were thought to be irretrievable.
How to Create a USB Bootable Media
Step 1. To recover data from a Mac, install and run Deep Data Recovery on another Mac, then select "File > Create Bootable USB" and choose a USB drive to create the bootable disc.
- Warning
- The creator will prompt to erase the drive to reallocate the space, then write the bootable files to this drive, but first, please back up all USB files before processing "Eraser".
Step 2. The program creates a 2GB space on the USB and saves the boot files, leaving the remaining space for storage.
Step 3. To recover a corrupted Mac, create a bootable disc using a Time Machine backup or a bootable drive. Once it's complete, boot the Mac from the disc and follow the on-screen instructions to start the recovery process. It's recommended to restore the data to an external hard drive to ensure its safety.
How to Recover Data from Mac Hard Disk
Step 1. Launch Deep Data Recovery software, select the desired file types, and click "Next" to initiate the recovery process.

Step 2. Select the disk location where you lost data and files, then click the "Scan" button.

Step 3. Deep Data Recovery for Mac will immediately scan your selected disk volume and display the scanning results on the left pane.

Step 4. Select the file(s) you want to recover from the scan results, and then click the "Recover" button to restore the data to your Mac.
The Closing Words
Creating a macOS Ventura bootable USB is a relatively simple process that can be completed with a few steps. To start, you'll need a USB drive with a minimum capacity of 16GB, as well as a computer running macOS Ventura. Next, you'll need to download the latest version of the macOS installer from the App Store, and then use the built-in Disk Utility app to create a bootable USB drive.
If you're experiencing issues with your Mac or MacBook, you can download and install Deep Data Recovery for Mac to recover lost or deleted data.
- If your Mac won't boot, but you need to access the data on it, you can try using a third-party recovery tool like Disk Drill or Deep Data Recovery Wizard to scan your Mac's drive for recoverable files. These tools can often recover data even if your Mac won't boot.
- If your Mac's system crashes and you lose important data, try booting in safe mode, which may help resolve the issue. You can also try running a diagnostic test to identify the problem.
- If you've accidentally emptied the Trash on your Mac and need to recover data from it, you can try using the Time Machine backups, if you have them. If not, you can also try using a data recovery software like Disk Drill or Deep Data Recovery Wizard.
- To recover lost files after the Monterey update, you can try using a reliable data recovery software like Disk Drill, Deep Data Recovery Wizard, or DiskGenius. These tools can scan your Mac's hard drive or external storage devices to locate and recover deleted or lost files, including those that were overwritten by the Monterey update.
Create macOS Ventura Bootable USB FAQs
Reading this part's additional questions and answers may provide valuable information to help you understand the process of creating a macOS Ventura bootable USB. This will give you a better grasp of what's involved in making a bootable USB for macOS Ventura.
How do I make a bootable macOS Ventura USB?
To create a bootable macOS Ventura USB, follow these steps: First, download the macOS Ventura installer from the App Store and create a bootable installer on a 16 GB or larger USB drive. Then, insert the USB drive into your Mac and restart it.
- 1. Prepare a USB drive with more than 16 GB of storage space and format it to Mac OS Extended.
- 2. Download the macOS Ventura resource on Mac.
- 3. Use Terminal to make a macOS Ventura bootable USB.
Can you boot macOS Ventura from a USB drive?
To boot macOS Ventura from a USB drive, you'll need to create a bootable USB drive using a compatible operating system and a USB drive with at least 16 GB of free space. First, download the macOS Ventura installer and create a bootable USB drive using the built-in "Create a bootable installer" feature in the installer app.
- 1. Prepare a USB drive with more than 16 GB of storage space and format it to Mac OS Extended.
- 2. Download the macOS Ventura resource on Mac.
- 3. Use Terminal to make a macOS Ventura bootable USB.
- 4. Connect your bootable USB to your Mac.
- 5. Turn on the Mac and keep holding the power button or Option key.
- 6. Release the key when you see the startup window on the screen.
- 7. Choose the bootable USB flash drive you just plug in.
- 8. To install macOS Ventura, select the "Install macOS Ventura" option and click "Continue". You'll then follow the prompts to complete the installation.
Should I upgrade to macOS Ventura?
macOS Ventura vs macOS Monterey, upgrade or not?
macOS Ventura is the latest version of macOS, offering exciting new features such as using your iPhone as a webcam and the ability to unsend messages. If you're interested in these innovative capabilities, upgrading to macOS Ventura is a good idea, as it provides a range of useful new features.
How do I clean install macOS Ventura?
You can clean install macOS Ventura using a macOS bootable installer.
- 1. Prepare a USB that has more than 16 GB of storage space, and format it to Mac OS Extended.
- 2. Download the macOS Ventura resource on Mac.
- 3. Use Terminal to make a macOS Ventura bootable USB.
- 4. Connect your bootable USB to your Mac.
- 5. Turn on the Mac and keep holding the power button or Option key.
- 6. Release the key when you see the startup window on the screen.
- 7. Choose the bootable USB flash drive you just plug in.
- 8. To install macOS Ventura, select "Install macOS Ventura" and click "Continue", then follow the prompts.
Related Articles
- Fix: Blue Yeti Not Recognized on Windows 10/11 [Step by Step]
- How to Boot Computer from USB and Make A Portable OS
- [Fixed] Boot Camp Error "The Startup Disk Cannot Be Partitioned Or Restored To A Single Partition"
- File System Verify or Repair Failed. : (-69845) | How to Fix
If you're experiencing the error "file system verification or repair failed. : (-69845)", you're not alone. This error can be frustrating, but there are ways to fix it. - What Is Dell Boot Menu & How to Access?🔥
Have you ever heard of the Dell boot menu? Do you know what the Dell boot menu means and how to enter it? This article will describe the Dell boot menu in detail and tell you how to enter the boot menu of a Dell laptop. - What Is Difference between .BAT and .EXE files? [Full Information]
A full description of .BAT and .EXE files.