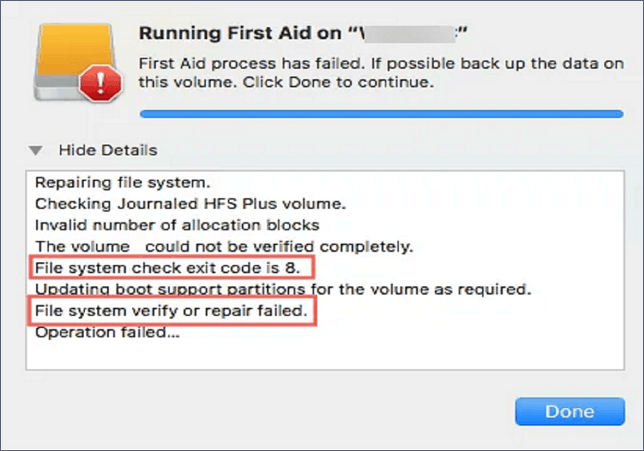
File System Verify or Repair Failed. : (-69845) | How to Fix
Why Encounter 'File System Verify or Repair Failed. : (-69845)'
Mac Disk Utility is a utility program that helps users identify and fix directory system issues on their Macs, assisting with file system problems like damaged data, missing files, and other issues.
When using Disk Utility to repair hard drives, users may encounter the error "file system verify or repair failed: (-69845)". This error can occur due to various reasons, including corrupted file systems, incomplete or interrupted repairs, or issues with the disk itself. Understanding the primary causes behind this error can help users take necessary steps to resolve the issue and prevent future occurrences.
- When conducting First Aid on an external disk, including an ExFAT disk or a Time Machine backup, it occurs.
- The "file system verify or repair failed. : (-69845)" error can occur on external or internal hard drives, SD cards, and USB flash drives on Macs running any macOS version. It typically indicates file system corruption on the drive, which can be caused by sudden power failures, invalid volume headers, ransom attacks, or catalog file corruption.
- This error might be accompanied by details, including "error: Unable to conduct postponed repairs without complete space verification."
You're experiencing an error with file system verification or repair, indicated by the code '-69845'. This issue can be resolved through various methods, including running the built-in System File Checker (SFC) tool, checking for corrupted system files, and performing a full system restore. Additionally, you can try running a DISM scan to repair corrupted system files, or using a third-party system file repair tool. If none of these methods work, you may need to consider reinstalling your operating system. It's worth noting that these solutions may vary depending on your specific system configuration and the cause of the error.
Recover Lost Files When Encounter 'File System Verify or Repair Failed. : (-69845)'
Data loss is expected if you encounter file system verify or repair failed, indicated by error code (-69845). However, with the help of professional data retrieval software, you can quickly recover every type of file. Deep Data Recovery is a tool that can help you retrieve lost data when unexpected disk errors occur, making it a reliable solution for data recovery.
With the aid of Deep Data Recovery for Mac, difficult data loss situations can be resolved.
- 🛠️Recover data from corrupted hard drives with this tool, which can help you recover data before repairing corrupted hard drives on Mac.
- ❌You may be able to recover data from a formatted Mac hard drive with the Qiling recovery tool, giving you an additional chance to recover your lost data.
- 🔖If you've lost files after upgrading to macOS Ventura, a powerful tool can help you recover them. This tool can be very helpful in retrieving essential data that was lost during the upgrade process.
- 🗑️If you've accidentally deleted important data on your Mac and emptied the Trash, you'll need Deep Data Recovery for Mac to recover it.
Now, you can follow the leads to recover lost files:
Step 1. Search for lost files
To search for lost files on macOS, select the disk location where you want to search, such as an internal HDD/SSD or a removable storage device, and click the "Search for lost files" button.
Note: Before attempting data recovery, create a backup of your Mac by clicking "Disk Backup" from the left sidebar to avoid further data loss. Once backed up, the software can recover data from the Mac backup, allowing your computer to write new data again.

Step 2. Go through the scanning results
Deep Data Recovery for Mac will immediately scan your selected disk volume and display the scanning results.

Step 3. Select the file(s) and recover
Select the file(s) you want to recover and click the "Recover" button to restore them.

How to Fix 'File System Verify or Repair Failed. : (-69845)' on Internal Drive
To resolve the "File System Verify or Repair Failed: (-69845)" error on a Mac, you can try using various tools, such as Disk Utility, which is built-in, or third-party software like Disk Drill or DiskWarrior. However, if you need to perform a more extensive repair, such as reformatting a drive, be aware that this will erase all data on the drive, and you should consider backing up your data before proceeding. If you're looking for a more straightforward solution, you might want to try using the built-in Disk Utility to repair the file system, or if that doesn't work, consider running a diagnostic test to identify the issue.
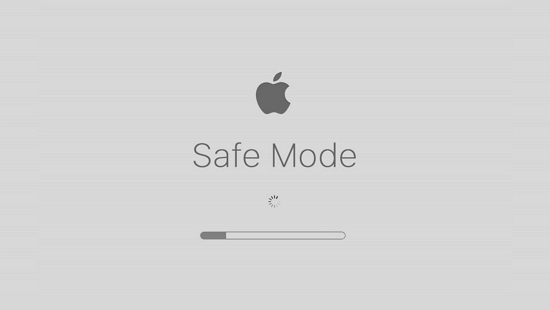
1. Troubleshoot the Error by Booting Mac into Safe Mode
To boot your Mac in Safe Mode on macOS Catalina 10.15, follow these steps: Restart your Mac, immediately hold down the Shift key until the login window appears, then release the Shift key. This will prevent most third-party kernel extensions from loading, allowing you to troubleshoot issues or perform maintenance tasks without interference from other software.
Step 1. To shut down your Mac, press the Power button or select the Apple menu and choose "Shut Down".
Step 2. Keep it shut down for approximately 10 seconds.
Step 3. Hold the power button.
Step 4. Once it starts, quickly press & hold the Shift key.
Step 5. Release the Shift key after watching the grey Apple logo and the progress indicator on its screen.
2. Run FSCK to Fix 'File System Verify or Repair Failed. : (-69845)'
FSCK, or file system consistency check, is a useful program for detecting and fixing drive errors. To run FSCK, you need to boot into macOS single-user mode, which allows you to conduct the check and make any necessary repairs.
Step 1. Switch off your Mac.
Step 2. Turn it on and press Command + S to hear the boot sound.
Step 3. In single-user mode, enter the command `/sbin/fsck -fy` and press Enter.
Step 4. The volume [name] appears to be functioning correctly, with all issues resolved after file system modifications were made.
Step 5. If you see the second text, enter the /sbin/fsck -fy command again until you receive the message "The volume [name] appears to be OK".
Step 6. Restart your MacBook.
3. Run First-Aid in macOS Disk Utility to Fix the Issue
To quickly diagnose and resolve disk formatting and directory structure errors, you can use the First Aid application in Disk Utility. To access it, open Disk Utility in Recovery mode. From there, select the disk you want to repair and click the "First Aid" button. This will scan the disk for errors and attempt to repair them. If the issue persists, you may need to reinstall macOS.
For M1-based Mac:
Step 1. Restart your MacBook.
Step 2. Until the "Loading Startup options" pop up, keep holding the power button.
Step 3. Opt for the Gear symbol.
Step 4. Open the Disk Utility.
For Intel-based Mac:
Step 1. Restart your MacBook.
Step 2. Hold down the Command + R keys.
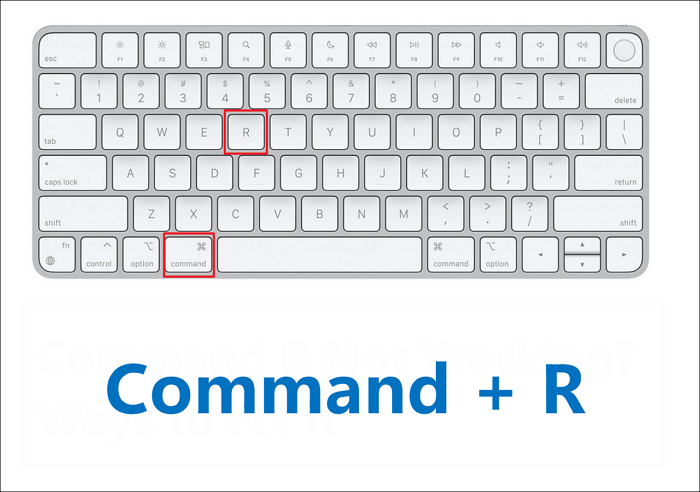
Step 3. When the macOS utility window opens, launch the Disk Utility.
The disc that displays the "File system verify or repair failed" error should be repaired using First Aid, a utility that comes with macOS. This process will attempt to repair the file system on the disc, which may resolve the issue.
Step 1. Select View on the menu bar in the Disk Utility.
Step 2. Opt for Show All Devices.
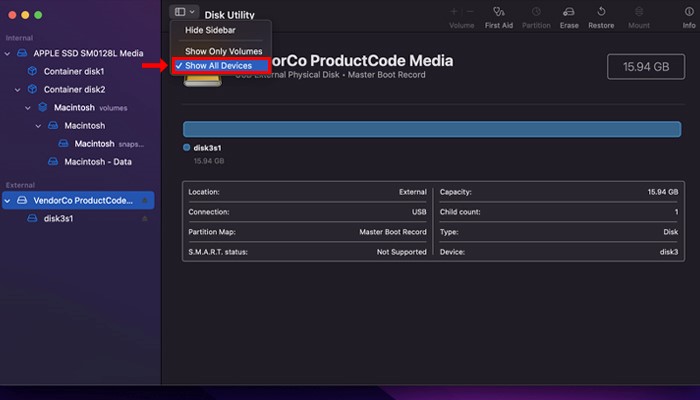
Step 3. To fix a Mac partition or disk, select the partition or disk you want to fix from the Disk Utility menu > click the First Aid button > click Run.
Step 4. Restart your MacBook to finish the error fix.
If you've successfully fixed the "file system verification or repair failed. : (-69845)" error, please share the methods you used with more users who may be experiencing this issue!
4. Factory Reset and Reinstall macOS on Mac
If nothing works, it's time to factory reset your MacBook Air or Mac and reinstall macOS. To do this, follow the steps below:
Step 1. To access System Preferences, click on the Apple logo in the top left corner of the screen, then select System Preferences from the dropdown menu.
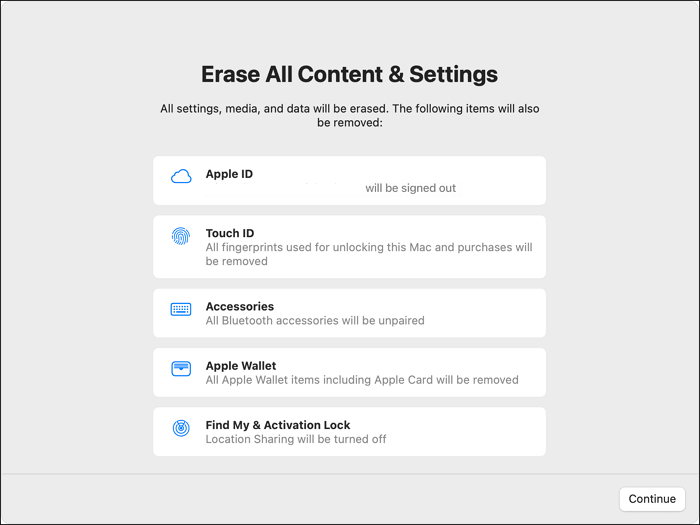
Step 2. Open erase assistant. Open "Erase All Contents and Settings" from system preferences.
Step 3. Go through the Erase Assistant prompts. You can follow Erase Assistant's instructions to perform a factory reset, but you must log out of iCloud before it's finished.
You can reinstall macOS using a bootable USB installer. To do this, follow these steps:
Step 1. Download macOS Ventura or other versions.
Step 2. Build a bootable USB using the Terminal.
Step 3. Employ a Bootable Installer.
For Intel-based Mac
- You need to plug in the installer and check the compatibility and connectivity.
- Long-Pressing the Option key will display a list of available volumes on the screen.
- Choose the volume with a bootable installer, and press the Return key.
For Apple Silicon
- If you want to reinstall macOS, plug in the bootable USB drive.
- Crosscheck its internet connectivity and its compatibility with the installed macOS version.
- Long-press the power button until the Utility window pops up.
- Opt for the volume containing the OS, and select Continue.
How to Fix 'File System Verify or Repair Failed. : (-69845)' on External Drive
If you're experiencing issues with your external drive's file system, such as exit codes like "File system check exit code is 1" or "File system check exit code is 65", you can try running a File System Verify or Repair with Disk Utility to resolve the problem. This process can help identify and fix any errors, allowing you to access your data again without risking data loss. : (-69845) on external drives without the hassles of losing data. If Disc Utility reports exit codes like "File system check exit code is 1," "File system check exit code is 65," "File system check exit code is 8," etc., it is recommended to continue with the following simple fixes.
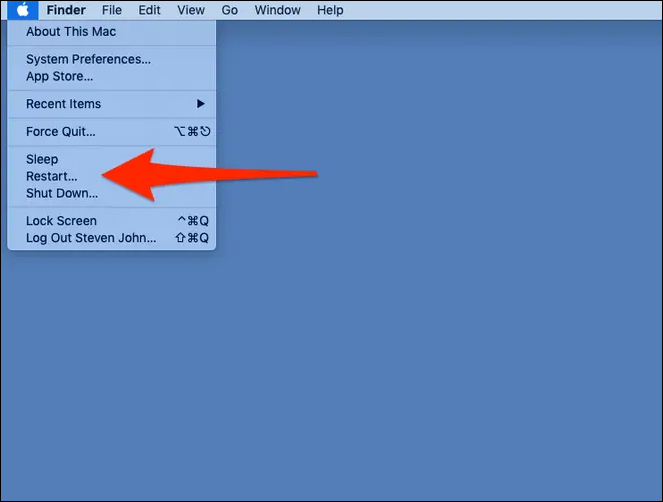
1. Reboot Mac to Fix 'File System Verify or Repair Failed. : (-69845)'
If your Mac is experiencing issues like a "File System Verify or Repair Failed" error, a simple reboot can often resolve the problem. To reboot your Mac, follow the steps below: 1. Click the Apple logo in the top left corner and select Restart. 2.
Step 1. To turn off your Mac, press and hold the Power button until it shuts down. This is usually located on the top right of the keyboard or on the back of the laptop.
Step 2. Wait 10 seconds, and turn it on again to operate First Aid. In case it still shows this error, check the next solution.
2. Reformat the External Drive with Mac Disk Utility
Reformatting is a flexible way to resolve disk errors, such as a File System Verify or Repair Failed issue (-69845) on an external drive. To make it work again, you can reformat the hard drive, following these significant steps.
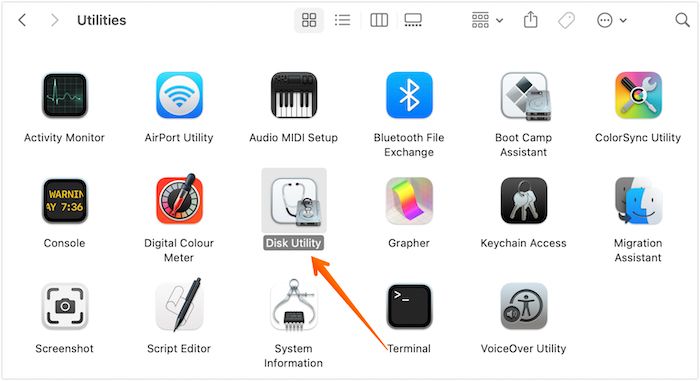
Step 1. Head over to Disk Utility.
Step 2. Select the drive from the left sidebar that is experiencing problem 69845.
Step 3. Hit the Erase button located on the top of the Window. This will remove all the text from the current window, leaving it blank.
Step 4. Hit the Erase again after providing a name and format. The whole deletion process will take some time.
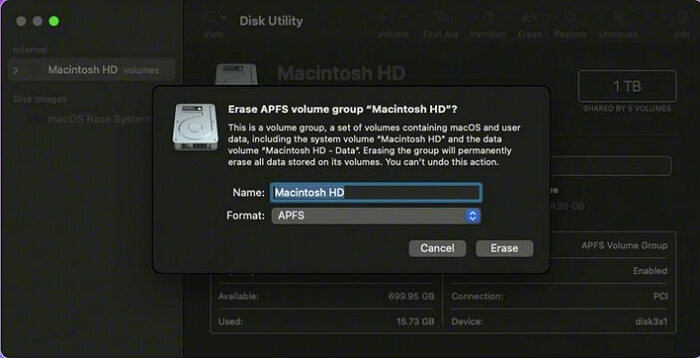
Step 5. Select Done when it's over.
3. Send Your Damaged External Hard Drive for Repairing
If the fixes mentioned don't work, the drive is likely damaged and should be replaced or taken to a repair facility.
To resolve the error "File system verify or repair failed.: (-69845)" when trying to access external discs, ensure the issue causing the problem is resolved. If that's the case, follow the steps provided to help others with the same issue.
Conclusion
Unfortunately, your Mac's file system verification or repair failed, resulting in the error code (-69845). To resolve this issue, try the techniques described in this article to fix your internal or external hard drive. Before attempting any repair, use Deep Data Recovery for Mac to recover any lost data from the damaged drive to ensure your data's integrity.
File System Verify or Repair Failed. : (-69845) FAQs
Go through the FAQs below to understand the topic better:
1. How to fix corrupted hard drives on Mac?
You can fix a corrupted hard drive on Mac by initiating the FSCK command or repairing it using the disk utility, or use Deep Data Recovery for Mac to retrieve lost data.
2. Why my Mac says 'file system verify or repair failed. : (-69845)'?
On macOS, the error "File system verify or repair failed.: (-69845)" can occur on internal or external hard disks, USB flash drives, or SD cards, likely due to file system instability caused by factors such as abrupt power outages, damaged catalog files, erroneous volume headers, or malware attacks.
3. How to fix 'file system verify or repair failed. : (-69845)' in Disk Utility?
To fix the 'file system verify or repair failed. : (-69845)' error on an external drive, you can reformat it using Disk Utility. This process will erase all data on the drive, so be sure to back up any important files first. To do this, connect the external drive to your Mac, open Disk Utility, select the drive from the left-hand menu, and click on the 'Erase' button.
- 1. Activate Disc Utility.
- 2. From the left sidebar, select the drive that is experiencing problem 69845.
- 3. On the screen, click Erase.
- 4. "Please provide a name and format, then select Erase. The erasing process will take some time to complete."
- 5. When it's finished, click Done.
4. How do I fix code 8 on my Mac?
Follow the steps below to fix code 8 on your Mac:
- 1. Make a backup of the stored Mac data.
- 2. Head over to Applications > Utilities > Disk Utility.
- 3. To repair a corrupted external drive, go to Disk Utility, select the corrupted drive, and click First Aid. This will scan and repair any issues with the drive, potentially recovering your data.
- 4. Hit Done, and restart your MacBook.
Related Articles
- What Is Mac Terminal Format Disk & How to Format Disk [Best Solution]
- [2023 Updated] Macbook Pro Is not Charging? Find Your Solutions Here
- How to Stop Finder Action on Mac in 5 Ways | MacBook Air/Pro/iMac
- How to Fix File Explorer Keeps Popping Up Without Losing Data
- What Is Clipboard and How to Copy and Paste? [Full Guide]
This article teaches you about a clipboard on a computer or a mobile device (Android and iPhone) and how to copy and paste information from your clipboard. - What Is Disk Space, All You Want 2024
Learn what disk space means, how it differs from RAM, and why available storage matters for files, apps, and system performance.