How to Stop Finder Action on Mac in 5 Ways | MacBook Air/Pro/iMac
To stop Finder action on Mac, you can use the Force Quit function from the Apple menu. This will instantly terminate the Finder process, allowing you to restart it without any issues. Alternatively, you can use the Activity Monitor to locate and quit the Finder process. If you're experiencing issues with multiple Finder windows, you can also try closing them individually or using the 'Command + Q' shortcut to quit the Finder. If the issue persists, you can try restarting your Mac.
| Workable Solutions | Step-by-step Troubleshooting |
|---|---|
| Fix 1. Quit Finder in Apple Menu | After clicking Finder, an error message reads, "You can't open the Finder because it is not responding...Full steps |
| Fix 2. Use Shortcuts to Restart Finder | There are also helpful shortcuts for you to force quit the Finder and restart it...Full steps |
| Fix 3. Stop Finder Action in Terminal | You can use the Terminal to execute this Command if the Force Quit option from the Apple menu...Full steps |
| Fix 4. Close Finder in Activity Monitor | A built-in Mac program called Activity Monitor keeps track of all of your running processes and helps you ...Full steps |
| Fix 5. Relaunch Finder from Dock | Some users tried to quit using keyboard shortcuts, only to discover that force quit is not working on Mac...Full steps |
If Finder is functioning correctly, there's no need to quit or close it. However, if it becomes slow, unresponsive, or keeps crashing, you can try quitting and relaunching Finder to fix the issue, as this can help macOS to restart the Finder process and resolve the problem.
Why Finder Is Not Responding and Why It Needs to Be Stopped
Finder is the built-Finder, the default file manager on macOS, is typically left open as it serves as the hub of your Mac. However, like any other program, it can occasionally lose responsiveness or freeze. This can happen due to various reasons, such as a high number of open windows or tabs, a large amount of data being processed, or a corrupted system file. Other possible causes may include software conflicts, malware, or a malfunctioning extension. As a result, Finder may become unresponsive, making it difficult to navigate and manage your files.
Mac Memory or Space Shortage
It's recommended to keep 20% of your Mac's storage free to ensure smooth performance, especially when RAM is fully utilized, preventing the Finder from becoming slow and unresponsive.
Corrupt System Preferences and Apps Hanging in the Background
Mac's Finder not responding could be due to frozen applications, corrupt system preferences, or multiple app procedures causing the Finder Action to be sluggish.
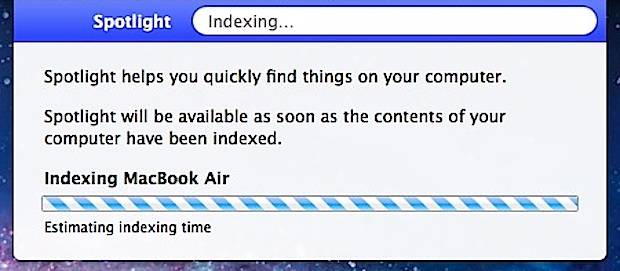
Spotlight Indexing Impedes Finder Action
It's not uncommon for users to experience issues with their Mac's disk space after a macOS reinstall or a large file transfer. This can be due to various factors, such as a lack of available disk space, corrupted system files, or issues with disk permissions.
How to Stop Finder Action on MacBook
Finder, a core Mac program, cannot be uninstalled or deleted with a single click, unlike other unwanted apps. However, the Force Quit option can be used to stop Finder action on Mac, but it's not easily accessible unless you know where to find and how to use it. Fortunately, there are five effective methods to resolve this, allowing you to regain control over your Mac.
Fix 1. Force Quit Finder with the Apple Menu
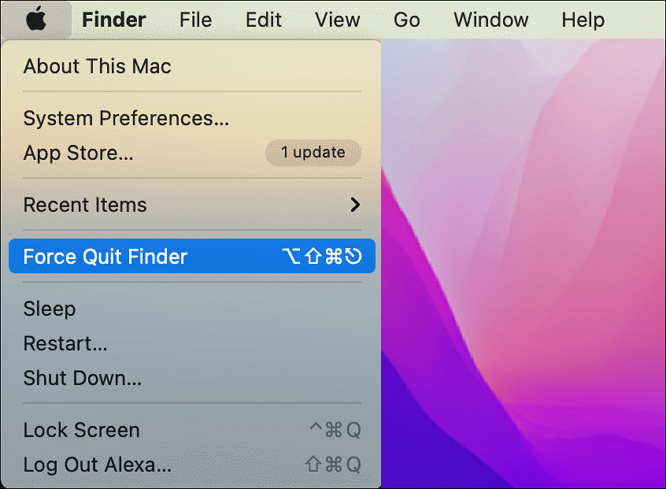
You may occasionally get an error message after clicking Finder that reads, "You can't open the application Finder because it is not responding." If this happens, you can force quit Finder using the Apple menu and then try restarting it to see if the error message disappears.
- First, click the Apple logo in the upper menu bar.
- Next, select Force Quit.
- Finally, select Finder - Relaunch.
If the fix doesn't work, you may need other methods.
Fix 2. Use a Shortcut to Restart Finder
Just like Command + C means copy and Command + V means paste, there are also helpful keyboard shortcuts for forcing quit and restarting the Finder.
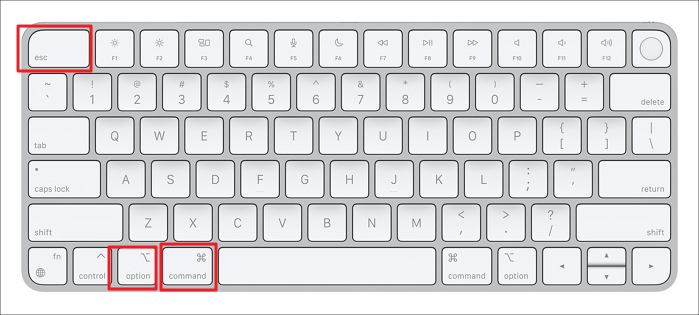
- Press Option, Command, and Esc at the same time.
- Click Finder - Relaunch.
- To force Finder to shut down without asking for confirmation, use the keyboard shortcut Command + Shift + Option + Esc when it isn't responding and the cursor isn't moving.
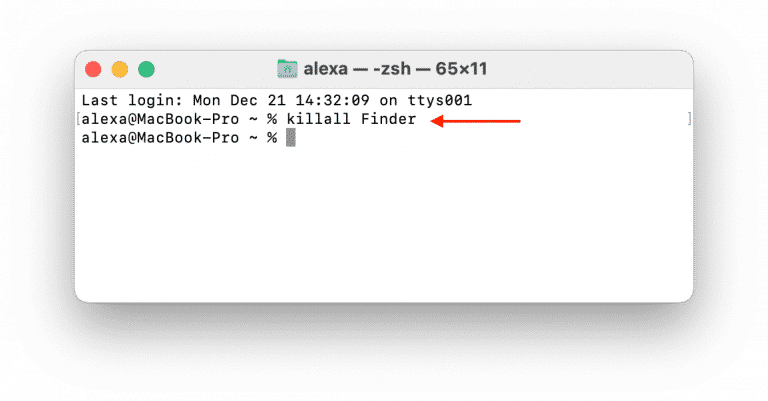
Fix 3. Stop Finder Action in Terminal
To add the Quit option to the Finder menu, you can use the Terminal command line to execute this command. If the Force Quit option from the Apple menu does not work for you, you can use Terminal to add the Quit option to the Finder menu for future convenience.
- Launch the Terminal app, which can be found in the Utility subfolder of the Applications folder.
- To close the Finder application on your Mac, you can enter the command "killall Finder" in the Terminal. This will immediately shut down the Finder process, and you can then relaunch it by opening a new Finder window.
- Type the key.
- The Finder will restart.
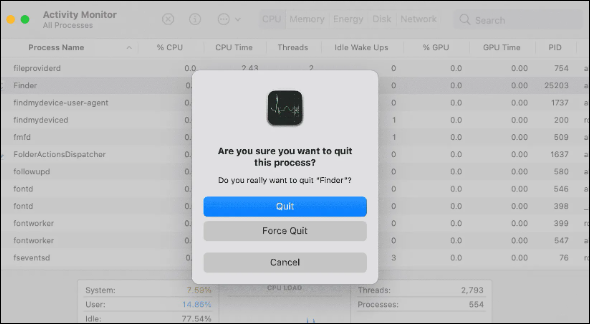
Fix 4. Force Close Finder Using Activity Monitor
A built-In the Mac program called Activity Monitor, you can track and manage your running processes, including quitting the Finder operation. To do this, open Activity Monitor, find the Finder process, select it, and click "Quit Process" to stop it. This can help resolve issues where the Finder is not responding or is consuming excessive system resources.
- Open Activity Monitor from the Tools menu.
- To find the Terminal app, you can use the search bar in the Finder window. Type "Terminal" in the search bar, and it should appear in the results list.
- To close Finder, click the Close button (X).
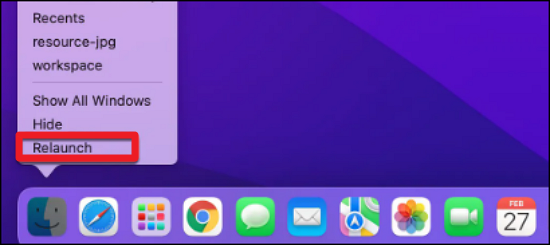
Fix 5. Relaunch Finder from the Dock
Some users tried to quit using keyboard shortcuts and from the Apple menu, but found that force quit wasn't working. To resolve this, try restarting Finder through the Dock panel.
- Hold Option while right-clicking on the Finder icon on the Dock.
- Choose Relaunch.
How to Recover Lost Data on Mac with Crashed Finder
If your Mac Finder is crashing, trying to fix the issue may put your data security at risk. When you force a restart, there's a chance you might accidentally delete files and data, which could be lost when you try to turn on your MacBook again. In this situation, it's a good idea to consider recovering deleted Mac files to prevent data loss.
To recover lost files after a macOS update, we recommend using Deep Data Recovery for Mac, which is designed to recover various types of data lost due to system updates, factory resets, deletion, virus attacks, and more.
Deep Data Recovery for Mac
- You can recover lost or deleted files on a Mac from an external or internal hard drive, regardless of the file system used.
- To recover data from a dead MacBook and resolve the crashing issue, try booting in Safe Mode by restarting the MacBook and immediately pressing the power button until the MacBook turns off, then press the power button again to turn it back on. This will load the bare minimum of macOS, allowing you to access your data.
- If you've accidentally deleted important files, don't worry! You can recover them using a bootable USB drive on your Mac.
If your Mac Finder keeps crashing or freezes, there's a high chance of losing data after a reboot. To recover your data, you can try using Disk Utility to repair the startup disk, boot your Mac in Safe Mode, or use a third-party data recovery software. Additionally, you can also try resetting the System Management Controller (SMC) and the Power Management Unit (PMU) to see if it resolves the issue.
Step 1. Select file types
Launch Deep Data Recovery software, select the desired file types, and click "Next" to initiate the recovery process.

Step 2. Select the drive to be scanned
In the main Deep Data Recovery window, select the drive you need to recover lost/deleted files from and click the "Scan" button to initiate the scanning process.

Step 3. Select your lost data/files
Deep Data Recovery for Mac scans the selected disk volume and displays the results on the left pane, allowing users to sort and find specific files if needed.

Step 4. Recover lost/deleted data
After finding the desired files, preview them and then click "Recover" to initiate the recovery process for your deleted or lost Mac files.
Conclusion
If your Mac's Finder frequently freezes, it's possible that you risk losing data. To minimize this risk, consider using data recovery software like Qiling to restore your files. If you need to quit Finder, there are five possible ways to do so, although it's worth noting that system app freezes can be a sign of a larger issue.
How to Stop the Finder Action on Mac FAQs
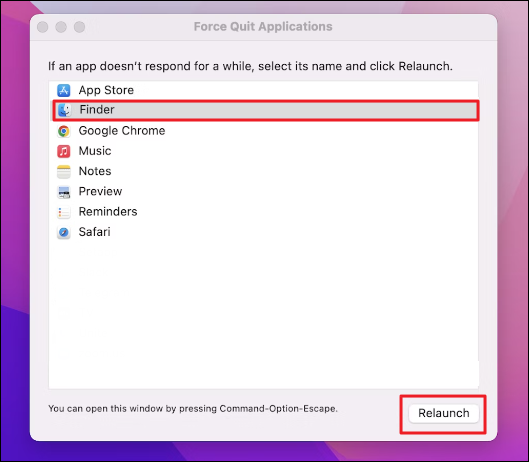
To force stop Finder on a Mac, you can try the following methods: Press Command + Option + Esc to open the Force Quit Applications window, select Finder, and click Force Quit. Alternatively, you can try pressing Command + Option + Esc again, and this time, select Finder and click Relaunch.
1. How to force quit finder won't relaunch?
- If none of the above fixes worked, try restarting your Mac.
- If the Mac won't turn on, try keeping the power button pressed for a few seconds. If that doesn't work, press the Power button while simultaneously pressing the Control and Command keys. This combination may help the Mac recognize the power button press and turn on.
- If your Mac is experiencing issues, try booting it in Safe Mode to troubleshoot. If that doesn't resolve the problem, you may want to consider restarting your Mac.
2. How to stop the Finder from showing recent files?
Step 1. To change the default location of the new Finder windows, open the "Finder" application on your Mac, go to the "Finder" menu, select "Preferences", and then click on the "General" tab. From there, you can select the desired location for new Finder windows to open.
Step 2. When opening a new Finder window, you can choose to display a specific location instead of the default "Recents" section.
Step 3. The update will remove the "Recents" shortcut from the Finder sidebar.
Step 4. If the "Recent" still shows, go to System Preferences - Spotlight - Privacy and add external drives to the exclusion list.
3. How do I stop the finder action to eject a disk?
If the Finder stops responding, you can force quit it and then try to remove the external HD by selecting Finder in the Force Quit window and clicking Relaunch. This should allow you to proceed with removing the external HD.
4. Why can't I force quit Finder on Mac?
If you're unable to force quit Finder on your Mac using the shortcut or Apple menu, it could be due to a keyboard issue or a problem with the Apple menu. You can try alternative methods, such as closing the Activity Monitor or Terminal, to resolve the issue.
Related Articles
- [2023 Tips] Update Not Found - The Requested Version of macOS Is Not Available
- 2 Workable Solutions to Reset MacBook Air to Factory Settings Without Disc
- What Does Format Disk Mean? [Most Detailed Answer 2023]
- Detailed Guides to Fix FIFA 23 Career Mode Not Saving
- Xprotectservice Explained: Apple's Built-in Antivirus Software
The Xprotectservice in macOS is an antivirus system that scans for malware and other threats in real-time. It uses a combination of signature-based and behavior-based detection to identify and block malicious software. - Zoom Product Key Finder Free Download, Find Missing Zoom Product Key
This page aims to provide a guide to help users find a missing or lost Zoom product key. By following the steps outlined here, individuals can recover their Zoom product key and regain access to their account.