2 Workable Solutions to Reset MacBook Air to Factory Settings Without Disc
Is It Possible to Reset MacBook Air to Factory Settings Without Disc
You can reset your MacBook Air to its factory settings without a disc. This is possible because you don't need a disc to reinstall your operating system, making it a straightforward process. Many users have successfully done this, and you can too!
A system or factory reset on a MacBook Air without a disc will retune the operating system to its original settings, removing any settings, configurations, or cache build-up that may be causing it to slow down. This can be done through the built-in Recovery Mode or by booting from an external drive. Reasons for doing this include: removing malware, resolving system crashes, and restoring the laptop to its original condition, making it run faster and more efficiently.
- Factory reset macOS.
- Reset MacBook Air to restore performance.
- Erase all content and settings on MacBook Air before selling.
- Wipe your MacBook Air for any performance issues related to the macOS base system.
You may need to erase your MacBook Air for several reasons, including improving performance and ensuring that no sensitive data remains if you're selling the device. This process will help you regain a clean slate and ensure that your MacBook Air runs smoothly and efficiently.
Erase Private Data Before Resetting MacBook Air to Factory Settings
To protect your private data and information before resetting your device, sign out of all necessary accounts, including email, social media, and any other sensitive services. This will prevent unauthorized access to your data. Additionally, consider backing up any important files or data to an external storage device or cloud storage service. This will ensure that your data is safe and can be easily restored if needed. Furthermore, take note of any login credentials or passwords that you may need to reset or update after the device reset.
Tip 1. Cancel or Transfer AppleCare Coverage
To cancel your AppleCare+ coverage, follow these steps:
Step 1. Head into App Store.
Step 2. Go to your Account Settings.
Step 3. Click on "Manage".
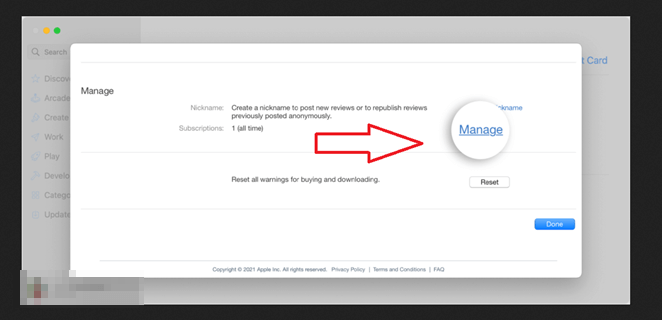
Step 4. Then click on "Edit Plan".
Step 5. At the bottom, find and click "Cancel Plan".
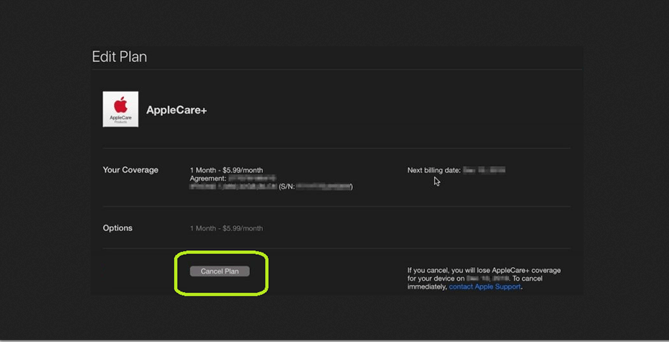
To avoid paying every month, you can simply sign out of your Apple ID on your current Mac device. This way, you won't be charged for the service. If you still plan to use another Mac device, we'll show you how to do that in the next step.
Tip 2. Back-Up or Transfer Personal Data on MacBook Air
To back up your personal data and preferences on your Mac, you should export your Safari bookmarks and passwords, export your Mail and Calendar data, and export your Contacts data. Additionally, you should back up your iCloud Keychain, which stores your login information and other sensitive data. This will ensure that you have a copy of your personal data and preferences in case your Mac device is lost, stolen, or damaged.
Step 1. Open "Utilities" on your MacBook Air.
Step 2. Head into Applications and open "Migration Assistant".
Step 3. Pick the "To another Mac" option and press continue.
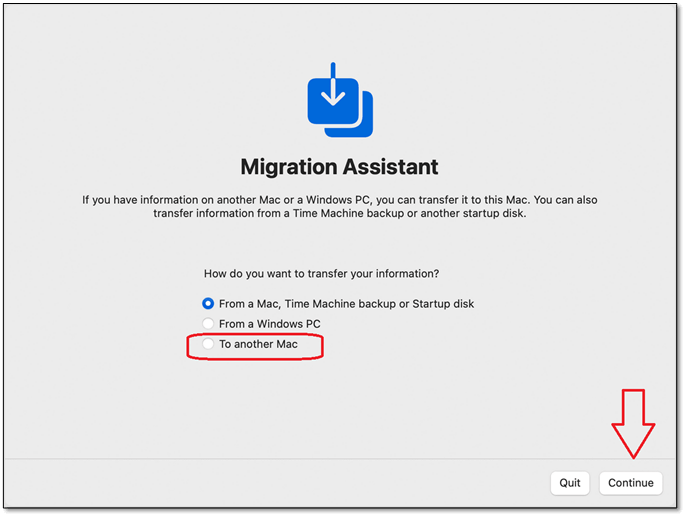
Step 4. Select all your important data and press continue.
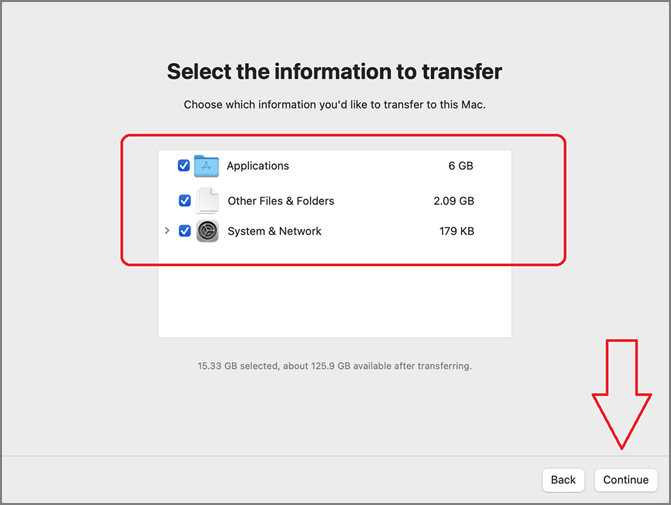
Step 5. Wait for the transfer to finish.
To share files between Mac devices, ensure both devices are connected to the same Wi-Fi network. This will allow for seamless file sharing between them. If you're having trouble, try restarting both devices and reconnecting to the same network.
Tip 3. Sign Out of iTunes, iCloud, and iMessage
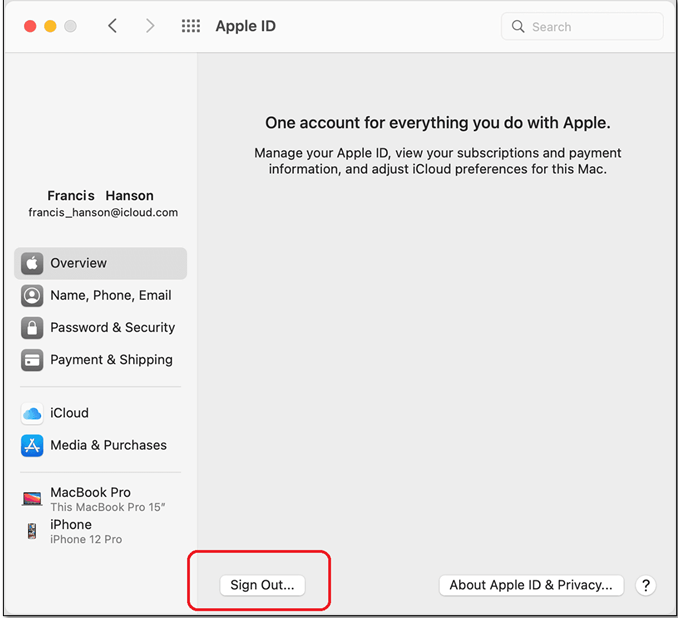
You need to Sign-To sign out of iCloud and iMessage at the same time, go to Settings > [Your Name] > Sign Out, and confirm that you want to sign out of iCloud and iMessage. Alternatively, you can sign out of iCloud on a device, and it will automatically sign you out of iMessage as well. If you're using a Mac, you can sign out of iCloud and iMessage by going to System Preferences > Apple ID, and then clicking on the "Sign Out" button.
Step 1. Open "System Preference" on your MacBook Air.
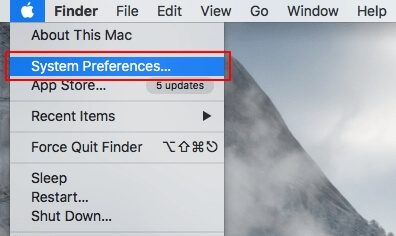
Step 2. Head into Apple ID, and then click iCloud.
Step 3. On the bottom side, click on Sign Out.
To sign out of iTunes, go to iTunes, click on "Account" in the top menu, then select "Sign Out" from the drop-down menu. This will log you out of your account and end the current session.
Step 1. Open iTunes on your MacBook.
Step 2. On the top, find and click Account.
Step 3. Navigate down and click on "Sign Out".

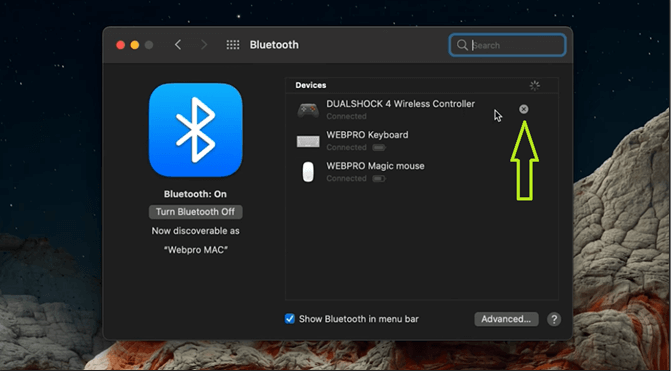
Tip 4. Unpair Bluetooth Devices on MacBook Air
To reset your router, ensure all devices connected to it are disconnected, including any Bluetooth devices, which can disrupt the resetting procedure. Then, locate the small pinhole or reset button on the back or bottom of your router. Use a paper clip or similar object to press the button or insert it into the pinhole and hold it for 10-15 seconds.
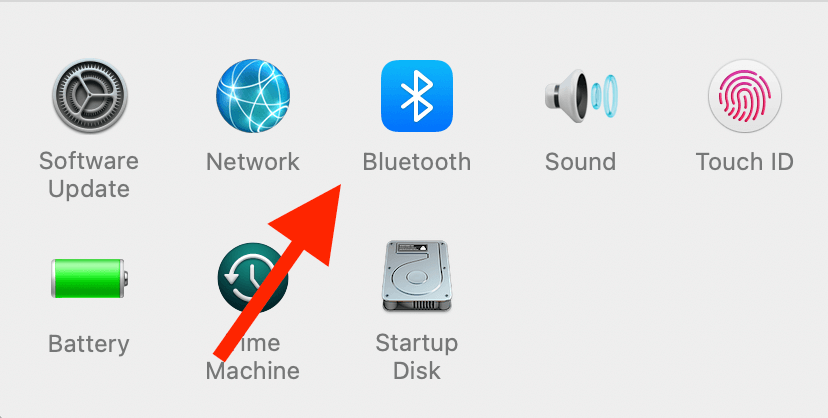
Step 1. Open "System Preferences".
Step 2. Find and click on the Bluetooth icon.
Step 3. In the next section, you will see the connected devices.
Step 4. To disable a device, hover your mouse over it and wait for the "X" icon to appear.
Step 5. To disconnect a device, click on the "X" icon next to it. This will remove it from the list of connected devices.
Before you get started, there are a few things you need to do first. Make sure you follow each of these tips carefully. By doing so, you'll be well-prepared to move forward with the rest.
How to Reset MacBook Air to Factory Settings Without Disc
Now that the prerequisites are done, we'll reset MacBook Air to factory settings without a disc. There are two methods to achieve this, which we'll discuss here. Before proceeding, please check out the video we've made for you.
The video provides a step-by-step guide, with each step explained at a specific time stamp. It covers various aspects of the topic, with clear instructions and demonstrations to help viewers understand the process.
- Hold the Command + R keys immediately after powering on your Mac to enter recovery mode.
- To factory reset without deleting the disk, you should select the option to "Reset" or "Reinstall" Windows, but not the option to "Remove files and clean the drive" which would delete the disk. This option will restore the computer to its original settings without erasing any data on the disk.
- To reset your MacBook Air properly, you can choose the following options:
Here are the two methods in writing to make it easier for you:
Solution 1. Reset MacBook Air to Factory Settings Without Disc in Recovery Mode
To reset your MacBook Air, put it in Recovery Mode, then select the correct option to either restore it to its factory settings or reset it without a password, as shown in the video. This process offers various choices, so it's crucial to choose the right one. Additionally, you can factory reset your Mac without a password using Recovery Mode.
To boot into recovery mode for Intel-based silicon, press the power button and immediately hold the Command (⌘) + R keys until you see the Apple logo and a progress bar. For Apple-based silicon, press the power button and immediately hold the power button until you see the Apple logo and a progress bar. Once you're in recovery mode, you can follow the on-screen instructions to restore your device from a backup, reinstall macOS, or put your device in DFU mode.
Step 1. Boot your Mac into Recovery Mode or Disk Utility to troubleshoot and resolve issues with your Mac's operating system. To do this, restart your Mac and immediately hold down the "Command" (⌘) and "R" keys. This will boot your Mac into Recovery Mode, where you can run utilities like Disk Utility to diagnose and fix problems. Alternatively, you can also boot into Disk Utility by restarting your Mac and holding down the "Command" (⌘) and "R" keys, then selecting "Disk Utility" from the Utilities window.
Step 2. Once at the Recovery/macOS Utilities screen, click on Disk Utility.
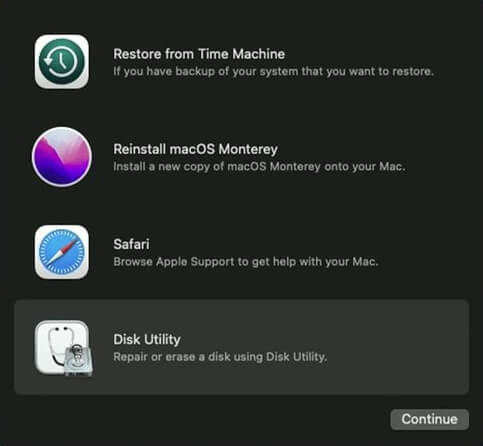
Step 3. In the internal drives section, click on the Macintosh HD drive.
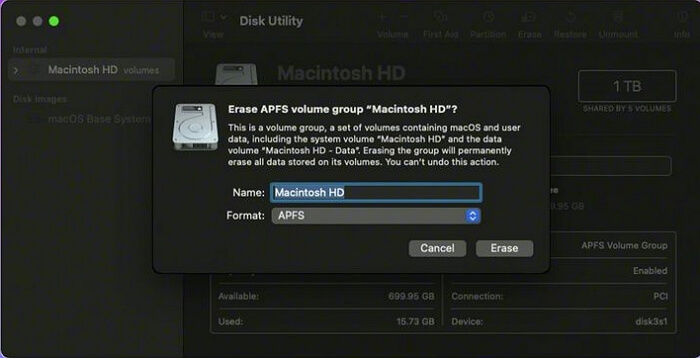
Step 4. In the top bar, select "Erase".
Step 5. The dialogue box will then prompt you to confirm that you want to erase the volume group. Click on Yes to proceed.
To completely wipe a Mac and reinstall macOS, restart your Mac and immediately hold down the Command (⌘) + R keys to boot into Recovery Mode. From there, select Disk Utility, then the drive you want to erase, and click the "Erase" button. Next, go back to the main menu and select "Reinstall macOS" to reinstall the operating system. This process will erase all data on the drive, so be sure to back up any important files before proceeding.
Step 1. Reboot into Recovery mode once more.
Step 2. This time, select "Reinstall macOS".
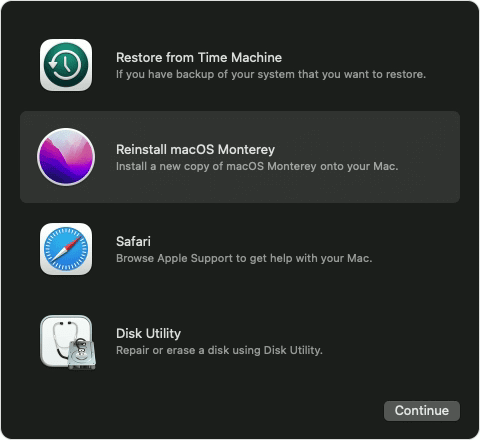
Step 3. Follow the on-screen instructions and boot your macOS.
Reinstalling macOS on a MacBook Air will result in a factory reset, effectively erasing all data and previous configurations, similar to what would happen with a traditional factory reset using a disc. Once the process is complete, the device will restart, and the user will find themselves back at the initial setup stage, with no remnants of the previous setup.
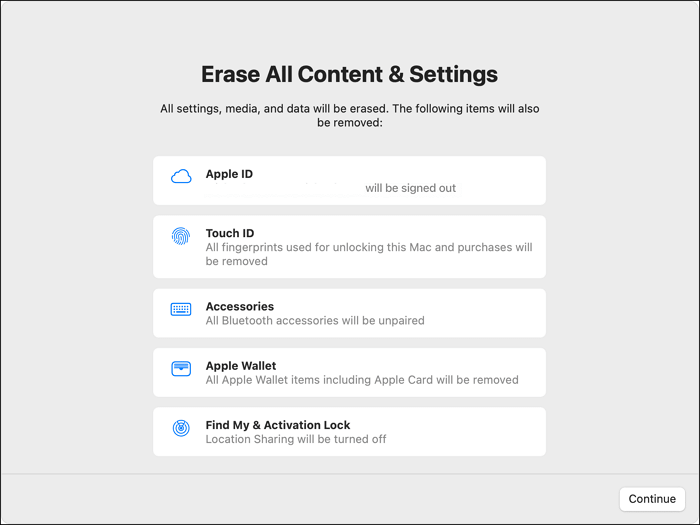
Solution 2. Use Erase Assistant to Reset MacBook Air to Factory Settings Without Disc
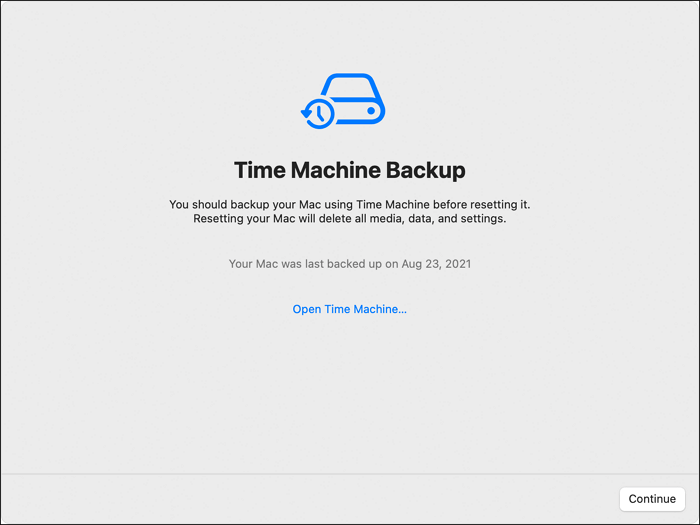
To erase your MacBook without going into Recovery Mode, you can use the macOS Erase Assistant on macOS Ventura and macOS Monterey. This method works slightly differently for each operating system. On macOS Ventura, you can open Erase Assistant from the Apple menu, select your MacBook, and follow the on-screen instructions.
Once you open the macOS Erase Assistant on your Mac, you can skip backing up since you've already done so, and proceed with the erasing process.
Then, here's what you're going to do:
Step 1. Press the Windows key + Tab keys to open Task View, and click on Task View to open the Task View window. Then, click on the Clear button to clear the Task View window.
Step 2. Once you press continue, there'll be a warning.
Step 3. Press on Erase All Content & Settings to confirm.
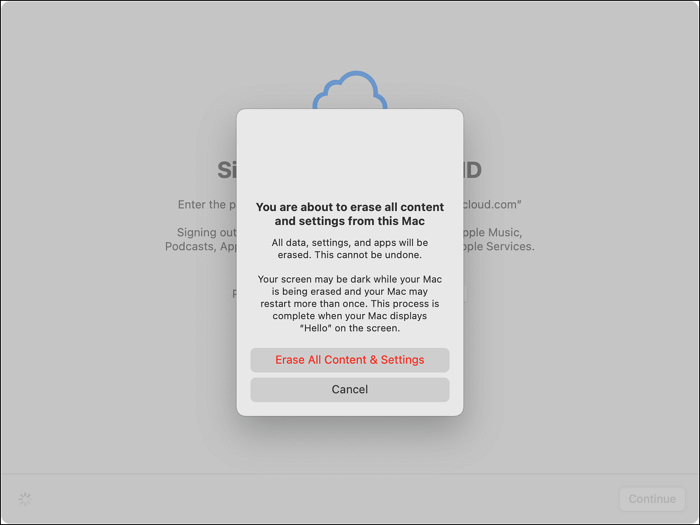
Step 4. Wait for it to progress and restart your MacBook Air.
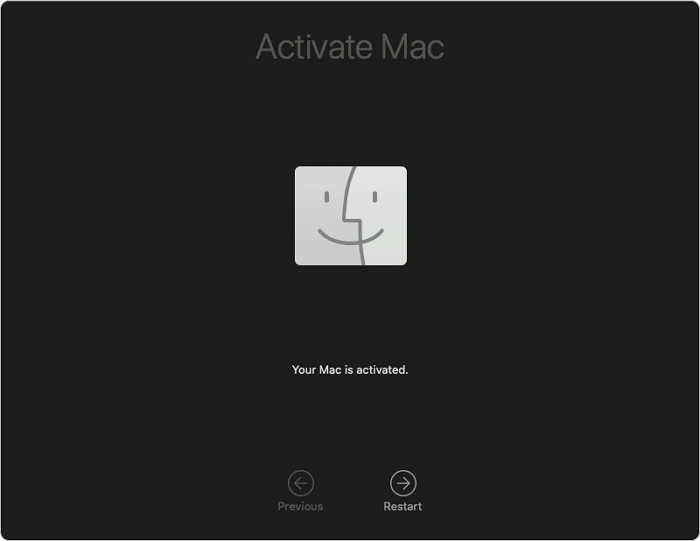
After confirming the reset, your MacBook Air's screen may go black for a few seconds as it resets various settings. Once complete, the device will restart, and you'll notice that all data and settings have been erased.
Restore Deleted Files After Reset MacBook Air to Factory Settings
After a factory reset on a MacBook Air, many users will find that their content is gone, which can be due to accidental deletion or lack of backup. To avoid this, it's essential to back up your files before performing a factory reset.
You can lose files even without a factory reset, so it's not just a factory reset that can result in file loss. A professional recovery tool like Deep Data Recovery for Mac is needed to recover files after a factory reset on a Mac.
The unique features of this product include its ability to combine multiple functions in one device, making it a convenient and space-saving solution for users. Additionally, its sleek and modern design makes it a stylish addition to any home or office. Furthermore, its high-quality materials and construction ensure durability and longevity, making it a worthwhile investment for those seeking a reliable product.
- Recover deleted files on a Mac due to virus attacks, malware infections, partition loss, and disk damage.
- You can recover deleted graphics, videos, music, audio, and documents after a factory reset by using data recovery software or a professional service. This can help you retrieve lost files and get back to where you left off.
- Recover lost data when macOS installation failed/stuck/frozen.
To launch a post-reset recovery for your data, you can follow these steps:
Step 1. Select file types
Launch Deep Data Recovery software, select the desired file types, and click "Next" to initiate the recovery process.

Step 2. Select the location to scan
Select the storage device where the data was lost, click "Scan" to begin the scanning process.

Step 3. Filter lost Mac data
The software automatically scans MacBooks and iMacs for lost data, and once the scan is complete, users can filter the recovered data by type and path to easily locate and retrieve their wanted files.

Step 4. Recover lost data or files
Double-Click a file to preview it, then click the "Recover" button to restore the lost data to another place.
Conclusion
To reset your MacBook Air to factory settings without a CD, start by backing up your data and signing out of your Apple accounts. This will prevent any account-related issues. Once you've taken care of that, you're ready to proceed with the reset.
To recover deleted files on a Mac, follow the steps: immediately stop using the Mac, download and install a reliable recovery tool like Deep Data Recovery for Mac, and follow the tool's instructions to scan and recover your deleted files. This will help you retrieve your files quickly and efficiently.
Reset MacBook Air to Factory Settings Without Disc FAQs
Here are some FAQs to answer your further queries:
Can I reset my MacBook Air to factory settings without a password?
To factory reset a Mac without a password, you'll need to perform a full reset. This involves erasing all data on the Mac, including the password. To do this, you'll need to boot the Mac in recovery mode, then select "Disk Utility" from the Utilities window.
- 1. Head into recovery mode.
- 2. Use the disk utility.
- 3. Select the Reinstall macOS option.
To reset your MacBook Air to its factory settings without needing a password, follow these steps: Start by turning off your MacBook Air. Next, hold down the power button for about 10 seconds to discharge the computer's power.
How do I restore my MacBook pro to factory settings without Recovery Mode?
You can use the built-To reset your macOS, you can use the built-in utility called macOS Erase Assistant, which can be found in the system preferences section of your system settings. From there, you can choose "Erase All Content and Settings," allowing you to reset your macOS without entering recovery mode.
How do I restore my Mac to factory settings without a disk?
There are two options to reset your Mac: boot into Recovery and select "Reinstall macOS", or use the macOS Erase Assistant in System Preferences. The first option is more reliable.
How can I entirely wipe my Mac to factory settings?
To completely wipe your Mac to factory settings, follow these steps:
- 1. Boot into recovery mode according to your mac device.
- 2. Use the Disk Utility option.
- 3. To erase the Macintosh HD (the primary volume), select it from the list, click on the "Erase" button, and confirm your action. The process will start, and you'll need to wait for it to complete.
- 4. Once done, reboot into recovery mode again
- 5. This time, select Reinstall macOS
- 6. Wait for it to finish and restart
To completely wipe your Mac device to factory settings, you'll need to boot into the built-in Recovery Mode. To do this, turn off your Mac, then press the power button while holding down the Command (⌘) + R keys.
Related Articles
- How to View and Clear Clipboard History to Windows
- Mac Format SSD: How to Format SSD on Mac [Step-by-Step Guide]
- Bypass "Administrator Blocked You From Running This App" in Windows 10 [Full Information]
- Clean C Drive without Formatting in Windows 10/8/7 [Tested & Worked]
- What is USB-C? [2022 All You Need to Know]
This article introduces the functions and features of USB and USB-C, providing an overview of what USB-C is and how it differs from regular USB and Thunderbolt. Keep reading to learn more about USB-C! - What Is VMM? Virtual Machine Manager Explained (All You Need to Know)
Learn what VMM means, how Virtual Machine Monitor works, and how it manages virtual machines, hardware resources, and system virtualization.