[2023 Tips] Update Not Found - The Requested Version of macOS Is Not Available
| Workable Solutions | Step-by-step Troubleshooting |
|---|---|
| 1. Download macOS Upgrade | As you're already on your browser, visit the Mac App Store webpage and hit...Full steps |
| 2. Restart Your Mac | Hit the "Apple icon" from the top-left corner of the mac screen to open the...Full steps |
| 3. Remove the Beta Profile | Hit the Apple icon, located at the top-left side of the screen, and choose...Full steps |
| 4. Restart Your Router | The best way is to reboot your router, which will help eliminate...Full steps |
| More Workable Solutions | Sync Your Date and Time Settings > Reinstall your macOS With the Latest Version...Full steps |
If you're trying to upgrade your macOS, but the requested version is unavailable, you're not alone. This issue can occur when attempting to upgrade from the Software Update option in system preferences or from the App Store, or even when trying to install the latest version directly.
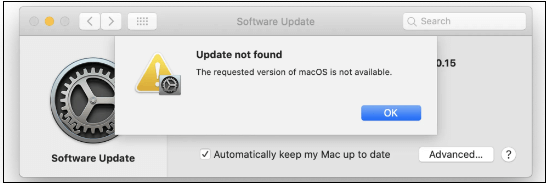
Update Not Found - The Requested Version of macOS Is Not Available
You need to resolve the update not found issue as soon as possible, as macOS updates include many exciting features and security updates that will help protect your Mac from malicious attacks and malware. So, if you're concerned about the requested macOS version being unavailable, we're here to help!
This article provides comprehensive solutions to various Ventura update errors, including the issue where the requested macOS version is unavailable. Let's dive in and explore the possible fixes.
The Requested Version of macOS Is Not Available (Why)
Apple regularly releases macOS updates to enhance security, stability, and performance. However, some users encounter an error message saying "the requested version of macOS is not available Ventura" when trying to update to the newest version, hindering the download process.
The probable reasons that obstruct you from installing the newest macOS update include your Mac's inability to support the latest version, corrupted system files, a full disk, or a software issue preventing the installation process. Additionally, outdated or incompatible software, hardware problems, or a previous failed update attempt could also be the cause.
- Unstable network connection.
- The Apple software updater doesn't work.
- The Mac version is too outdated to update.
- Inadequate storage space for installing the newest update.
- If your macOS is unable to detect or install updates, try restarting your computer, as this can resolve the issue. If the problem persists, check the Apple System Status page to see if there are any known issues with the update servers.
How to Fix Update Not Found - The Requested Version of macOS Is Not Available
If you're facing the error "the requested version of macOS is not available," it's likely because macOS Beta is installed on your Mac. To resolve this, you'll need to remove the beta version and then wait for the new update version to become available, similar to finding macOS on the App Store or public MacOS.
If you're experiencing issues with the macOS Monterey or Big Sur update not showing in the Software Update or the requested version being unavailable, there are possible solutions to resolve this error. You may consider doing a clean macOS install on a supported version of Mac, but if that's not feasible, you can try other troubleshooting steps to resolve the issue.
Then, you can follow the steps below to solve your problem.
Fix 1. Download macOS Upgrade from Mac App
The first possible fix to the error "update not found - the requested version of macOS is not available" is downloading the macOS upgrade from the Mac App Store, but not necessarily using this window to download the newest version of macOS.
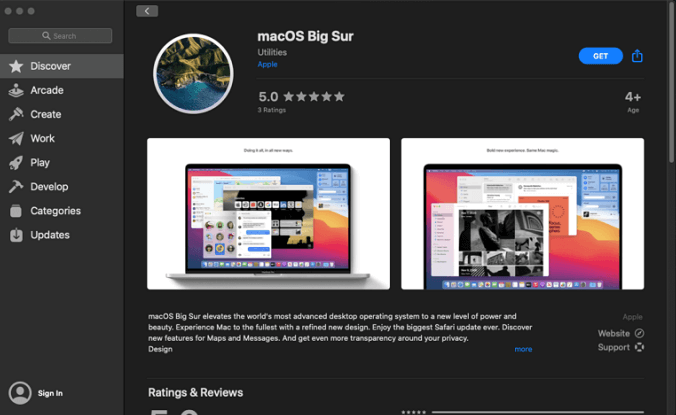
Apple allows you to download macOS updates, including Ventura or Big Sur, from the Mac App Store. To download the Big Sur update, follow these steps.
Step 1. Go to Mac App Store
- Visit the Mac App Store webpage, click on "View in Mac App Store" and it will open the macOS Big Sur page.
- To open the App Store, click the icon at the bottom-right edge of the system tray. Then, search for "macOS Big Sur" in the search bar.
Step 2. Download macOS Big Sur
- To download the Big Sur update, click the "Get" button on the Big Sur page of macOS and confirm your choice.
To resolve the error "the requested version of macOS is not available", it's best to update to the latest version of macOS if you've already discovered the update. This should fix the issue.
Fix 2. Restart Your Mac to Fix Update Not Found Error
Restarting your Mac is a healthy habit that can help eradicate software bugs accumulating in the background, making it easier to get rid of technical glitches and OS-related issues. Unlike laptops, people tend to be less inclined to turn off or restart their PCs, but doing so can be beneficial for the device. To restart your Mac, follow these two straightforward steps:
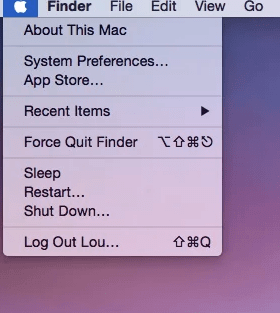
Step 1. To open the drop-down menu, click on the Apple icon located at the top-left corner of the Mac screen.
Step 2. Hit the "Restart" button by moving your mouse down.
The fastest reboot is the most efficient way to resolve software issues.
Fix 3. Remove the Beta Profile from Your macOS Ventura/Monterey/Big Sur
To eliminate the beta profile from your macOS Big Sur, go to the Apple menu, select System Preferences, click on Users & Groups, then select your username, click on the lock icon and enter your password, click on the "Edit" button next to your username, click on the "Login Items" tab, select the beta profile and click the minus button to remove it, then restart your Mac. This should resolve the issue.
Step 1. To access the System Preferences, click on the Apple icon located at the top-left side of the screen and select "System Preferences" from the dropdown menu.
Step 2. To update your software, search for "Software Update" at this stage and select the option.
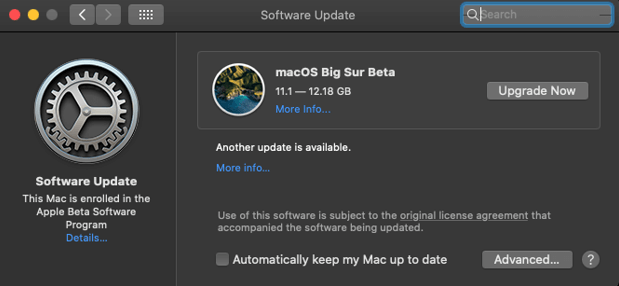
Step 3. Wait a few seconds for the software update to appear, or press Command + R to refresh the window. If it appears, select "Details" to proceed. If not, wait a few seconds or refresh the window again.
Step 4. To exit the Apple Beta Software Program, hit the "Restore Defaults" option when a pop-up menu appears. This will reset the program to its original settings and allow you to leave the beta testing process.
To resolve the issue of the macOS Big Sur update not being encountered, restart your Mac after retrieving the settings back to their default orientation and departing the beta program. This ensures all necessary changes are made to your PC.
Fix 4. Restart Your Router to Fix the Requested Version of macOS Is Not Available
Give your router or modem a rest by rebooting it to resolve network issues, or the problem might be a faulty connection to Apple's server preventing the macOS update.

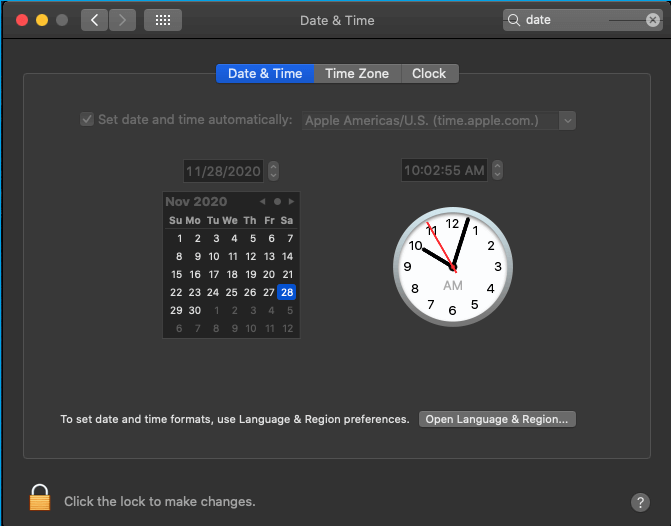
Fix 5. Sync Your Date and Time Settings
To sync your date and time settings, follow these steps:
Step 1. Hit the Apple menu and open System Preferences.
Step 2. Choose a date and time from there.
Step 3. To set the date and time automatically, press the lock icon at the screen's bottom-left edge and select the option "Set date and time automatically".
Once you have executed the previous steps, proceed to search for the available Big Sur update on your Mac.
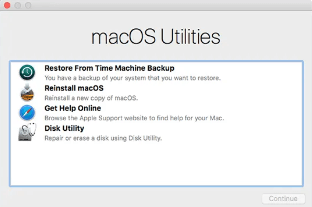
Fix 6. Reinstall your macOS With the Latest Version
Reinstalling macOS might help install the latest version, which can resolve the "update not found - the requested version of macOS is not available" error. This process will only affect system-based files and won't touch personal files. To reinstall macOS with the latest version, such as macOS 13 Ventura, follow the steps below.
Step 1. To reset your Mac, you'll need to restart it while holding down the Option, Command, and R keys. Press and hold these keys simultaneously until you see a globe or the Apple logo appears. Then, release the keys.
Step 2. Type your password if required. However, you must be in the macOS utility window when you're done with the credentials.
Step 3. Choose the "Reinstall macOS" option from the list of available choices on the screen.
Extra Tips: How to Recover Data After macOS 13/12/11/10 Update
If you're looking for a professional data retrieval software for Mac, Deep Data Recovery is a helpful tool that can retrieve lost data from unexpected deletion or an emptied trash bin.
If you experience data loss due to a macOS installation error, you can use Deep Data Recovery for Mac to restore your mislaid files. This software offers a range of top recovery features, including streamlined functionalities that power your Mac data retrieval. These features can help you recover your lost data.
- Recover lost photos after upgrading to macOS Ventura/Big Sur/Catalina/Mojave
- Run Mac data recovery, MacBook recovery, and Mac Trash recovery with simple steps by using a reliable Mac data recovery software, following the on-screen instructions, and selecting the desired recovery mode to recover lost or deleted files, documents, and other data from your Mac device.
- If you've accidentally deleted files from your Mac's SD card, hard drive, USB, or other storage devices, don't worry - you can recover them. You can use data recovery software like Disk Drill, Deep Data Recovery Wizard, or Stellar Data Recovery to scan your device and retrieve deleted files.
Step 1. Select file types and click "Next" to start
Launch Deep Data Recovery on your Windows computer. Select the file types you want to recover and click "Next" to proceed with the recovery process.

Step 2. Select the location
After updating to macOS Ventura/Monterey/Big Sure/Catalina, select the disk where you lost data and click "Search for lost files".

Step 3. Find lost data after the scan
Deep Data Recovery for Mac scans the selected disk volume, displaying the results in the left pane, allowing users to find specific data using file type and file path.

Step 4. Recover data after macOS update
Select the target files that were unknowingly lost during or after the update and click the "Recover" button to retrieve them all.
Conclusion
If the requested macOS version is unavailable, try these 6 fixes. The steps are straightforward, but may take a while depending on your hardware and internet connection. If you've lost data during an update to macOS 13/12/11/10, consider using Deep Data Recovery for Mac to recover lost videos, audio, photos, emails, and documents.
The Requested Version of macOS Is Not Available FAQs
The error: update not found - The requested version of macOS is not available. This message may occur at any time. Here are some FAQs to know:
1. What Mac is compatible with Ventura?
Apple has affirmed that Ventura supports these Macs:
- MacBook models from 2017 or later.
- MacBook Pro models from 2017 or later.
- iMac Pro (all models).
- MacBook Air models from 2018 or later.
- Mac Pro models from 2019 or later.
- Mac mini models from 2018 or later.
2. How do I upgrade my Mac to Big Sur?
When the general release of the update is available, your Mac will notify you. To update, click the "Install Now" button on the notification, or go to the Apple icon, select System Preferences, then Software Update to manually search for an update.
3. Missing photos after the macOS Ventura update, how to recover?
To retrieve missing photos after the Ventura update, follow these steps. You can get your lost photos back by checking the Photos app, looking for the "Media" folder, and then searching for the missing photos within the app.
- Run Deep Data Recovery for Mac to scan and recover lost photos. The software will search for and identify deleted or lost images on your Mac, allowing you to recover them with ease.
- Retrieve lost images after the Ventura update with iCloud.
- Visit photos > settings.
- Choose the iCloud tab.
- Opt for iCloud photos.
4. How to fix macOS 13 Ventura installation failed?
To resolve macOS 13 Ventura installation failure, you can remove the Beta Profile from your macOS Ventura.
Related Articles
- What Is CDR File and How to Open & Convert It? [Full Description]
- A Beginner's Guide | How to Install Hard Drive in PC?
- 6 Solutions to Fix Unmountable Boot Volume Windows 10/8/7
- Fix 'Restoring Your Previous Version of Windows' Stuck/Loop in Windows 10
- How to Change Boot Drive Windows 10? [Updated 2024]
This guide will show you how to change the boot drive of Windows 10 using two methods: the recovery tool and BIOS settings. Follow the step-by-step guide to learn how to switch the boot drive using these methods. - How to Change Your IP Address on Computer
This guide will teach you how to change your IP address on a computer, whether a Mac or Windows system. In addition, you will learn how to change your public IP address when you need to.