How to Install Python Mac on macOS Sonoma/Ventura
If you're not familiar with programming languages, you might not know about Python, but its numerous benefits make it a favorite among programmers. If you want to install Python on a Mac, it's definitely worth considering, given its wide range of advantages.
Python offers numerous advantages, and using it on a MacBook Pro/Air is also beneficial. It has extensive libraries and is easy to learn, making it a great choice for developers. Additionally, being platform-independent, Python runs smoothly on Mac, regardless of the operating system, whether it's macOS Sonoma or Ventura.
The Unix-based foundation of Mac provides a fantastic coding experience, making it ideal for Python programming. The powerful hardware and software allow programmers to enjoy a smooth and efficient coding experience. This guide will walk you through the process of installing Python on Mac and running Python scripts.
Check Preinstalled Python on Mac
To check if Python is installed on your system, follow these steps:
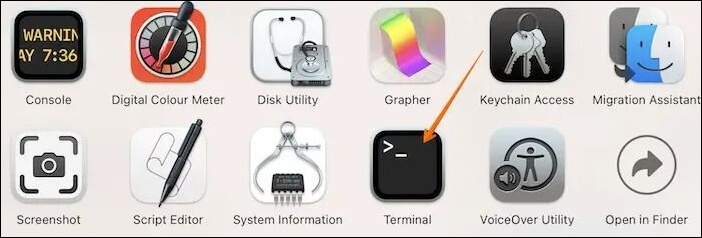
Step 1. Open "Terminal". To do so, please follow the path "Applications>Utilities>Terminal".
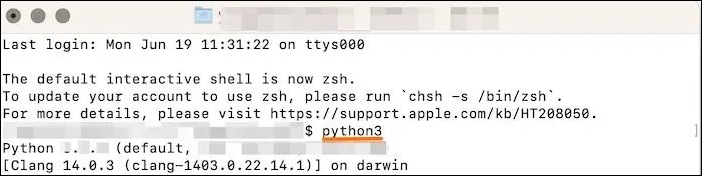
Step 2. Type python3.
Step 3. If you see the message "Python 3.x.x", it means Python is already installed, and "3.x.x" indicates the version number of Python installed.
Step 4. If you get an error message that Python is not found, it is not pre-installed, meaning you need to install it first.
Use Official Installer to Install Python Mac
Installing Python on a Mac can be done in a few ways, but one of the simplest methods is to download it directly from the official Python website.
For that, here are the steps to follow:
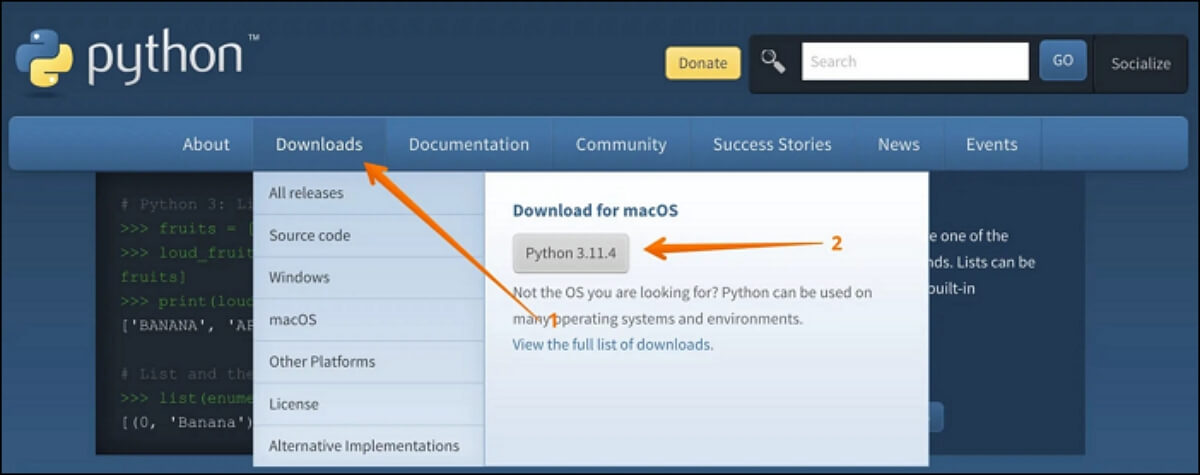
Step 1. Visit the Python official website: Python.org.
Step 2. Click the "Downloads" button on the website menu, then select the Python version under the "Download for macOS" label to download the latest macOS version.
Step 3. Go to the "Download" folder.
Step 4. Locate the python-macosx.pkg file and double-click on it.
Step 5. Now wait as the Python installer initiates the process.
Installing Python on a Mac is a straightforward process that can be completed in a few steps. First, you'll need to download the Python installer from the official Python website.
Install Python Mac Using Terminal
Installing Python on a Mac can be done through the Terminal, which is a popular and efficient tool among Mac users. To do this, you can use Xcode and Homebrew commands to install Python on your system.
Method 1. Install Python M1 Mac Using Xcode
To install Python using Xcode on your Mac, open Xcode, go to the "Window" menu, select "Devices", and click the "+" button to add a new device. Choose "Simulator" and select the Python version you want to install, then click "Install".
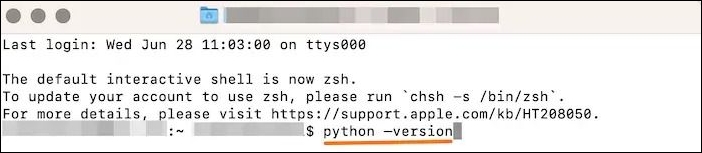
Step 1. Open "Terminal" and type python –version.
You'll see a message saying that no developer tools were found at '/Applications/Xcode.app' and that it's requesting to install them. You'll be prompted to download the command line developer tools via a dialog.
You can also get a prompt asking you to install command-line developer tools.
Step 2. Click the "Install" button.
Step 3. If you don't get the prompt, enter $ xcode-select –install. This will install Python 3 on your Mac.
How to Fix Zsh: Command Not Found: Python [with Video]
If you're experiencing the "zsh: command not found: python" issue on your Mac, there are 4 proven ways to resolve it. Firstly, you can try updating your Python installation using Homebrew, which is a package manager for macOS. Alternatively, you can add the Python executable directory to your system's PATH environment variable, which will allow you to run Python commands from anywhere.
Method 2. Install Python M2 Mac with Homebrew
Homebrew, a free and open-source software package management system, can also be used to install Python on Mac. This simplifies the process of installing software on macOS.
Here are the steps to follow:
Step 1. Install Homebrew on your Mac, and open "Terminal" on Mac.
Step 2. Install Homebrew to Path. Type 1 |$ export PATH="/usr/local/opt/python/libexec/bin:$PATH.
Step 3. Type 1 | $ brew install python to install Python.
Mac Terminal can be intimidating for novice users, as it can lead to accidental file deletions if not used carefully.
You can't recover permanently deleted files on a Mac using Terminal unless you use a professional data recovery tool like Deep Data Recovery for Mac, which can recover deleted files by command line.
You can quickly restore data with a few clicks using the Qiling data recovery software.
Step 1. Launch Deep Data Recovery for Mac, select the hard drive where data was lost, and click "Search for lost files" to initiate scanning.

Step 2. The software scans a MacBook/iMac for lost data, and once the scan is complete, users can filter the recovered data by type and path.

Step 3. To recover lost data, double-click on the file to preview it. After previewing, click the "Recover" button to restore the lost data to a designated location.
Deep Data Recovery for Mac Review [Update in 2023]
Deep Data Recovery for Mac has received positive reviews from customers, who praise its powerful recovery ability and main features. The software is designed to recover lost data from various types of storage devices, including Mac hard drives, external hard drives, and USB drives. Its ability to recover deleted files, formatted drives, and corrupted data has been particularly praised by users.
Run Python Script on Mac to Check the Installation
After installing Python on your Mac, you can verify the installation by running a Python script in Terminal. To do this, follow these steps:
Step 1. Open "Terminal".
Step 2. To locate the directory, use the `cd` command followed by the path to the directory. For example, `cd ~/scripts` will change the current directory to the one located at `~/scripts`.
Step 3. You will now go to the scripts directory.
Step 4. To run the Python script, open your terminal and type `python3 HelloWord.py` (assuming the script is named HelloWord.py), and press Enter. This will execute the script and display the output.
Step 5. To verify that Python is installed and working properly on your Mac, you can run the following command in your terminal: `python --version`. If Python is installed, you should see the version number printed out.
If the Python installation on Mac fails, it's likely due to either insufficient storage or permission issues. To resolve this, first check the available RAM on your Mac and free up some storage space to allow for a successful reinstallation of Python. Alternatively, you can check the installation permission on your Mac to ensure it's not a permission-related problem.
Conclusion
Installing Python on Mac is an excellent idea, offering numerous benefits. The process is also straightforward, regardless of your macOS version, making it easy to get started.
To download and install Python, one can visit the official Python website to obtain the installer, or alternatively use Terminal on a Mac to install it via XCode or Homebrew, which involves following straightforward steps and results in a seamless installation process.
Install Python Mac FAQs
If you're curious about installing Python on your Mac, you'll find helpful answers to your questions listed below.
1. How do I install Python 3 on a Mac Terminal?
To install Python 3 on a Mac Terminal, open Terminal, type "python –version", and follow the prompt to download the command line developer tools.
To install Python 3 on your Mac, follow the prompts to download and install the command-line developer tools, or enter $ xcode-select –install if you don't get the prompt, which will install Python 3 on your Mac.
2. Is Python automatically installed on Mac?
Python is no longer pre-installed on Macs. Previously, Macs came with a pre-installed Python 2.7, but this is no longer the case. However, you can easily install Python on your Mac by downloading it from the official Python website or using Terminal commands.
3. Where is my Python installed on my Mac?
To find Python on your Mac if it was preinstalled, follow these steps:
Step 1. Open the Terminal using the "Spotlight Search" or navigate to "Applications > Utilities > Terminal".
Step 2. You can also use the command `python3 --help` for more information about the Python 3 interpreter.
Step 3. To find the path to the Python executable file on your Mac, type the command `import sys; print(sys.executable)` and press "Enter" in the terminal. This will print the path to the Python executable file, which is the path to the Python interpreter on your Mac.
4. How to uninstall Python on Mac?
To uninstall Python on a Mac, you'll need to delete the Python installation files, remove any associated configuration files, and then remove the Python framework. This can be done by running a few terminal commands.
Step 1. To access the "Applications" folder in Finder, go to the top menu bar, click on "Go", and select "Applications".
Step 2. If you see a pop-up asking permission to move Python files to the Bin, give it permission. Drag the Python folders to the Trash, and then empty the Trash. This will remove all Python files and folders from your system.
Step 3. After that, delete the Python framework from the Library Directory.
5. How to update Python on Mac?
To update Python on Mac, use the official Python installer. Once your macOS is detected, download the latest Python version for your system, then double-click on the install package and follow the on-screen instructions to begin the installation. After installation, verify that the Python version you installed is working correctly.
6. How to fix the Python command not found on Mac?
To fix the "Python command not found" issue on Mac, first verify that Python3 is installed. If it is, try running commands with "python3" instead of "python" in Terminal. Additionally, ensure the Python path is correctly set.
Related Articles
- Fix A Device Which Does Not Exist Was Specified [100% Working Solutions]
- How to Fix It: Your Hard Drive Is Full Battle Net
- Hard Drive Not Spinning? Causes and Fixes Here!
- Why Is My SD Card Suddenly Blank | How to Fix Blank SD Card?
Have you ever inserted an SD card only to find it blank? This phenomenon can be frustrating, but there's a solution. This article provides a detailed guide and explanation, and offers eight efficient ways to recover your SD card and get it back to its original state. - What Is Microsoft Update Health Tools? Everything You Need to Know
Microsoft Update Health Tools are a vital aspect of Windows Update. In this article, we'll explain its origins, release, purpose, and importance. One such aspect is Microsoft Update Health Tools. So, what is it? What does it do? And, how does it work? These are common questions from people who see this first time. Today, we'll answer them all. - What Is Minimum Processor State? Everything You Need to Know
The Minimum Processor State functionality is available under the Power options of windows system settings. In this guide, we will introduce you to the ways to set, add or remove the Minimum Processor State in your Windows 10/11.