How to Factory Reset Terminal on Mac [Bash and Zsh]
| Workable Solutions | Step-by-step Troubleshooting |
|---|---|
| Fix 1. Factory Reset Terminal on Mac with Reset Option | How to factory reset the Terminal on Mac? If you're worried about this, two primary ways are to...Full steps |
| Fix 2. Reset Terminal Preferences on Mac in Library | For the majority of users, hard or soft resetting the shell resolves any issues with the Terminal...Full steps |
What Is Terminal on Mac
You must be well-As a software developer, IT engineer, or someone in a related field, working with the Terminal app on a Mac is likely second nature. However, if you're new to these interfaces, don't worry - this article is here to help! Whether you're just starting out or looking to brush up on your Terminal skills, this guide will walk you through the basics and beyond, so you can become a conversant user in no time.
The Terminal on a Mac allows users to operate scripts and system commands by directly typing them into the computer, bypassing the need to click on desktop icons. This application, also known as the Command Line Interface (CLI), is used by technical users and network administrators to perform actions that are not supported by the graphical user interface (GUI) of the operating system.
Here are the top 2 methods to reset the Terminal on macOS, along with opening Terminal on Mac in 3 ways: You can reset Terminal on Mac by deleting the Terminal preferences file, which can be done by running the command `rm ~/Library/Preferences/com.apple.Terminal.plist` in Terminal.
How to Reset Terminal on Mac in Two Ways
Being a handy tool for commanding your Mac, the Terminal can be opened and reset in feasible ways. Therefore, the top 3 ways are the following to open the terminal on Mac, and the top 2 ways are given if you're wondering how to reset the Terminal on Mac!
1. How to Open Terminal on Mac in 3 Ways
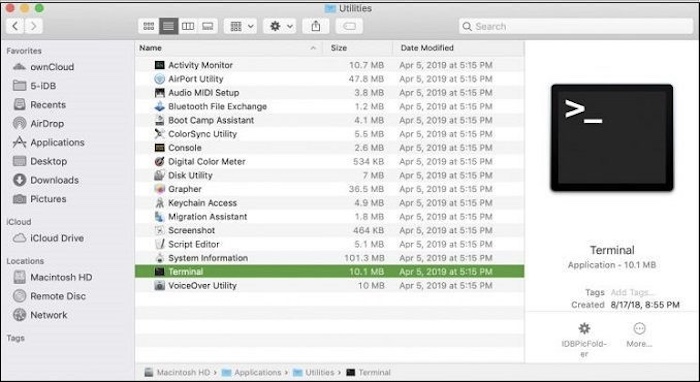
Method 1. Open Terminal with Finder
To open a Terminal on Mac, you can use Finder by clicking on the "Finder" icon in the menu bar, which is usually located at the top left corner of the screen, and then navigating to the "Applications" folder, and finally clicking on the "Terminal" app. Alternatively, you can use Spotlight by pressing Command + Space, typing "Terminal", and selecting the app from the search results. If you're using a trackpad, you can also use a three-finger tap to open the Terminal.
Step 1. Select "Go" and click "Utilities" from the menu bar.
Step 2. Double-click on the "Terminal" once the utility folder opens.
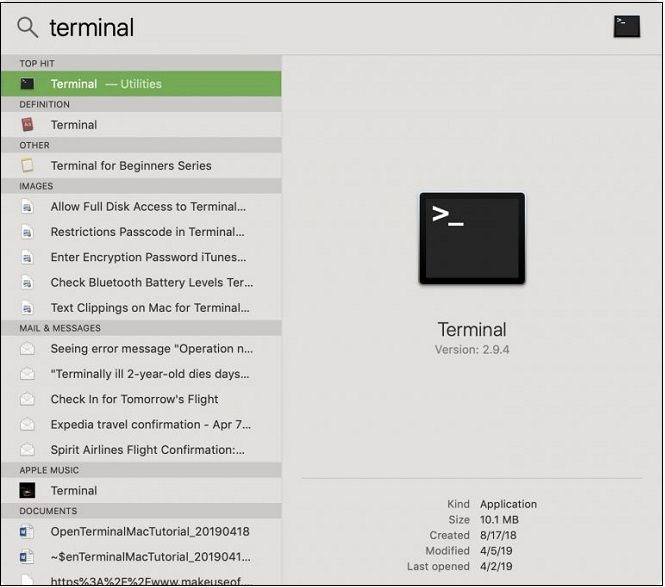
Method 2. Open Terminal with Spotlight
To open Terminal using Spotlight on a Mac, follow these steps: Simply press Command + Space to open Spotlight, type "Terminal" in the search field, and press Enter to open the Terminal application. This method allows you to quickly access Terminal from anywhere on your Mac.
Step 1. To search using Spotlight, click on the Spotlight search button available on the menu bar, or use the keyboard shortcut Command + Space.
Step 2. It would help if you typed "Terminal" on the search bar.
Step 3. To open the Terminal app, double-click on the Terminal icon in the "Top Hit" section of your computer's menu bar.
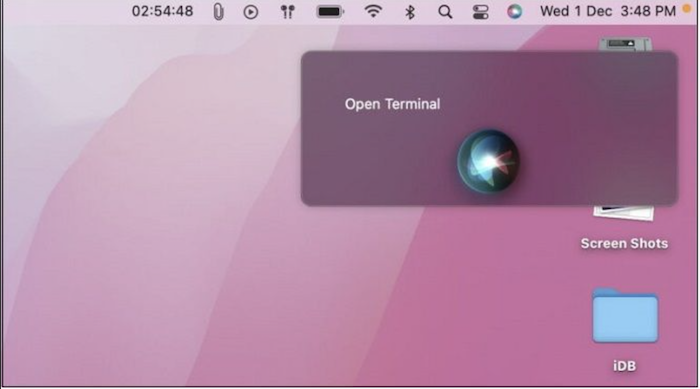
Method 3. Open Terminal with Siri
To open Terminal on Mac using Siri, you can say "Hey Siri, open Terminal" or "Hey Siri, open Terminal app." This will open the Terminal app on your Mac, allowing you to access and use the command line interface. You can also customize the command to fit your preferences.
Step 1. To launch Siri, press and hold the Siri button on your iPhone, or you can open Siri from the Applications folder on your iPhone.
Step 2. The terminal can be opened using the voice feature ("Open Terminal" on the microphone) or keyboard shortcuts (e.g.
2. How to Factory Reset the Terminal on Mac?
To reset your Terminal on a Mac, you can choose from two methods. Before attempting either, it's a good idea to back up your important files with a data recovery software like Qiling. Once your files are safe, you can follow the steps to reset or hard reset your Terminal, which can be found in a tutorial. This will allow you to easily restore your Terminal to its original state.
Back Up Your Mac and Never Lose Data
You can back up and restore your MacBook or iMac without relying on Time Machine, iCloud, or external hard drives. To do this, you can create a bootable clone of your startup disk using the built-in "Disk Utility" app, which allows you to restore your system to a previous state in case of a problem.
Fix 1. Factory Reset Terminal on Mac with Reset Option
To factory reset the Terminal on a Mac, you can either delete all the commands you have run from the Terminal window or reset the shell. You can delete all commands by quitting the Terminal, then deleting the contents of the Terminal's history file, typically located at ~/.bash_history. Alternatively, you can reset the shell by running the command "bash --norc" in the Terminal, which will start a new shell without loading any configuration files. This will effectively reset the Terminal to its factory settings.
Factory Reset Terminal on Mac by Resetting Shell
There are two ways to reset the shell: a normal reset, which is a standard procedure, and a hard reset, which is a more extreme measure that should be used only when necessary.
Step 1. You need to open the Terminal application on your macOS.
Step 2. The shell option must be enabled by tapping on it, which can be found in the menu bar.

Step 3. Now, hit the "Reset" option from the menu; otherwise, you may type on your Mac keyboard the option+command+R key.
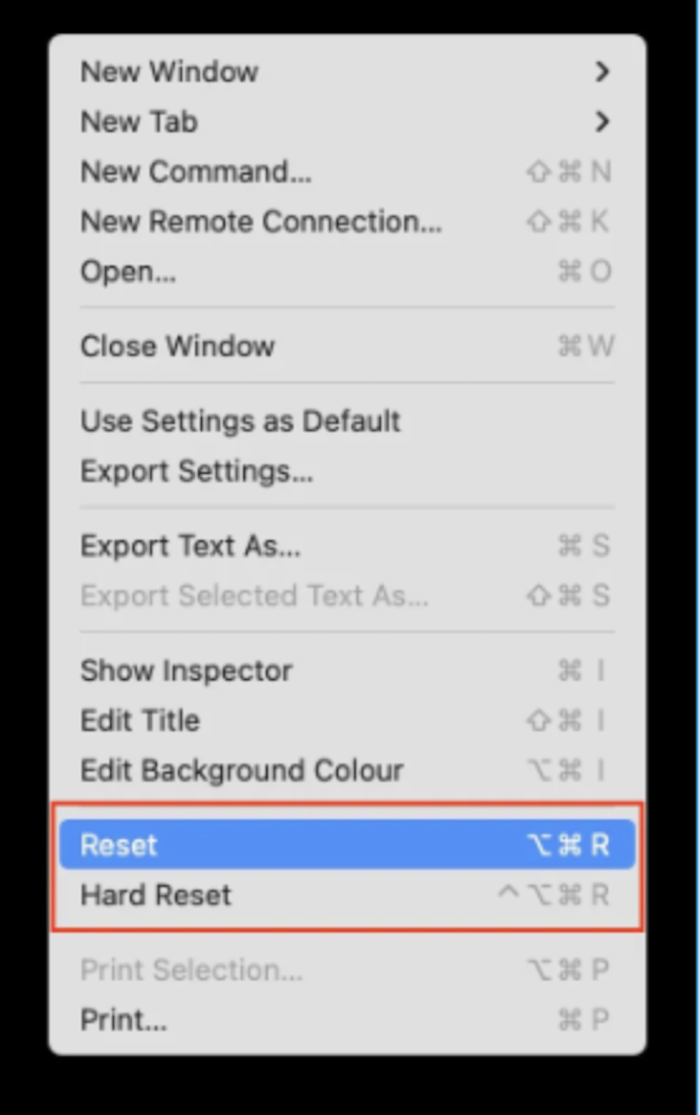
The steps to reset the Terminal State will not show any divergence on the Terminal screen.
Factory Reset Terminal on Mac by Hard Reset Shell
To hard reset your Mac, press and hold the Power button until the computer turns off. Then, press and hold the Power button again until the computer turns back on. This will clear the Terminal screen of any lingering commands. Alternatively, you can also press Command (⌘) + Option (⌥) + Esc to open the Force Quit Applications window, and then select the Terminal app to force quit it.
Step 1. The Terminal needs to be opened on your Mac.
Step 2. Similarly, opt for the shell option from the menu bar.
Step 3. To initiate a hard reset, you can either tap on the reset button instead of pressing it, or use the keyboard shortcut control + option + command + R on a Mac.
A hard reset on a Mac will completely erase all data and content, including the Terminal screen, resulting in a blank black screen once completed.
To reset terminal preferences on a Mac in the Library, navigate to the Terminal app, select "Terminal" from the top menu bar, and choose "Preferences." In the Terminal preferences window, click on the "Profiles" tab, select the profile to reset, and click "Duplicate" to create a copy. Then, click "Edit" next to the profile and select "Delete" to remove it, and finally click "Save" to save the changes.
For most users, resetting the shell resolves Terminal issues, but if that doesn't work, refreshing Terminal Preferences may still resolve the problem.
To reset Terminal Preferences on a Mac, you can delete the Terminal Preferences file from the Preferences folder. This can be done by going to the Terminal application, then using the "rm" command to delete the Terminal Preferences file. The file is located in the ~/Library/Preferences folder. After deleting the file, restart the Terminal application to see the changes.
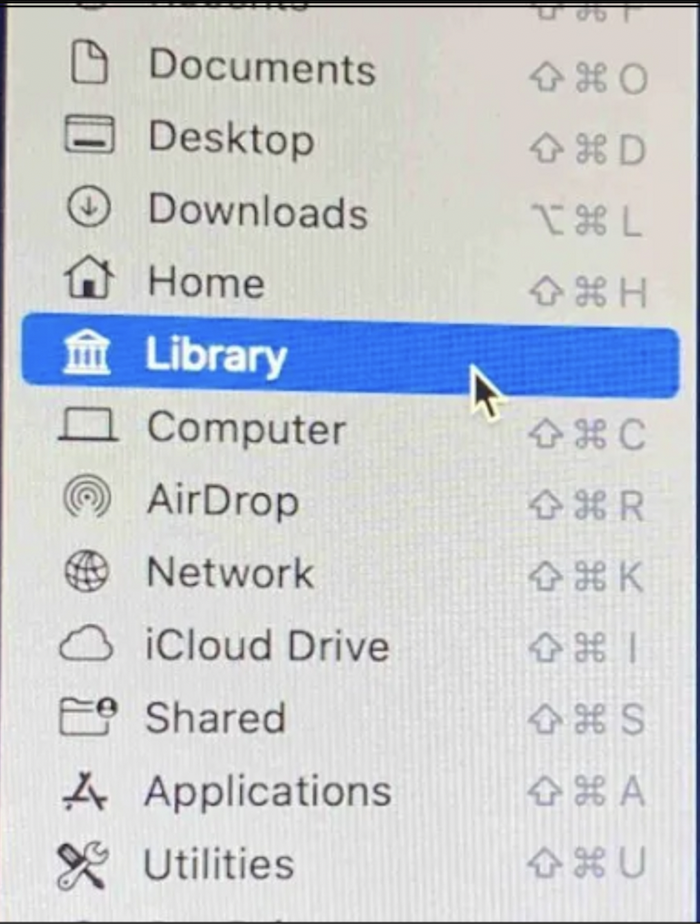
Step 1. To access the Library folder on your Mac, press and hold the "Option" key while navigating to the "Go" menu in the top menu bar, then select "Library". This will reveal the Library folder, which you can then open immediately.
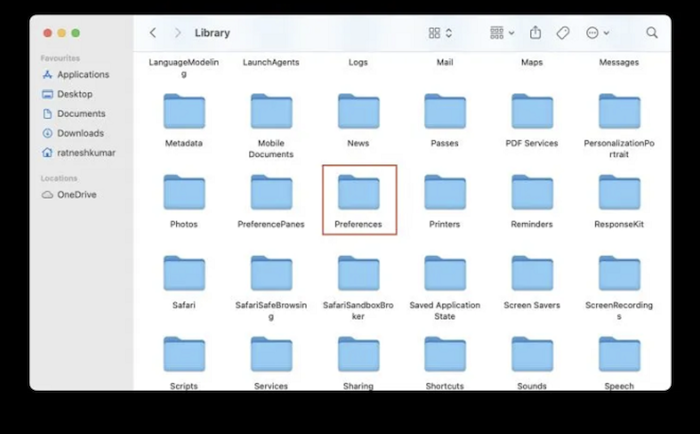
Step 2. To view all the preference files for the applications installed on your Mac, go to the "Library" option and search for "Preferences", then open it. This will display all the preference files for the applications you have installed on your Mac.
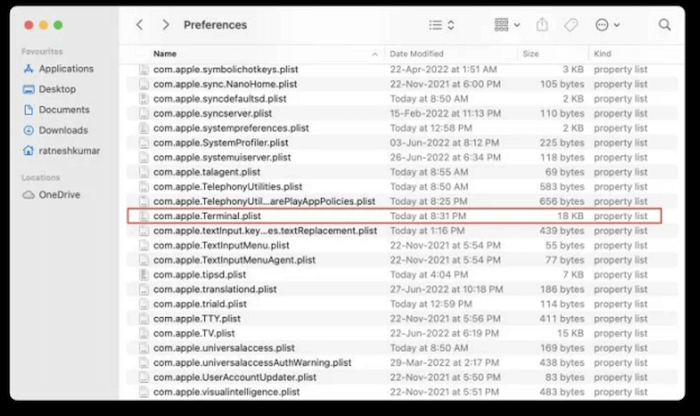
Step 4. If you're unable to locate the "com.apple.Terminal.plist" file in the preferences folder, try searching for it by tapping on the search icon at the top left side of the screen. This should help you find the file.
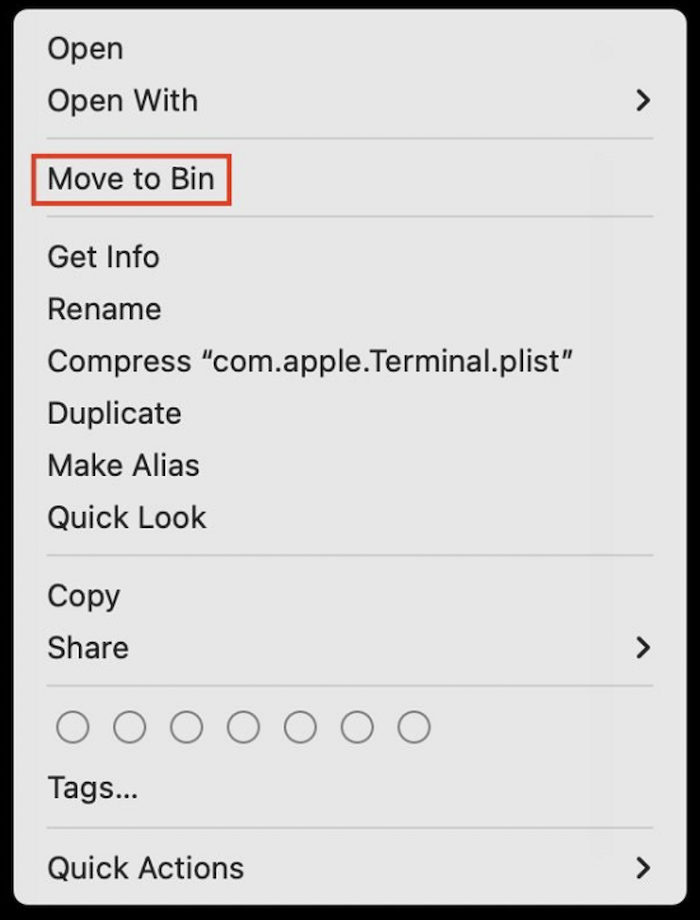
Step 5. Once you've located the file, right-click it and choose "Transfer to Bin" from the context menu.
Step 6. To reset Terminal on a Mac, you need to open the Terminal app, then type in the following command and press enter: "defaults delete com.apple.
Bonus Tip: How to Delete Files on Mac with Terminal
To delete files on a MacBook using Terminal, follow these steps: First, open Terminal on your MacBook. Then, navigate to the directory where the file you want to delete is located using the 'cd' command. Next, use the 'rm' command followed by the file name to delete the file. If you want to delete multiple files at once, separate the file names with a space.
Step 1. Use the Finder window to open Applications and then open Utilities on your Mac to access Terminal.
Tip: To launch Spotlight, press Command + Space, type Terminal, and then press the Enter key.
Step 2. Type "rm" followed by a space, then drag and drop the file you want to delete into the Terminal window.
Step 3. After pressing Enter, the file will be deleted forever.
Recover Terminal Deleted Files on Mac with Software
Have you ever accidentally deleted files on your Mac? If so, you're probably wondering how to recover them. Fortunately, there's a solution. Instead of using the Terminal for a factory reset, you can use a professional file recovery tool like Deep Data Recovery to retrieve lost files after an unexpected deletion. This software is specifically designed for Macs and can help you recover endless lost files.
The Qiling Mac data recovery software can retrieve various files and folders of any size, from a single Office Word document to a large number of images, and handle different data loss scenarios, including various files and folders of any size.
- Formatting
- Hard drive damage
- macOS wrongly retrieved
- Virus attack
- Partition errors
- Unmounted drive
The Qiling Data Recovery Tool can retrieve various types of files, including documents, images, videos, audio files, and more, allowing users to recover a wide range of lost or deleted data.
- Photo - NEF, RAW, NRW, JPG/JPEG, and others.
- Music - OGG, AIF/AIFF, RealAudio, APE, etc.
- Document - PDF, DOC/DOCX, XLS/XLSX, etc.
- Video - RM(RMVB), MP4, 3GP, MXF, etc.
There are detailed steps for operation:
Step 1. Search for lost files
To search for lost files on macOS Sierra, High Sierra, Mojave, Catalina, Big Sur, Monterey, Ventura, and the latest Sonoma, select the disk location where you want to search, such as an internal HDD/SSD or a removable storage device, and click the "Search for lost files" button.
Note: Before recovering data, it's recommended to create a backup of your Mac using the "Disk Backup" feature to prevent further data loss. This backup can then be used to recover data, allowing you to write new data to your computer again.

Step 2. Go through the scanning results
Deep Data Recovery for Mac will immediately scan your selected disk volume and display the scanning results.

Step 3. Select the file(s) and recover
Select the file(s) you want to recover and click the "Recover" button to restore them.

Summary
The Terminal program for Mac allows users to execute operating system-level commands to perform various tasks, troubleshoot issues, and gain insights into their system, making it a powerful tool for Mac users.
The Terminal on a Mac allows for the execution of a virtually infinite number of commands and scripts. It can be set up in various ways, and resetting it can be done using the procedures outlined above.
If you've accidentally deleted a file, don't worry - you can restore it using the Qiling Data Recovery Tool for Mac. This tool can help you recover files that were lost due to resetting Terminal, so you can breathe a sigh of relief and get back to work.
1
Reset Terminal on Mac FAQs
Here are the FAQs about resetting the Terminal on a Mac in one paragraph:
1. Is the Mac Terminal the same as the command prompt?
The Terminal app on a Mac is a command line interface that allows users to interact with the operating system through text-based commands. This interface is also known as a command prompt, and a terminal application operates it, enabling users to enter commands. The Terminal app is a type of terminal that displays open text-mode applications, and it can be used to manage a Mac by executing commands.
2. How to recover deleted files with Terminal on Mac?
You can recover deleted files from your hard drive, including those that have been sent to the Mac trash, using Terminal on your Mac. This process allows you to retrieve files that have been mistakenly deleted or removed. The steps for doing so involve using Terminal, which enables you to recover deleted files and support Mac trash recovery.
Step 1. To access the Terminal on a Mac, launch the Utilities folder and then open Terminal. Then, type the command "cd .Trash" and press Return to navigate to the Trash folder.
Step 2. The command "ls -al ~/.Trash" is used to list the contents of the trash folder in a detailed format. The "ls" command is used to list the files and directories in a directory, and the "-al" options are used to display the file and directory information in a long format, including permissions, ownership, and timestamps.
Step 3. To move a file, enter `mv` followed by the filename and the destination path, separated by a space, and press Return. For example: `mv filename../` and press Return. You must enter the complete file name in the command line for this method to function.
Step 4. Type "quit," and this command ends a Terminal session.
3. How do I reset my Terminal on macOS Ventura?
To reset Terminal on your macOS Ventura, launch Terminal, select Shell in the menu bar, and tap Reset, or use the keyboard shortcuts option+command+R to restart.
4. Should I use Bash or Zsh on Mac Terminal?
The Z shell, or zsh, is a Unix Terminal that adds more features to bash, which is macOS's standard shell. This is why using zsh over bash is recommended. Zsh was built on top of bash, giving it more functionality.
Kali Linux and macOS use zsh as their native shell, offering features like plug-in support, personalization, theme support, and spelling check, giving users maximum control.
Related Articles
- Fix: Blue Yeti Not Recognized on Windows 10/11 [Step by Step]
- Mac Won't Update? Here Are 7 Ways to Fix macOS 13 Ventura Upgrade Failed
- [10 Fixes] Error 0x800701b1 Troubleshooting on Windows 11/10
- Reset MacBook to Factory Settings | Complete Guide in 2023
- Delete Files Using rm Command on Windows, Linux, and Mac
Learn what the rm command does on Linux, Mac, and Windows-like shells, and how to delete files safely from command line. - Samsung Portable SSD T7 Processes Fast Transfer Speed with Robust Security
After the standard T7 and T7 Touch, Samsung has released the Samsung portable ssd T7, a new SSD in its rugged line of portable SSDs. Is this SSD good? this guide contains all details about the Samsung portable ssd T7. Continue to read and learn.