Mac Won't Update? Here Are 7 Ways to Fix macOS 13 Ventura Upgrade Failed
| Workable Solutions | Step-by-step Troubleshooting |
|---|---|
| Fix 1. Restart Your Mac | Go to "Apple logo" on Mac. Go to the "Restart"...Full steps |
| Fix 2. Run a Virus Scan | Go to the "Apple" menu on Mac. Go to the "System Preferences"...Full steps |
| Fix 3. Check Internet Connection | Go to the Mac Wi-Fi connection. Go to the Mac Wi-Fi connection...Full steps |
| Fix 4. Check Your RAM | Go to the "Apple menu". Click on "About...Full steps |
| Other Practical Solutions | Check the Storage Space on Your Mac > Boot Your Mac in Safe Mode...Full steps |
macOS Ventura Update Failed with PKDownloadError Error
Mac devices receive regular macOS updates with improved features for professionals, businesses, and students. These updates are compatible with all Mac devices and can be easily installed over a stable internet connection. However, users may encounter issues such as a failed macOS 13 Ventura upgrade due to various reasons.

Some of the common Ventura updates failed error messages:
- App or system crashes
- Wi-Fi or Bluetooth not working
- Ventura is not able to boot
- Ventura set-up issues
- Failed Ventura installation
- Ventura stuck download
If you're encountering macOS 13 Ventura upgrade failed error messages, don't worry, as you can resolve the issue with some quick fixes. Let's move on to these fixes now.
7 Ways to Fix macOS 13 Ventura Update Failed
The macOS 13 Ventura upgrade failed error can be caused by various reasons depending on your Mac's state. Fortunately, there are different fixes for this update error that can be easily applied without assistance, allowing you to resolve the issue and successfully upgrade to macOS 13 Ventura.
macOS Ventura update supported system
To determine if your Mac can update to macOS Ventura, it's essential to know that the update is only possible for the following Mac systems:
- Mac Studio (2022)
- The MacBook Air (2018 and later), MacBook (2017), and MacBook Pro (2017 and later) are the models that support the Touch ID feature.
- Mac mini (2018 and later), Mac Pro (2019 and later)
- iMac (2017 and later), iMac Pro (2017)
Here's a one-paragraph summary of the solutions for the "Ventura update failed" error:
Fix 1. Restart Your Mac to Fix macOS 13 Ventura Update Failed
The first solution to resolve the macOS Ventura update failed error is to simply restart your Mac system. This can resolve software glitches and file system issues that may be causing the update to fail. To do this, simply shut down your Mac and then turn it back on. This quick restart can often resolve the issue and allow the update to proceed successfully.
- Go to "Apple logo" on Mac.
- Go to the "Restart" option.
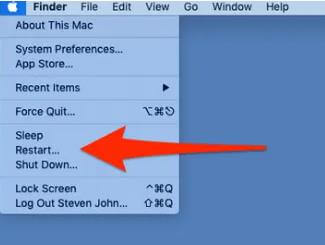
Let your Mac restart and wait until you can download macOS 13 Ventura from the App Store.
Fix 2. Run a Virus Scan to Let the Update Begin Again
To complete the macOS 13 Ventura update, you can try running a virus scan to restart the update. This helps eliminate any malware or bugs that may be interfering with the update process, allowing you to successfully install macOS 13 Ventura. To do this, follow the quick steps to run a virus scan and restart the update.
Step 1. Go to the "Apple" menu on Mac.
Step 2. Go to the "System Preferences" and click on the "Security and Privacy" settings.
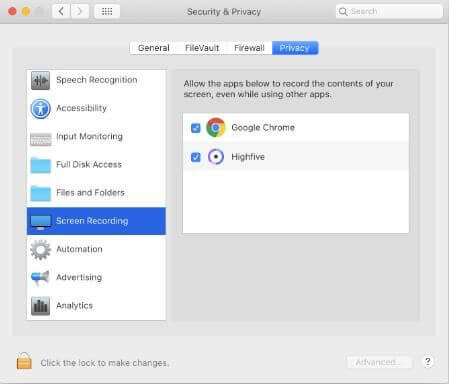
Step 3. To ensure your Mac can only download updates from the official store, go to System Preferences, then click on "Software Update" and make sure the box next to "Automatically update my Mac" is unchecked. This will prevent any unauthorized or malicious updates from being installed on your device.

Fix 3. Check Internet Connection: Turn off/ Turn on WiFi
The Ventura update failed error on a Mac may have been caused by a poor Wi-Fi connection, rather than a worst-case scenario, as seamless internet connectivity is necessary for downloading software updates, including macOS 13 Ventura.
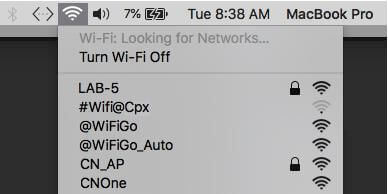
The quick steps for the same are:
- Go to the Mac Wi-Fi connection
- Turn off Wi-Fi once and restart the connection.
- Try downloading the macOS 13 Ventura upgrade again with good internet. If that doesn't work, you might want to restart your computer and try again.
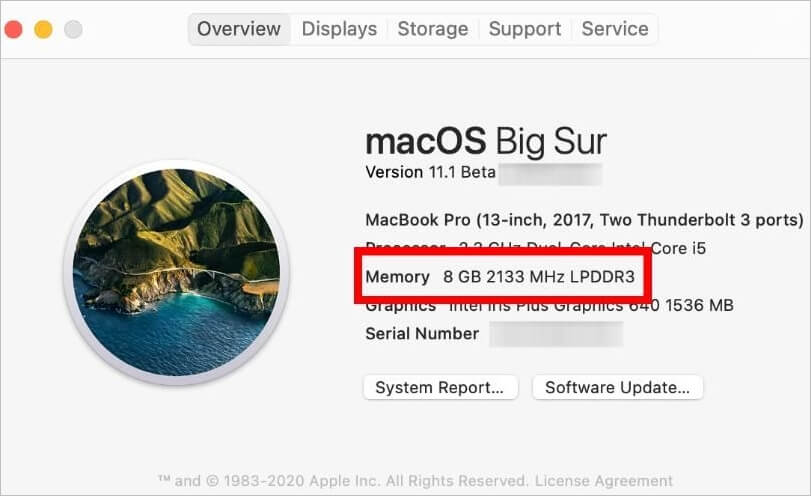
Fix 4. Check Your RAM (Capacity & Memory)
The macOS 13 Ventura upgrade failed error can be due to limited RAM availability on your Mac device, so it's essential to check your Mac system's RAM capacity and memory.
The quick steps for the same are:
- Go to the "Apple menu".
- Click on "About This Mac".
- Go through the memory details of your Mac.
Fix 5. Check the Storage Space on Your Mac
Checking the available storage space on your Mac before starting the macOS 13 Ventura update is essential. To do this, click the Apple logo in the top left corner, select "About This Mac," and then click "Storage." This will show you how much storage space is available on your device, allowing you to free up space if necessary before updating to macOS 13 Ventura.
Step 1. Go to the "Apple" icon.
Step 2. Go to the "About This Mac" option.
Step 3. Go to the "Storage" option from the top center menu.
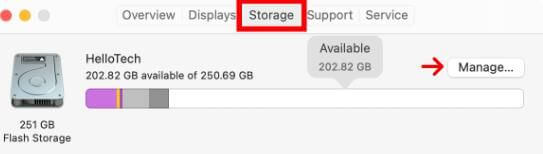
You need at least 25 GB of memory for downloading and installing the macOS 13 Ventura update.
Step 4. To free up space for the macOS 13 Ventura update, go to the "Manage" option, where you can check and delete files, apps, and other items to create enough space.

Fix 6. Boot Your Mac in Safe Mode to Upgrade
To resolve the macOS 13 Ventura upgrade failed error, try booting your Mac in safe mode, which can help resolve boot issues that might be preventing the upgrade. To do this, restart your Mac and immediately hold the Shift key, then release it when you see the login window. Once in safe mode, you can attempt the macOS 13 Ventura upgrade again. This approach may help resolve any boot-related issues that were hindering the upgrade process.
- Go to the "Apple" menu.
- Go to the "Shut down" menu.

- Wait for 10 seconds and press the power button again.
- Press and hold down the "Shift" key on your keyboard and release it when the "Apple logo" appears on the screen.

Now re-download the update.
Fix 7. Re-Download and Install macOS 13 Ventura
Last but not least is the re-To download and install the macOS 13 Ventura update, users can easily connect to the official Apple store and complete the process. Simply follow the steps to install the update, which allows for a seamless and efficient installation process.
Step 1. Go to support.apple.com on the Mac web browser.
Step 2. Select the update from the available options.
Step 3. To install the software, go to the "Download" section and select the option to "Save File." After that, click "OK" and then open the downloaded file.
Step 4. Double-click on the install package and click on "Continue" to all the following prompts to install the software.
Wait for a few moments until all the updates are installed. Reboot the system to ensure the correct updates are applied.
Bonus Tips: How to Recover Data After macOS Update
It's easy to resolve macOS 13 Ventura upgrade failed errors by trying the top fixes mentioned above. However, users often worry about data loss during the upgrade process. Fortunately, a tool like Deep Data Recovery Mac can help alleviate these concerns, making it easier to manage and recover data.
Deep Data Recovery Mac is a professional software that helps recover deleted data from Mac devices. It allows both beginners and experts to quickly select a hard drive, scan deleted files, and preview recoverable files, such as emails, documents, music, and photos.
Deep Data Recovery Mac functions:
- It can resolve data loss issues from various Mac-based devices, including SSDs, Time Machine backup drives, memory cards, cameras, USB drives, SD cards, fusion drives, and HDDs.
- It can recover missing photos after various scenarios such as the macOS Ventura update, human errors, unexpected shutdown, hardware failure, system crashes, virus attacks, macOS update formatting, deleting without backup, etc.
- It can recover deleted files on various macOS versions, including Ventura, Big Sur, Monterey, Catalina, and others.
- This tool can recover data from various devices and cloud storage services, including memory cards, USB drives, hard drives, and popular cloud platforms like OneDrive, Google Drive, and Dropbox.
Follow the steps below to recover Mac data after the update:
Step 1. Select file types and click "Next" to start
Launch Deep Data Recovery on your Windows computer. Select the file types you want to recover and click "Next" to proceed with the recovery process.

Step 2. Select the location
After updating to macOS Ventura/Monterey/Big Sure/Catalina, to recover data from a lost disk, select the disk where the data was lost and click "Search for lost files".

Step 3. Find lost data after the scan
Deep Data Recovery for Mac scans the selected disk volume and displays the results, allowing users to find specific data by file type and path.

Step 4. Recover data after macOS update
To recover lost files after an update, select the target files that were unknowingly lost during or after the update, and click the "Recover" button to retrieve them all.
Conclusion
No more confusion for Mac users when it comes to fixing macOS 13 Ventura upgrade failed errors, regardless of expertise level, as beginners and professionals can understand typical error messages and use different fixes accordingly.
To troubleshoot a slow Mac, users can try quick fixes such as restarting the device, running a virus scan, checking the internet connection, and verifying the RAM. If these steps don't resolve the issue, further troubleshooting can involve checking storage space, booting the Mac in safe mode, and re-downloading or reinstalling the macOS 13 Ventura update. Additionally, users can utilize a tool like Deep Data Recovery Mac to restore lost data on their device.
Mac Won't Update FAQs
It's easy to understand the Ventura failed updates and quick fixes, but users may have specific questions when handling macOS 13 Ventura updates for their Mac devices. To address these concerns, here's a quick list of top questions related to Ventura updates.
1. How to fix macOS 10.13/10.13.4 High Sierra update failure?
Fixing a macOS High Sierra update failure is relatively straightforward, as it can be resolved based on the reasons behind the issue. To address the problem, one can follow various methods, depending on the specific cause of the failure.
If you're experiencing issues with downloading and installing macOS High Sierra on your Mac, try the following steps to resolve the problem. First, ensure that your Mac meets the system requirements for High Sierra, which includes a 64-bit processor and at least 2GB of RAM. Next, restart your Mac and try downloading High Sierra again. If the issue persists, try clearing the App Store cache by deleting the `com.apple.
- Go to "Launchpad" and delete the "Install macOS Sierra" file.
- To resolve the issue with downloading the macOS 10.13/10.13.4 High Sierra update, try rebooting your Mac and then retry the download. This simple step can often resolve connectivity and software update issues, allowing you to successfully install the High Sierra update.
- Go to "Apple menu", select "App Store", and click "Update".
To fix macOS 10.13/10.13.4 installation issues on High Sierra, try the following steps: First, ensure your Mac meets the minimum system requirements. Next, restart your Mac and boot in Safe Mode by holding the Shift key while restarting.
- Start by disabling or uninstalling any active antivirus on Mac.
- To install macOS High Sierra, start by booting your Mac in safe mode with a reliable internet connection. This will ensure a smooth installation process and prevent any potential issues that may arise from a slow or unreliable internet connection.
- Restart the system and boot it in Safe Mode.
- Try installing macOS 10.13/10.13.4 High Sierra update now.
2. Why does my macOS update keep failing?
Keeping macOS updated is essential for enhanced security and bug-free functionality, but users often face issues with failed updates due to a poor internet connection, Apple server problems, or insufficient disk space, among other reasons. Understanding these common causes is key to finding effective solutions and resolving the update failures.
3. What version of macOS can I upgrade to?
Upgrading to the latest version of macOS, such as Big Sur 11.6.8 or Catalina 10.15.7, is recommended for smooth functioning and seamless interoperability.
4. Why is macOS Big Sur not installing?
Users experiencing issues with macOS Big Sur may encounter problems due to various reasons, such as software compatibility issues, hardware incompatibilities, or bugs in the operating system itself. These problems can manifest as system crashes, freezes, or other errors, and may be caused by outdated drivers, incompatible software, or other system configuration issues.
- To avoid having an outdated Mac system, it's essential to check if your Mac is compatible with the macOS Big Sur update, as installing the latest operating system is necessary to keep your Mac up to date.
- A faulty macOS Big Sur installation can be caused by an unreliable internet connection, so using an Ethernet connection is recommended.
- Big Sur requires at least 15GB of space on the Mac system, which can cause the update to fail if the system lacks sufficient space.
- To download the Big Sur update, it's crucial to establish a connection with Apple servers, so checking the live status of servers to ensure Apple server connectivity is necessary.
Related Articles
- How to Fix Diskpart Failed to Clear Disk Attributes Error
- Quick Fixes for Windows Stuck on Repairing Disk Error in Windows 10/8/7
- [New Tutorial] Backup Game Saves on PS4 in Three Methods
- [Fixed] Destination Folder Access Denied You Need Permission to Perform This Action in Windows 10/8/7
- SAN vs. NAS: A Thorough Comparison Between SAN & NAS
SAN (Storage Area Network) and NAS (Network-Attached Storage) are both designed to share data across multiple devices, enabling multiple users to access the same storage database. - Highlights of SanDisk Extreme | Is it Worth Buying and How to Choose it
SanDisk has many different products, including SanDisk Extreme, SanDisk Extreme Pro, SanDisk Ultra, etc. What are the features and advantages of each of them? Should we buy it and how to choose the one that suits us? This article will tell these points and be able to give you pertinent advice when selecting a suitable series.