Reset MacBook to Factory Settings | Complete Guide in 2023
To reset a MacBook to factory settings, you can choose between an automatic and manual method. The automatic way involves using the built-in Recovery Mode, which can be accessed by restarting your MacBook and immediately holding down the 'Command + R' keys. This will allow you to reinstall macOS and restore your MacBook to its factory settings.
| Workable Solutions | Step-by-step Troubleshooting |
|---|---|
| Fix 1. Reset MacBook to Factory Settings | Automatically |
|
| Fix 2. Reset MacBook to Factory Settings | Manually |
|
Why Reset MacBook to Factory Settings
Resetting a MacBook to its factory settings is a drastic measure that should not be taken lightly. Before proceeding, it's essential to understand the reasons behind it, as opting for a factory reset without a valid reason can lead to data loss. Users may choose to reset their device to its factory settings due to various reasons, but it's crucial to weigh the pros and cons before taking this step.
1. MacBook is running slowly or is experiencing problems
Mac users may experience slowing issues due to virus attacks, too many background apps, or other reasons, which can be resolved by opting for a factory reset, allowing the system to start fresh and remove temporary files.
2. Sell your MacBook and ensure all your personal data is removed
To sell your MacBook, first back up all necessary data, then delete all existing data, and consider using the factory reset option for a quick and secure process.
3. Upgrading to a new MacBook and want to give your old one a fresh start
If you're planning to sell or give away your old MacBook, a factory reset is a good idea to ensure it's wiped clean of your personal data and settings. This way, the new owner can set it up as if it were brand new, and you can feel confident that your information is secure. It's a good practice to do a factory reset before passing on your old device.
To reset your MacBook to its factory settings, you can follow these steps: locate the "Disk Utility" in the Utilities folder, select the startup disk, and click "Erase". Then, select the "Mac OS Extended (Journaled)" format and click "Erase".
Pick a Recovery Program Before Reset MacBook to Factory Settings
If you've already reset your MacBook to factory settings without taking a backup, don't panic - your data can still be recovered. You can take steps to recover lost files after factory reset Mac.
Opting for a good recovery program like Deep Data Recovery for Mac can be helpful in retrieving lost data, including deleted videos, photos, documents, music files, and emails.
Users can retrieve lost data from Mac-based devices, including SSD, HDD, and fusion drive, using the software. The scan mode helps load files quickly, and recovered data can be sent to cloud storage devices like Google Drive and Dropbox. The simple user interface makes it a suitable tool for beginners, making data recovery accessible to a wide range of users.
This software can also support the latest macOS version. If you want to use Deep Data Recovery for Mac to recover deleted files on macOS Ventura, here are the steps you need to follow: 1. Download and install the software 2. Launch the software and select the drive or partition where your deleted files were located 3.
Step 1. Search for lost files
To search for lost files on macOS, select the disk location where you want to search and click the "Search for lost files" button. This can be an internal HDD/SSD or a removable storage device.
Note: Before recovering data, it's recommended to create a backup of your Mac by clicking "Disk Backup" from the left sidebar to prevent further data loss. Once backed up, the software can recover data from the Mac backup, allowing you to write new data to your computer again.

Step 2. Go through the scanning results
Deep Data Recovery for Mac will immediately scan your selected disk volume and display the scanning results.

Step 3. Select the file(s) and recover
Select the desired file(s) from the scan results, then click the "Recover" button to retrieve them.

How to Reset MacBook to Factory Settings | Automatically
Erase Assistant is a useful feature that allows users to reset their MacBook to factory settings, removing all data and restoring the device to its original state. The steps to use Erase Assistant vary depending on the MacBook model.
Reset MacBook to Factory Settings on macOS Ventura
Here are the steps to reset MacBook to factory settings on macOS Ventura with the "Erase All Content and Settings" feature:
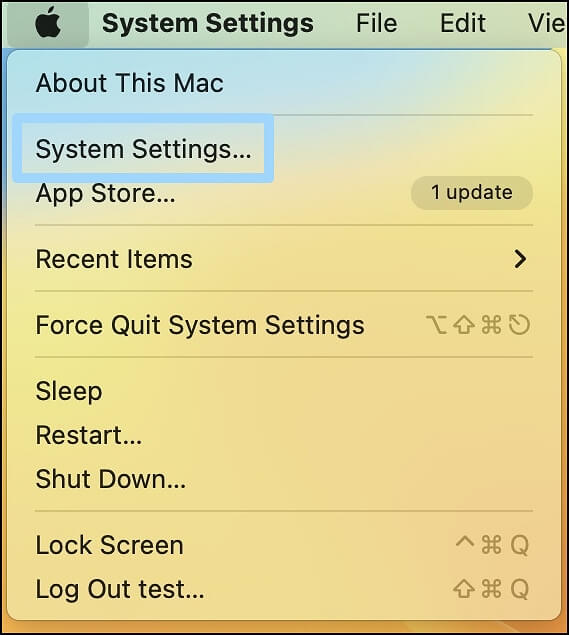
Step 1. To access System Settings on a Mac, go to the Apple menu, click on it, and select System Settings from the drop-down menu.
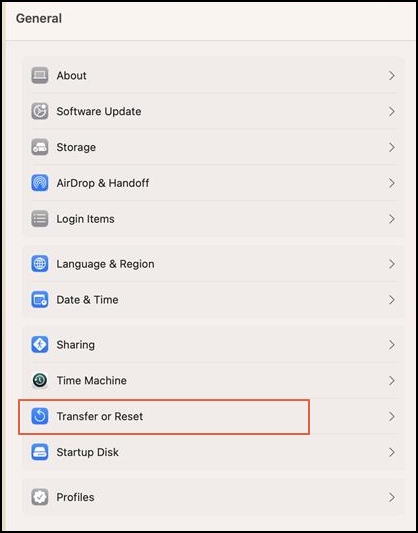
Step 2. Select General from the left-hand side, followed by Transfer or Reset on the right side, and then proceed accordingly.
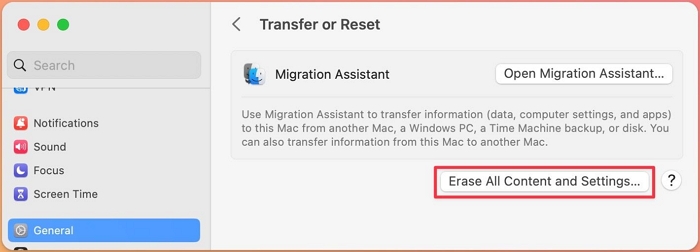
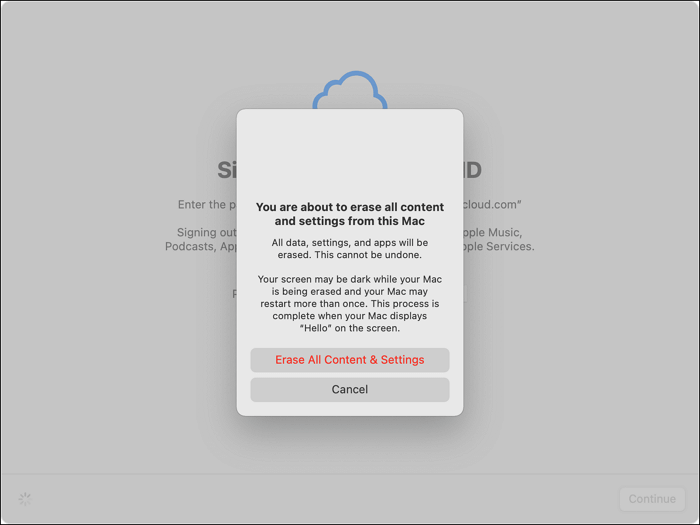
Step 3. Select Erase All Content and Settings from the next window.
Reset MacBook to Factory Settings on macOS Monterey
You can reset your MacBook to its factory settings on macOS Monterey using the "Erase All Content and Settings" feature. To do this, follow the steps to reset your MacBook.
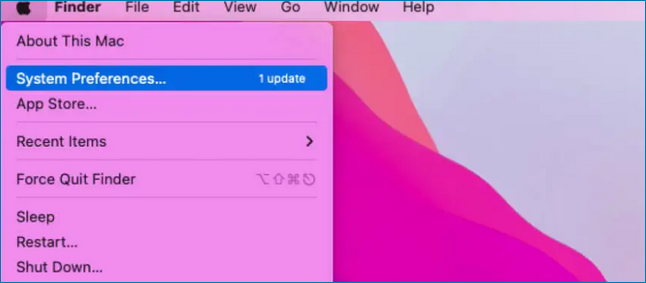
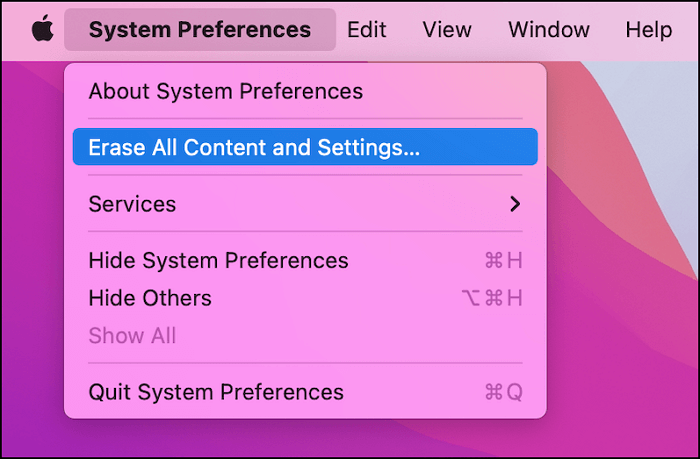
Step 1. Go to the Apple menu. Click on System Preferences.
Step 2. Click Erase All Content and Settings on the next page.
How to Factory Reset MacBook Big Sur [Latest Update]
On macOS Ventura, Monterey, or Big Sur, you can factory reset your computer by going to System Settings > Erase All Content and Settings. This will completely erase your Mac, restoring it to its original factory settings. It's worth noting that this process will also erase any data on the computer, so make sure to back up any important files before proceeding.
How to Reset MacBook to Factory Settings | Manually
Here are the steps to reset MacBook to factory settings using Recovery Mode:
1. Sign Out of iCloud and Other Accounts
To sign out of iCloud, go to System Preferences, click on Apple ID, then select "Sign Out" from the dropdown menu. This will prompt you to enter your Apple ID and password to confirm your identity. Once you've signed out of iCloud, you can proceed with the next steps.
Step 1. Go to iCloud's official website from a web browser.
Step 2. Sign in with Apple ID.

Step 3. To access iCloud settings, click on your profile name located at the top right-hand side of the screen, which will then open up the iCloud settings.
Step 4. A new page will open, scroll down and click on the "Sign Out Of All Browsers" link.

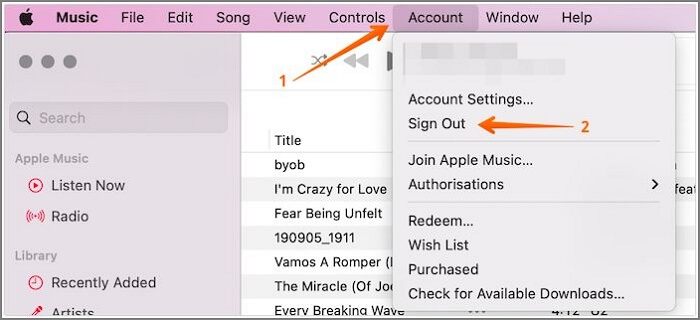
To sign out of iTunes, check out these steps:
Step 1. Open iTunes on your system.
Step 2. Select Account from Menu.
Step 3. From the drop-down menu, choose Sign Out.
To keep your accounts secure, sign out of all other accounts and ensure you're logged into only the one you're currently using. This prevents unauthorized access and maintains your online security. Share this information on your social media platforms.
2. Deauthorize Your Mac Computer
The rewritten response is concise and to the point, while still providing the necessary information. It also includes a polite closing to encourage further interaction.
Step 1. Open iTunes.
Step 2. Ensure you use your Apple ID while signing in.
Step 3. Select Account.
Step 4. Choose Authorizations.
Step 5. Click on Deauthorize This Computer.

Step 6. Log in with your Apple ID and password.
Step 7. Select Deauthorize.
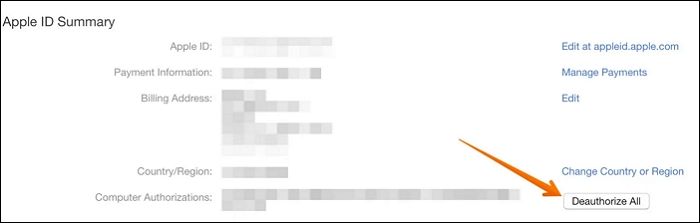
But what if you want to deauthorize a system you can't access? Don't worry! Take a look at these steps below:
Step 1. Go to iTunes.
Step 2. Select Account.
Step 3. Choose Account Settings from the drop-down menu.
Step 4. Sign in with your Apple ID and password.
Step 5. An Account Information page will open next.
Step 6. In the Apple ID summary section, go to Computer Authorizations.
Step 7. Click on Deauthorize All button.
3. Restart Your MacBook in Recovery Mode
To start Mac in Recovery Mode, you will need to restart your Mac and immediately hold down the power button until the login window appears. This will boot your Mac into Recovery Mode, where you can access the Disk Utility and other tools to help you repair or erase your startup disk. Note that some Mac models, such as those with a T2 chip, may require you to hold down the power button for a longer period of time or press a specific key combination to enter Recovery Mode.

For Apple Silicon-based Macs:
Step 1. Go to the Apple menu and select Shut Down.
Step 2. Press the power button and hold it until the Options and System volume buttons appear.
Step 5. Select the Options button and click Continue.
Step 7. Select the admin account and press the Enter key.
Step 9. Enter the admin password and select Continue.
For Intel-based Macs:
Step 1. Restart the system.
Step 2. Press and hold the Command and R keys on your Mac's keyboard until you see the Apple logo and a progress bar. This will boot your Mac in Recovery Mode, which allows you to perform various system maintenance and troubleshooting tasks.
Step 3. Enter the password if needed.
Step 4. Choose the admin account and press Enter.
Step 6. Enter the admin password and select Continue.
4. Erase MacBook Hard Drive in Disk Utility
To erase your MacBook, you can use the Disk Utility tool. To do this, restart your MacBook and immediately hold down the 'Command' + 'R' keys. Release the keys when you see the Apple logo, then select your startup disk and click on the 'Erase' tab.
Step 1. In the Utilities window, choose Disk Utility.
Step 2. Select Continue.
Step 3. Check the name of the volume.
Step 4. Choose Macintosh HD.
Step 5. In the toolbar, select the Erase button.
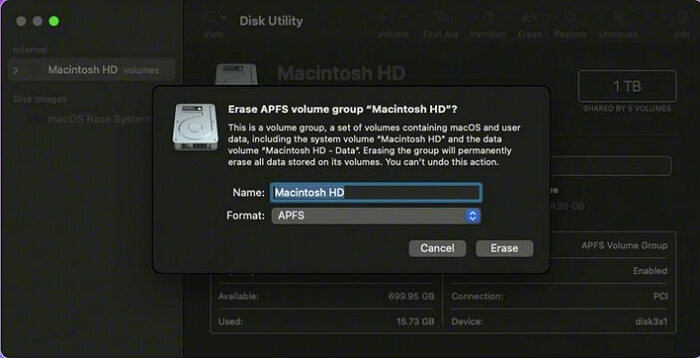
Step 6. Enter the name and format.
Step 7. Press the Erase button.
Step 8. Enter Apple ID if asked.
Step 9. Choose Erase Mac and Restart for confirmation.
Step 10. Wait for the system to restart.
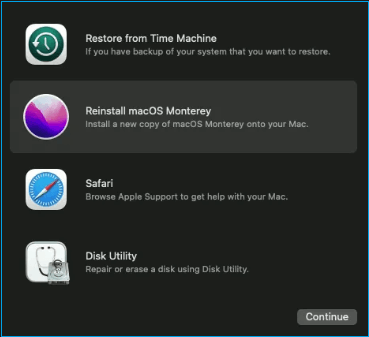
5. Reinstall macOS and Set Up MacBook
To complete the process, you need to reinstall macOS. This is done by entering the Recovery mode and selecting "Reinstall macOS" from the utility window. Then, follow the on-screen instructions to reinstall the operating system.
Bonus Tip: Troubleshoot MacBook Factory Reset Problems
During a factory reset, you may encounter some common issues, including, but not limited to, software glitches, hardware malfunctions, and data loss. These problems can arise due to various reasons, such as incorrect formatting, improper shutdown, or a faulty reset process.
- ❌Unable to reinstall iOS after deleting everything.
- 💽Formatting hard drive
- 🛠️Mac won't boot into Recovery Mode
- 🌐Missing WiFi
Methods to troubleshoot factory reset problems
Method 1: If you can't boot into recovery mode, you can restore your macOS from a Time Machine backup. After restoration, check your system to rule out any hardware issues.
Method 2: To resolve the WiFi issue, restart your Mac and toggle the WiFi on and off multiple times, which should clear out any temporary issues.
Summary
To factory reset a MacBook Air/Pro, you can either do it manually or use the Erase Assistant. However, it's crucial to back up all your data securely beforehand, as the reset process will wipe away all data, including personal files and settings.
If you haven't already, consider using a professional data recovery tool like Deep Data Recovery for Mac. It's user-friendly and effective, and can be downloaded and installed today.
Reset MacBook to Factory Settings FAQs
What are the steps to reset a MacBook to its factory settings?
1. How to reset MacBook Air to factory settings without a disc?
To reset your MacBook Air to factory settings without a disc, you can use the Recovery Mode or Erase Assistant. Both methods are compatible with MacBook Air, but make sure to back up your files first to avoid data loss.
2. How long will reset my MacBook to factory settings take?
It generally takes 1-5 hours to reset MacBook to factory settings. However, in some cases, it can even take 12 hours. So if you encounter issues like Mac stuck on Apple logo, you need to seek assistance.
3. Will I lose data after resetting my MacBook to factory settings?
Resetting your MacBook to factory settings will result in the loss of all data, making it essential to back up critical information beforehand. Without a backup, you may need to use a third-party tool like Deep Data Recovery for Mac to attempt to recover lost data.
4. Can I reset MacBook Pro to factory settings automatically?
You can automatically reset a MacBook Pro to its factory settings using Erase Assistant on Mac, but this option is only available on macOS Monterey and later versions.
Related Articles
- What Is "Format FS=NTFS Quick" and How to Use It? [2023 Full Guide]
- [Fixed] The Object Invoked Has Disconnected from its Clients
- How to Improve SSD Read and Write Speed [100% Working Solutions]
- How to Prevent Apple M1 Mac Report Excessive SSD
- An Error Occurred While Processing Your Request [How to Fix]
The 'an error occurred while processing your request' issue can be resolved by understanding its cause and following the steps outlined in this article. If data loss occurs during the troubleshooting process, using Deep Data Recovery may be a helpful solution. - How to Export bookmarks from Firefox to Chrome (2023 Tutorial)
If you're planning to switch from Firefox to Chrome, you can easily transfer your bookmarks to the new browser using one of three simple methods. This way, you won't lose any of your favorite saved links and can continue to access them seamlessly in Chrome.