How to Fix 'Switch User' Option Missing in Windows 10/11
You can find various hands-The "Switch User" feature in Windows OS is a utility that allows multiple users to share the same PC by creating separate user accounts. This feature enables different individuals to log in through their respective accounts, providing access to their personalized apps, files, and information, while preventing any unauthorized access or interference with others' data. This way, multiple users can work on the same PC without compromising each other's privacy or security.
If you're having trouble using the "Switch User" feature on your PC, this guide can help you fix the issue, we recommend trying three effective solutions that can instantly resolve the problem and provide multiple login facilities, especially when the "Switch User" option is missing in Windows 10/11.
What Does the "Switch User" Option Missing in Windows 10/11 Mean?
You've created multiple user accounts for a separate login utility, allowing you to work on apps and files with freedom. However, when you try to switch to another user account, you're surprised to find that it no longer exists. This unexpected issue can be frustrating and disrupt your workflow, making it difficult to access the apps and files you need.
The "Switch User" option going missing in Windows 10/11 can be a frustrating issue, as it prevents you from switching to a particular account or accessing files and apps saved for that account. However, this problem can be easily resolved without requiring professional assistance.
- Solution 1: Enabling the Option of Fast User Switching
- Solution 2: Configuration of Windows Group Policy
- Solution 3: Enabling the Account for Built-in Administrator
Solution 1: Enabling the Option of Fast User Switching
In Windows 10/11, the "Switch User" option may be missing due to misconfigured settings. To resolve this issue, you'll need to make changes to administrative levels to enable fast user switching, which can be done by modifying settings in the Windows Registry. It's recommended to take a registry backup before proceeding, and ensure you're accessing the Registry as an administrator.
Useful Steps:
Step 1: To open Run, start by tapping the Windows and R keys simultaneously. This will open the Run dialog box, where you can type in a command or program name to execute.
Step 2: To move ahead, type "regedit" in the given space and tap "Enter."
Step 3: Tap on the "Yes" option as soon as a prompt for User Account Control appears.
Step 4: To access the Registry Editor, follow these steps: locate the Start button, type "regedit" in the search bar, and press Enter. Once you're in the Registry Editor, navigate to the location HKEY_LOCAL_MACHINE\SOFTWARE\Microsoft\Windows\CurrentVersion\Run.
HKEY_CURRENT_USER\Software\Microsoft\Windows\CurrentVersion\Policies\System
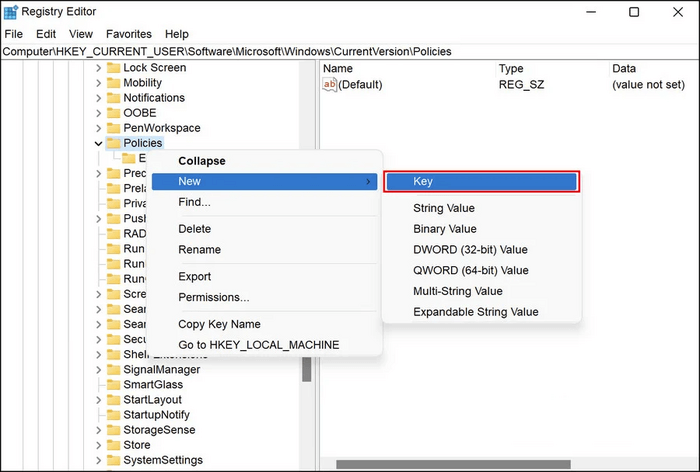
Step 5: If you can't get the "System key," try this: right-click on the 'Policy key', then choose "New" and "Key" from the menu.
Step 6: Go ahead by renaming the key as "System."
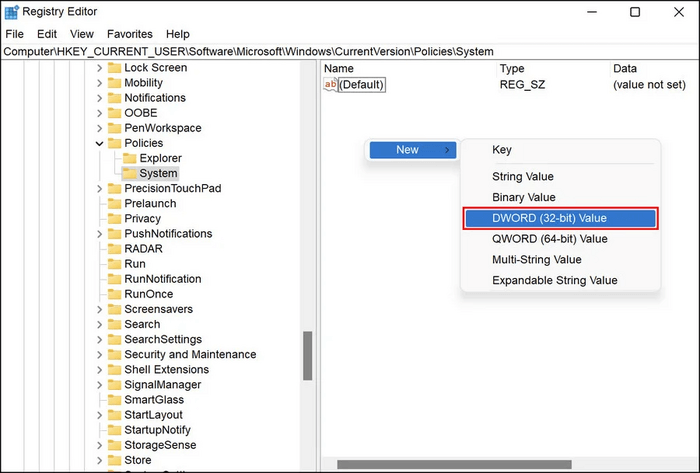
Step 7: Then, by choosing "System Key," go to the right pane.
Step 8: To create a new DWORD (32-bit) value in the right pane, right-click anywhere in the right pane and select "New" followed by "DWORD (32-bit) Value".
Step 9: Now give a new name to the key as: "HidefastUserSwitching."
Step 10: To disable "Hide fast user switching", tap twice on the "HidefastUserSwitching" key, then type "0" in the Value data field.
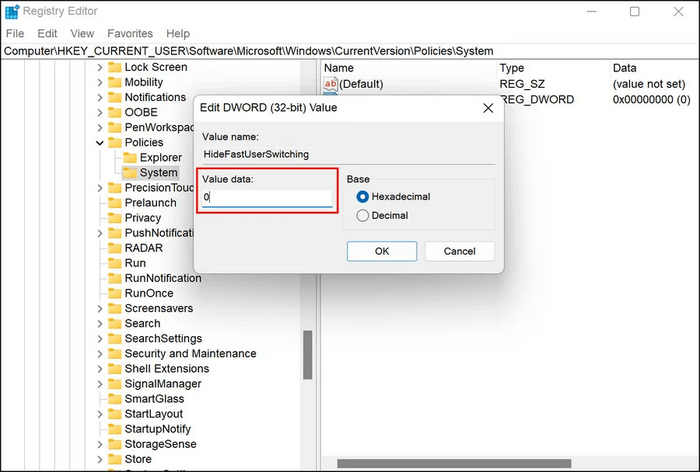
Step 11: Tap the "OK" option to save the changes.
Step 12: To conclude, close the Registry Editor and reboot your PC.
Solution 2: Configuration of Windows Group Policy
Windows Group Policy is a centralized management system that controls user account settings and provides security settings, allowing operations to be handled in a controlled environment. It can be used to resolve issues such as the "Switch User" option being missing in Windows.
Useful Steps:
Step 1: To access the Local Group Policy Editor, press the Windows key + R to open the Run window, then type 'gpedit.msc' and press Enter. This will open the Local Group Policy Editor, where you can make changes to the settings on your local machine.
Step 2: You will see a window for Local Group Policy on the next screen. To proceed, follow the path: Computer Configuration -> Windows Settings -> Security Settings -> Local Policies -> User Rights Assignment.
Computer Configuration -> Administrative Templates -> System -> Logon
Step 3: To hide entry points for fast user switch, double-tap the "Hide Entry Points for Fast User Switch" option and open it.
Step 4: Select "Disabled" to turn on the option.
Step 5: Tap on "Apply" and then on the "OK" option.
Step 6: To resolve the issue of the "Switch User" option missing in Windows 10/11, open the Local Group Policy Editor, navigate to Computer Configuration > Administrative Templates > System > Logon > and enable the "Always show all icons in the notification area" policy. Then, exit the Local Group Policy Editor and verify if the "Switch User" option is available.
If you had no luck with this one, try the following option and fix the issue.
Solution 3: Enabling the Account for Built-in Administrator
To fix the "Switch User" option missing in Windows 10/11, you can troubleshoot using the current user account by running the DISM and SFC utilities using the recovery menu and then via the Command prompt to scan for potential issues. If this doesn't work, enabling the built-in administrator account and creating a new user account may be recommended.
Useful Steps:
Step 1: You can try to resolve the issue by holding the Shift key while signing in to your PC, and then restarting it.
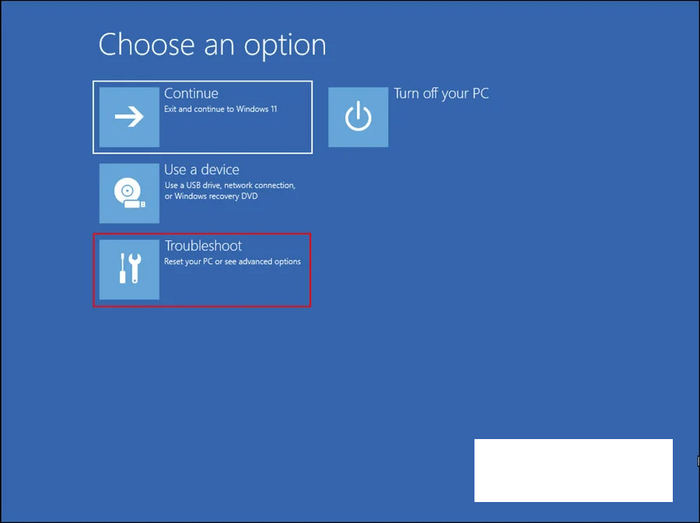
Step 2: Windows has started booting into the "Recovery menu" and from the list of available options, choose "Troubleshoot."
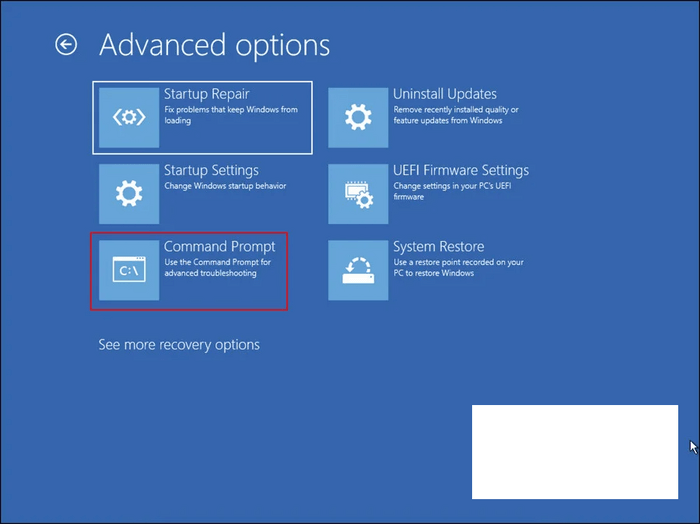
Step 3: Make your way toward "Advanced Options" and then "Command Prompt."
Step 4: Once you find the Command prompt, type the given command and tap on "Enter" to execute it.
net user administrator /active: yes
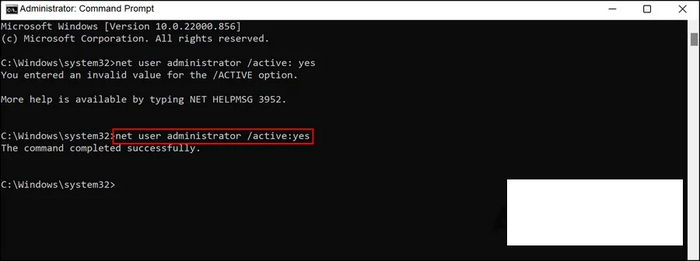
Step 5: To execute your command, you'll need to restart your PC and then log in using the built-in administrator account.
Step 6: Press the "Win + I" keys to open the Windows settings, allowing you to access and manage various system settings in one place.
Step 7: Refer to the left pane and choose the "Accounts" option.

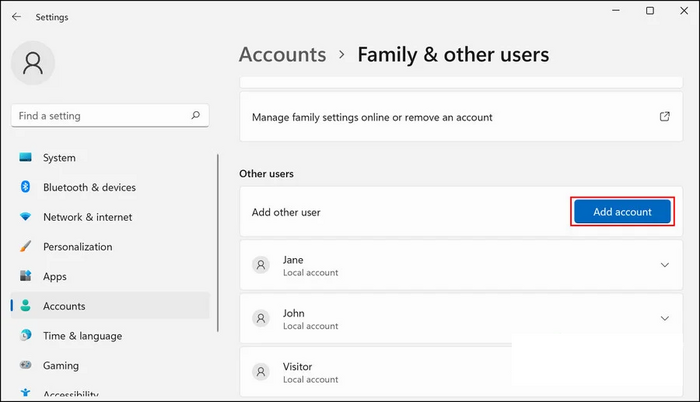
Step 8: Tap on the "Family and Other Users" option.
Step 9: To add another user, tap on the "Add Account" option which is associated with the "Add other user" option.
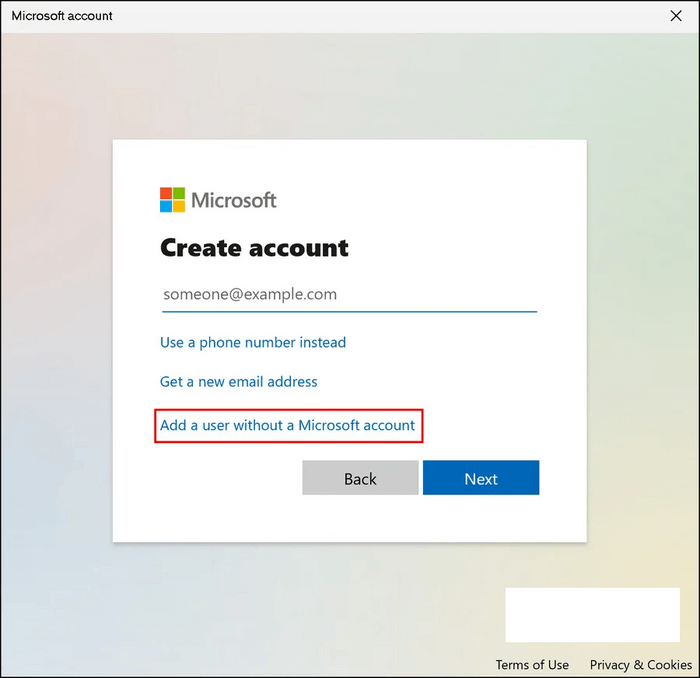
Step 10: Now you can see a dialog wherein you have to tap on the "I don't have this person's sign-in information" option.
Step 11: Then, tap the hyperlink stating the "Add a user without a Microsoft account" option. Make an entry for all the fields that are required.
Step 12: There will be some instructions on the screen that you need to follow.
Step 13: As soon as your new user account gets created, make a login and see if the issue got fixed.
Conclusion
The Switch User option in Windows is beneficial for multiple users working on different projects, providing privacy and security for their work. However, it may sometimes disappear or get removed, hindering productivity. Fortunately, by using specific methods, this issue can be resolved, allowing users to regain access to the Switch User option and maintain their work's integrity.
Related Articles
- How to Reinstall macOS in 3 Methods [ Ventura/Monterey/Big Sur Available ]
- How to Cancel Windows 10 Updates Once Started
- [SOLVED] The Operation Cannot Be Performed Because the Message Has Been Changed
- How to Connect HP Printer to WiFi? Follow A Full Guide
- Fix Word The Add-In Template is Not Valid
If you encounter the error message "Cannot display the template" with the note "add in template is not valid template name" when opening a Word document, don - Adobe Serial Number Checker Free Download | Find Adobe Software Serial Key in Windows
You can easily find your Adobe serial number for your installed Adobe applications using a reliable Adobe serial number checker that can be downloaded and applied in a few a few clicks.